Beautiful frames for a badge. How to use Word templates - making a badge
Badges – great way to identify employees, they create a trusting atmosphere between partners at seminars, trainings, presentations and other events. The minimum amount of information guides the potential client and helps direct the conversation in the right direction. In addition to the owner’s personal data, the product usually displays a company logo. This article will help you prepare a complete template for a badge of any size and print it on a printer. At the bottom of the article there is a link to the badge template standard size.
Deciding on a standard size
The basic principle for choosing the size of a badge is the amount of information that needs to be placed on it and is available for that size. For standard badges containing the name, position and company logo, a 90x60mm format is sufficient. Badges for private security company employees are usually made in sizes 100x70mm, and for public events large badges in A6 format (105x148mm) are usually made. According to our statistics, the main size of pockets for badges is ordered for a horizontal liner of 90x60 mm. IN in this example We will proceed from these dimensions.
Create a template for a badge in MS Word
Step-by-step instructions for preparing a template in Word for printing badges of the required size.
STEP 1
We create new document in MS Word and select the sheet orientation. Depending on the version of the program - this is done in the tab "Page Layout" or "Layout". For a horizontal format badge, it is best to use landscape orientation, for a vertical badge - book. In our example, we will make a badge in a horizontal format, so on the “Page Layout” tab we select Landscape. 

To ensure maximum working space on the sheet, we need to reduce the margins from the edge of the document: "Page Layout or Layout - Margins - Narrow".

STEP 2
Now, we insert a table into our sheet, for this in the panel quick access choose "Insert - Table - 3 x 3"(or any other required number of cells). 
 The table we need has appeared and now we need to right-click on the cross, which is located in the upper left corner of the grid.
IN context menu that lights up on the screen, select the section "Table properties...". 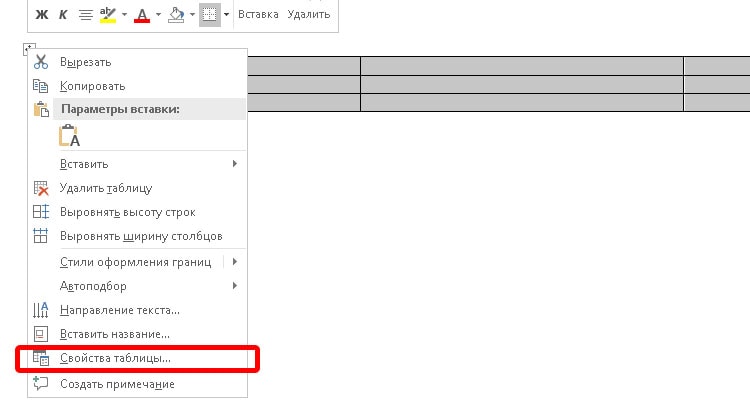
To begin with, select the “Line” tab and set the line height to 6 (cm), size to exact and uncheck "Allow line wrapping to new page"
. On the "Column" tab, set the column width to 9 (cm). If you need other sizes, please indicate them. 

The table is ready, its cells have received the size we specified. 
STEP 3
At this step we begin the layout of the first badge. It is necessary to enter two required fields in the initial cell of the table - full name and position. For full name, a larger font size is usually used than for the position. Also, on the badge, depending on its purpose, you can place a photo of the person and additional fields - the name of the company and the name of the event at which it is used. It is advisable to insert the logo of the organization for which we are printing badges into the upper corner of the cell. Let's do it in a standard way: "Insert - Drawings" and then select the saved image on the computer. To reduce the size of the image, select it and drag it inward beyond the required impact area. Set text and image correct sizes and move on to the next paragraph. 

Now, we need to copy the contents of our badge to other cells. To do this, place the cursor at the end of the inscription and triple-click the left mouse button, Word selects the entire necessary area for us. Press "CTRL + C" to copy the data and move the cursor to the familiar cross at the top of the table and click on it. 

Word will highlight the entire table for us and all we have to do is press the combination “CTRL + V” so that our badge template appears in all cells of the table. 
Manually change the field with full name and position for each badge and go to the printing section.
You will need
- - computer,
- - printer,
- - paper,
- - laminator,
- - scissors or cutter,
- - hole punch for laminated film.
Instructions
Make a blank badge on a computer, this can be simple, done in Word program, or maybe an image made using Photoshop. The badge has a size of about 65 by 95 mm, it indicates your full name or name and, as well as anything else you need - department, position, photograph.
To make badges of the same size, the easiest way is to use the program Microsoft Word. Using Microsoft Word 2007 as an example: select “Mailouts” at the top, then top corner“Stickers”, in the window that appears, select “Page with identical stickers”. A window with templates will open in front of you, which you just have to fill out and click the “Print” button.
Another way is to create a table in Word, specifying the cell sizes you need as cell sizes badge. Subsequently fill in the cells with the information you need.
Take a cutter or regular ones and cut the workpiece into rectangles. With the help of a cutter you will definitely get straight edges badge, but if you use scissors, you will have to try a little more.
To make a laminated badge, take a film suitable in size and thickness and place a paper blank between its layers. Pass it through a laminator, which will soften the laminating film and seal it securely badge.
Make a hole for the clip. To make a hole in a laminated badge, you will need a special hole punch. Laminated film simply will not work with a regular hole punch. Make a hole for the clip and attach it to the badge.
Video on the topic
Do not use too much for badge inscriptions small font- in this case, no one will see what is written on it. You can make one word (for example, first or last name) larger than the rest.
Sources:
- how to print a badge
Create seal possible at home. It is not necessary to use it Photoshop capabilities, as it is special program, designed to create stamps that are quick and easy to work with.
You will need
- Computer, Internet, Stump 0.85 program.
Instructions
Download the Stump 0.85 program from the Internet. It is usually presented in the archive. Inside the archive, run the file Stump085d.exe.
In the window that appears, select the “Start Feature Demo” button and follow the actions shown on the screen.
To get started self-creation print, run the Stump085d.exe file from the archive again and select the “Continue” button.
In the “Top” field, enter the inscription that should be displayed on the seal in the upper part, and in the “Bottom lines” field, accordingly enter information for the bottom of the seal. In this case, you can constantly view the result of your work by pressing the button on a piece of paper and a magnifying glass in the program menu (preview). Set , bold, italic.
Go to the "Center" tab and enter the lines that will appear in the center of your stamp. Set them up.
In the “Form” tab, you can change the standard round printing option to another.
In the “Create and Edit” tab, adjust the quality, clarity, and blur of your print so that it looks more realistic on . Click the "Create" button to see the result of your work. You can also paste into Word using the appropriate button.
Hair lamination is a hairdressing service that helps prevent color fading, prevents increased hair fragility and increases the effectiveness of styling for a long period of time.

Hair lamination is a relatively new hairdressing service. With normal care, their condition improves for a relatively short period, sometimes sometimes only before the first wash, and gives the hair a healthy, beautiful, radiant look and at the same time a dazzling shine for about a month.
Lamination involves the procedure of covering with a breathable, thin, transparent chemical film that prevents color from fading, closes gaps in damaged areas of the hair, compacts it and prevents injury. In order to carry out a safe and high-quality hair procedure, you will need an experienced specialist and quite large financial costs.
The lamination procedure can also be carried out under conditions. This option will be cheaper, but to carry out such an operation, it is necessary to have successful experience acquired earlier in, when a professional lamination master carried out this action clearly with sensible advice and explanations for the client. To carry out proper lamination, you must first perform steps to thoroughly cleanse and restore the hair before putting it in laminate.
Strengthen and is necessary in any case. Lamination should never be considered some kind of panacea that will prevent any type of split or brittle hair. By the way, all professional hairdressers constantly remind us of this. The composition of the laminate film includes nutritious biologically active substances, which act as an external shield, but it is still necessary to take care of it several weeks before the lamination procedure full restoration hair, since the stronger and healthier the hair is, the more spectacular it will look in the end.
Video on the topic
Sources:
- lamination what is needed for lamination in 2019
If you make an educational raid through dictionaries, the word “badge” can be explained as “individual information card.” This is an element of the work uniform in the form of a card, badge or special sticker, which contains information about its owner.

Scope of application
It is these small cards that are usually present among employees of large offices, representatives of foreign companies, waiters, airport employees, medical workers of medical institutions, etc. This is a mandatory element of the uniform for participants in press conferences, seminars, exhibitions, scientific symposiums, business meetings and others. public events.
In fairly large enterprises, not all employees know each other personally, so the names of employees are simply irreplaceable in order to avoid awkward situations. The simplest badges simplify the communication process as much as possible and increase the level of communication skills among staff, because with the help visual memory the necessary information is remembered much faster. In addition, calling a person by name is a sign of good manners, and having one makes this all easier.
What is it
The plastic one looks like a small business card with the owner’s first and last name, his position, logo and the name of the company or department where he works. As a rule, this card is placed in a transparent plastic frame, which is equipped with a cord for wearing around the neck or a clothes pin. The presence of this simple element removes awkwardness during communication and increases loyalty, because the client receives full information about the company, which makes it easier to file a complaint with management if necessary.
Where to buy a badge
In the price-convenience-quality format, the classic badge is 86x54 mm. The plastic base itself can be purchased at any stationery and office supply store or made to order from the manufacturer. The basis is transparent PVC with a density of more than 200 microns. For fastening to clothing, a carabiner, clip, or ribbon is used when worn around the neck.
Today, under the guise of badges, badges can be used, which are made of wood, plastic, metal or other material. Branded badges are significantly more expensive than classic badges, but at the same time they look more stylish and aesthetically pleasing. They can be attached to clothing using a magnet or by puncture. Badges cannot be purchased in the stationery department; they must be ordered from printing companies that produce image symbols.
Sometimes there is a need to do emblem company, organization or sports team. It should be bright and original, unlike others and attract attention. Most often, designers are involved in creating such a sign, but their services are expensive, and the lack of necessary information about the company, mission, strategy often leads to the fact that the developed option does not correspond to the internal spirit of the company. Try to do emblem yourself using Photoshop.

Oh friends, how many strange things I had to do in graphic editors. Labels for champagne bottles, blown onto discs, two-meter people from A4 paper. This list can be continued endlessly. A year ago I decided to start on my work computer text file, in which I began to write down all such tasks. And just yesterday, having opened and counted the most frequent requests, I discovered that the most in demand... badges! Yes, you heard right, employees and students most often ask for help making badges. You can endlessly shout about how it’s possible that everyone can easily make badges. Not everyone gentlemen...not everyone.
I know for sure that this material will be useful to active students participating in events and teachers who organize various competitions. And in general, the ability to make a beautiful badge is by no means an unnecessary skill in everyday life. The peculiarity of this lesson is that you do not need to have prior skills in working in graphic editors. I will demonstrate, without any fuss, how to make a finished product step by step from scratch.
Download and install CorelDraw X7
Step 1. First of all, download the program to work with vector graphics. Namely CorelDraw. To do this, go to the developer’s website www.corel.com and in the trial versions section click “Download” trial version».
![]()
Step 2. In the window that appears, select the download button depending on the bit depth of your operating system. If you don’t know the bit depth, then feel free to download the 32-bit version.
![]()
Step 3. After installation package will be completely downloaded to your computer, you need to run it. We are waiting for all installation files to be unpacked. The program notifies us that for its correct operation additional libraries are required and kindly offers to download them during the installation process. Click “Continue”.
![]()
Step 4. We are waiting again. In a new window we accept the terms and conditions license agreement. In the next one, indicate the name and select the item “ Serial number not available, trial use of the product is required.” Click “Next”.
![]()
Step 5. In the window that appears, select the item “ Custom installation..." and leave a checkmark only on the first product, namely CorelDRAW. Click “Next”.
![]()
Step 6. We don't change anything on the second page. But on the third one, be sure to uncheck the box to allow software updates. As always, “Next”.
![]()
Step 7 In the last window, indicate the installation path of the program. I recommend leaving the default and starting the installation process. It's quite long, so you can make yourself some coffee for now.
![]()
Step 8 And here is the long-awaited message telling us that the installation was successful. Click “Finish”
![]()
Creating a badge layout
Step 1. Launch the CorelDraw program shortcut on your desktop and fill in the data to create account on the company server. Click “Send”. Then “Continue”.
![]()
Step 2. In the main program window, click “File-New”. In the window that appears, we don’t change anything, just click on “OK”.
![]()
Step 3. We have passed the most depressing stages. What awaits us next is exclusively creative activity. On the panel on the left, select the “Rectangle” tool and draw a rectangle in an arbitrary place without bothering too much with the size.
![]()
Step 4. We measure our plastic blank for the liner with a ruler. The size of a standard badge is 85 x 55 mm. With the square selected, change its size and press “ENTER”.
![]()
Step 5. Similarly, in the panel on the right, select the overall color of the badge. As an example, I'll fill it with blue.
![]()
Step 6. Great. Now, on the panel on the left, select the “Text” tool and, by clicking once in the center of our badge blank, write the owner’s full name.
![]()
Step 7 It seems good, but it gets lost against the blue background. In order to fix this, let’s select the “Select” tool on the same left panel and select our full name. Fine. Now in the properties panel we will slightly change the font and its alignment, namely, we will make it bolder and align it to the center. Next, from the already familiar color palette on the right, we will choose a more interesting shade. Yellow goes well with blue. Then, using the mouse, we will eyeball the inscription to the center of the badge.
![]()
Step 8 In the same way, we will write the position below and the full (or abbreviated) name of the organization above. Let's work a little on the design of the inscriptions. We will make the name of the organization in italics. Then, using the already familiar “Select” tool, select our name and select the “Shadow” tool below.
![]()
class="eliadunit">
Step 9 Holding the mouse, move from the center of the inscription slightly up and release the button. On the properties panel, set the opacity to 100, the blur to 5, the blur direction to outward, and the merge mode to normal.
Step 10 Similarly, add a shadow to the name of the organization and position. You can play with the sliders. The same shadow doesn't always look good in the finished product.
![]()
Step 11 All that remains is to add a few interesting details to our badge. To begin, select the “Rectangle” tool and draw the maximum narrow line between initials and position. Then fill it with white by right-clicking (not left!) on the white color.
![]()
Step 12 So. Now our simple badge is missing only one detail, namely the logo. It is advisable to have the organization's logo in electronic form in PNG format (i.e. without background). Just drag this picture into the window of our graphic editor and reduce it to a suitable size.
![]()
Step 13 The result is a finished badge. But let's do one more option just in case. Two templates are always better than one. To do this, select our badge, copy (CTRL+C) and paste side by side (CTRL+V).
![]()
Step 14 Insert below beautiful picture, and on top we will draw the usual rectangle 85x55 mm.
![]()
Step 15 Selecting the “Shape” tool, we carefully crop our picture by the corners to the size of the rectangle.
![]()
Step 16 Right-click on the resulting image – “Order” - “Send to back of page”. Then carefully click on the blue corner of the second badge and press the “DELETE” key on the keyboard. We transfer the beautiful picture under our ready-made inscriptions and voila. We get an intermediate result.
![]()
Step 17 Let's play a little with color scheme fonts and their style. As a result, we will get two ready-made badge templates that can be copied and filled out. All that remains is to save them correctly and print them.
![]()
Saving the project and exporting for printing
Step 1. In order to always be able to modify or edit our badges, we will save them in CorelDraw project format. To do this, go to the “File” tab and select “Save As” from the drop-down list. We indicate the save location, then specify the file name, type and be sure to indicate version 14. This is necessary so that you can edit the project on computers with a Corel version lower than 17. Click “Save”.
![]()
Step 2. We saved the project. Now let’s competently prepare our document for export to JPEG format. To do this, draw a rectangle measuring 210 x 297 mm (A4 sheet) and press the P key on the keyboard (center at the center of the sheet).
![]()
Step 3. Now that we have a frame the right size Click “Export” (CTRL+E) on the top panel.
Step 4. Set the file name, select the save location and change the file type to JPG. Click “Export”.
![]()
![]()
Step 6. We received two files. The first is a project file, we can change it on any computer with installed program CorelDraw. And the second is an image file, we put it on a flash drive and take it to the printing house closest to our house to print.
![]()
I hope you understand the meaning of saving in image format. Not everyone has the Corel program, but the picture can be printed anywhere. We made the frame so that the size of the badge remains unchanged.
Let's summarize. To design a badge, you should have the following things at your disposal:
- Corel Draw program (you can download a trial version, buy the program, or if your conscience allows, download it from a torrent);
- a list of people and positions to be filled;
- logo in electronic form and the full name of the organization.
And for making final product You will need a printer (preferably color). I hope that now if you need to make a badge, you won’t look for a friend who knows Photoshop. After all stranger will not be able to fully bring your design ideas to life.
Denis Kurets was with you and the next issue of the blog information technology. Today you learned how to make a badge with your own hands. Subscribe to updates. Write your questions. And may your path of knowledge be fast and successful!
*****PARADIGM*****
Microsoft Word is excellent text editor which is included in the package Office programs. It is one of the most used in the world. Many users mistakenly believe that Word has earned such popularity solely due to its belonging to one of the largest companies, however, this is far from the case.
Editor "Word"
This program opens up many possibilities for formatting and layout of text of varying complexity, and it will be convenient for both beginners and professionals to work with it. Word is widely used by office workers, journalists, copywriters, schoolchildren and students. It can be both a complex mechanism for creating a unique design and a platform for editing quick notes. The program adapts perfectly to many text formats and synchronizes with others Office products, has a huge set fonts and functions for their modification, etc. Word will become an indispensable assistant and to create primitive information material.
A badge is a small plate that indicates the identity of the employee (first name, last name), his position and, as a rule, the name of the organization. Badges are worn suspended by a string around the neck or attached to a pin on the chest. You might have seen such cards from employees of supermarkets, beauty salons, large firms, corporations, and so on. The “trend” has reached schools and institutes. So, duty officers, interns, library workers and others carry such cards. Plastic holders can be found in a huge variety of office departments. But how to make badges and their informative content in Word? We will talk about this further.
How to make a frame for a badge in Word using a ready-made template?
There are several ways to make a badge. The simplest of them is to edit a ready-made template. Some of them are already installed by default, but templates such as badges need to be downloaded additionally. However, it won't take much time. First, you need to check whether such a template has been downloaded in advance and look at the available templates. To do this, go to “File”, then click “Create” and “Sample Templates”. If there is no badge template, click “Office.com Templates” and download the required option. Further work will proceed in the same way as with any other document. We enter the required data, you can add the organization’s logo, play with fonts, add borders, fill, and more.

But often the badge template does not meet user expectations. They want to create their own unique option from the very beginning. How to make badges from scratch in Word?
Create your own version of the badge
Even though all badge holders are made in a standard size, you still need to measure it to be on the safe side. We will make this version of the badge using table blocks. They are fairly easy to draw and cut after printing. If the badge is horizontal (this is the most common type), it is better to immediately set the sheet to landscape orientation. This parameter can be easily changed in the "Page Layout" tab and in the "Orientation" item. In the "Margins" item, you can set the "Narrow" checkbox. I would like to note that it is better to make several badges at once and print them on one sheet.
Badge using table designer
Open the "Insert" tab and select "Table". We denote the number of cells. It depends on the number of badges you want to receive as a result. When the table is ready, you need to adjust the size. To do this, hover your cursor over the table and click on the small cross that appears in the left corner. Go to "Properties".

Set the size to “Exact” and uncheck the “Allow line wrapping” checkbox. We set the line height to 5.5 (standard badge height, if your holder has other sizes, you should stick to them). Set the column width to 9. Now you can start editing the content.
How to make an inscription for a badge in Word?
If you need to place an organization’s logo on a badge, it is best to do it right away so that you don’t have to cut it, stretch it, or narrow it later. To do this, let's use the "Insert" tab again and do the work as with regular pattern. By the way, you can place a photo of a person in the same way. Now you can enter the personal data of the employee or student. The capabilities of Word allow you not to edit the contents of each cell.
If you need badges of the same type (for example, only the first and last names of employees will differ), then you can easily copy the contents of one badge, paste it into another cell and make minimal adjustments. You can even save the badge template in Word’s memory and then use it as a template. To do this, click “File” and select “Save as Word template”.

How to make badges in Word without the help of a table designer? To do this, you can draw a rectangle autoshape and then continue editing the content. This is less convenient, but it will work as an alternative option.
So we figured out how to make badges in Word. We hope that this process will be simple and quick for you in future.
Reputable companies, medical and educational institutions cannot do without a badge. It is not at all necessary to contact special printing houses or do it in the Word editor. Quickly and easily you can make a badge online for free. There are several trusted sites that will help you with this.
With this web service easy to work, no need to download and install additional programs. It allows you to create an interesting badge with a unique design in just a couple of clicks, and the services are available for free. To create the object we need online, we need to go through a few simple steps:
- select a template;
- enter data;
- download the result;
- adjust the required sizes.

The layout can be selected in the “ ready-made templates" If you don’t find anything suitable there, you can use your own copy, downloaded in the “upload your own” section. You can proceed to the second step by going to the very top of the page and clicking on the “Information” section.
Here in empty fields Enter the required information. It is worth noting that there are options for customizing parameters, colors, and styles. You won’t be able to see all changes in text settings during editing; they are displayed in the final version. If you do not need some of the available fields, you can leave them blank. After entering, click on the orange arrow.
If any adjustments are needed, click on the orange arrow and you will return to the previous step. If the result is suitable, download the image and save it to your computer.
Until you can print the badge, you need to adjust the dimensions. Traditional parameters are 85x55 millimeters or 240x155 pixels. You can change these parameters in MS Word or the Paint editor. In Word, double-click on the picture and look for the setting in the panel that appears. In Paint, select “Resize”, then pixels, indicate the ones you need and tap OK.
Offnote.net can help you make a badge online for free.
This virtual editor Designed for creating a variety of business cards, but it will work great if you need to make a badge. You can start working after switching to home page and pressing the “Open Editor” button. The operating algorithm is simple:
- choose a template;
- edit information;
- upload a photo, clipart or figure (if necessary);
- change sizes.

It’s easy to choose a template, I’d like to go into more detail on text editing. You can change the text online by double-left clicking on it and deleting it extra words Left clicking on the block and pressing the Delete button will help. Main feature site - the ability to move text blocks to the right places. To do this, hold down the left mouse button on the block and drag it to the specified location.
After completing the settings, click “Download image PNG format” (there are two more options, but they cannot be used in free version) and save the image to hard drive. Next, you need to change the image size; this can be done easily using the method described above (as for the first service).
Another free one tool for creating and printing business cards. Working with the web application is simple; it is designed for inexperienced users, so creating a card layout at a professional level will not cause any difficulties. You can easily print the resulting layout in PDF format on your printer. This online constructor you don’t need to install, register, and you get the result instantly without paying, sending SMS, or anything else. On the site you can:
- enter and edit information online;
- format text on the card field;
- post photos and other pictures in PNG format, Jpeg, Gif;
- change the color of text elements;
- upload emblems and personal logos;
- save the created layout;
- supports a huge number of languages, including Russian.

This utility was originally designed for creating business cards, but if necessary, it is easy to make good badges for a schoolchild or a healthcare worker. It must be said that this product is paid, but you can use the demo version, which has the following limitations:
- the operating period is ten days after installation;
- you can't save your badge in graphic format.

If you approach the process creatively, the Business Card Master will help you develop a quality product. The main advantages of this site are a huge catalog of templates, fonts, various pictures, helping to make a badge that meets the specified requirements. The demo version is downloaded for free. It’s easy to create a card according to your parameters:
- choose a layout;
- edit the text;
- customize the color scheme;
- export everything to Paint;
- adjust the dimensional characteristics.
The “Business Card Templates” section will help you create a badge. A list with templates for any occasion will open, just choose the appropriate option.
Below the layout are fields for text. On the right side there is a font setting. If you do not want to fill out any field, simply uncheck the box next to it.
This utility, unlike other web services, allows you to customize the background color; there is a panel on the right side for this. It was already noted above that in the trial version it will not be possible to save the project in graphic format, so you will have to take a screenshot of the monitor (press the PrtSc SysRq button, next to the F12 key). After that, open Paint, press the combination Ctrl + V. Next, cut off all excess. To do this, select “Select rectangular area”, click the left mouse button in the upper left corner of the badge and move the cursor to the bottom right corner, click “Crop”.
At the last stage, you need to change the dimensions; the procedure is similar to that described in the review of the first service.
If necessary, it is easy to make a badge for a schoolchild or other field of activity online for free. The tools described in this article will help with this.