Webmoney payment system: Step-by-step registration and wallet creation! How to create your own e-wallet
Hello friends! Do you want to know how to create a webmoney wallet? Then you are at the right place! I hope you liked the previous article about that newbie that I wrote about last time. If you haven't read it, be sure to read it. But today we will talk about the popular electronic Internet wallet webmoney.
Even without planning any purchases, when leaving the house, the item that everyone has with them is a wallet. Browsing the Internet is usually associated with searching for information, but even on the Internet you may need money at any time.
If you are the owner of your own business, then you should definitely know about the need, and the WebMoney payment system will open up many opportunities for you, the main one is payment for goods.
Electronic money is applicable not only on the Internet; pay rent, electricity, gas, water consumption, purchase tickets and insurance - the list of available operations is huge. The benefit is obvious - minimum commissions, saving time and effort. All that remains is to find out how to create electronic wallet WebMoney in Russia and abroad without a passport and get a personal account in the system.
How to create a webmoney wallet in Russia
Types of webmoney wallets and their purpose
Before moving step by step through the registration stages and creating a WebMoney electronic wallet, let’s consider the main options for managing an electronic wallet:
WebMoney Keeper Mobile
It may happen that you need to pay for something, that is, gain access to your WebMoney wallet, but you won’t have a laptop or computer at hand.
In order to facilitate user access to electronic wallets, the system offers WM Keeper Mobile is an application with the ability to install the program on your phone; it is adapted to work from almost any mobile device.
WebMoney Keeper Light
Manage your wallet through a browser on the system’s online service page with mandatory inclusion JavaScript support.
WebMoney Keeper Mini
The control method is similar WM Keeper Light, but JavaScript support is not required.
WebMoney Keeper Classic
Program, webmoney keeper classic, for managing WebMoney wallet, installed on personal computer. It is considered the most convenient and in a reliable way.
How to create a WebMoney Keeper Classic wallet on your computer
How to register a WebMoney wallet
First you need visit the payment system website, on home page at the top right you will see two prominent buttons Registration and Login. We choose the first one, you will need the second one after you register.
On the page that opens, you will be offered to register and manage your account using social network or enter a number mobile phone.
Please note, create electronic webmoney You can only access a wallet if you provide reliable information about yourself, starting with your phone number. Passport details must match, otherwise you won’t be able to withdraw money from the system later.
After entering the number in international format for Russia, it starts with +7, click continue and fill out the form.
Next, you must fill out its form and agree to the terms, and click on the activation button “ continue". Next, a message will be sent to your specified mailbox or mobile phone. registration code. Enter the code into the form and click continue.
After the system checks the correctness of the entered code, you are taken to a page with a choice software for managing electronic wallets.
In the next step you need download Webmoney Keeper program. After launching the installation file, it is advisable to read the terms of the agreement and then follow the instructions of the installation program.
When you first launch your webmoney wallet, select the option indicating your desire to register with WebMoney.
In the next step, you need to enter the registration code that was sent to you earlier. You must enter it in the appropriate field and then follow all the instructions that the registration wizard offers.
As soon as key generation is completed, you will become the owner of your own WM identifier (WMID). It is required to log in, so it's best to write it down.
Attention. The key file is saved in the computer's memory, and an access code is assigned to it. In a situation where you decide to reinstall the operating system or decide to use keeper on other equipment, the system will definitely request the keys and code for them.
For greater security, it is recommended to store key files in an inaccessible place and have backup copy on any removable media. Of course, if the keys are lost, they can be restored, but this will take time. There is another one the way to store a file with keys is the Enum-Storage service.
At the last stage of registration in the system, you will receive an offer to enter a special activation code, it will be sent to the phone or email specified at the beginning of registration.
Congratulations! Now you have a webmoney wallet, registration of which will allow you to instantly perform various financial transactions.
How to use webmoney keeper on a computer
You can launch WM Keeper Classic from the start menu. After entering the WM identifier (WMID) and password chosen during registration, the program will connect to the certification server, and you will gain access and be able to manage WM wallets. To do this, in the main menu of the program, go to the wallets tab.
How to create a webmoney wallet wmr, wmz, wmu
By analogy with ordinary money, your wallet may contain rubles or euros, your electronic money will be stored in different accounts depending on the currency. Creating them is quite simple: using the special webmoney tab you will be taken to the wallet creation menu. To begin with, you can limit yourself to ruble, it will begin with the letter R (wmr) and dollar, it is called wmz.
Only these twelve-digit numbers must be specified when replenishing your balance in cash or indicate for transfer of electronic payments. If necessary, you can add wallets in other currencies to your WMID.
Now, as soon as you need to make or receive any payments, you just need to launch Webmoney Keeper and specify the WMID and password in the window that appears.
How to exchange currency in webmoney
If you need to exchange dollars for rubles, you can do it in a few seconds. Just select the desired wallet and use the right mouse button to see available operations. In the list that opens, select the exchange item and enter the amount of currency that needs to be exchanged in the appropriate field, the second line will be filled in automatically, there you will see the amount in the desired currency at the system rate.
If you are happy with it, just follow the prompts.
How to use webmoney on a mobile phone
It may happen that you need to pay for something, that is, gain access to a virtual wallet, but you don’t have the necessary equipment at hand. Webmoney offers WM Keeper Mobile is an application that can be installed on a mobile phone or communicator; it is adapted to work from almost any mobile device.
You just have to take into account that whether to receive a Webmoney certificate or not depends on your desire. This is an optional operation, but it is very useful for doing business. Thus, users with a passport lower than the initial one and who only have one received during registration in Keeper Mobile have some restrictions and one of them concerns the maximum possible amount in the account, it should not exceed 5 thousand rubles or an equal amount in another currency.
The amount of one transfer cannot exceed 1 thousand rubles, there are limits on the number of transactions for any specific period, for example, per day. You can learn more about the rules for using the system, limits and other types of wallets on the official website of the Webmoney payment system.
I hope you liked the post on how to create a webmoney electronic wallet, and you will be happy to read my previous article about that, but first, help me develop the project, all you need to do is click on the button below from your social network, and this material will be seen your friends. Until we meet again, friends.
Today we will talk about how to create a webmoney wallet. This is the first action in the Webmoney system that does new user to start using electronic payments online. Therefore we will give detailed step by step instructions what and how to do so as not to make mistakes.

The WebMoney wallet itself can be compared to a bank account - this will help simplify the understanding of its essence. Not every person is an entrepreneur or a millionaire to have a solid account, but almost everyone has plastic cards. This means that everyone has a bank account. We are talking about “plastics”, on which most people receive pensions, scholarships and salaries. They are used to withdraw money from ATMs and pay for purchases in stores.
A WebMoney wallet is practically the same “plastic” that can be used to receive cash, and also spend them. There is also the possibility of "transformation" electronic money, located in a webmoney wallet, into cash, which is familiar to many. Let's take a look at how this system works.

Currently, the WebMoney system has ten types of different wallets. There used to be eleven, but the eleventh is no longer available for registration:
- R-wallet - ruble with the designation WMR, type R. Money equivalent to Russian rubles. The wallet number consists of 12 digits (fronted by the letter R).
- Z-wallet - dollar wallet with the designation WMZ, type Z. Finances equivalent to US dollars are stored here. The wallet number consists of 12 digits (fronted by the letter Z).
- U-wallet - hryvnia with the designation WMU, type U. Equivalent to Ukrainian hryvnia. Numbering – 12 digits (fronted by the letter U).
- E-wallet – for storing the equivalent of euros. Designation WME, type E. Numbering – 12 digits (letter E in front).
- B-wallet – for storing money equivalent Belarusian rubles. Designation WMB, type B. Numbering – 12 digits (letter B in front).
- K-wallet – for storing the equivalent of Kazakh tenge. Designation WMK, type K. Numbering – 12 digits (letter K in front).
- X-wallet is the most unusual. The title characters on it are equivalent to Bitcoin, with 1 WMX equal to 0.001 BTC. Numbering – 12 digits (letter X in front).
- G-wallet – the proceeds contained in it are backed by gold. In this case, 1 WMG is considered equivalent to 1 g of gold. Numbering – 12 digits (letter G in front).
- C-wallet, D-wallet – designed for receiving and issuing loans. Such wallets for creating are not available to beginners.
Webmoney wallet and WMID what is the difference
Please note that some beginners are sometimes mistaken in believing that WMID and wallet are one and the same. It is necessary to clearly understand that WebMoney wallet numbers do not correspond to WMID numbers. For example, if you follow the link http://passport.webmoney.ru/asp/CertView.asp?purse=Z291143207289, you can check which WMID corresponds specific number WebMoney wallet. The numbers you receive will be different in any case.
WMID is a registration number that can correspond to several different types of wallets in the WebMoney system
.Transfers can only be made between WebMoney wallets of the same type. That is, you can transfer funds from a personal Z-wallet to the WebMoney Z-wallet of the same name of any other participant in the system. It follows from this that, for example, it is impossible to transfer money from a Z-wallet to an R-wallet. To convert, you can use the funds exchange link.
After getting acquainted with the theory, we’ll figure out in practice how to create WebMoney wallets step by step.
How to create a webmoney wallet
After registering directly in the WebMoney system, you can get into your account. If the window was closed for various reasons, then you should:

Errors when creating a Webmoney wallet
In a situation where when creating wallets, for example WMU or WMR, these types of wallets are not in the list of possible ones, you will need to obtain a formal certificate. To do this, you will have to upload photographs of the document directly to the Webmoney system server.
There are cases when a user encounters the error “the account already has a wallet of the specified type.” Then you should simply log out of your personal account and log in again. As a result, it will be possible to see the current state of wallets after updating the cached information.

Please note that in the process of creating WebMoney wallets, various errors are possible. For example, you may be asked to provide passport information by going to the website of the certification center
. That is, get a formal certificate free of charge and instantly. However, after receiving it, sometimes you are asked to provide passport details again - try uploading a photo of the document and wait for the administrator of the certification center to check the provided data. Usually this is two working days.
It is important to know that when creating a WMB wallet you should obtain an initial certificate, otherwise you will constantly receive an error. Obtaining a certificate in the process of creating a WebMoney wallet is subject to the laws of the Republic of Belarus. According to these laws, only verified users have the opportunity to make online payments.

To create another type of WebMoney wallet, you need to click the “Create” link again and repeat the procedure.
To display information about the WebMoney wallet number and the current balance on it, open the “Wallets” tab in personal account. In the screenshot below, the wallet numbers are highlighted in blue, and the amount is highlighted in green.

If necessary, WebMoney wallet numbers can be written down - this information is not secret. To receive money in your wallets, you should provide their numbers to your correspondents.
Detailed video instructions on how to create a webmoney wallet for those who prefer video format for receiving information:
Conclusion
Now you know in detail how to create a WebMoney wallet and are ready to start using this payment system. Do not forget that creating a WebMoney wallet will not automatically make you rich. Therefore, in order for the title units of various currencies to ring on this wallet, you will have to try. But we know that everything will work out for you! Stay tuned!
How to create your own electronic wallet?
You need money so you don't have to think about it.
"Stalker", Strugatsky.
Today, electronic payments are increasingly becoming part of our lives, so having at least one your wallet in electronic payment systems recommended to everyone. IN present moment, in Russia there are 3 most popular systems: WebMoney, Yandex.Money and Qiwi. Let's look at the step-by-step procedure for creating wallets in each of them.
§ 1. How to create an electronic wallet in WebMoney?
Visitor review:
During registration, I was asked the question: in what currency to create a wallet and the choice was offered in rubles, dollars, euros and others. I chose in dollars. Maybe, of course, I didn’t understand something, well, I’ll look again tomorrow. Thank you, by the way, for the useful article on the Internet. True, it is very clearly and accessiblely written. I would say you are inspiring, so I decided to try it, I hope something works out
Yulia Balashova.
Process creating a wallet in WebMoney a little more complicated than in other systems: in WebMoney there is multi-level system certification, with which you can expand the functionality of your account. But first, a simple registration is enough for us. Such electronic wallet will be sufficient to perform normal payment transactions, and with additional options you can figure it out yourself later.
1. Go to the website start.webmoney.ru. On the page that opens, you will need to enter your phone number (1) and click on the “Continue” button (2):
2. A page will open with a personal data form (1) that must be specified. Please enter your email address carefully! After this, you can uncheck or leave the checkboxes in items (2) and click on the “Continue” button (3):
3. After this, you will be shown the data you entered again and asked to check it. Check and click Continue again.
4. On specified address You will receive an email something like this:
5. The registration page looks like this:
6. Next stage- phone number confirmation. Unlike other services, WebMoney does not send you messages. Instead, you send a message to any of the numbers (1) and click the “Continue” button (2). Message text - (3) :
7. In a reply SMS message to your phone, you will receive a code that you must enter in field (1). After that, click the “Continue” button (2):
8. Next, you will see a form for completing the registration of the WebMoney electronic wallet, in which you need to enter personal data (1), create a password for your account (2), and click the “OK” button (3):
9. That's not all. The WM Keeper Mini resource will open in front of you, in which you can create your own electronic wallets:
10. You will see a form for creating wallets, where you need to click on the appropriate place:
11. In the wallet creation form, you indicate the type of currency (1), read the agreement (2), confirm that you agree with it (3) and click on the “Create” button (4):
12. Everything is yours WebMoney e-wallet created, and you can make payment transactions using it. If the functionality of this wallet seems insufficient to you, you can go through the procedures of obtaining various certificates that give you the right to conduct commercial activities through the service, withdraw money to cards and bank accounts, and carry out many other operations.
§ 2. How to create an electronic wallet in Yandex.Money?
1. Go to . Go to the “More” tab and see the “Money” item:
2. You will see a window like this (we mean that you are not registered in any). Click on the “Open wallet” button:
3. You will see the following window. In it you need to come up with a login (1), password (2), indicate a phone number (3), and click the “Continue” button (4):
4. If you already had a Yandex mailbox or were registered in any of its other services, you will immediately be taken to this page:
Here you enter the code that will be sent to the phone number you specified (1). Come up with a payment password (2) - it should not match the password of your Yandex account. Specify the email address that will be used for notifications and restoration of access if something happens (3) - as a rule, this is the address of your current or newly registered email. Check the appropriate boxes (4) and (5), and then press the “Open wallet” button (6).
5. You will contemplate the following page for some time:
6. After which, your electronic wallet in Yandex.Money ready to use:
§ 3. How to create a wallet in Qiwi?
1. Login to (3)
6. After this, an authorization page will appear with the phone number already entered, where you just have to add your password and click the “Login” button:
7. That's it, now you have it e-wallet in Qiwi, whose number is similar to your phone number:
By the way, it is very difficult to delete a wallet in the QIWI system. But you will soon be charged for its use subscription fee even in the absence of transactions with the wallet. So think about it - do you need it?
And so, you found out how to create your own e-wallet in the three most popular payment systems. I hope I have answered one of your most frequently asked questions. Work and may your wallets always be full to capacity.
WebMoney Transfer is an international electronic payment system. Through it, Internet users have the opportunity to pay for their purchases in online stores, mobile communications and also send money transfers to each other. To gain access to the system's functions, you must create an account in it. In this article you will learn how to register a WebMoney wallet for free on the official website of the service.
Registration of user WMID
To use all WM functions there is no need to enter into any contracts. Relationships with the company's clients are built on the basis of a public offer. This means that the user registered on WebMoney, accepts the terms of the agreement published on the page and undertakes to comply with them. In case of gross violation of these conditions, the service administration reserves the right to block the client’s wallets.
Before registering for WebMoney, you need to acquire an electronic by mailbox and mobile phone that were not previously used when opening a WM account. Email is needed to receive reports and restore forgotten password access, and a cell phone - to receive confirmation codes for your financial transactions.
Let's take a closer look at how to create a WebMoney account on the website www.webmoney.ru:
- On the main page of the site, click the “Registration” button.

- Enter your number cell phone in international format - for residents of Russia it should start with +7 and then 10 digits.

- Enter your date of birth, email, select Security Question and come up with an answer to it. You may need it when recovering a lost password.

- You should receive a message with a confirmation code on your mobile phone, enter it in the special field.

- Come up with strong password to log into your WMID.

- WebMoney is a multi-currency system, so during registration you must select the currency of your first wallet. The equivalents of real currencies in the system are title units, and . To create a ruble wallet, install WMR in the “Currency” column and accept the terms of the agreement.

For confirmation purposes email addresses on email address the user receives a message with a special code.
- Copy the code, follow the link and paste the code into the input field.

Once your email is confirmed, the registration process is completed.

A new user automatically receives an alias certificate, which allows him to top up his wallet balance and make online payments. The limits available with this status can be found on the page.
Creating electronic wallets inside your WMID
Registration of a WebMoney wallet in Russia, as well as throughout the world, implies the creation of a WMID, which is virtual storage for several electronic wallets in different currencies. A client with an alias certificate can use only one wallet, the currency of which he selects when opening an account. To create wallets in other title units of the system, you must connect one of the following methods for managing your WMID:
- KeeperWinPro - special program for installation on a PC with operating system Windows system, which allows secure access to wallets without using browsers.
- KeeperWebPro is a browser-based wallet management option that is suitable for PCs with other operating systems and for users who prefer to carry out their transactions via a browser.
Let's look at how to make a WebMoney wallet using the WinPro program. The application itself must be downloaded from the page and installed on your computer. After logging into the program, open the “Wallets” tab and click “Create”. A special window will open in which you need to select the title character for the wallet and set its name.

To complete the operation, you must check the box to accept the terms of the agreement and click “Next”.

After accepting the agreement, the new wallet appears in general list, you can already top it up and make transactions.
Next, we’ll figure out how to create a WebMoney electronic wallet using WebPro. Log in to your account and inside the “Wallets” tab, click “Create”, where you need to select a currency from the drop-down list and come up with a name for the wallet.

Accept the terms of the user agreement by clicking the “I agree” button.

Your new wallet is created and ready to use. You can create as many wallets as you like in the WebMoney system, but they cannot be deleted in the future. Do not create extra wallets unnecessarily, so as not to get confused in them.
Registering and creating a wallet: Video
Today I will tell you how to create your own wallet in the WebMoney system. We will go with you full procedure WebMoney registration, which will allow you to fully use Internet money (receive, transfer, exchange, withdraw, pay for goods and services with it, etc.). What will be especially useful to you if you decide to create an online store for free.
In this article you will learn:
Preparation and important points
I would like to immediately draw your attention to the fact that it is better to immediately indicate your real data, so that later there will be no problems with confirming the authenticity of the entered information. You don’t have to worry about confidentiality, this system is quite safe, for example, I myself have been using WebMoney for more than four years.
But let's start registering with WebMoney. To do this, it is advisable to prepare your passport, identification number, mobile phone number, and, of course, keep the phone itself nearby.
To access your wallets in Webmoney, there are 4 different clients:
- WM Keeper Light;
- WM Keeper Mobile.
To help you understand which client is best to choose, check out this article.
WebMoney registration Mini
First we need to register WebMoney Mini, it couldn't be easier to do. To do this, open any browser (in my case it is Inernet Explorer, since it is installed by default on all computers with operating system Windows). It is launched using a shortcut on the desktop or from the Start menu, as shown in the screenshot:
A browser window will open in front of you, address bar where enter the WebMoney system address: https://webmoney.ru and click the button Enter» on the keyboard. The following window will open in front of you: 
On the left side of the site, you will see two big buttons: “Registration” and “Login”. We will need the first of them only now, when we are going to create a WebMoney wallet. We will now click on the second button, “Login,” whenever we want to log into the WebMoney system. So, let's register in WebMoney, to do this, click the "Registration" button: 
Now you will see a page with a choice of registration method. There are two methods: 1) using your social network account; 2)or using your personal mobile number. In principle, it makes no difference whether you register via a social network or via a mobile phone, however I would still recommend that you register through mobile number (You will still have to enter it to remove restrictions), and subsequently registration will be simplified.
However, I am not looking for easy ways and, despite everything, I chose to register through social networks (which I later regretted a little). If you want to repeat this, please note that only your real first and last name should be indicated on your social network. If there are nicknames there, then they will be used to create a WebMoney wallet, which means that in order to attach a card for withdrawing money from WebMoney you will have to change your first and last name (to real ones), and for confirmation you will need to send a scan of your passport, and for Russians also scanned identification number. In general, trouble for one or two weeks for sure! It’s better to register immediately via mobile phone
But, I choose to register with WebMoney through a social network: 
My choice fell on registration through Twitter account, however, regardless of the selected social network, you will still be shown a somewhat similar window in which you will be asked to enter your username and password. Don't be afraid to inject, this procedure is absolutely safe. Many sites practice this procedure, and logins and passwords will still not be known to WebMoney, since the procedure goes through the server of the selected social network (in my case, through Twitter).
So, in the selected window, enter your login, password and click on the “Authorize” or “OK” button, as shown in the picture below: 
After the login and password have been entered and you click “OK”, a window will appear in front of you for a few seconds informing you that the authorization was successful and you will be redirected back to the application (in our case, to WebMoney): 
As soon as the WebMoney system receives your data from social networks. A window will open in front of you, in which it will be written “Welcome, your name! Your personal data obtained from...” And under this message you will see your nickname, name, language, time zone. If the data is correct, check the appropriate box and click the “Next” button. In general, do everything as shown in our screenshot: 
Next, you will see a page through which you can invite your other friends on social networks who do not yet have WebMoney. To do this, you need to tick the people you want to invite. In my case, I will not do this, since most of my friends already have wallets in WebMoney, and there is no desire to send spam letters to others.
If you don’t want to send invitations to anyone, then make sure that there are no checkboxes anywhere, or first check everyone’s boxes and then uncheck them, as shown in the screenshot below. Then click the button at the bottom of the “Next” page: 
And now the solemn moment has come: you have registered with WebMoney! Congratulations!!! Those who registered via phone saw this window shown in the screenshot below a little earlier than me.
So, what do we see on the screen:
- Congratulations on your successful registration in the WebMoney Transfer system! (this window can be safely closed by clicking on the red cross in the corner of the green message)
- We are advised to enter a mobile phone number, since now the limit on the wallet is set at 5,000 Russian rubles, and by entering our number, we immediately increase the limit to 15,000 Russian rubles, which in Webmoney is more often called WMR.
- However, we are short of wallets. They need to be created. To do this, click on the “can be created” link in the “Wallets” field. As shown in the picture below.

Creating a wallet is a fairly simple task; to do this, first select the desired currency (WMR - Russian rubles, WMZ - dollars, WME - euros, WMU - Ukrainian hryvnia, etc.). Then read the agreement (to be honest, I didn’t read it, because I don’t understand anything about legal intricacies). Next, check the box next to the text indicating that you accept the terms of the agreement. Finally, click the save button.
You can see it more clearly in the screenshot: 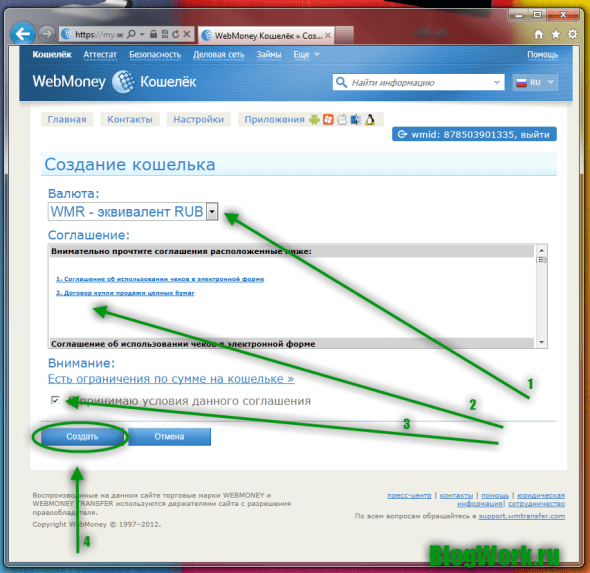
- At number one, we are shown a notification stating that a WMR wallet has been created (if you selected a different currency, then another wallet will be created accordingly).
- Our wallet number is shown under the second arrow. This is exactly what we will give to those from whom we want to receive the specified currency.
- If you want to add a new wallet, then click on the corresponding button, which looks like “[+]”. After which you will be transferred to the previous window, in which you will also need to select a currency, accept the agreement and click the “Create” button.
- Under the fourth arrow we see your balance. IN at the moment it is 0.00 WMR. You can click on these numbers to get a more detailed report.
- Well, actually the fifth arrow points us to the long “Update” button, by clicking which we will update the system and get more exact information about the state of our wallet.
Here is the actual picture with the arrows: 
How to use WebMoney
This is actually the first part of registering wallets in WebMoney. For those for whom this minimum is enough (receiving small amounts, paying for services, goods, withdrawing money, etc.), they can stop reading this article. Those who have decided to get the most out of WebMoney and not feel limited, I recommend that you continue to follow our recommendations.
First, let's review how to log into the WebMoney system. To do this, as usual, enter in the browser address bar https://webmoney.ru and click on the “Login” button, which is located on the left side of the site. Here is a screenshot for clarity: 
Next, you will see a page called the WebMoney system, like “WebMoney Enter”. Scroll your mouse down and you will see not only the fields for entering WMID and password, but also WM Keeper different versions. We are interested in WM Keeper Mini, and that is what we choose.
For more details, see the figure: 
Next, we will be asked to introduce ourselves, to do this we will need to enter our username (phone number) and password, or use social networks if you registered through them. I registered via Twitter, and I select it (I hope you did this via phone): 
I can’t show how this happens when you enter your login and password, so I’ll show you how this happens: when you click on your social network. First, a window pops up asking you to log in, you click on this button: 
After which it happens automatic login into your wallet. The advantage of such a login is that you do not need to enter logins and passwords into the system.
Now let's expand the capabilities of our wallet by increasing the limit: enter your phone number. To do this, we will use the advice that hangs in the yellow frame. And let’s follow the link “Enter your phone number”, as shown in our screenshot (if you have already entered your phone number, just skip this point). 
In the next window we need to assign a phone number. We enter it in a special field, but keep in mind that it must be mobile and it must be entered in full, but only without the “+” sign at the beginning. After that, click the “OK” button and wait for an SMS message on your mobile phone (it arrives within the first few seconds). 
As soon as I received the code via SMS, I entered it into a special field and successfully updated my phone number. Now my limit has been changed to 15,000 Russian rubles.
How to get a formal certificate in WebMoney
If you want to expand your capabilities even further using WebMoney. We recommend that you obtain at least a formal certificate, which will also help you when using the WebMoney wallet during transactions with other participants in the system. In short, you need to provide your passport information to the system, that is, indicate where you live, and also enter your passport information. It's a matter of three minutes. Again, you don’t have to worry about safety at all!
To receive a certificate, go to the “Certificate” tab and click on the “Get Certificate” button, which is located on the left side of the site. However, if you don’t see such a link, just follow this link: https://passport.webmoney.ru/asp/aProcess.asp
Most likely, you will again be asked to log in either through your phone or through a social network. So log in. Next, follow the link “Your personal data”, the link can be found in the left sidebar of the site. If you're too lazy to look, here it is: https://passport.webmoney.ru/asp/aUserInfo.asp
A page like this will open in front of you, where you will need to enter all your personal data: 
Please note that it is better to immediately indicate your real passport details, otherwise you will have to change them to real ones if you have to confirm the specified passport details. In addition, you will not be able to attach a bank account plastic card to your WebMoney wallet, if the data differs from what you indicated in the bank. In general, believe me, it is better to indicate your real data! After all the data has been specified, click the “Save” button.
The city cannot be entered, it can only be indicated, to do this, click on the link indicated opposite the city, a new window will open in front of you, in which check the box which city you will indicate (City of permanent registration, City of passport issue, City of birth). In my case, there was one city, so I immediately checked all the boxes with three checkboxes, then clicked on the “Select city” button. As shown in the picture: 
Once you have entered all the data and clicked the save button, you will be redirected to the passport control panel page, where you will see that You now have a formal certificate. Congratulations! 
I also recommend that you undergo E-Num authorization for greater security and greater opportunities. This is quite easy to do, just follow the link: https://security.webmoney.ru/asp/setenum.asp
I won’t describe it, since there is nothing complicated, but it all comes down to the fact that you need to enter your mobile phone number, and then confirm it by email. And not everyone will want to install this function.
How to change WebMoney Keeper Mini to WebMoney Keeper Classic
Now it’s the turn to finally remove all restrictions from your wallet! Change WM Keeper Mini to WM Keeper Classic. This is quite simple to do, you can do it through the wallet settings, or go to the “Security” tab on the WebMoney website, then select the “Management Methods” item in the left column. Or just follow the link: https://security.webmoney.ru/asp/controllist2.asp
As always, you will have to confirm the reality of your identity using a social network or mobile phone. I have an E-Num security system connected, so logging in is somewhat complicated. Specifically, I'm first asked to log in using a social network: 
And then they send you a code that you will need to enter in a special field. 
However, I eventually get into the account management methods. Currently the green light is on near WM Keeper Mini. Therefore, we click on the “Disconnect” button, after which we click on the “Connect” button, but already in the WM Keeper Classic box, as shown in the screenshot published below. 
Of course, you can choose another control method, for example WM Keeper Light or WM Keeper Mobile. However, you cannot switch to WM Keeper Light from WM Keeper Mini (the system has not yet implemented this function), and WM Keeper Mobile is even more limited in its functions than Mini. Therefore, there is only one solution - WM Keeper Classic! Moreover, for many this is the most ideal option, as it provides maximum possibilities and is very easy to use.
After you click this button, you will be prompted to download the generated key, which you will subsequently need to log into the WebMoney program. To do this, right-click on the “Download keys” link. In the opened context menu, select “Save target as...”. You will be prompted to save the file, just indicate where to save the file and that’s it. Then click on the continue button: 
WebMoney registration Keeper Classic
In this part we will tell you how to register WM Keeper Classic and how to use it. First you need to download it, it’s better to do this from the official website, latest version You can find it at the link: https://wiki.webmoney.ru/projects/webmoney/wiki/WM_Keeper_Classic
Follow the link, select the “Russian version” (you can have the English version if you want), after which the installation file is downloaded: 
The downloaded file looks something like this: 
Click on the file double click left mouse button and the application will launch. Most likely, the security system will ask you whether it is really worth running this application, answer “Yes, run” (if you downloaded it from the official website): 
Next, the WM Keeper Classic program will greet you and tell you which version you are installing and ask you to close the rest Windows applications(so that the installation goes smoothly), and will also inform you that the program is protected by copyright. In general, nothing particularly important, so feel free to click “Next”: 
The next window will be an agreement, which, as a rule, is in any program or computer game. Of course, you can read this agreement carefully and then accept or not accept it. However, the majority (I will not hide that I am among them) do not read such agreements at all, since if you are not going to do anything illegal with the program, then you are unlikely to find anything very interesting or important in this agreement.
Therefore, you can simply check the box next to the message that you agree with the agreement and accept it. Then click on the “Next” button. 
In the next window you need to indicate where you want to install the program (you can leave it unchanged and the program will install its files, at the root of others Windows programs). At the end, click “Next” again. 
The next window informs us that a root certificate from WebMoney Transfer Root Authority will be installed on the computer. Therefore, you should click the “Yes” button. In general, nothing serious again, just click the “Next” button. 
Upon completion, you are offered to additionally install a browser plugin, which will increase your security when visiting sites. You can bet, you can - no. The main thing is to click “Done” at the end. 
So, the program is installed on your computer, now launch the shortcut, which should already be on your desktop. After which the following small window will open in front of you, in which you need to click on the “Recovery” link: 
In this window, enter your WMID number, which can be seen in WM Keeper Mini in the right top corner(small blue line with numbers written on it). Then enter your password. Now specify the path to the file that we saved when registering WM Keeper Classic. It will have a name - your WMID number, and the extension will be “.kwn”. For example, my file is called “878503901335.kwm”. When everything is entered, click the “OK” button: 
Next you will be asked about the wallet file, which you most likely do not have, so feel free to allow the program to create new file wallets and click the “OK” button. 
And, Voila! We createdWebMoney! And note, they did it completely free of charge! Congratulations!

If you have any questions, ask them in the comments! And if you want to start earning a lot of WMR, WMZ or WME, subscribe to our blog and read new articles about how you can make money on the Internet! Good luck everyone!
Published by author