Realistic print impression in Photoshop. How to draw a round seal for documents in Photoshop
The following source materials were used to create this lesson:
- Portrait of a Man
1. Create a Grunge Background
Step 1
Create new document with the following sizes 850 x 550px. You can, of course, use other working paper sizes for your work, but you must proportionally adjust all sizes that will be used in this lesson.
Add a grunge paper texture to our working document.
Step 2
2. Create a Postage Stamp Form
Step 1
Select a tool Ellipse(Ellipse Tool). Hold down ( Shift) to create a perfect circle. Name this layer Circle 1(Circle 1).
Step 2
Duplicate the layer three times Circle 1(Circle 1) by pressing the ( Ctrl+J). Name the duplicate layers Circle 2(Circle 2), Circle 3(Circle 3) and Circle 4(Circle 4).
Decrease the value Fills(Fill) for layer Circle 1(Circle 1) to 0% Stroke(Stroke), stroke size 6px, stroke color #000000 .
Step 3
For layer Circle 2(Circle 2), press the ( Ctrl+T Maintain proportions 95% .
Decrease the value Fills(Fill) for layer Circle 2(Circle 2) to 0% and then add a layer style Stroke(Stroke), stroke size 4px, stroke color #000000 .
Step 4
For layer Circle 3(Circle 3), press the ( Ctrl+T) to scale the figure. Don't forget to click on the icon Maintain proportions(Maintain Aspect Ratio), and also set the scale to 75% .
Decrease the value Fills(Fill) for layer Circle 3(Circle 3) to 0%
and then add a layer style Stroke(Stroke), stroke size 6px, stroke color #000000 .
Step 5
For layer Circle 4(Circle 4), press the ( Ctrl+T) to scale the figure. Don't forget to click on the icon Maintain proportions(Maintain Aspect Ratio), and also set the scale to 75% .
Decrease the value Fills(Fill) for layer Circle 4(Circle 4) to 0% and then add a layer style Stroke(Stroke), stroke size 4px, stroke color #000000 .
Step 6
Download the original Round Photoshop Shapes and then download the file CSH in your Photoshop program. Next, let's go Editing - Manage Sets(Edit > Preset Manager) and in the drop-down menu Dial type(Preset Type), select an option Custom figures(Custom Shapes). Click the button Download(Load) to load the CSH file.
Set the Foreground color to black #000000 . Select a tool Free figure(Custom Shape Tool), and also in the drop-down menu, select the option Maintain proportions(Defined Proportions). For this tutorial, I used shape #17, but you can use any shape you like.
3. Add Text to the Postmark
Click on the vector layer mask thumbnail Circle 3(Circle 3) to make it active. Select a tool Horizontal text(Horizontal Type Tool) and then hover directly over the circle track. The cursor will change to an "I" icon surrounded by a dotted line.
I used the font Intro, font color #000000 . You can use a different font and color for the text.
4. Create a Print Effect with a Photo
Step 1
Add the original image with a portrait of a man to our working document.
Step 2
While holding down ( Ctrl), click on the vector layer mask Circle 4(Circle 4) to load the active selection.
Step 3
Make sure to set the Foreground color to #000000 and the Background color to #ffffff , otherwise the next photo effect won't look right.
Let's go Filter - Sketch - Linocut(Filter > Sketch > Stamp). Install Tone balance(Light/Dark Balance) on 4 , A Mitigation(Smoothness) on 1 .
Step 4
Double-click on the man's portrait layer to open the window Layer Styles (Layer Style). Function Overlay if(Blend If) is located at the bottom of the window. Use parameter sliders This layer(This Layer) to delete white. Just move the right slider to 180 to hide the white color.
Right-click on the layer with the portrait of a man and in the window that appears, select the option Convert to Smart Object(Convert to Smart Object).
5. Add a Grunge Effect
Step 1
Select all layers with stamps (layers with circles, a layer with text and a layer with a portrait of a man), right-click on the selected layers and in the window that appears, select the option Convert to Smart Object(Convert to Smart Object).
Add a layer mask to the merged layer with the smart object. Select a tool Brush(Brush Tool), set the brush size to approximately 800px, and also set the Foreground color to #000000 . Using grunge brushes, add a grunge effect to the stamp; use different brushes. Translator's note: don't forget to go to the layer mask.
Step 2
Create new layer, name this layer Line Stamp(Stamp Lines). Select a tool Brush(Brush Tool), and from a set of brushes Rubber Stamps, select a brush Line Stamp.
Add a layer mask to the layer Line Stamp(Stamp Lines). Using the grunge brush again, add a grunge effect to the stamp lines and also hide separate areas die lines that cover the main die.
6. Create a Color Print
If you want to create color printing, then you can add a layer style Color overlay(Color Overlay) to the merged smart object layer, use the following shade as the overlay color #d9a4ae or you can use other color shades for the smart object layers.
For the finishing touches, create a new layer, name this layer Old envelope(Old Envelope). Using the Old Envelopes brush, add realistic effect old envelope. Use the following color shades: #b24659 and #b24659 to add various types seals.
Congratulations! We have completed the lesson!
In this tutorial you learned how to create a mail stamp in Photoshop from scratch using brushes and textures. Hope you enjoyed this tutorial!
This postage stamp effect is part of the Rubber Stamp Action, which is available on my Envato Market profile.
In this lesson we will learn to draw realistic print in Photoshop program. Here is the result of this lesson:
Now let’s start creating a seal, but under no circumstances fake the original one. Punishment for counterfeiting seals and stamps is provided for in Article 327 of the Criminal Code of the Russian Federation.
When creating a seal, try to comply with generally accepted standards for seals and stamps:
- Seals practically do not use special fonts (handwritten, Gothic, with complex designs). It is recommended to choose one font for all print layers.
- An invariable attribute of any print is the frame. it must have the correct geometric shape.
- Align words relative to each other. Try to fill the voids inside the frame by changing the font size. All printed words must be clearly legible.
Step 1: Create New document (Ctrl + N) size 300 x 300 pixels. Select a tool Text (T) and write two lines of text, each on a separate layer. Select the font size so that both lines are the same length.

Step 2. Deform both text layers. With active instrument Text (T), click on the icon in the tool settings panel Warp text and set the following settings:

Step 3. If, after deformation, the text goes beyond the working document, then in the palette Layers click on one of the text layers, and then, while holding down the key Shift, on the second. As a result, you will have two text layers active at once. Next, select a tool Shift To maintain proportions, drag the side handle inside the transform frame and position the text inside the working document. Click Enter.

Step 4. Now click on the top text layer and select the tool Free transformation(Ctrl + T), then rotate the text 180 degrees and move down to create a circle shape (be sure to hold down when resizing Shift key).

Step 5: Create . Select a tool Oval area(M) and while holding down the key Shift, create a circle-shaped selection. Set the Foreground color to black (D). Then select the command Editing > Stroke. Set the width to 5px. and press OK. Deselect (Ctrl + D). Using a tool Free Transform (Ctrl + T) Place the outer stamp frame around the text.
Create an inner frame in the same way (stroke width 2 px).

Step 6. Inside the stamp on a new layer, paste required text, drawing or logo.

Step 7: Hide the visibility of the background layer. Then in the palette Layers right-click on one of the visible layers and select the command Merge Visible. As a result, all print layers will be combined into one layer. After that, turn on the visibility of the background layer again.

Step 8: Create New Layer (Shift + Ctrl + N) above all layers and apply Filter > Render > Clouds and then Filter > Noise > Add Noise.

Step 9. Change the blending mode of this layer to Lightening (Screen).

Step 10: Hold down the key Ctrl, click on the thumbnail of the layer with the seal to get a selected area.

Step 11 Invert (Shift + Ctrl + I) selected area, then in the palette Layers Click on the noise layer to activate it and press the key Delete to noise outside the print. Deselect (Ctrl + D). Then merge the noise layer with the previous print layer (Ctrl + E). As a result, we got a print with noise on a separate layer.

Step 12: Switch to mode Quick mask(Q). Press the key D to set the foreground color to black. Select a tool Brush (B) and a brush with a diameter of 1 px. draw something similar to what you see in the picture below. The more lines you draw, the stronger the effect you will get.

Step 13: Press the key Q to exit the mode Quick mask. This will automatically highlight all the red lines. Then at the bottom of the palette Layers click on the icon Add a Layer Mask. We've already got a pretty realistic print.

Step 14. For greater realism, let's set the color of our print. Select a team Image> Correction> Hue / Saturation (Image> Adjustment> Hue / Saturation), in the window that appears, be sure to check the box Toning (Colorize) and select the desired print color and press OK.

Step 15. Finally, let's slightly rotate the resulting seal. Select a tool Free Transform (Ctrl + T) and turn the seal. Click Enter. That's it! The print is ready.
The result is very realistic, so do not use the knowledge gained to forge documents. Remember that this is illegal and punishable quite harshly.
Lesson prepared by: Vladimir Nesterov
Probably everyone new user“Photoshop,” burrowing deeper and deeper into the functional jungle of the program, makes more and more discoveries with delight and surprise, thinking with gratitude and admiration about the creators of a unique program, the possibilities of which sometimes seem unlimited. And here, out of nowhere, an insinuating thought appears: “So you can draw money too?!”
Well, let’s say, not everyone will think about money, but many people are interested in Photoshop, and not to fake it, no, just curious.
Requirements for stamps
Since we are not going to falsify anything, there is no need for us to know that, according to the law, there are no special rules regulating the content of seals (if they do not reproduce the state emblem), their production, registration and procedure for use. In order to create a stamp in Photoshop, it is enough for us to know that only a round stamp must have legal entities, and the rest - whoever knows what.

The most important thing is that the full organization or full name of the entrepreneur must appear in the press, as well as an indication of the Legislation not against additional information, so you can display the logo or OGRN, INN, etc.
And one more very significant detail, which determines how to make printing in Photoshop as realistic as possible. This, of course, is a printing cliché, by means of which an impression is made in mirror image, and since it is cut out, the text in the picture should look voluminous (but this is not an acquired taste).
Round stamp
Let's move from words to action and draw a simple round stamp. Create a new document in Photoshop, for example, 300 x 300 px. with a resolution of 72 pixels/inch on a white background.
Turn on the "Text" tool, select the size (say, 18 pt.), color and font type to your taste, and write a not very long name of your company, company, "shop", office, name of the entrepreneur or something else like that kind.
Select the text on the canvas and in the settings panel at the top, click on the button with the letter "T" on the slide. In the window that opens - “Deform text” - expand “Style” and select the “Arc” option, bending it with the “Bend” slider to 100%.
Copy (Ctrl+J) the text layer and flip the duplicate upside down (Edit > Transform > Rotate 180 Degrees), then position the copy under the original half-circle of text.
Add a new layer, turn on the "Oval Marquee" selection tool and circle the text, then go to the "Edit" menu and select the "Stroke" command, specifying a width of about 6-8 px. and placing it "Centered". Deselect (Ctrl+D).
Repeat the previous step to create an inner ring just below the lettering, as is typical for round stamp designs, but make the stroke a little thinner, about 5 px.
Note: you can move the text in a circle without deforming the direct inscription, as was done with ours. You can draw a circle with the Ellipse tool, specifying the "Outline" mode in the settings panel at the top, then go to the "Text" tool and move the cursor to the outline line. As soon as it transforms, you need to click the mouse, after which the cursor will flash in a familiar way, inviting you to enter text. You can delete a path by pressing Ctrl+H so you don't have to mess around with the Paths tab. In addition, to create a circle, you can use rings from a standard set of arbitrary shapes, for example, “Thin Round Frame”. Just remember to rasterize this layer before adding the porous texture.
In the inner ring in the center of the seal, you can (on a new layer) add a logo or trademark, a company abbreviation, or anything else you want, and it can be text, a picture, or both.
We figured out how to draw a seal in Photoshop, but that's only half the battle. Now the cliche design needs to be given a porous (or fine-grained) texture, just like stamp impressions typically look like. This is achieved in different ways, but all of them, in principle, come down to adding noise.

Create a new layer on top of all the others, go to Filter > Render and select Clouds, then open the Filter menu again and select Noise > Add Noise. Here you need to set the “Effect” to 18-20% (in our case), specify the “Gaussian” distribution and select “Monochrome”. We change the current blending mode for the “noisy” layer to “Screen”, and the print design is ready for fake activity.
Now you can select all layers except the background, and for the sake of plausibility, casually bevel the print by calling the transformation (Ctrl+T) and rotating the drawing a little.
Rectangular stamp
It’s even easier to make a print in Photoshop if its shape is rectangular. Let's say that our stamp is made of rubber.
Create a new document with dimensions 250 x 150 px. (enough for a medium stamp) and select red as the main color (looks impressive), and make the background black.
Activate the "Text" tool in bold size of at least 50 pt. make an inscription. For simplicity, let it be one word.
Go to "Layers" > "Rasterize" > "Text" or right-click on the layer and select a similar command.
Turn on the Rectangular Marquee tool and stretch the frame to enclose the text, then go to the Edit menu and choose Stroke, setting the width to about 10 px. and placing it “Center” or “Inside”. Then deselect (Ctrl+D).
You can add a Drop Shadow layer style to the stamp frame with text inside, using appropriate options to create a 3D effect.
Now let's add a texture to the picture that imitates a stamp made of porous rubber. To do this, go to Filter > Strokes and select Spatter. In Photoshop CS6, this “splatter” tool is located in the “Filter Gallery” in the same “Strokes” folder.
In the filter dialog, set Spray Radius to 17 and Smoothness to 5.
Next, open the “Select” menu and select “Colorrange”. Here, in the “Select” list at the top, select “Sampled Colors”, set “Fuzziness” to the maximum (200) and select “Selection” at the bottom. Now take the eyedropper and pick out the black on your stamp. By clicking OK, you will see that all the black spots are now selected, so they can be removed, thus creating a stamp effect. Without removing the selection, click the Delete button until complete removal black spots.

Note: the mottled texture of a rubber stamp print can also be created using large grunge brushes (there are plenty of them on the Internet), choosing a suitable print pattern and a color darker than the cliche. Click on the print pattern and the rubber material texture is ready.

Action
To create a stamp, you don’t need to know how to make a stamp in Photoshop. with my own hands, because kind and “lazy” people have already done this for us. We are, of course, talking about Actions, as they are called, although in the program these macro commands are called “Operations”. There are both paid and free versions.

After downloading the file, take it with you (or copy it) and go along the route: drive C: > Program Files > Adobe Photoshop CS > Presets. Here you will find the folder Photoshop Actions(Operations) and put your file there.
Now launch Photoshop, select "Actions" from the "Window" menu, then click the triangle in the top right and select "Load Actions." A window will open in front of you where you need to select your file and click the “Upload” button. Make sure that your collection has been replenished with a new action and use it to your health.
Brushes
As you know, Photoshop brushes can paint not only with classic strokes, but also with a wide variety of designs. However, the most important advantage of this artistic tool of the program is that it allows us to create our own prints. Having mastered this not very complicated science, you can easily cope with such “jewelry” work as printing in Photoshop, because you don’t have to draw anything, but simply use drawings or photographs of stamps as prints in the procedure for creating a brush.
It’s even easier and faster to solve your printing problem by downloading ready-made brushes (for free!), although it’s unlikely that you’ll be able to use them in scams.

Downloaded brushes are usually placed in the Brushes folder, which can be reached via the following route: C: > Program Files > Adobe > Adobe Photoshop CS > Presets. Then the files will immediately go into the editor, but you can also create your own folder in any place convenient for you and send the files there.
In this case, open “Photoshop”, go to “Editing” > “Presets” > “Manage Presets”, in the window that opens, indicate the location where the file is located and click “Upload”, after which new brush will appear in the set. We hope you now understand how to make a seal in Photoshop.
Good evening, dear craftswomen! Today we have a master class from our designer - beloved Irishka Sokolova. We read, learn, rejoice and say thank you;)))
Sometimes, for a change, you want to use something new rather than your “working” stamp. It occurred to me to try to make a round seal. The kind that most often appears on various important documents. I tried to describe all the steps so that even the person who opened it could understand Adobe program Photoshop for the first or second time.
To get started, create a new document 600*600 (or 300*300) pixels. with a white background.

Select the T (text) icon on the toolbar
If you don't see the text, it means you have white selected in your palette. You can change the palette by clicking on this icon:
We write a small text about what we want to see on our seal. For me it's "Made with Love".
In the layers palette, select the layer with the text, then top panel Click on the button with the letter “T” and an arc under it. Set the following values.

If you need to adjust the inscription to size, then select Edit-Transform-Scaling and do not forget to click on the “chain” icon so that you do not have incorrect deformation.

Copy the layer by pressing Ctrl+J and rotate the copy 180 degrees: Edit-Transform-Rotate 180. Move the copy so that it is located under the original.


I also added handprints to my stamp. If you also want to make a stamp with handles, then select the tool " arbitrary figure", then on the panel at the top, click on the arrow next to the "free shape" tool and then select the desired element from all the presented shapes. In in this case right and left hand. To prevent them from merging, I reduced the opacity. If you wish, you can choose a different color altogether and then we will have them in a different color.

Press the Shift+Ctrl+N keys to get a new layer and write the desired text on this layer. If the text is not written, but an existing inscription is selected, then we rasterize the layers (to do this, right-click on the layer with the inscription and select “Rasterize layer”) and only then write the text.

Rasterize the layer again. Now select all layers except the very last one (“background”) and connect them together by pressing Ctrl+E.
For greater realism, add noise: Filter - Noise - Add Noise

As a result, we get this print:

If desired, it can be
Rotate at the angle we need using Edit - Transform - Rotate,
You can print and use in your work,
Or you can make a brush from the resulting stamp to put an “imprint” of the stamp on your photographs.
To do this, we return in history to the steps before adding noise (if you use a stamp on a photo of your work, the noise will not look very good), then remove the background.
18.11.2014 27.01.2018
In this lesson you will learn how to draw a seal or stamp in Photoshop. The seal will be round, although it can be made triangular. You will learn how to print yourself, with your own data for the organization. Read the instructions below.
Note: This tutorial is not intended or intended to be a tutorial for creating fake seals for documents. The lesson teaches you how to create comic stamps for postcards or simply to decorate any images that are not documents. Do not violate the laws of the Russian Federation under any circumstances.
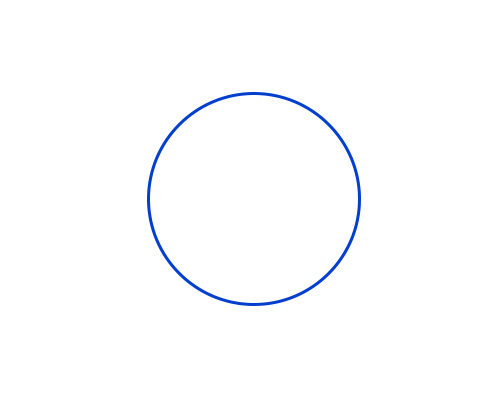
Create a circle for printing
The first thing you need to do is with a transparent color inside, but with a 3 px blue stroke. Best blue for printing - #013fcd
To create a circle with an empty fill, but with a color stroke, use the tool Ellipse:

The tool settings in the top panel look like this - the main color is transparent, the stroke color #013fcd
.jpg)
Now that the circle settings are set, draw a circle.
To do this, press SHIFT And Left Mouse Button. Next, drag the cursor to the side, creating a circle. This way you will get a perfectly even circle.
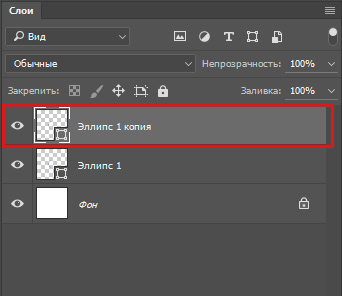
Duplicate the circle
Make a copy of the circle layer. To do this, select this layer and click CTRL+J.

A copy of the circle layer will appear. We will continue to work with him.
Change the stroke size of the new circle to 1 pixel.
Click CTRL+T to scale and make the circle smaller by holding down SHIFT+ALT(so that the circle decreases in proportion to the center).

Great! We have prepared a frame for printing and a place for the inscription.
Adding an inscription for printing
Copy the last circle from thin stroke and make this copy of the circle’s stroke transparent - in fact, the circle will not be visible, but it will be on top of the original one. Next, activate the tool Text Tool to add a caption.
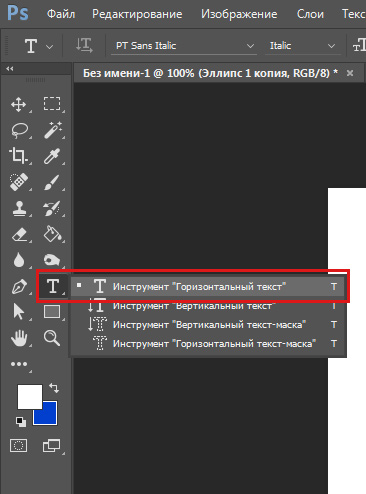
Hover your cursor over this circle (and you will see the cursor change, prompting you to add an inscription along the contour of the circle), click left button mouse and start writing.
Add the inscription you want, you can play with the size of the inscription so that it fits exactly the entire circle.
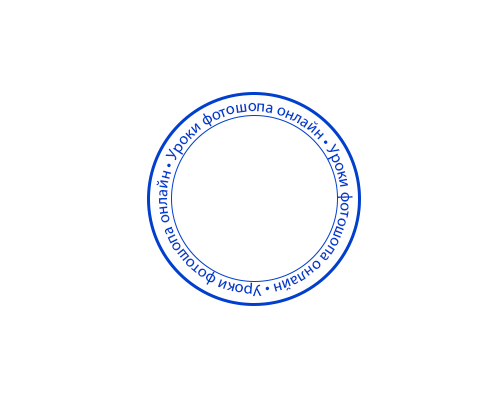
All that remains is to add the main inscription in the center.

Actually, a simple seal is ready. You can complicate and experiment as you wish, you understand the technique.
You can add a paper background for effect. It will be more beautiful and realistic if you twist the seal.