Google Play Market account - login, registration and recovery. What is a Google account and why is it needed?
So, for some reason, you cannot log into your Google account in YouTube, Gmail, AdWords, AdSense, Google+, Google Drive, etc. It doesn’t matter if you forgot your password, username, or even your account was hacked by ill-wishers. I have repeatedly encountered the problem of recovering my google.com/accounts/recovery account, so below I will outline a simple and effective method for solving it. Therefore, let's get started.
Before going through the account recovery procedure via www.google.com/accounts/recovery, you should double-check that you entered your password correctly. Make sure that the Caps Lock key is not accidentally pressed when entering the password, and that you are typing the password correctly in Latin or Cyrillic. From my own experience, I know that many users make mistakes with their passwords, using Cyrillic letters instead of Latin ones, or simply confusing capital and small letters. Be careful and enter everything correctly.
Standard password recovery
We will use the procedure for restoring access to your account, kindly proposed by Google. If, after entering a password, you receive a system refusal to log in with the line “Invalid address or password specified,” and brute-forcing the password does not help, then feel free to click the line “Need help.”

Strange activity on my account
If you notice suspicious activity from your account, I recommend changing your password to make it more difficult for attackers to use your data to their advantage. Avoid trusting your password to other people; when logging in on someone else’s computer, do not click “remember”, otherwise you will automate the process of logging into your account, which should be avoided in every possible way on other people’s computers.
For maximum protection of your Google account, it is recommended to enable two-step authentication by sending a code to your phone, instructions in the video and at the link https://support.google.com/accounts/answer/185839?hl=ru:
Conclusion
As you can see, the process of restoring access to your Google account via google.com/accounts/recovery does not pose any problems. It’s enough to take a couple of steps, confirm your identity using your phone or email, and you’ll get access to your data. At the same time, it is important to take the procedure for creating your password seriously, not trust it to other people, remember about security precautions, exclude the possibility of various malware penetrating your computer - and then you will not experience problems with the operation of your account. Good luck.
Most Android device users have their own Google account. With its help, we can log in and use any services from Google, for example Google Play.
Sometimes the following error occurs on a device running Android OS: when trying to log into our Google play account, we enter the password and login, but a message appears stating that there is a problem connecting to the server for data transfer.
We solve the problem with built-in tools
Perhaps the problem lies in the fact that you are entering the wrong username or password. To avoid this misunderstanding, write down your account login information on a regular piece of paper. Well, if the data is lost, we restore it by following the instructions:
1. Click the “forgot password” button.

2. Indicate your phone number.

3. Log in using the code sent to us via SMS.

If after this the error still appears, do the following:
First, we check for an active Internet connection. Very often, due to their carelessness, users forget to turn on the Internet and then wonder why they can’t log into their Google account.

Changing the SIM card can also fix this error. Just insert another SIM card and try to log into your account. If everything worked out, take out this SIM card and insert the old one.
The error may be due to an operating system failure. Therefore, we simply reboot the device and try to log into the account after the reboot.
A factory reset can also solve this problem. The main thing is to copy all the information important to you to another drive before performing a hard reset. Read more about this elsewhere.
Go to settings in “Accounts” and check the box next to “Auto-sync data”.
 |  |  |
In addition, clearing the Google Play cache sometimes helps. Go to the device settings in the “Applications” section. Find here “Google Play Services” and click the “clear cache” button.
 |  |  |
Using the YouTube app
If the above methods did not help, then we will go the other way and try to log into your Google account using the YouTube application. You can download it from our website by going to
Leave any questions you have in the comments, and we will definitely answer you.
As soon as you launch your brand new smartphone for the first time, the system will instantly ask you to log in to your Google account. We will assume that you have it or you know perfectly well how to register with the largest search engine. The fact is that, even if you are not a fan of this search engine, you will still have to get an account, especially if your phone is based on Android.
Another question is why is it so necessary, how to log into your Google account if you skipped this step at the first stage.
Why do you need a Google account?
Almost all applications installed on your Android are Google products, and your account is the key for all applications at the same time. So, with just one profile, you can use applications such as Drive, Gmail, YouTube, G+, but probably the most important application is Google Play. It is from the Market that you can download additional applications, games, music, books, etc. Therefore, a Google account is vital for an Android smartphone, and you will have to get one if you have not already done so.
How to log into Google account on Android
The first and most commonplace way is to use Google Market. Before logging into your Google account, do not forget to connect to unlimited Internet or Wi-Fi, because as soon as you log into your account, Market can start automatically updating all applications, and this is very expensive on a networked Internet.
So, in the general menu we find the “Market” icon and launch the application. A window will open in front of you with a sentence such as “Login to your Google account.” In the first window you need to enter your login, or rather your mailbox address. It looks like this: [email protected], then click "Next". In the next window you will need to enter your mailbox password and click “Next” again. If your login and password are entered correctly, you will be asked to accept the privacy policy and click “I Accept.” All that remains is to indicate whether you need to save copies, and also enter your payment information. After all of the above, your account will be linked to your phone or tablet, and Google Market will open in front of you.
The second way is to do everything listed above in the settings of the phone itself. Click on the gear in the menu, find the “Accounts” or “Accounts” section on the screen, click on “Add an account”, select Google. Further actions are identical to those listed in the first option.

How to log into your Google account using a different login?
Let's say you've set up another mailbox and now want your phone to sync with the new account. What to do? First you need to delete the old profile from your Android smartphone. And it's very easy to do.
As in the previous steps, go to the settings, alternately find the “Accounts” and Google sections there, then in the very top right corner you can see three horizontal dots, click on them, in the window that opens select “Delete account”. After confirmation, your Google profile is deleted from the device, you can now log in under a different login, as described above.

Why doesn't anything work out?
If all your attempts have failed and for some reason you can’t log in, try using the tips below and solve the problem yourself:
Before logging into your Google account on your phone, check your Internet or Wi-Fi connection.
Enter your username and password correctly. If you forget them, remember that it is always possible to restore this data.
Perhaps the problem lies with the phone itself. Try rebooting your device.
In the worst case scenario, resetting the settings may help. This measure will result in the loss of all files and user data.
So, now you know the answer to the question “How to log into your Google account?” We hope that the information presented in the article helped you.
On Android from the Google Play store, the user must have an account in this store. If you already have an account with Google, then when you first launch the application store, simply add this account, specifying the login and password for it, and start using this huge repository of games and other useful applications for your smartphone or tablet.
What is a Google Account
A Google account is a single access to all company services. For example, if you have created an email account on the Gmail service, then you automatically gain access to all Google services (including Google Play) under one login and password. If you don’t have an account or for some reason want to register on Google Play under a different account, you will have to create one.
Create an account on Google Play
Let's take a step-by-step look at how to register in the official Google app store.
- Launch the Google Play application on your device and click on the link " Or create a new account».

- Enter your first and last name in the appropriate fields (in Russian or Latin - optional). If you plan to sometimes buy applications with your bank card, then it is better to provide real data. If you only use free programs, you can enter a fictitious name. After filling in the fields, click the " Next».

- The account login settings screen will open, where you can create and enter a username (login) to log into your Google Play account. Unlike the first and last names, the user name must be entered strictly in Latin. Your login will look like "your made up name"@gmail.
com, For example [email protected]
. This will also be your email address in the Gmail mail service. Click the button Next».

- On the next screen, you must create a password of at least 8 characters and enter it twice to check for typing errors. Tap again on the button " Next».

- Here the registration system will offer to link your new account to your mobile phone number. The number may be needed if your password is lost or changed. It is recommended to link your account and phone number. If you do not want to provide a number or will do it later, then click on the link " Skip» to move to the next step. If the phone number is entered, then click on “ Next"and wait a couple of minutes for an incoming SMS with a control code. If the SIM card is in the smartphone from which registration is taking place, the procedure will continue automatically, otherwise the code must be entered manually.

- At the next stage, you will be asked to read the privacy policy, terms of use and accept them. You can mark your consent to subscribe to news from Google Play or unsubscribe from the newsletter.

- At the final stage of registration, you will be asked to set up payment information for in-store purchases or do this later.
Hello, dear readers of the blog site! Creating a Google account makes it possible to use all the numerous features of this search giant in full. This is very convenient for ordinary users, many of whom use, for example, a mail server from this search giant for their needs. I'm not even talking about webmasters or Internet entrepreneurs, for whom having a Google account is vital.
The Google account system is built in such a way that once you register, you get access to all services at once, while simultaneously purchasing a mailbox on GMail, which I use myself and which I consider the most optimal and reliable in every sense. Moreover, Google does not regulate the number of accounts you can create.
That is, if you have one account, you can add several more to it at any time, registering a new email each time. By the way, exactly the same mechanism applies when registering in Yandex. Below we will analyze all the necessary details of obtaining a Google profile in detail, so that if possible there are no dark spots left.
How to create a Google account for your needs
So, we begin the operation to get an account on Google. Registration is carried out on a special page, where you need to fill out the form provided there, in the first part of which you need to enter your first name, last name and login as part of your email:

Naturally, your mailbox will be located on the Gmail server; this service is part of Google applications. However, of course, there must always be an alternative, since users will not understand the lack of choice. In this case, if you do not want to create your own mail on GMail, then you need to click on the link “Use current email address.” mail." Then the form will take a slightly different form and you can enter your email, which will further serve as your login when logging in:

Please keep in mind that in this case, when registering, you will have to confirm the address of such an email. An email will be sent to the specified mailbox containing a link that you must follow to confirm. But, I repeat, such additional steps need to be made only if you do not want to register your mail with GMail.
However, in my opinion, the Google account you create requires the presence of a Gmail email account, if only because it is much more convenient when using various Google applications and services. In addition, the interface and settings here are constantly being modernized and, most importantly, the Google email service is very reliable in terms of security, which I will talk about in more detail.
So, if, after switching to entering your current email, you suddenly change your mind and decide to use Google mail after all, nothing prevents you from simply clicking on the “Create a new GMail address” link. We go further and in the next block of the registration form we enter the password twice, as well as our date of birth and gender:

Please note that your date of birth will not be publicly available without your consent. Of particular note is the need to make the password as complex as possible, since this directly affects the security of the future account. For my part, I would dare to recommend Kipas in this regard, which I have been successfully using for quite some time. But let’s continue filling out the Google registration form:

First you need to enter your mobile phone number and, preferably, an additional email. This information will not be superfluous in terms of increasing the level of security. For example, if you forget your password or somehow lose it, you will receive the data necessary to restore access to your Google account via SMS. A backup email address also contributes to increasing the level of account security and can also be used to receive notifications.
Next, enter the captcha in the appropriate line “Enter text” and proceed to the final part of the registration form, where you need to select the country (the one in which you live will be automatically indicated), and also tick your agreement with the terms of use of Google services and the privacy policy:


However, you can easily ignore this suggestion at this stage and upload the photo later. This can be done at any time using the appropriate options on your profile. Therefore, you can immediately click on the “Next” button. The result of this action will be the realization that you have managed to create a Google account:

After clicking “Forward” you will find yourself on a web page from where you can access all applications, services, settings and other necessary services:

Perhaps for some it will be easier to absorb the information from the video. Therefore, I provide a video on the topic of creating an account in Google:
Well, given the level of modern technology, it’s not superfluous, I think there will be a video about creating a Google account for mobile devices based on Android:
Login to Google account and basic settings
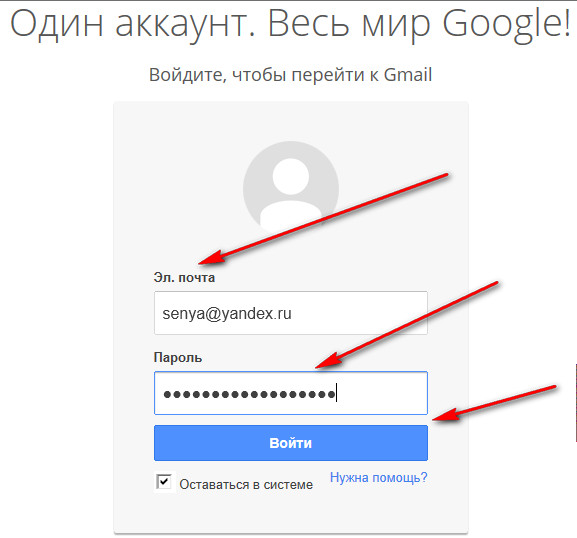
So, in the example above, we have determined how to register a Google account. You can log into your UZ right away by clicking on the silhouette in the upper right corner and then clicking on the corresponding link (in the future you can log in from the authorization page):

As you know, Google allows you to create as many profiles as you want, corresponding to different GMail mailboxes. If you receive several accounts, then it is possible to make multiple logins by logging into them simultaneously and switching between different accounts, which is very convenient when working:
After logging into your account, you can go to settings, thereby defining your preferences. By the way, I really like the interface, both in terms of ease of perception and in terms of the breadth of possibilities that are provided. Therefore, I, perhaps, will not describe in detail all the possible options, everything is intuitive here, I will tell you in general terms and will only dwell in more detail on those points that seem to me the most important.
IN section "Personal data" First of all, you can add a photo if you did not do this during the registration process:

All possible editing on the left side of this section is connected in one way or another with the settings of the profile options automatically created for you in, which is gaining wild popularity, which is not surprising, considering under whose powerful wing it is located. But we will talk about this in more detail in a separate article, since there are many nuances there.
On the right side basic data, which were specified during the registration process (e-mail address and telephone number). To change this information, you just need to click the “Change” button and edit what you need on the newly opened page.
In the "Language" tab select the main interface language, as well as languages that should be excluded from translation when working with text. Here you can also define the keyboard input method. You press the appropriate buttons and you immediately get the result, nothing complicated.
How to ensure maximum Google account security
I think everyone will agree with me if I say that the most important aspect of any closed systems is their reliable protection from outside attacks. Therefore, now I’ll tell you in more detail about the measures that can be taken to improve the security of your account and preserve confidential data.
First of all, go to the “Security” section of your account settings. In the first block, one of the options allows you to change your account login password at any time. To do this, just click the “Change Password” button:

A major step towards enhancing security is to enable two-step authentication, which is disabled by default. Click “Settings” and go to the web page for starting to activate this option, where its advantages are presented in pictures:

As you probably understand, in short, the essence of this method is that when logging into your Google account, in addition to the password itself, you will also have to enter a code that will be sent to your mobile phone. So, click on the “Start setting up” button and, as a first step, indicate your cell phone number:

You can also choose the method of receiving the code (voice or SMS). Then ask to send a verification code. Once received, enter it in the appropriate line:

Next, make a “Confirm” request. In the third step, you will be asked to consider this computer reliable. This is necessary so that the next time you log into your account from this computer, Google no longer sends a confirmation code each time:

The last step is devoted to the final activation of protection in the form of two-step authentication:

After this action, a page will open where further suggestions for optimizing the security system will be given. I advise you to study them carefully, since these settings not only allow you to increase the level of protection, but also make it possible to always have a backup option if unforeseen difficulties arise.

Let's see what else can be done to obtain optimal security and prevent unwanted situations from occurring:
- Create codes in the application - when you try to log into your Google account from another computer, phone or tablet, you will be asked for a verification code, which can be obtained using the Google Authenticator program. If any difficulties arise, there is still an alternative to order the code via SMS or voice message. This application can be downloaded from the official Google Play page;
- Add a phone number - if the main phone is unavailable for some reason (breakdown, theft, etc.), then you can use a backup option in the form of another mobile phone, to which a code will be sent. The more additional numbers you add, the more you will insure yourself against force majeure. For each phone number, a confirmation operation similar to that described above will be performed as part of two-step authentication;
- Print or download backup codes - This option is intended for those who are away for a long time and cannot use the Google Authenticator app or phone at some point. To begin with, 10 codes are given; the used codes cannot be used further; in the future, it is possible to generate additional code numbers. All this is on the page that you will be taken to if you follow the “Show backup codes” link.
In the same “Security” section there is a settings block "Account access". If you click on the “Entire list” link, you will be taken to a page where a list of all web resources and applications that in one way or another have access to the account will be given:

If you have bad suspicions about them, then you can easily and simply block their ability to use your UZ data by selecting an object on the left side and clicking on the “Deny access” button on the right.
Next. If in the section "Recent Activity" follow the “Entire list” link, you will receive all the necessary information about all actions related to the security of your account (attempting to log in or changing your password). If some action seems suspicious, for example, logging in from a browser that you have never used or a time when you could not perform such an operation in any way, you can draw the appropriate conclusions and take the necessary steps to correct the situation. Let's say, in this case, it is advisable to immediately change the password.
In another subsection "Recovery and Alerts" You can configure to receive messages about suspicious activity. Click on the “Change” link opposite the inscription “Send reminders to phone”:

We check the boxes next to the alert types, as a result of which you will receive SMS from Google on your mobile phone if suspicious actions are detected on the part of third parties in relation to your UZ.
How to manage data, delete and restore your Google account
Tab "Data Management" allows you to make a wide variety of settings that you need. For example, the “Storage Space” subsection provides comprehensive information about the volume of files stored (on Google Disc, on GMail and on Google+ Photos).
The free plan allows you to use up to 15 GB of disk space. Agree, this is a lot for the average user. Well, if you want to add free space for a specific purpose, you will have to switch to a paid option by clicking on the “Change tariff” link.

In the same tab there is such an interesting option as “Google just in case”. In fact, this is a will in the most literal sense of the concept. After all, anything can happen in our lives, so you can make a list of people to whom all your “property” in the form of photos, files and other data will be transferred if the account is inactive for a certain period of time, which should be set in the settings.

So, first, we set up the inactivity period, then add trustees who will receive all the account information in your will. Click on the appropriate link and follow all the steps according to the instructions, which are very easy to understand.
I note that it is possible to set up an autoresponder for this GMail mail, which will send a specified message to all recipients who write to you after the period of inactivity has expired. If after a specified period the account must be liquidated, left-click the empty cell opposite the “Delete account” option, and then click “Enable”.
In the subsection of the same name in the “Data Management” tab there is a link “Delete account and data”. After clicking on it, carefully read the warning, since deleting an account is a responsible decision.

So, we looked at how to delete a Google account, now it’s time to understand what steps need to be taken to restore it. I mentioned this possibility above in the text during the description of registration. This may be necessary if suddenly an unpleasant situation arises associated with the loss of a password or, even worse, with the seizure of an account and loss of access to it.
Google cares about the safety and security of its users’ data, so you can restore your account only when it is one hundred percent sure that you are the owner. That’s why during registration we indicate the recovery parameters, which in this case are an additional e-mail and phone number.
You can restore access to your Google account. If you can’t figure something out, you will get answers to your questions and options for action in a given situation at this And this help pages.
All Google apps and services
Google has a whole bunch of a wide variety of services and services, as they say, for all occasions. Almost every user will find in this list the necessary application to solve a particular problem. Therefore, when talking about creating an account, I cannot ignore this aspect. I suspect that at the moment, the most complete list of services is located on one of the Wikipedia pages.
Now let's go to our account and click on the icon, which will call up the default set of icons, each of which represents a specific Google service or application:

By clicking on the selected icon, you will be taken to the page of the service indicated by this picture. If you click on the “More” link, you will get a couple of additional icons:

A new link “Other offers from Google” will also appear here, by clicking on which you can go to a new web page, where there is an expanded list, which, however, is also far from complete (you will get a more voluminous one if you visit the Wikipedia page using the link provided above):

To add a particular application to the initial registry for convenience, which appears when you click on the icon in your account, you need to go to the page of this service after logging into your account:

Now in your UZ you should click on the inscription “Add a shortcut”, as a result of which the icon of this Google service will be present in the collection along with other pictures.