Change network category in windows 7. What is the difference between public and private networks
In Windows systems, starting from the seventh version, it has become possible to set a specific type for connections or networks used to access the Internet or combine computers, which is sometimes extremely necessary, since the default settings for accessing computers installed by the OS can vary quite a lot. Next, let's look at how to change the network type in Windows 10 by all available methods, and also dwell on why all this is needed at all.
Some user misconceptions about setting the type of networks
But first, let's take a quick look at some common user misconceptions related to choosing the preferred type of network (connection). For some reason, most ignorant users believe that a private network or connection, compared to a public (public) one, has a higher level of protection, since everyone who is not too lazy can use a public connection, and only strictly defined people with their computers can use a private network, laptops or mobile devices.
In fact, it isn't, and here's why. If you change the network type for a public connection in Windows 10 to private, the system will automatically allow access to all computers that are part of the Network Neighborhood. But when setting the network type to public, the security settings will have more restrictions regarding access.
The feasibility of using private (home) and public (public) networks
As it is already clear, the main questions concern just the general access to computer terminals or mobile devices that can use the established connection. But why then might you need to change the type of connection used?
Actual steps to install a private type of network are only in the case when several computers are combined into one network, and for them it is necessary to minimize restrictions on file sharing, the speed of their transfer between computer devices, etc.
In the case of using a public connection, any device is protected much more strongly, but at the same time, the interaction of such terminals with each other is minimized, which in some cases may even affect the possibility of remote access (for example, when using the connection functions with a remote "Desktop") .
How to change the network type (public / private) in Windows 10 in the simplest way?
The theory seems to have been sorted out a little. Now let's move on to practical actions. So, let's look at how to change the network type in Windows 10 in the simplest way. To get started, use the "Network and Sharing Center" and see what type is set as the current value. If you have the latest system upgrades installed, you can only change the network type in Windows 10 from the corresponding section of the options menu.
In the Network and Internet section, select the status item, and then change the connection type in the advanced options.

In systems without such upgrades, you can use the advanced settings directly in the desired section of the Control Panel.

For each type of network, you can also use personal settings (for example, enable network discovery and access to shared files or directories for both private and public networks, and the networks themselves will differ only in name).
How to change network type "Home" to public in Windows 10: alternative method
Another method to change the type of connection being used is to apply the wireless connection settings (if any).

In this case, you need to select the Wi-Fi section, check the box for the automatic connection within range option, and also deactivate the option to allow computer discovery on the network. If there is no such item, you can set the required parameter in the "Control Panel".
As it is already clear, in Windows 10 you can change the type of the “Public” network to a private one by performing the reverse steps, although, based on the foregoing, when sharing a computer for both types of connection networks, they will not differ at all.
Changing the connection type by resetting the network settings
Another technique that can sometimes also be used. In Windows 10, you can change the network type by clicking the network reset link in the main network and internet section (in settings).

After that, an automatic reboot of the system will follow, and after the restart, a request will be issued to identify a specific connection with the installation of one of the preferred types.
Sometimes you can use the creation of a homegroup to perform such actions. When you change your network location, you will be prompted to enable sharing. If you answer yes, the home type will be set, if you answer negatively, the public type will be set.
Group Policy, Registry, and PowerShell Use Cases
Finally, let's look at more complex methods.

To change the network type, you can use group policies (gpedit.msc), find the "Network Manager Policies" section in the security settings, go to the settings properties, and on the network location tab, set the desired type and set permissions for users.

In the registry (regedit), follow the HKLM branch to the NetworkList folder, go to the Profiles subsection and use the directory whose name begins with the profile identifier. On the right, the Category key is set to 0 if it is a public network, 1 for a private network, and 2 for a domain network.

Finally, in the PowerShell console, launched exclusively with admin rights, you can enter the command presented above, and add the attribute Private for a private network or Public for a public network separated by a space.
For all three last options for changing the type of connection used, a subsequent restart of the system is mandatory.
Data security is a priority for any computer network. Windows developers are well aware of this, so they created special profiles for network connections. Profile selection appears the first time you connect to the network. But what if you accidentally chose the wrong item or did not know what to indicate. The solution is quite simple - you need to manually change the network profile. This and other useful things will be discussed later.
The importance and necessity of changing privacy settings
In Windows, you can distinguish between private and public networks. The fundamental differences lie in the restrictions imposed. In private networks, they are minimal, because it is assumed that access from the outside is limited, respectively, nothing threatens the security of your data. There are more restrictions on public networks to improve security.
A private network must be installed if you have full control over it. This will allow you to take full advantage of all the advantages of the network:
- file exchange between nodes;
- using a shared printer;
- creating a multimedia DNLA server.
If data security is a priority, or you, for example, connect to Wi-Fi in an office, college, or any other public place, then use only the public network profile. This will allow the built-in firewall to protect your personal data from possible encroachments of other users on the network.
Please note that when connecting to an Internet provider directly without using a router, it is recommended to set the "Public network" profile. Other network members can theoretically access your computer, although the ISP should provide a high level of security. This profile makes the computer "invisible", making it harder for malware to infiltrate the system.
For these reasons, it is extremely important to set the correct network profile. Incorrect settings can either limit functionality or expose your computer to the risk of hacking and loss of personal data.
How can I change the network profile in Windows 10
"Ten" boasts sufficient flexibility of settings, therefore it allows you to change the network connection profile in several ways. For ordinary users, we recommend using the standard Windows settings using the OS interface. In rare cases, problems occur, so there are a number of alternative methods, for example, some use the registry or Windows Shell. These and other methods will be discussed later.
Using default settings
The network connection interface allows you to change the network profile in virtually one minute. We will look at the change options for local Ethernet and Wi-Fi connection. The scheme of the procedure is general. Here the differences are only in the windows that open.
When connecting with Ethernet
If the PC or laptop is connected via a wired (Ethernet) connection, then to change the network profile, you need to do the following:
As you can see, the process is maximally simplified, while not presenting difficulties. The profile change happens instantly, so there is no need to restart the computer.
For Wi-Fi connection
The user needs to follow the following instructions when connecting to the Internet through a Wi-Fi hotspot:

When using Wi-Fi at train stations, cafes or offices, be sure to set a public profile. This action will not take more than a minute, and you will provide increased security for your system.
Through setting up homegroups
If for some reason the methods presented above do not work, we recommend that you try changing the profile through the homegroup settings. This section greatly simplifies the process of sharing resources with users. The function is able to set up a network connection, open folders for public viewing, and much more. This section in the OS can also be used to change the type of network from "private" to "public", and, if necessary, back.
To do this, users need to follow the steps of the following instructions:

Don't forget to apply the settings for the changes to take effect. This is an alternative method how to change the profile.
Reset network settings
As many have already understood, the request to select the type of profile appears only once, i.e. the first time you connect. Already after the profile is set according to the selected answer. You can change it only through the settings, as described earlier. However, you can call the pop-up menu with the profile selection again. To do this, you need to perform a reset. This procedure is completely safe and will not affect any user data. To implement it, follow the steps:

For the procedure to succeed, you need to restart your computer. After that, the system will detect a new connection and prompt you to select a profile again.
Via local security policy
Another alternative way, which involves using the local security policy section. To complete the setup, you should:

Setting the user permission is necessary for the settings to be active and not be reset.
Via Windows PowerShell
Windows has a special tool for automating processes, which is a command line with an interface. The tool will help you change the privacy settings, but this method is only suitable for advanced users, as it is supposed to work with PowerShell. In the console, you just need to enter the command
to install "Private Network". To change your profile to public, change the word "Private" to "Public".
July 20, 2015Two ways to change the network type in Windows 8 will be described below. Changing the network to private in Windows 8 has become more difficult than it was in Windows 7.
Windows, starting with Vista, uses the network profile mechanism to group network settings.
In Windows 8, these profiles are called " private network" And " public network".Profile" public network" imposes restrictions on data transmission over the network and the operation of network programs. Profile " private network" has fewer of these restrictions and allows you to use file and printer sharing, as well as network programs.

By default, when you connect to a new network, Windows assigns it a " public network". At the moment of connecting to a new network, Windows 8 issues the following request:

If you click the "Yes" button, the network will be assigned the type " Private". But if you click the "No" button or ignore this prompt, then Windows 8 will assign this network type " Public".
If only the Internet is distributed through the network, then the type of network is not important. However, when using shared resources on a local network, the type of network profile already matters. You may need to change the network type (profile) from "Public" to "Private" to reduce restrictions on this network. For example, to create a homegroup, the network type must be set to profile " private network".
In Windows 7, you could change the network profile directly in the Network Control Center, but in Windows 8 this feature was hidden quite deeply. And now, how to make the network private under Windows 8 is not at all obvious.
Change network to private via Windows 8 settings
On Windows 8, you can change the network type through the settings, but this is done now (unlike Windows 7) is quite difficult. If you do not know where this setting is hidden, it is unlikely to be found. The chain of action is long.
First you need to open the Windows 8 sidebar (for example, using the keys Win+I) and there click on "Change PC settings":

Then click on " Net":

Then click on "Connections", and then, in the right panel, click on the icon with the name of the desired network:

The next screen will have text and a network type switcher:

Position " Off" changes network type to " Public".position" On" changes network type to " Private":

This is how they dug deep into the network type change in Windows 8.
Change network type through local policies
Open local security policies. This can be done slowly via the GUI, or quickly via direct launch:
- Or through the Control Panel - Administration.
- Or Windows + R on your keyboard, then secpol.msc and Enter.
There you need to open the "Network Manager Policies" policy key and in this key open the policy that has the same name as the network you need (in the first screenshot of this article):

Then, in the properties of this policy, open the "Network location" tab and specify the location type and user permission there:
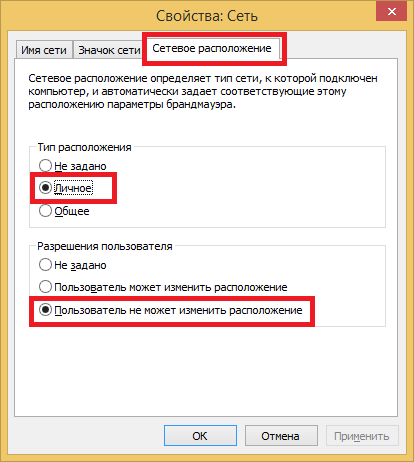
Note! If the user's permission is not set exactly like this - "User cannot change the location" - the setting will not work.
How to make a network private in Windows 8 through the registry
It may be easier and faster to change the network type through the Windows 8 registry. But this is not safe.
Find the key in the registry HKLM\SOFTWARE\Microsoft\Windows NT\CurrentVersion\NetworkList\Profiles.

This key must contain at least one key with the view name (84464.....E00). Each such key corresponds to one network that is displayed in the "Network Control Center". You can find out which of the keys is associated with the desired network using the " ProfileName". This parameter contains the name of the network that is displayed in the "Network Control Center". That is, if in the "Network Control Center" your network is called "Network 2" then you need to look for the key that has the parameter " ProfileName"equal to value" Network 2".
If you have several networks in the "Network Control Center", then by parameter ProfileName" you can find the desired key in this key, you need to change the value of the parameter " Category". This setting specifies the network settings profile to be used for the network.
Sometimes a user, even a completely inexperienced one, needs to change the Windows network type.
Why and how to do it correctly so that everything works correctly?
What is a network type
Read also: How to set up a local network on Windows? The simplest ways

The network can be home (private) and public.
Other users can connect to the public network, while the home network is limited to you personally, your environment and is a reliable means of protecting a computer or laptop from intrusion.
Each of them has its own advantages and disadvantages.
The first time you connect a new network, Windows will ask the user for permission to automatically connect to the public network.
That is, a network that will not allow other users to find your PC or laptop when you are in a public place.
For a laptop, this is especially useful. In fact, no one will be able to connect to you, view your data, organize a group without your permission and in general, this is a very reliable means of protecting iron.
But if you are a user of a personal computer, the system unit from which, unlike the same laptop, you don’t want to drag anywhere, then the home network will be more useful.
It gives access to all the devices in your home and those to whom you have allowed it, but at the same time hides the computer itself from other people's users and allows you to easily share files and data within your home network.
In fact, both are useful in their own way, each has advantages that are needed at one time or another. But at the same time, you can choose only one of them as “working”.
But how to do this if the wrong one is currently set by default?
How to change network type in Windows 7
Read also: Unidentified network without Internet access: How to fix it?

The permission to automatically select a network has already been mentioned above. Windows literally forces the user to choose whether he wants the computer to be visible on the network or not.
If the user answers "Yes", then the network becomes private, uniting the devices. If "No", then closed from other public devices.
Moreover, it happens that when you first connect, the system itself selects the type of network, and this is fraught.
The user, most often, will eventually be forced to change it. And here comes the question of how to do it.
On Windows 7, changing the network is much easier than on the others, since, for example, even on the G8, these functions are hidden much deeper, but the ability to switch the network is almost tightly hidden.
And if you have Windows 7, whether home, professional or any other, you can change the network type to home and vice versa in a few clicks:
- At the bottom we find the network connection icon. It's on the taskbar, to the right, and looks like either steps in profile or like a computer monitor with a cord.
- Click on it to open the menu.
- And in this very menu, select the item: “Network and Sharing Center”. After that, a window with connection settings should appear.
- To avoid problems, it’s better not to touch anything superfluous, but very carefully click on the inscription “Home network” or “Public network”. One wrong click in this menu can bring down the network connection completely.
- And finally, in the window that appears, change the network to the one that is needed at the moment.
As you can see, working with the network in Windows 7 is quite simple, but now the eighth version in this regard becomes a little more complicated.
Read also: 5 Tips for Setting Up the Windows Page File (7/8/10)

Difficulties begin with the fact that the “Home Network” is now not “Home” at all, but “Private”, and along with the changed name, some changes have come in the operation of these same networks.
For example, the “Public Network” now not only restricts the computer from illegal intrusion or legitimate, but unwanted connection, but also restricts the user from working with the network - it becomes an order of magnitude more difficult to transfer data.
Well, in the "Private Network" there are advanced functions for connecting to printers and other devices.
Windows 8 also has a network setup prompt, asking the user if they want to automatically connect to devices.
This determines the type of network and its functions. For example, to connect a TV, tablet or any other device that needs the Internet, the type of network does not play a special role, but when exchanging files, data, or creating a home group, “Private” must be selected.
Yes, in Windows 7 you could change the network in a few clicks, but here you have to suffer longer:
- The first step is to open the sidebar. Even no, it's not. The first thing to do is to find it. If you succeeded - fine, if not - then the keyboard shortcut Win + I will help.
- Just below the icons and icons is a menu with the name "Changing computer settings", which you need to click on.
- Then you need to select the item "Network", and after it - "Connections".
It remains only to select the icon with the name of the desired network and click on it. It would seem that the most difficult is over, but no.
Consider that you are a knight who has reached the castle, but still has to find the princess. And this same princess is under the inscription "Search for devices and content", in the form of a small switch.
If you select "On", then the network will be private, well, if "Off", then public. Difficult? Yes. But there is another way.
Changing the network through local policies
Read also: TOP 15 Best Free Antivirus for Windows | Ranking 2019

This is not to say that this method is much simpler, but for some it may seem like an easier option for changing the network.
And, in the end, it's a bit faster:
- First of all, you need to open the local security policies. You can do this if you enter "Start", and then in "Administration" where you need to select the appropriate item.
You can do this much faster if you hold down the keys Win + R, then enter secpol.msc into the line that opens and press Enter. Then the desired window will open instantly
.- In the window that opens, in the list of folders on the left, we find.
- And then on the right we are looking for the name of the network that you want to make working - private or public.
- Right-click on the desired name, select "Properties".
- Need to open tab "Network location".

And finally, Windows 8 and Windows 8.1 also have a third, albeit very unusual for the average user, method.
Also, it's not very secure, but it's a bit easier than the previous two network change methods.

Find the key in the registry HKLM\SOFTWARE\Microsoft\WindowsNT\CurrentVersion\NetworkList\Profiles.
Each such key corresponds to one network, which is displayed in "Network Control Center".
You can find out which of the keys is associated with the desired network by the "ProfileName" parameter.
If in "Network Control Center" your network is called "Network 1" then you need to look for a key that has a parameter "ProfileName" equal to the value "Network 1".
In the desired key, you need to change the value of the parameter "Category". This setting specifies the network settings profile to be used for the network.
The values of the "Category" parameter can be the following:
- 0 - "Public network".
- 1 - "Private network".
Change the "Category" parameter to one of these values and close the editor. If immediately after this the network type has not changed in "Network Control Center" then restart windows.
If everything was done correctly, then the network you need will immediately appear in the menu.
It seems to be very difficult, right? But it's not that hard if you try it, although it certainly looks like a real puzzle compared to Windows 7.
And if everything is so complicated with the “eight”, then what can we expect from the “tens”?
Each Wi-Fi or Ethernet network is designated as a private network by Windows 10. (she's home), or public (public) network. Depending on the assigned network profile, the default settings for a specific connection (network) change. There are settings for sharing files and printers. Which determines whether other devices will see your computer on the local network.
When we connect to a Wi-Fi network for the first time, or connect the Internet via a network cable, Windows 10 asks us: "Do you want to allow other computers and devices on this network to discover your PC?".
If you select "Yes", the system will assign this network the status of a home network. And if you choose "No" (or choose nothing)– the network profile "Public" will be assigned.
You can view the current network status in the Network and Sharing Center.

In the settings, you can always change the public network to your home network, and vice versa. But first, let's find out what the difference is in general, what the network status affects, and what problems can be if the network location is not set correctly.
What is the difference between home and public network?
As I wrote above, the difference is in the sharing settings that are applied to the network by default after assigning a network profile to it. It's simple:
- Private network, or home - the computer will be found on the network by other devices and file and printer sharing will be available. Of course, it is recommended that you only assign this network profile to a Wi-Fi network, or an Ethernet connection, if you trust the network itself. For example, they are connected to their home network, at work, etc. And if there is a need for the computer to participate in the local network.
- Public network, or public - it's the other way around. For this profile, the default settings are set so that your computer will not participate in the local network. It will not be detected by other devices on the network and will be protected as much as possible. When we connect to open, unknown Wi-Fi networks, or even directly via a network cable from a provider, it is recommended to set this particular network profile.
Sharing options can be changed individually for each profile. Or at once for all networks. You can do this in the control panel. At: Control Panel\All Control Panel Items\Network and Sharing Center\Advanced sharing settings

These settings can be useful for example with . But it is better not to change the parameters unless necessary. Especially in the section "All networks" and "Guest or public".
By the way, take a look at the screenshot above. Near the profile that is selected for the network to which you are currently connected, there will be an inscription "current profile". These are already parameters of network profiles. And we have an article on a slightly different topic. Now I will show you how to change a public network to a private one and vice versa in Windows 10.
Which network profile to choose?
If your Internet is connected via a cable from your home router, you can select the "Private" profile. And if the Internet is connected directly from the provider, then it is better to set "Public".
As for Wi-Fi networks, everything is simple here. If you trust the network (at home, at work, with friends) then you can select "Private". And if the network is somewhere in a cafe, hotel, store, etc., then of course we prohibit general access by selecting the "Public" profile.
Change profile from public to private (or vice versa) in Windows 10
There are several ways in which you can change the network type. Let's look at the simplest one first. This method is suitable for both Wi-Fi networks and Ethernet connections.
Open the settings, then go to the "Network and Internet" section. On the Status tab, click on Change connection properties.

And just change the network profile to the required one.

All is ready.
How to change the network profile of a Wi-Fi network?
Get to the settings as quickly as possible. Click on the connection icon and select "Network and Internet settings".


Change your network location.

Once configured, the computer will either be online or hidden.
Setting up a network location for an Ethernet connection in Windows 10
As I wrote at the beginning of the article, for an Ethernet connection (via network cable) you can also change the network location from "Public Network" to "Home Network". And in reverse order.
In the same way, go to the settings and in the "Network and Internet" section, you need to open the "Ethernet" tab. Click on a connection to open its settings.

It remains only to select the desired profile.

Instead of configuring a network profile, there may be an item "Make this computer discoverable". If you set the switch to the "Off" position, then the computer will not be discovered on the network (Public network). And if you put "On", then the profile "Private network" will be applied.
Some nuances
It is not uncommon, due to an incorrectly selected network profile, that it is not possible, for example, to configure. Since the TV simply does not see the computer on the network due to the "Public" profile set. Or you can't set up file and printer sharing. Therefore, in the network where you plan to exchange files, access media content from other devices, you need to activate the "Private" profile and, if necessary, configure it additionally.
For your security, always prevent other computers from discovering your computer on a network if you do not trust the network and cannot be sure that it is secure. Just activate the "Public" profile, or click "No" in response to the question that appears immediately when you connect to the network.