Detailed instructions for installing any script on any hosting. How to install the PHP program Configuring Apache to work with PHP
Do you want to feel like an administrator? BUT! How to install a script (hype, bux or other)? In this article you will find all the answers.
Hello dear readers of the blog site.
Do you want to have your own investment game? Do you want to feel like a project administrator? Don't know how to install the script correctly? Don't worry... In this article, I will tell you all about it in detail.
So let's go...
First of all, I would like to say where you can download such scripts from. I have identified three projects for myself, which, in my opinion, are the best and without viruses. You can find out about them in my other article. Link .
We downloaded the finished script, which is in the archive. Open it and copy all the files to a separate folder. Next, we need to buy ourselves hosting and a domain. I use hostia. High quality, reliable and most importantly, very cheap. In one word, I recommend.
I won't dwell on it because not every hosting has the same control panel.
My hosting supports Direct Admin, but be aware that you may have a completely different management system (for example: ISPManager, ZPanel, WHM/CPanel). If you have one of them, then there is nothing to worry about. The whole script installation process is no different.
Instructions for installing the script (investment game, hype, bux)
Step 1. Upload the script itself to the hosting
For this we need one of the programs: FileZilla(I recommend), Total Commander or Notepad++. We download any to our computer, run it and create an FTP connection. I forgot to mention that hosting control panels also have a "built-in" file uploader. You can use it. I chose FileZilla for myself. The program is stable and completely free.
As for FTP, here we need some data that can be obtained from your host without any problems:
- Login.
- Password.
- IP Address.
If there are problems with logging into the admin panel, write in the comments. Help!

Waiting for the download to complete...
Step 2. Create a database
Go to the "Databases (MySQL)" section and click "Create New" or "Create Database". We write down the name and password. Fields: Database name And DB Username can be filled in the same way. Attention! Remember your username and password or write it down somewhere. We will need them when we modify the config. Using an example, I will show how it looks in Direct Admin. See:


Step 3. Import SQL into our database
Each script has a file in "SQL" format. Perhaps there may be exceptions and there is simply no such file. I don't know, I haven't experienced this. But! If you're that lucky, then just skip it (see Step 4).Now we need to find in our personal account " PhpMyAdmin". The utility is used to import or edit MySQL DBMS databases. We go into it, connect (if there is no account, then we will definitely go through a simple registration).
We go in, and on the left we see a list of the databases we created. We select the one that was created in the second step. And then we do everything according to the screenshots:


Step 4. Modify the file config
In the folders of the script, we are looking for a file called config. In HYIPs, look for the file in the "classes" folder. Found? Great! We open it. We see:
public $HostDB = "localhost";
public $UserDB = " DB Username"
;
public $PassDB = " password"
;
public $BaseDB = " Database Name"
;
Replace your data and save. With this, we have connected the script to our database.
All friends! I congratulate you! The script is fully installed!
Now for a little addition...
Free scripts from the Internet often come with holes. Be careful! Check files for viruses. Also remove any extra references in the script files. They often look like this:

But still, if you are unable to install the script, we can do all the work for you. For example, install a script of any complexity, connect additional payment systems, make the script unique, etc.
Thank you very much for reading the article to the end. . There will be many more delicious treats to come!
As you all know, the uCoz system has made it easy to buy a format where you can install PHP scripts on your site. You only need to pay for the optimal package, it can be one month or more and it automatically comes with it, which was not there before and had to be bought separately. And from this it turns out that now more and more web masters will put them on their portal. Since they are functional in their structure and work in a completely different way, and if you put a plus, then they will immediately appear and you do not need to reload the page.The first thing to do is download the program FileZilla is a free FTP client and you don't have to pay anything and it's very easy to work on it.

I couldn’t understand from the beginning, because I couldn’t install the script on the site, it says that it can’t be installed with this format. And then I read that when you activated PHP, a folder called scripts is automatically created on the hosting, but we need to create an activation from the beginning.
And this we go to the General admin panel - the main page and find the inscription PHP details there and click on it and a window will open and your host and login will be there, but there will be no password and it will be written differently. We click and go to a page similar to how we change the password for the admin panel, but in our case it will be a PHP panel and there we create a password and everything can be closed.
As we downloaded the program and we need it now, we launch FileZilla, and when everything is loaded, we need to write the login and password that we created, there will also be a port, but it is not necessary.
And this is how it should be.

When everything is set, click on Quick connect and you will connect to your hosting, where your scripts folder is located, this is purely your folder, under the password that we created. And we launch and see such a picture, on the left side we show all the folders that are on your computer, if you downloaded the PHP script, then it is in the folder and you need to find it, it is better to leave it on the desktop. And the main thing here is that we do not need to drag this script, as some do. Just read the installation description and it will say that the folder in which the script and the name will be written will be tediously dragged to the remote scripts folder we created.
We just need to click on it and drag it to our created folder, and we see that the download is in progress, and how it went, we read that the file is in place, then everything is fine.

That's not difficult, we uploaded the file, but sometimes they go with it for the root of the site, these are transitions, we need to put the pictures in the root, and the file itself as a folder, as usual. And we do all other codes in this format like this.
Also watch the video where you can understand what to do.
If you have any questions, I'll be happy to answer, thank you all.
Let's take a look at how to correctly set a PHP password on your site in the admin panel. But from the beginning you need to enter it and then click on General - Home page and a window will open, but we need the upper right corner, where we find PHP details and click on it to bring up the window.

In the window itself, there will be your host and login, but the third one, it will be written in red, that you need to set a password and click on this entry. Since it is installed and that's how it will be later.

I just can’t log in, because it’s installed, but it’s not connected on the test one, which means there won’t be such an inscription, we will take the FTP details as a basis, everything is like in PHP. In general, clicked and get to the installation page. We write down our invented password and answer the secret question that everyone should have when creating the site and save it and there is nothing more to do here.

And now we only need this password on the program itself to enter the system folder scripts that it is not on the site and is located on the hosting, and each has its own, under the password that we created.
Let's now move on to installing the PHP language version 4. Unfortunately, at the time of this writing, PHP did not have a proper setup program that could install PHP with all the modules we need in one go, as we did with Apache. So, perhaps, its installation will seem to you a little more difficult.
First of all, you need to be patient and download two files from the official PHP site http://www.php.net in the Downloads section: one with a zip extension, and the other with an exe extension. Links to these two files are near the top of the page, after the Win32 Binaries heading. The first file is a full version of PHP 4, but does not have a convenient installer, and the second, on the contrary, is an automatic installer, but does not contain the most commonly used modules.
Important!
That was the case at the time of this writing. Perhaps in the future, PHP developers will ship the distribution as one large exe file, but this is not the case for now.
I also advise you to download the complete PHP documentation, the link to which is on the page just below. I'm sure she'll help you out more than once in the future.
It is worth saying a few more words about the PHP version. The language is constantly being improved, and at the time of writing this article, the latest version was 4.0.3. Most likely, when you read these lines, a newer version will be released - for example, 4.0.10. I think the best solution is to download the newer one, because it probably fixes some bugs from previous versions of the language. The main thing is that the first digit is 4, because the third PHP is much inferior to the fourth in terms of the number of supported functions.
Installing PHP
Run the exe file you just downloaded. In the dialog box that appears, click Next.
Agree to the license terms by clicking the I Agree button. In the dialog box that appears, select the Standard installation type.
Now specify the directory where PHP will be installed. By default, C:PHP is suggested, but I think it would be more logical to choose C:Program FilesPHP4, "closer" to Apache. To specify this directory, press the Browse button and enter its name, then press the OK button as usual and then Next to proceed to the next dialog. (If you are a real programmer and like order, then do these steps for sure).
Enter your SMTP (Send Mail Transfer Protocol) server address and your email address. It is this server and return address that will be used for outgoing mail requests when PHP's Mail() function is called. In general, this is the same server through which your usual mail client, for example, Outlook Express, sends mail. However, you can leave the default values in the text fields - in this case, the Mail () function simply will not work on the local machine.
Select the server on which PHP will be configured. In our case, this is Apache.
The process of copying files will begin. After it ends, some more dialog boxes with various notifications may appear. Pay no attention to them.
Configuring Apache for PHP
Open the Apache configuration file httpd.conf in Notepad, in the C:Program FilesApache GroupApacheconf directory. However, you can not search for this file manually, but use the Edit configuration shortcut in the Start menu - Programs - Apache Web Server - Management.
Find the following commented line in it:
#AddType application/x-httpd-php php
Uncomment it:
AddType application/x-httpd-php php
Thus, we have given all files with the php extension the application/x-httpd-php type.
Immediately after this line, add the following settings:
ScriptAlias /_php/ "C:/Program Files/PHP4/"
Action application/x-httpd-php "/_php/php.exe"
With this, we firstly create a _php alias for the PHP processor directory so that Apache can access it, and secondly, we associate all files with type application/x-httpd-php with the php.exe handler.
Important!
The "_php" string is calculated so that it won't conflict in the future with directory names you can make on your host.
Save the changes in the configuration file, stop Apache if it was running before (shortcut Start - Programs - Apache Web Server - Management - Stop Apache), and start it again. If Apache doesn't start (its window opens and immediately closes), then you've made a syntax error somewhere. In this case, you can use the troubleshooting tips above.
PHP Testing
Let's now make sure the PHP scripts work. To do this, create a test.php file in the z:/home/localhost/www directory with the following content:
echo "It works!
";
phpinfo();
?>
Now type in your browser: http://localhost/test.php. This should display a page with a variety of PHP information generated by the phpinfo() function.
Important!
We remind you that php scripts are not the same as cgi scripts. In particular, if cgi scripts are usually located in /cgi-bin/ or /cgi/, then the php script should be in the documents directory.
If the page is not displayed, then you made a mistake in the httpd.conf file. Open it again and fix the error, then don't forget to restart Apache.
Stop Apache as described above. Otherwise, only the Apache window will close, and the server itself will remain running.
Installing additional modules
After we have verified that PHP is working, we need to install additional modules for it, which are located in the downloaded zip file. Among them - tools for working with pictures, calendar, FTP (File Transfer Protocol - File Transfer Protocol), etc. It should be noted that the archive contains the full version of PHP, and not just modules for it. The only reason we didn't use it right away was the lack of a user-friendly installer. So, you need to do the following.
Unzip the zip directly into the same directory where PHP is already installed (in our example it is C:Program FilesPHP4). Some files will be overwritten, some will be added. In particular, the extensions directory will appear, containing almost all the necessary modules.
Now we need to let PHP know which modules it can use, as well as some more settings. To do this, open the php.ini file in Notepad in the Windows files directory (usually C:WINDOWS). This file was placed there by the PHP installer. The file is a set of lines, each of which is set to the value of one parameter. Parts of lines after the ";" character are treated as comments and are ignored.
Find the magic_quotes_gpc setting and set it like this:
magic_quotes_gpc=Off
This prevents PHP from forcing backslashes before certain characters coming from the form.
Now find and configure the following setting:
extension_dir=C:Program FilesPHP4extensions
By this we tell PHP that it should look for modules in the C:\Program Files\PHP4extensions directory, that is, exactly where it is needed. Note that the default value for this parameter is "./", i.e. in the same directory as PHP. This, of course, is wrong.
Look for commented lines that start with ;extension=. You have to uncomment those of them that correspond to the modules we need. Support for MySQL and calendar functions is already built into PHP.
It should be noted that in the previous version of the article, the procedure for installing PHP3 was described, and not PHP4. However, progress is making itself felt, and in the near future PHP3, apparently, will be completely supplanted by its fourth version counterpart (this is evidenced by at least the fact that the latter executes scripts several tens (!) Times faster, while having almost 2 times more built-in functions). In addition, PHP4 is top-down compatible with PHP3, which means that most scripts written for PHP3 will work on the fourth version of the interpreter.
Today's note is designed for very beginner webmasters.
What do you need to run a PHP script?
This requires a web server and a PHP interpreter. All this can be obtained on your computer absolutely free. The server is not necessarily a separate computer. A web server is simply a program that can be installed on any computer, including home computers. However, it will not interfere with the operation of other programs and will not change the behavior of the computer. How to set up a web server under or is described in the relevant articles. And another article on how to make a local server available to everyone.
If there is no desire to install and configure Apache, then you can simply order hosting. If you are not just going to try something, but want your own website, then you definitely need hosting. This note will consist of two sections: running PHP programs on the local computer and running PHP on the hosting.
Installing and running PHP programs on a local server
After finishing the installation and setting up the server, go to the root folder of websites. This folder, for example, could be C:Serverdatahtdocs(such a directory for those who installed by). You can copy a file or files with the extension to this directory. .php. The peculiarity of launching these files is that they are opened not by double-clicking, as we are used to, but through the browser. If the copied file is called programm.php and placed in the root directory of the web server sites, it will be available at
If in the root directory we create another directory like school(i.e. C:Serverdatahtdocsschool), and put a file in it, for example classes.php, then this file will be available at the address in the browser
If we need to install not a separate file, but, for example, a forum or a message board or a blog. For example, you can take any script, I will take a fairly popular WordPress engine. Go to his website and download.
I have downloaded the file wordpress-4.1.1-en_RU.zip. Let's unpack it. Inside directory wordpress, and in this directory files:
If we want our blog to be available at http://localhost , then we need to copy the contents of the wordpress directory to the root directory of the sites, i.e. everything inside wordpress move to C:Serverdatahtdocs.
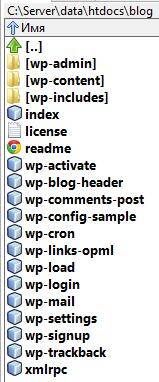
If there are many sites on our server (message board, forum, dating site, blog, etc.), then you need to copy them to a separate directory. For example, I create a directory
C:Serverdatahtdocsblog and in this directory I copy everything that is in the wordpress folder. It turns out like this:
Everything is ready, now in the browser we go to http://localhost/blog and see:
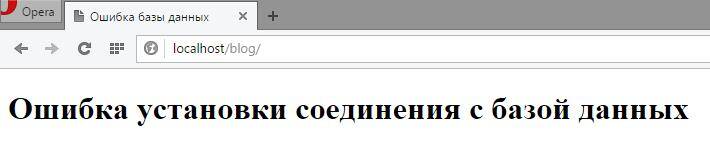
It seems that something is working, but definitely not in the way we would like.
Modern popular scripts have their own installer, or you need to manually write the data into a file (usually these files are called config.php and so on.). Let's not guess, but just open the file readme.html. And we immediately find the answer:
"Open wp-admin/install.php in your browser."
Those. in our case, the path to the future blog http://localhost/blog, add to it wp-admin/install.php, as a result we get the address

Just click "Forward".
In the next window, you need to enter a username and password. Note that this is the database username, not the blog owner. Usually, on the localhost, the username is root, and the password, if you have not changed it, is empty.
You also need to create a database. To do this, go to phpMyAdmin (http://localhost/phpMyAdmin/). There we go to the section " Database". Enter the name of the base and click " Create».

We return to our WordPress installation and click next.

On this window, simply click "Run the installation".

We enter the name of the site, the username (blogger) and his password - everything is clear. Press " Install WordPress” and everything will be ready - you can use the blog.

Installing and running PHP programs on hosting
First, we need hosting. The best hosting on which it works, including . Please note that a promo code has been entered: c79d4aad
Then you will get all the bonuses: a free month, a free domain, a discount when paying for a year, etc.
So, we already have hosting. Now we need to upload files to it. This can be done, for example, via FTP. I've been using FTP for a long time and, frankly, I'm not thrilled with this long outdated technology. An FTP connection can be configured, for example, in a file manager like (or Total Commander). There are specialized programs for communication using this protocol. I will not dwell on this in detail. Enough information. Just a hint where to find the site's root directory. For example, in my case it is here:
/site/blogs/htdocs/www/
Those. The site's root directory is located at:
your_domain/htdocs/www/
If you copy the PHP file progaramm.php to this directory, it will be available at
http://your_domain/progaramm.php
Is that another useful link - domain registration . Domains in some (not all) domain zones can be obtained for free if you pay for hosting for a year - keep this in mind.
Otherwise, the installation of PHP scripts on the server is exactly the same as on the hosting. If you still have questions - ask, we will figure it out together.