Download disk image creator. How to create an ISO disk image
In this article we will tell you how to correctly create an ISO disk image. Major difficulties usually do not arise during this process, although many people do not have the slightest idea what an ISO image is and how to create it correctly. In addition, they are afraid of doing something wrong and damaging their computer. It is these reasons that prompted us to write detailed instructions for actions that will help you create an ISO disk image quickly and without problems.
It is worth saying that an ISO image is much more convenient to use in your work than interacting with files and folders copied from an optical disc. Moreover, thanks to the creation of an image, the necessary operating systems and diagnostic programs contained on the original optical disk will always be stored on your PC. You just need to write all the information onto a blank medium or mount it using a virtual drive. But about everything in detail.
Create an ISO image using the CDBurnerXP program
Let's first define what is meant by ISO image?
ISO image is a slang, even "jargon" term for an optical disc image. It stores the entire file system (ISO 9660 standard), and therefore this term can be applied to absolutely any such image. In other words, it is a simple file, just like the usual Word file, only it has a more complex structure and is mounted using special programs.
Imagine: you have a disk with program files written on it. However, you cannot simply copy information from it to your computer and then write it to another disk. Or rather, this can be done, but most likely this program will not be able to work without failures or will not start at all, especially since some files in it are protected from emulation. The created ISO image will exactly repeat the structure of the desired disk.
Or imagine another situation: you borrowed a disc with a game from a friend for a while, but the hour of “reckoning” has come: you need to give the game back, but you haven’t opened all the locations yet. What to do? I can't copy the game to my computer because after transferring it from the disk it doesn't want to start. The computer urgently requires you to provide “optics”, which must be inserted into the drive. This is where a program that helps you create a virtual CD/DVD/BD drive will come to your aid. You play for fun and don’t worry about anything!
You are also familiar with the situation in which optical discs, to the great regret of PC users, cannot be stored for a long time. Creating an exact copy of the disk in the form of an ISO image helps to extend their life and insure yourself against unexpected loss of all data. To do this, you will need a special program designed to create an ISO image. We have already written to you about one of them, which is called Daemon Tools Lite. It not only records the image, but also helps you protect it with a password later.
Such programs can be both paid and free. Now we will look at the most affordable option - the multifunctional free program CDBurnerXP, which creates and burns ISO files. It can burn bootable disks and check all folders after creation, if necessary, converts nrg and bin files into iso, and can independently separate data from disks into parts and “scatter” them across several media. In addition, with CDBurnerXP you can burn both CD and DVD discs, even if they are dual-layer. For a program that is provided to the user free of charge, it has rich functionality and dozens of well-deserved awards.
The latest version of this program is available for download on the official website of the developer: http://cdburnerxp.se
First, we need to take a closer look at how you can create an ISO image from files and folders in this program.

When the program starts, select the first menu item that appears on the screen: Data disk. Click OK.

Find and then add all the necessary files to the created project. This is necessary in order to mount the ISO image.

Select a team by clicking the button File from the top menu. Then click along the chain Save project as ISO image. All that remains is to name the ISO image and then click on the button Save. As we promised, there are no difficulties in this process.
Let us consider in detail how the program we have chosen copes with this process.

Launch the program, then select a function Copy disc and press OK.
To create an ISO disk image in the desired format, you need to select the settings necessary for this in a new window. If your PC has multiple drives, mark the one where the optical drive was installed.
In Read Attempts, the optimal number of them is selected by default, so there is no need to change anything here. The checkboxes located below, or scientifically called “checkboxes” - Ignore unreadable data, Disable hardware error correction - are not currently activated. Do not change this condition because otherwise the resulting image will not work. It is necessary to activate checkboxes only when absolutely necessary, when it is impossible to create an image without their participation.
Decide for yourself where exactly you want to burn a copy of the disc: on another optical device or on your hard drive as an ISO image. If your computer has only one disk drive, you can select it as Source, and in quality Receiver. When these conditions are met, CDBurnerXP creates a temporary image file directly on your hard drive. When the original media is created, it will eject from the drive automatically. Simply insert a blank disc into the drive to write information to it.
As an example, let's try to create an ISO image of a disk by saving it on the hard drive. Just switch it to Hard Drive, then select a folder and name your file, simply checking the type you want. In our case, it is worth noting the ISO type.

Click: Copy disc.

As soon as the computer completes the received task, an ISO image of the disk will appear on the PC’s hard drive in the specified folder. If necessary, you can burn it to disk using the CDBurnerXP program.

Unfortunately, despite all the advantages of CDBurnerXP, it is not able to equip an ISO image into a virtual drive. However, even this small drawback cannot overshadow the rich functionality of this free application, especially considering that there are a large number of such programs on the Internet.
Create an ISO image using the UltraISO program
In order to be honest in our “investigation”, let’s look at paid utilities that allow you to create ISO images. UltraISO in this regard will be an excellent choice, since it can work with other types of files, edits their “internals” (both from CD and DVD images), creates a virtual drive and even writes these images to real media.
This miracle utility understands and identifies images created in other programs, such as: Alcohol 120% or; It independently emulates disks for loading information, edits files and folders contained within the images, and also creates images from both USB drives and hard and optical drives.
You can download the latest version of the program on its official website.
If you doubt the versatility of this program or are afraid to buy it, just work with it in the test version. Decide whether UltraISO is suitable for your computer and whether it is convenient for you to work with it. The only limitation for the trial period is the inability to create an image larger than 300 MB.
After downloading the program, you will need to install it on your PC. Then click on the shortcut created on the computer desktop, after which the working application will “show” you its welcome window.

The screenshot shows that now manufacturers are offering you to buy this program by entering a registration code. You can also, as mentioned above, run the utility in a trial period.
We suggest for starters create ISO image from files. It's simple: find, select and add the necessary files to your project using the button Add(or by dragging and dropping the desired files and folders).

Save the process as an ISO image: select File located in the top menu, and then in the list that appears, click on the line Save as...Name the project, specify the ISO type, and then save it.

When the computer completes the process, the desired ISO image created from files and folders will be saved on your PC.
You can also create an ISO image from a laser disc. To begin, insert into the drive the disc from which you want to make it. Click Create CD Image. In the window that appears, select the area in which it will be saved. By the way, in the same window you can select the extension you need (.NRG, .MDF/.MDS, .IMG/.CCD/.SUB)

Press the button Do, thereby starting the workflow.
At the end of its work, the UltraISO utility will offer to open the file that you just created.

That's all, dear PC users. The technology for creating an ISO image is not as scary as frightened users say it is. We hope that this article was able to debunk the myths and overcome your fears associated with programs that help create virtual images of optical disks. Good luck in your work!
Working with discs implies a set of necessary functions for recording to CD/DVD. Therefore, this article will discuss the best software solutions to implement this feature. The tools of the presented programs will help you create and record images, obtain information about the media, and also erase a rewritable disc.
One of the most popular programs that has a set of necessary functions for burning discs. The convenient operation of creating an image from a CD/DVD will allow you to quickly copy a disk with autoloading. And mounting a virtual drive makes it possible to open image files saved on the PC.

This software contains an interesting tool with which you can convert image formats. All functions are provided in the Russian-language interface, but with the purchase of a paid version. UltraISO is suitable for people whose everyday life involves working with image formats.
ImgBurn
If you want to get detailed information about the recording media, then ImgBurn is capable of impressing you. In mode "Quality Test" the program displays complete information about all sessions (if the disk is rewritable) that were held on the media, as well as about its state. It is possible to create an ISO file from objects contained on the HDD.

Checking the recorded CD/DVD is another advantage of this product, which will make sure that the recording was successful. When a disc is being burned, information about the recording status is displayed in a specific window. And the free distribution of the program attracts users related to solving such problems.
Alcohol 120%
Alcohol 120% software is known for its tools, which are aimed at working with ISO images. It allows you to create virtual drives so users can mount images on them. A convenient media manager tool allows you to see information about the CD/DVD, namely, what reading and writing functions the disc has.

With storage sharing, your files can be used by friends or work colleagues. If necessary, the program has a separate operation that allows you to erase a rewritable disk drive. With such an abundance of functions, the program is not free, and its acquisition cost is $43.
CDBurnerXP
A simple, but at the same time convenient program that allows you to burn data discs. It is possible to create images for subsequent burning on CD/DVD. With CDBurnerXP you can create DVD Videos and Audio CDs.

The drive cleaning option has two options. The first allows you to quickly erase a disk, while the second performs this operation more carefully, excluding the recovery of deleted data. If your PC has two drives, you can use the disk copy function. Writing to the media occurs simultaneously with the copying operation. The free program is provided in Russian, which makes it even more convenient.
Ashampoo Burning Studio
The software is positioned as multifunctional. There are basic and additional tools for working with disk drives. Among the necessary ones there are such as burning discs with data, multimedia files, images. An additional set of functions includes recording with advanced settings and converting Audio CD.

There is support for restoring files on a disk if a backup copy was recorded on it. The ability to create a cover or label for a disc has been implemented, which allows you to end up with your own personal DVD. Working with images involves creating, recording and viewing them.
BurnAware
The program has an excellent set of tools that allow you to effectively work with disk media. Benefits include the ability to provide detailed information about the disk and drive. Data about disk reading and writing, as well as the connection interface and drive capabilities are displayed.

It is possible to copy a project to burn it onto 2 or more drives. You can easily create ISO images from the required files and folders. The software solution makes it possible to copy a disk in image format. Among other things, you can burn discs in Audio CD and DVD Video formats.
InfraRecorder
InfraRecorder has many similarities to UltraISO. There are tools for burning discs in various formats, including Audio CD, Data DVD and ISO CD/DVD. You can also create images, but unfortunately you can't open them in InfraRecorder.

The program does not have much functionality, and therefore it has a free license. The interface is extremely clear, with all the necessary tools located on the top panel. Among the advantages we can also note support for the Russian menu language.
Nero
One of the most popular programs for working with disk media and images. The solution has a multifunctional interface and ample opportunities for burning discs. Among the main ones is recording: data, video, audio, as well as ISO files. The program has the ability to add protection to specific media. A powerful cover creation tool allows you to completely customize your disc label to suit your preferences.

The built-in video editor makes it possible to edit a video and immediately record it on a disc. Using the data recovery function, you can scan your PC or disk drive for lost information. With all this, the program has a paid license and loads the computer quite heavily.
DeepBurner
The program has a set of necessary functions for recording disk drives. There is a help menu that fully reveals the capabilities of this solution. The Help also provides detailed instructions on how to use each feature.

You can record multi-session drives, as well as create a bootable disk or Live CD. This solution provides a limited version, therefore, to further use the functionality, you must purchase a paid license.
Small CD-Writer
The peculiarity of this program is that it does not require installation and does not take up space in the cache. Positioned as lightweight software for burning discs, Small CD-Write allows you to perform basic operations with drives. It is possible to create a boot disk with the OS or software on it.

The recording process is very simple, which can also be said about the program interface. The minimum set of options implies free distribution from the developer’s website.
The above programs will allow you to effectively use their functions for burning discs. Additional tools will help you set up recording on the media, and also provide the opportunity to be creative in creating stickers for your disc.
Almost every advanced computer user knows what an ISO image is, but does not know how to create one correctly.
Let's look at the topic of how to create ISO images from files and folders and how to create ISO images from disk. We will use several programs that are still used on the Internet today. Creating an iso image is not as complicated a process as it seems. Just a couple of clicks and the image is ready.
List of programs:
- Ultra ISO
- Poweriso
- BurnAware Free
- imgBurn
These programs are divided into paid and free categories. Paid programs have the opportunity to trial use, but with a limit of 300mv. But free ones are also not inferior to paid ones and even lead. Let's look at these programs.
How to create ISO images from files using the ultra ISO program.
First, go to the developer’s website and download this program. The installation process is the usual: install and run.
The program has a paid license and you can try it for free. In trial use, the ultra ISO program is limited to 300 mV. The program has a function to convert an image for similar utilities, for example:
- CloneCD
- Nero (.NRG)
- It also fits the .CUE and compressed ISO (.ISZ) formats
Creating an image from files and folders
If you decide to create an iso image, then you will need the files that you want to write to the image. In particular, these files are reinstallation disk or files for recording on a boot disk or startup disk
Open the utility. The program is divided into two windows. In the first top one it finds files prepared for recording, and in the bottom one there are files located on our computer.
To create an iso image, at the bottom of the program, open the files that we want to burn, select them all and click “add”.

Or you can also open the section on the computer where the files are located, select and drag them to the top window of the program.

In my case, I am creating an image for Windows 7.

Using this program and simple steps, we created an image for further recording on a disk or flash drive.
Creating an ISO image from files and folders from an optical disc
This method is mainly used to copy several copies of a disk you like, for example: an excellent build of an operating system. Let's consider this method. First, we need a disk from which we want to create an iso image.
On the top menu, go to “tools” and click “create CD image” or simply press the F8 key

This window opens, if you have several drives on your computer, select the desired DVD drive.
And the last section is the format output.
We look at the list and make a choice over the formats, the format in our case is “iso”, if you plan to use this image in the future in the programs listed in the section, select the appropriate option.

Create ISO image with PowerIso program
This program is the same paid as Ultra ISO and has the same recording limit above 300mV. The program also has the ability to convert the image into formats
- BIN/CUE
Create iso images from files and folders using Poweriso
Similar to the previous program, download the program, install it and launch it. To create an iso image, you need to load into the program all the files from which we will create the image. To do this, there is an “add” button on the top toolbar; click it.
Or drag it from the computer where these files are located onto the program window.
Select all the necessary files and add them.

Create iso image from optical disc with Poweriso program
To create an iso from a disk, go to “tools” on the top panel and click “create CD/DVD-ROM image file”


Create an iso image with BurnAware Free
We download this software, it is completely free and is a leader among competitors, and you yourself know why. Install and launch. A window with great opportunities will open.

Create an iso image from files with the BurnAware Free program
In this section, to record an ISO image, click “create iso”. Then this window will open
Select the file system “iso 9660” and click “ok”.

On the top panel, click on the “add files” icon, select all the necessary files, click “add” and after adding, click “close”

Now go to “file”, hover the mouse over “compilation” and click “create”. Next, as always, write the name, indicate the saving location and click “save”.

Create an ISO image from an optical disk with BurnAware Free
In this program, the window is divided into 4 masonry
Multimedia
In the window that opens, select the DVD drive as usual and specify the iso or bin format, then click copy, then wait for the process to complete.

Create iso using imgBurn utility
The first thing you need to do is download, install and run the imgBurn utility. The program is distributed free of charge. imgBurn has an English interface, but it can also be Russified. To do this, go to the website of the program developer. Let's go to the download section.

Which is located in the folder where you installed the imgBurn program

Create an iso image from files using the imgBurn utility
Open the program and to create an iso, select the section “Create an image from files/folders”


Select all the necessary files and click open. After completing these steps to create, you need to click on this icon

We write the name, indicate the location and save the image.
Create an iso image from a disk using the utility imgBurn
In order to create an iso image from a disk, open the imgBurn program and in the window that opens, go to the “create an image from disk” section


And now the final stage is to click on this button

Software to create ISO image from disc only
Creating an iso image from a disk with ISODisk program
ISODisk software is used to create an image from a disk. With support from the ISODisk utility, it is possible to create an ISO image from any disk in two clicks.
First, download the program from the official website, install and launch. The program has a simple appearance and will be understandable even to a teapot. The interface of this program is in English. ISODisk includes two partitions:
Mounting an ISO Image as a Virtual Disk
Create an image from an optical disk
Select the section “create an image from an optical disk”

In the window that opens, select the DVD drive and click on this icon
Creating an iso image from a disk using Ashampoo Burning Studio 14
Download and open the program. This utility, in my opinion, has a very beautiful interface that is simply pleasing to the eye. The program has many functions for different works and disks.
In our case, we need the “image creation” section. Hover your mouse over this section and select “create image”

Select your DVD drive and wait for the program to load the disc.

In the next window, indicate the location to save the image, write a name, select the iso format and click “next”
Creating an iso image from a disk using DAEMON Tools Lite
This program is easy to use and has a simple interface that everyone can understand. Open the program.
On the toolbar located in the center of the window, click on the “create disk image” icon

As in all of the above programs, select the drive, indicate the storage path, and press start

Creating an iso image from a disk with the Alcohol 120% utility
Download, install and launch the Alcohol 120% program. Like some, this utility is paid.
But despite this, you can use the program by waiting for about 8 seconds to start. In the window that opens, on the left toolbar, select “image creation”


Here we indicate the name, path, format of the created iso image and click “start”
Creating an iso image from a disk using Nero 2015
To create an iso image from an optical disk using this program, insert the disk from which you want to create the image into the drive and launch the Nero 2015 program.

Now select the path, specify the drive and write a name for this iso. Next, click on the “copy” button

Creating an iso image from a disk using CDBurnerXP
The installation process is the same as in all cases. Open the CDBurnerXP program, then select the “copy disk” section, click “ok”.

A window will open there, just like in all cases, select the drive, indicate the path, write the name. Next, check the “hard drive” box and click “copy disk”.

Conclusion
In this article, I talked about the most well-known methods of creating an iso image from files and folders and from an optical disc.
In my opinion, recording with an iso image is much more convenient and efficient than simply copying a disk, since when recording with an iso image we get a 100% copy of the original.
As everyone already knows, optical discs do not last very long if they are used more often.
Therefore, in order not to take risks, it is better to make a copy of your disk using the recommendations in this article and sleep peacefully.
This is where I end the article. I hope this information was useful. If you have any questions, write in the comments. Bye!
You might be interested

A free program for creating ISO disk images from any folder on your computer.
Using a PC every day, we sometimes don’t even think about many of its capabilities. However, as soon as we are faced with a task that we are not used to solving on a regular basis, many questions immediately arise about what and how to do so that everything works out as it should...
Here's a simple example. Let's say you registered on a torrent tracker and decided to distribute the contents of your folder with a selection of software, but the tracker does not support distribution of entire folders. What should I do?
You can select and distribute only certain programs one at a time, or you can do it simpler - turn the contents of the directory into a disk image and distribute everything in one file!
There are many examples when you need to create a disk image from the contents of a specific folder on a PC. This includes creating your own startup disks, exchanging computer games with friends, and preparing to burn DVDs... In a word, sooner or later any user may face a similar task.
In such cases, on numerous forums people are advised to pay for software packages for working with disk images such as Alcohol 120% or UltraIso. Undoubtedly, these applications allow you to cope with the task, but finding the necessary tools in them can be quite difficult for an untrained user. The solution to the problem can be the use of small, highly specialized utilities.
I suggest you familiarize yourself with the program Folder2Iso. This small utility allows you to quickly create ISO images from any directory in Windows. It also supports creating images of real CD/DVDs and other removable storage media, which in some cases allows you to get rid of rather cumbersome paid solutions.
There is another program very similar to Folder2Iso - AnyToISO. For a long time I could not choose which one to recommend to you, since the second allows you not only to create, but also to convert disks in almost any other formats (for example, IMG, MDF/MDS, NRG, BIN, etc.) into ISO images.
However, it turned out that the free edition of AnyToISO does not work with volumes of information exceeding a standard CD. Therefore, as they say, less is better (in the sense of fewer functions, but more benefits;)
Comparison of the Folder2Iso program with its paid analogue AnyToISO
A serious disadvantage of Folder2Iso compared to its counterpart is the lack of a function for reversely extracting files from a finished image to a specified folder. To do this, you still have to use a CD drive emulator.
However, on the other hand, Folder2Iso is not designed for such actions, and was originally conceived precisely as a simple way to create images, and not unpack them.
The good news is that Folder2Iso does not require installation. It is enough to download the archive with the program and run its executable file to get started (you can even do it without extracting it from the archive):

Folder2Iso interface
The interface, as can be seen from the screenshot above, is very minimalistic, therefore, despite its English language, anyone can easily understand how the program works.
Creating an ISO Image Using Folder2Iso
First you need to select the folder that you want to turn into an image. To do this, click the “Select Folder” button and in the Browse window that opens, specify the desired directory:
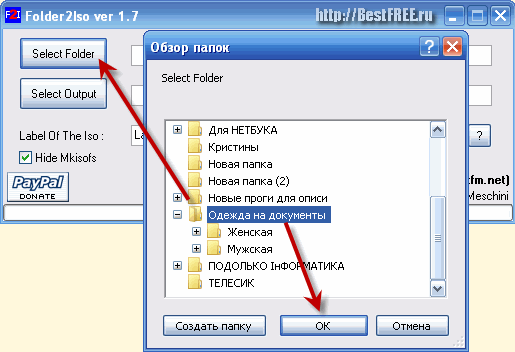
The next step is to select the folder in which to save the finished ISO image. Click the next button “Select Output” and, again using Explorer, indicate where to save our project. At the bottom, in the “File name” field, you need to set a name for our future image, after which you can click the “Save as” button. It should look something like this:

In principle, at this stage you can already start creating an ISO image, but it is worth paying attention to some nuances of working with the program. We will talk about additional Folder2Iso settings, which you will find under the main fields.
Additional settings
So, the first additional function is to indicate the title for the future disk. We can set the title in the “Label Of The ISO” field. It will be visible in Windows Explorer if you burn the created image to a real disk (or mount it to a virtual drive) as the disk name.
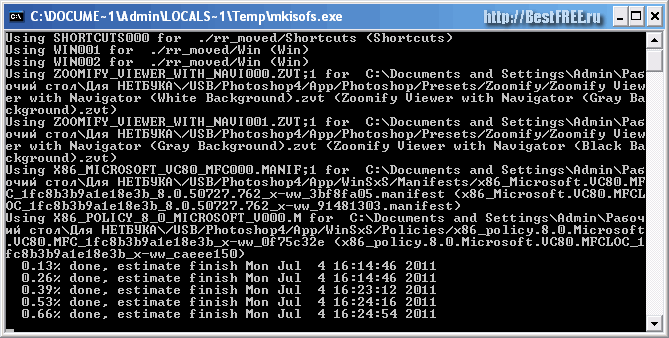
Directly below the inscription of the previous paragraph there is a checkbox “Hide Mkisofs”. It serves to hide/display the window of the DOS utility routine Mkisofs.exe, which is directly involved in creating disk images.
If you disable this item, then during image creation you will be able to observe the entire generation process in a separate window, similar to the command line:
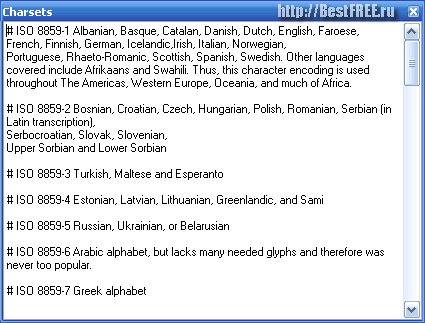
Finally, the last additional option is the choice of encoding for displaying text characters on the future image. This item is presented as a drop-down “Charset” window on the right side of the Folder2Iso window.

By default, the standardized European encoding is ISO 8859-1 is used, but you can easily change it to any available one from the list. In case you don’t know which encoding is used for which language, the program provides detailed help (though in English). To display it, just click on the button with a question mark to the right of the encoding list:
Now you really know everything about Folder2Iso and are ready to start creating an image. To do this, click the “Generate Iso” button and wait a little. The generation progress will be visible at the bottom of the program window as a green bar:

As mentioned above, Folder2Iso allows you to create images not only of local folders, but also of removable media. Therefore, it can be equally successfully used to create images of real CDs or DVDs! To do this, just insert the disk into the drive and specify it in Explorer as the source folder. Next, everything follows the same scenario as with a regular folder.
conclusions
Folder2Iso will be useful to everyone who wants to exchange various kinds of digital information with other people without any problems, without resorting to expensive programs.
Everything contributes to this: from portability (you can easily run the program from a flash drive), to a simple interface and decent operating speed. Therefore, if you ever face the need to quickly create an ISO image with any data, don’t hesitate, download Folder2Iso!
P.S. Permission is granted to freely copy and quote this article, provided that an open active link to the source is indicated and the authorship of Ruslan Tertyshny is preserved.
UltraISO is an indispensable program for working with images on Windows computers.
ISO images are images of CD/DVD discs. To work with the .ISO format you need to download UltraISO for Windows. Your OS can only write data to disk if you have a disk drive, but it won't be able to work with images unless you have additional software. The program's developers are not the inventors of the format, but they are the developers of the product that has become the most popular tool for working with this format. The software needs to be downloaded not only by those who have a disk drive, but also by those who do not have a disk drive, but need to create an image or work with virtual disks, as well as interact with boot disks/flash drives.
A convenient tool for working with images.ISO
You can download a disk image with some program, or create this image yourself. To interact with this format you need to download the software. These programs are distributed free of charge, but you can not only download the software for free, but also continue to use it. There is also a paid version of this utility (costs 1,400 rubles), but for everyday purposes you will definitely have enough free options. They are limited only by file size, but to create a bootable USB flash drive, the free version is definitely enough.

The program interface is very similar to the standard Explorer interface in Windows, so you should not have any difficulties in working. In addition to this, UltraISO is in Russian, which means everything is as simple and clear as possible without any translation. The latest version of Ultra ISO allows you to work with the structure of the disk image to save space both on the HDD, when storing the ISO disk, and to reduce the size on optical media. This is not the only advantage of the latest version; here are several innovations and improvements:
- Working with boot sectors of hard drives;
- Interaction with Daemon Tools;
- Ability to create a boot floppy disk;
Boot sectors of hard drives and floppy disks are the lot of not only computer professionals, but also ordinary users who use UltraISO. You can configure the HDD the way it suits you. This feature appeared only in the latest version of the utility. You can also work with boot sectors of optical disks and floppy disks.
Floppy disk support is not a relic of the past. For example, this support will allow you to write a bootable floppy disk with legacy operating systems, for example, you can create a bootable floppy disk for DOS OS. Of course, there is support for bootable disks and even bootable flash drives. You can create a bootable USB flash drive in both standard mode and dual mode – USB-HDD and USB-ZIP. You will learn more about creating such flash drives from the video:
For those who want to use software to create virtual disks or floppy drives, we recommend using this utility in conjunction with or. And although these utilities have different developers, the software supports both utilities for working with virtual disks. You can use a tandem of these utilities to bypass disk protection.
UltraISO in Russian runs not only on Windows 32 bit, but also on the x64 version; in our archive you will find an installer for both versions of the OS. To run the utility, just install it. You will not need activation and an activation code until you decide to burn a large disc or flash drive. Reviews show that the free version is sufficient to handle 99% of the tasks of the average user.