Instructions for restoring flash drives. How to choose a utility to recover a flash drive on an SMI controller
The era of CDs and DVDs is almost completely over. Today, flash drives are used everywhere as universal storage media. USB drives are small in size, have a sufficient amount of built-in memory and allow you to add or delete any files without any harm to existing ones.
Everything seems to be fine, but flash drives have one significant drawback - if used incorrectly, they often fail... The most typical failure is the computer identifying the drive as an unknown device or a disk with zero memory capacity:
If you were careless to unplug your USB drive from its slot without first using the safe removal function, it is quite possible that it will become a victim of a short circuit and become unreadable. Is it possible to restore a flash drive after such an incident? Read on...
Types of flash drive failures
So, if you are reading this article, then most likely you already have a “dead” flash drive. Before you try to revive it, you need to find out what kind of trouble happened and how your USB drive reacts when connected to a PC. In other words, let's see how bad it is :)
The flash drive can react in two ways: either the indicator diode on it will light up or not. If the diode does not light, then a physical breakdown can be diagnosed. In this case, you can try to repair the drive only if you have a soldering iron and know how to work with it (the last section of the article is about this).
A much more optimistic forecast can be given if the indicator lights up and does not go out. This means that our problem is software and can be fixed using special software. In this case, one of two scenarios awaits us: the flash drive may be detected as an unformatted disk with a capacity of 0 bytes, or it may not be detected at all.
If the computer sees an empty drive, then everything can be solved by correct formatting. However, most often the problem is that due to a sudden power surge, the firmware of the flash drive is damaged and we will have to look for it on the Internet.
To summarize the algorithm for diagnosing a breakdown, I suggest you act according to the scheme below:

Formatting treatment
The easiest damage that can happen to your flash drive is a file system failure. Failure can be of two types: with a violation of the cluster layout and without. In the latter case, you can even do without formatting and save all the data on a flash drive!
You can diagnose a failure without violations if the flash drive is detected by the computer, but does not open. The computer simply freezes when trying to display its contents, so we don’t try to open anything. We look at what letter the removable media is identified under, launch the Command Prompt (Start - Run - cmd) and enter the command "CHKDSK G (or other letter): /f":

The /f key will automatically try to correct file system errors that led to the unreadability of your flash drive and, if the command completes successfully, you will receive a fully functional drive with all the data that was on it before the error appeared!
Unfortunately, it’s not often that you get off so easy... Much more often you have to deal with flash drives, whose size is determined by the computer as 0 bytes. In this case, formatting can help. And not with standard tools, but with special utilities. One of the most universal in this regard is HP USB Disk Storage FormatTool (you can download it in the archive via the link at the end of the article):

This utility allows you to correctly format any media in FAT32 and NTFS systems. To do this, just select the desired device from the drop-down list and click the “Start” button. By default, the quick format option is activated, but this mode may not work with a damaged flash drive. If unsuccessful, you must uncheck the corresponding box before starting the procedure again.
In particularly advanced cases, when even HP USB Disk Storage FormatTool gives an error, but the flash drive is still recognized as removable media, so-called low-level formatting can help. It erases all memory sectors byte-by-byte and fills them with zeros, making it impossible to attempt to recover data in the future.
If saving a flash drive is more important to you than saving the data that was on it, then the HDD Low Level Format Tool utility (available in the archive for the article) can help you format it in the above-mentioned way:

When you start the program, a window will appear asking us in what mode we want to use the HDD Low Level Format Tool. Naturally, we need a free one, so we click the “Continue for free” button or simply close the window. A main window will appear with a list of disks. Select the one you want, click “Continue”, confirm your consent and wait for the process to complete.
Low-level formatting itself takes quite slowly, so be prepared in advance for the fact that it can take about an hour (depending on the capacity of the flash drive and its read/write speed). Moreover, in free mode, formatting speed is limited to 50 megabytes per second (approximately 180 gigabytes per hour).
Determining the controller type
If formatting does not produce results or the flash drive is initially detected by the computer as an unknown USB device, then the problem is most likely due to damaged firmware. Finding firmware for popular media models on the Internet is not that difficult, but you need to know exactly what to look for. And to do this, first of all you need to determine the type of flash drive controller.
This can be done in two ways: using special programs or using PID and VID identifiers. It is preferable, of course, to use programs with good databases, since controllers from completely different companies may have the same identifiers and you will have to search for a long time for a suitable utility for flashing the firmware...
The best in terms of determining the type of controller are the Chinese programs ChipGenius and ChipEasy, and from the Russians, perhaps, Flash Drive Information Extractor (everything is in the archive). You can use any of them, however, the disadvantage of the Russian language is the lack of links to download utilities for firmware (highlighted in pink in the screenshot):

All of them provide quite a lot of different information, however, we are mainly interested in two parameters: device identifiers (highlighted in yellow in the screenshot) and, directly, the controller model (highlighted in green). Knowing this data, we can find a firmware program on the Internet.
By the way, Chinese programs already give us links to such programs, but it’s not always possible to download them, even if you use Google’s page translator, so the search will be discussed separately below. It’s a pity, of course, that our developers were unable to integrate the search for a link to the firmware into their program, but oh well :)
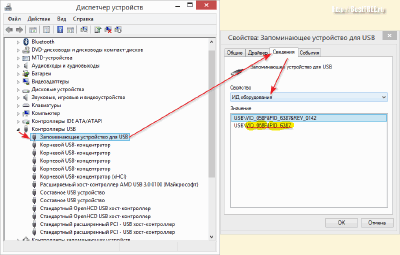
In the meantime, it’s worth mentioning that you can find out the identifiers (but not data about the controller!) of a flash drive without special utilities. To do this, you need to go to Device Manager (context menu of the “My Computer” icon - “Properties” - “Device Manager”), select our drive from the list, call up its properties and in the “Details” tab select the “Hardware ID” property:
We have at our disposal an unnamed flash drive (alas, it’s working :)) and we found out its identifiers, as well as the type of controller and its model. Now it's time for the most difficult procedure - searching for a program for firmware.
Flash drive firmware
Firmware or firmware (abbreviated F/W) is a microprogram that controls the operation of the flash drive controller. If it fails, the drive, while remaining physically functional, stops responding to standard computer requests, which is why you can neither read nor write information from it.
Fortunately, the firmware for most controllers is freely available on the Internet. Therefore, the main problem is only finding them. You can search directly in search engines using queries such as: "Alcor (chip manufacturer) AU6982 (chip model) VID: 058F PID: 6387 firmware", and on specialized sites.
One of the best Russian-language resources for searching and downloading firmware for any flash drive is FlashBoot.ru:

On the search page we need to enter the PID and VID identifiers, and then click the "Search" button. We will receive a whole list of flash drives that have the same ID as ours. The task now comes down to finding a device with the same controller model as ours.
If you find a flash drive in the table that resembles yours in all respects, click on its name and see detailed information about it:

Here we are primarily interested in the UTILS line, which contains the name of the utility needed to flash our flash drive. We copy this name and search for it on the Internet. You can do it differently. You can search on the same site. To do this, go to the "Files" section in the top menu. True, the names of the programs from the list and those on the site differ, so the search will not always be successful.
In any case, we found out that our flash drive is based on an Alcor chip and its model is AU6982. This is already enough for a successful search, which leads us to the need to download the AlcorMP utility one of the versions available on the website:

We unpack the downloaded archive into a folder, check whether the program version matches the version that we identified by identifiers and run the executable file. If the firmware version is suitable, then we will see data about our flash drive in one of the cells of the working window. All you have to do is press the "Auto" or "Setup" button (if you know how to configure parameters) and wait for the firmware to finish.
If the working window is empty, which often happens, then we were unlucky the first time :) You need to try downloading other versions of programs suitable for the same chips as your flash drive. In short, this is where the lottery begins and sometimes you can try up to a dozen different utilities until you find the only one that will correctly identify your drive.
After flashing the firmware, safely unplug the flash drive and reinsert it. If everything worked out, then it should be detected by the computer without any problems. If not, try other flashing programs until you succeed.
Treatment for physical injuries
The most severe case of a flash drive failure is when it does not show any signs of life when connected to a PC: the indicator does not blink, messages about unknown equipment do not appear, and there are no unidentified devices in the Device Manager. In this case, real physical damage can be stated.
However, unless the flash drive has been dropped from a great height, exposed to high temperatures, or dropped into water, you have a small chance of saving it (and sometimes even the data on it!). Most likely the problem is that due to a short circuit on the flash drive board, something has become unsoldered. Often the legs through which food flows are unsoldered.
In any case, we will have to open the flash drive case to try to restore it. To do this, unfortunately, you may need to unscrew it if it does not disassemble. Inside we will see something like this board:

The main “problem” areas are the legs of the USB plug and the power stabilizer, which over time tend to become unsoldered or burn out due to short circuits. If you know how to work with a soldering iron, first try soldering the outer terminals of the plug, which are responsible for power and grounding. This should restore normal power to the flash drive.
If, after manipulating the soldering of the outer legs, the flash drive starts blinking when connected to a PC, but is not detected, perhaps the problem is in the unsoldered legs, receiving and transmitting data. Solder them too and check again. If the connection is not accompanied by a blinking indicator, then most likely you need to solder or replace the power stabilizer.
Conclusions
Alas, sometimes it happens that even after all attempts at resuscitation, the flash drive shows no signs of life. In this case, you should admit that you did everything you could and, with a clear conscience, throw the media in the trash.
Although, if the flash drive is very dear to you, you can take it to a good service center. There they can remove the memory chip for you and transfer it to a new board. True, the cost of such an operation is comparable to the cost of a new device, and sometimes even exceeds it! Therefore, it is advisable to do this only if there is some important information on the flash drive.
However, most often the matter does not reach the service center. Most flash drives can be restored at home. Our article and archive of programs will help you with this, which you can download from the link below. I wish you success!
P.S. Permission is granted to freely copy and quote this article, provided that an open active link to the source is indicated and the authorship of Ruslan Tertyshny is preserved.
Many users neglect to safely remove flash drives, as a result of which the drives stop working correctly: they are not recognized by the system, require formatting, do not read/write data, show the wrong size (for example, 14 Gb instead of 16 Gb). If you are faced with a similar problem, then the question of how to restore a flash drive will probably become relevant to you.
Is it possible to restore the functionality of a flash drive?
Some may think that restoring a flash drive is a pointless exercise. Drives from Transcend, Kingston, A-Data and other manufacturers have flooded the market, making flash memory cheap. Memory cards and flash drives with capacities from 8 Gb to 32 Gb are not so expensive that you can’t easily throw them away and buy new media. However, old flash drives and Micro SD memory cards are usually not thrown away at all: they lie on the table and wait to be restored.
Recovery is possible if the flash drive or memory card has not completely “died” (usually death occurs when the controller burns out).
But if the drive is simply not detected or shows the wrong volume, then the reason for this behavior is most often a controller firmware failure. We will discuss in detail below how to restore a flash drive after such a failure.
Saving information and searching for the necessary software
If important information is stored on a flash drive or SD card, then before flashing and restoring the controller (and with it the functionality of the drive), it is necessary to extract the data. This can be done using the Photorec utility, which can work with media for which the file system is not detected.
After extracting the necessary information from the SD card or flash drive, you can begin searching for a utility for flashing the controller firmware. But to flash a controller, you first need to determine its model. To do this, we use the CheckUDisk utility (distributed free of charge) and the website flashboot.ru:

After completing the check and receiving the necessary information (VID PID of the drive), you need to download a utility to restore the functionality of the flash drive or SD drive. Go to flashboot.ru and open the “iFlash” tab. Here you need to enter the VID PID values and find the desired manufacturer of the memory card or flash drive (HP, Generic Flash Disk, Protex, Oltramax, Smartbuy, etc.). 
If your exact model of flash drive or SD memory card is not in the online service database, then it’s okay: the main thing is that the VID PID and manufacturer match. If the necessary data matches, then you need to obtain information about the exact controller model for flashing and restoring it, as well as the name of the appropriate utility. 
The table has columns “Controller” and “Utility”. You also need to pay attention to the volume - the controllers of flash drives and SD cards for 16 Gb and 32 Gb may differ. You need to copy the full name of the utility and download it through the “Files” section on the flashboot.ru website or from another source. Often, along with the recovery program, instructions for its use are downloaded, which it is advisable to read carefully.
Controller firmware
Let's say you have a Protec flash drive with a capacity of 16 Gb. You find it by VID PID through the iFlash online service and download the controller firmware utility for free. What to do next? Carry out measures to restore the flash drive (SD memory card).
Universal instructions for restoring all flash drives:

If the firmware is successfully installed, you should see a positive status of the flash drive - “OK” or “Good”. If problems arise during the operation, an error code will appear: its explanation can be found in the help of the utility found by VID PID, or on other online services.
Restoring any flash drives (SD cards) is carried out approximately according to the same scheme, however, the instructions may differ slightly for different utilities: you need to use the VID PID to find the program for flashing the controller and start restoring the USB drive. 
To restore a flash drive, you must additionally format it. You can perform it using standard Windows tools or using special programs. It is recommended to run a full format rather than a quick format. This will take a little more time (especially if the storage capacity exceeds 16 Gb), but you will be sure that the flash drive is now completely clean and functional.
Recently, flash drives have firmly won the championship among storage media. They are compact, comfortable, nimble and roomy. For a long time, no one remembers disks and other bulky media. Nowadays, everyone has a flash drive, and not just one. We trust this little storage unit with our valuable data, documents, photos and videos. But many people do not treat such a device with sufficient care. For example, not many perform safe removal of flash drives. But this has a very detrimental effect on his work.
One day it may happen that, having inserted a flash drive with important documents into your computer, you will simply not be able to read the data from it. Of course, it may not necessarily be the user’s fault that the flash drive no longer works. There are still a huge number of factors that can disable it. But I have good news - if the flash drive is broken and it is impossible to copy important information from it, then this is not a reason to panic. Everything can be fixed by flashing the device controller and after that it will be a relief to get your lost data back. This is exactly what we will talk about today.
It is worth noting that you can restore a flash drive at home only if it shows at least some signs of life. In some cases, the device may permanently fail, beyond repair. But fortunately this happens so rarely that you may not encounter this.
You can determine the viability of a flash drive by the following criteria:
- after connecting the device, the computer signals that it has been detected;
- the operating system may offer to format the flash drive (however, when you try to do this, an error appears);
- The USB drive has been detected and we can see its directory, but if we try to open it, a message will appear asking us to insert the disk;
- if you try to drop something onto a flash drive, or vice versa, load from it, various errors appear;
- suspiciously slow operation of the device, low writing and reading speeds.
But before you do anything, think about how valuable information is stored on it? If the data is important, then it would be better to try to recover it before and after the firmware. To do this, you can use the Recuva program, or another similar one. And if extremely important data is stored there, which is very important and valuable, then in this case it is better not to do anything on your own. Take the flash drive to a specialized service center, where specialists can restore it without such a high risk to your data.
Restoring a flash drive using the example of Kingston DT
In our example, we will use a Kingston DataTraveler Elite 3.0 16GB flash drive. It worked fine for a while, but then strange things started to happen. When trying to delete or write data, the whole process is so slow that it can be said to not move at all. After reconnecting, the system displayed a message asking you to format the disk.
Considering the low importance of the data on the device, it was decided to format it. The formatting process took a long time and was not completed. Only a message appeared indicating that the formatting attempt was unsuccessful.
 After many attempts, I finally managed to do it. After successful completion of copying, the device will be detected normally. But here’s the catch: data can be copied to a flash drive, but the speed is not higher than 100 kb/s. And this is an eternity and it is clear that nothing was recorded on it. After this, it was decided to reflash the drive controller.
Preparing for flashing
First of all, you should find out the VID and PID. These parameters determine the type and manufacturer of the controller. Using them in the future, we will determine the utility for the flashing procedure. You can find out VID and PID using any small program designed for this. We will use Flash Drive Information Extractor.
We connect our faulty flash drive and run the utility. At the top of the program window there will be a button to receive data, click on it. After this we will see all the information on the device. Pay attention to the values next to VID and PID.
 They will be useful to us, so either do not close this window, or copy them somewhere.
Utility for flashing flash drive
Now we need to find a suitable utility that can reflash the controller type for our case. There is a special resource for this, flashboot.ru, where you can find data for many drives. Go to this site and in the top menu click on the iFlash link. Next there will be a page with fields for VID and PID. Enter our values and click on the “Search” button.
 A search may return several different types of flash drives. We need to find one that has a similar name. There may be a slight difference in the volume of the device, but I think it’s not a big deal.
After you have found a suitable device, pay attention to the “UTILS” column. There will be the name of the utility we need for flashing. Copy it, then follow this link http://flashboot.ru/files/. Enter this name there and click on the search button.
 Alas, in our case, this utility was not found on this site. But this does not mean that you should not try to find it there. In your case, success is quite possible. After you find the program you need, you need to download it to your computer. Well, in our case, we resorted to the help of the all-knowing Google. Thanks to his help, she was found on another site. You can download it.
Reflash a faulty Kingston flash drive
For now we disconnect the drive. We launch the utility for flashing (our program is called MPTool.exe). If the application comes with a file called readme.txt, then look into it. Most likely there are instructions there. Please note that there are different utilities and everything may look slightly different for you. But in general, the interface and operating principle should be similar.
After starting the flashing program, you need to connect the flash drive again. After this, the utility will detect the device. Now all that remains is to click on the start button for rewriting the firmware. Let's wait a little until the process is completed.
 Upon completion, the program will let you know that everything was successful.
 Then a system message will immediately appear that before working with the device it needs to be formatted. But it’s better to immediately disconnect the flash drive and then connect it again. And only after that begin the formatting process. After completing all these procedures, you can check the operation of the flash drive. Everything works as quickly as it should and files are adequately copied and read. Do not forget that some steps may be slightly different from those described in this article. But in general the whole process looks exactly like this.
That's all. Take care of your flash drives and remove the device safely.
USB flash drives have now firmly entered our lives as an inexpensive and at the same time quite reliable means of storing data. The cost of a gigabyte of storage capacity for flash drives is quite low, and the ease of working with it (combined with small size, weight and resistance to vibration and temperature influences) makes flash drives so popular.
But, as with any technically complex device, various troubles also happen with a flash drive, ranging from file system failures or microprogram destruction to physical breakdowns (usually). Due to the low cost of the device itself, repairs may not be justified and the drive is sent to the trash heap. Or not even in the trash, but lying somewhere on a shelf or in a desk drawer. Meanwhile, you can try to solve many device malfunctions yourself with a fairly high probability of success.
If The flash drive suddenly stopped being detected as a storage volume or flash drive reading speed or recording to a flash drive Very fell hard, and also if File system errors keep appearing, you can try to reflash the flash drive. Chinese flash drives, popular at one time, with huge volumes, files on which are written but not read back, can also be cured!
The flashing procedure itself consists of updating the microcode of the USB controller, but you can perform a number of useful actions:
- Excluding “bad” blocks from memory. In this case, the flash drive will lose a little in volume (by the volume of excluded blocks), but its stable operation will return.
- Restoring the true storage capacity. This fixes the problem when the flash drive is flashed with a larger capacity than the memory chips installed on it. Then the data is simply cyclically overwritten, which makes it impossible to read large files written earlier.
- Dividing a flash drive into partitions (also creating virtual CD-ROM partitions), additional partitions mounted in read mode, etc.
- Changing identification data (VID, PID, Serial number). .
So, if you decide to flash the firmware, remember one simple thing:
Flashing is fatal for data stored on memory chips. No one can give any guarantee of data recovery (or that the flash drive will work after flashing).
Let's continue.
Determining the model of the controller chip
The most reliable way is to open the flash drive case and read the model of the controller chip (a small chip, usually square in shape, surrounded by legs on all sides). Memory chips are most often rectangular, surrounded by legs on only two sides: 
We rewrite all the information from the chip: Phison(brand) and PS2251-60-5(series). This data will be useful to us to find suitable firmware. Incorrectly selected firmware can permanently “kill” a flash drive, so you need to be careful.
If it is not possible to disassemble the flash drive (for example, without damaging the case), then you can use programs to determine the flash drive chip using the software method. This method is less reliable, but nevertheless quite popular. Personally, I use the ChipGenius 4.00 program, but any other program with similar functions will do: 
Also, as shown in the screenshot, you can remove the VID and PID of the flash drive. These are Vendor Identifier and Product Identifier, respectively.
Looking for firmware for a flash drive
Where are we looking? As usual, on the Internet. In particular, a fairly good resource is flashboot.ru, “Files” section to search by controller model or iFlash to search by VID/PID database: 
Searching by VID/PID gives a lot of results; you need to select those options that most fully describe our flash drive (model, capacity, etc.). 
A search by controller model finds no less firmware; you need to try different options, because the first time you may not even get the firmware that is intended for this chip.
Flash drive firmware
The general appearance of programs for flashing flash drives is approximately the same. We take out and insert the flash drive (first make sure that no other flash drives are plugged in - this will be easier and safer). When the flash drive appears in one of the program fields, press the Start button (to start flashing) or, if you want to dig into the detailed settings (in particular, create an additional partition, etc.), then press the Setting button. 
The firmware process can take quite a long time, since blocks are tested for read/write suitability, “bad” blocks are deleted, the entire memory space is reformatted, etc. But when the process is completed, you can check the flash drive in the system itself. 
I usually do it this way: I format it using standard Windows tools (by the way, it’s more secure and reliable). Then I upload a large file to the flash drive and evaluate the writing speed. Then I copy this file to another directory on the logical drive, again, assessing the reading speed. If you are satisfied with the characteristics of the flash drive, you can safely use it.
Along the way, in order to immediately create a trap for them.
Congratulations! We just repaired the drive!
Friends! Join our
How to recover an SD card or USB flash drive if the computer does not see it, does not read or write data? Problems with flash drives are rarely caused by natural wear and tear. More often, problems with them are caused by users ignoring the rules for safely removing the device, experiments with various software in which these flash drives are involved, as well as their initially lousy quality. Below we will consider a list of possible actions carried out in the Windows environment that can solve the problem, unless, of course, the cause lies in a mechanical failure. And we, friends, will go from simple to complex.
- Note: below we will only talk about restoring the functionality of flash drives, but not about saving the data stored on them. This is a separate topic, and there is information about this on the website. Most of the methods proposed below for recovering SD cards and flash drives will lead to the loss of their data.
1. Hardware lock
SD cards, MicroSD adapters and flash drives can be hardware protected from writing data or completely blocked even for reading. On such devices there is a lock switch, which must, accordingly, be set to the “Unlocked” position.

2. Problems not related to the drives themselves
The cause of problems with SD cards and flash drives may be Windows security policy. You need to find out whether access to removable drives is blocked (in whole or in part of writing data to them) by the computer administrator. You also need to check the card reader or USB ports of your computer. If everything is fine with the latter - the card reader reads other SD cards, but problems still arise with the flash drive, no matter how you connect it to other USB ports, move on.
3. Windows Explorer
Standard formatting using Windows Explorer can help in simple cases such as unsuccessful writing of data to a flash drive. Or when for some reason a smartphone, tablet, camera or other device cannot cope with this operation regarding SD cards. In any current version of Windows, in the Explorer window on the drive, call up the context menu and click “Format”.

We leave the original file system and first try a quick format.

If it fails, we repeat the operation, but with full formatting (uncheck the fast box).

4. Windows Disk Management
You can try to perform the formatting procedure in disk management. To launch this tool, enter in the system search field:
diskmgmt.msc
In the disk management window, focusing on the size of the drive, we look for it among the disks connected to the computer. And in the context menu called on it, we launch formatting.

You can immediately select full formatting.

If the flash drive has a partition structure like a hard drive, you must delete each of those partitions. This is done using the “Delete volume” option in the context menu.

And then, in place of the resulting unallocated space, you need to create a single partition. To do this, in the context menu on this very unallocated space, launch the “Create a new volume” operation and follow the instructions of the step-by-step wizard.

5. Programs for low-level formatting
Standard formatting tools may not help in complex cases, for example, when flash drives are displayed (in the same Explorer or Disk Management) as unrecognized devices with the RAW file system. The latter means that either the Windows environment does not understand the file system of the drive, or there is no file system as such in principle. Actually, this is what causes problems with a flash drive or SD card when it works on other devices, with other operating systems. In such cases, third-party Windows programs designed for so-called low-level formatting will help restore the flash drive.
In fact, low-level formatting is a procedure that is carried out either in the production conditions of flash device manufacturers, or in serious specialized services. Various types of Windows software that claim to perform this kind of operation actually perform a regular full format, but using mechanisms that differ from those used by the operating system. Such programs cope well with flash drive problems if these problems arise at the file system level. Let's look at two of these programs.
HDD Low Level Format Tool
http://hddguru.com/software/HDD-LLF-Low-Level-Format-Tool/
The shareware portable program HDD Low Level Format Tool can format various types of storage media, in particular SD cards and USB flash drives. After unpacking the archive with the program, run it and agree to the license terms.

We choose free use.

Directly in the program window we indicate the problematic drive and click “Continue”.


We confirm the decision.

We wait for the operation to complete and check the operation of the media.

SDFormatter
http://flashboot.ru/files/file/355
A completely free small program called SDFormatter is another tool for so-called low-level formatting. Works with both SD cards and USB flash drives. Install SDFormatter into the system, launch it, and indicate the problematic flash drive in the “Drive” column. Click “Format”.

The program wants to make sure that our intentions are serious, click “Ok.

He asks not to touch the drive while the operation is being performed.

Upon completion, test the flash drive or SD card. If it doesn’t help, repeat the operation with the settings for complete overwriting of sectors (nothing more than full formatting). Press “Option”, select “Full (OverWrite)”. And also click “Format” at the bottom.

If using the above methods it was not possible to revive the flash drive, and it is still under warranty, you need to stop at this stage. And do not take any further action except contact the seller with a request to replace the device. All the actions described below should be resorted to only when, in fact, there is nothing to lose. The instructions below apply to USB flash drives, SD and MicroSD cards. However, in the case of the latter, the likelihood of recovery is extremely low.
6. D-Soft Flash Doctor
D-Soft Flash Doctor performs so-called low-level formatting, and at the same time also detects damaged sectors (cells). Well, and, accordingly, knows how to block them and replace them with backup ones. The program can help when flash drives or SD cards have difficulty reading individual files located on damaged sectors. The program is free and portable. I did not find the official website, but it can be freely downloaded on the Internet.
In the D-Soft Flash Doctor window, the first thing you need to do is run a scan to detect errors.

In my case, there were no damaged (broken) sectors.

But if in your case, friends, the scan results are different and bad sectors are detected, we start the recovery process.

The window for performing this operation promises that the process will not last longer than 10 minutes, but in fact, reassigning bad sectors on a drive with a capacity larger than 4 GB can take quite a long time. So it is better to run the recovery operation at night.

7. Flashing the memory controller
Programs for so-called low-level formatting or their analogues, which in any other form claim to be able to resuscitate all types of SD cards and/or USB flash drives, turn out to be powerless in the event of a software failure of the controller, when it requires flashing. This problem can have different symptoms, but more often it is either the computer does not see the drive completely, or it sees it and can even read the data, but cannot format it by any means. In particular, due to write protection even though the drive is not locked by hardware.