How to configure d link dir 320 nru routers. The old horse doesn't spoil the furrow. Preparing the router for work
If you purchased a new router or moved to a new place of residence with old equipment, then most likely you will need to configure the d link dir 300 Rostelecom router. This process is not as complicated as it seems at first glance. In this article we will prove this and consider all the stages of this procedure, as well as setting up the d link dir 320 Rostelecom router.
- Preparing the router
- Setting up a router dir 300 Rostelecom - old firmware
- New firmware and work with the dir 320 model
- Enabling WiFi protection
- Conclusion
You can read how to connect Interactive TV through a router here.
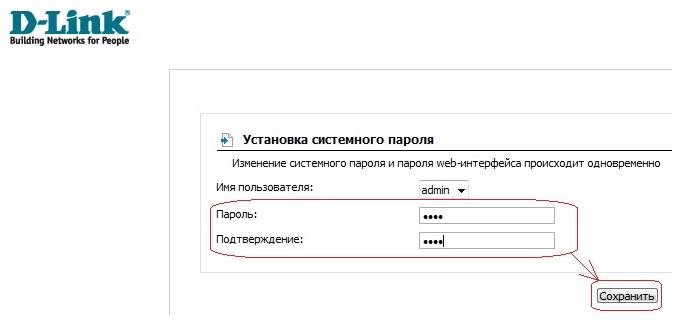
After successfully logging into the main interface, the router will most likely prompt you to change the standard password to your own. We enter the invented combination of characters in two fields, confirm and go through authorization again, but with new data. If everything is done correctly, you will see the main menu in the form of blue “buttons” of a fairly large size.
To start setting up the network, perform the following operations:
- click on the first (lower left) button of the second line “Configure manually”;
- In the top text menu, select “Network”;
- open an existing “WAN” connection;
- Scroll down the page and click “Delete” in the lower right corner;
- wait until the page refreshes, the “Add” button appears on the right, click on it;
- on the settings page that opens, specify the type of Internet connection – PPPoE;
we do not touch the port; - choose any name (this will be the name of your connection in “Network Connections” on your computer);
- Below we indicate the login from the agreement with Rostelecom, as well as the password;
- save the changes made, then click “Save” again in the center of the page.
- open the WiFi menu item (located next to “Network”);
- in the SSID field, enter any name for your network and move on;
to set a password, save the changes and select from the available WPA2-PSK options; - Enter the password you created and save again.
How to disable the Gudok service.
You can read about the transfer of subscribers of the mobile operator Rostelecom to Tele-2 here.
From this article you learned how to set up a dir 320 router for Rostelecom, as well as its previous model, and these instructions should work in most cases. If you have such a typical problem as the web interface being unavailable via IP (that is, the browser does not open the authorization page after entering the combination 192.168.0.1), then again go to the Internet protocol properties (where we set automatic IP/DNS acquisition) and switch network for working with static data. In the fields that become active, indicate:- 168.0.12;
- leave unchanged (should fill in automatically);
- 168.0.1;
- DNS data from the contract;
- also stated in the contract.
And that's all. Tell us about your experience connecting to the Internet. Any questions in the comments are welcome!
D-Link DIR-320 is a router that allows you to organize a wireless network to connect to the Internet. The built-in firewall protects users of the entire WiFi network. The router is equipped with additional security features (MAC filter) and encryption (WEP and WPS), which minimizes unauthorized access to the access point.
Any wireless network needs protection from connection by unauthorized persons. There are several ways to restrict access to the router. The simplest of them is to set a password for WiFi. To do this, you need to connect the router to your computer, configure it, and then proceed to set a password. As an example, let's try to set a password on the WiFi D-Link DIR-320.
Quick navigation through the article
Setting a password
A password allows you to protect your wireless network from unwanted connections. To set a password, you need to connect the router to the computer (via a special cable that comes with the kit), configure it and perform the following steps:
- Go to the IP address “http://192.168.0.1” (you can use the standard Internet Explorer browser, however, depending on the router firmware, the IP for connecting to the control panel may be different - http://192.168.1.1);
- In the “Username” field enter “admin”;
- In the “Password” line, write “admin” or leave it blank (depending on the router firmware version);
- Click the “Login” button;
- In the window that appears, on the left side, select the “WiFi” -> “General Settings” section;
- Check the box “Enable wireless connection”;
- Go to the “WiFi” -> “Security Settings” section;
- In the “Encryption key” field, create and enter a new password (it is best to set the WPA2 encryption mode);
- Click the “Change” button;
- In the upper right corner of the page, select “System” -> “Save and Reboot”.
In order for a password to become reliable protection, you must adhere to the basic rules for choosing it:
- The password must consist of at least 8 characters (letters of different sizes, numbers, symbols);
- You cannot use first names, last names, or animal names that may be known to unauthorized persons;
- It is not recommended to use dates of births, weddings, etc.;
- It is better not to use simple words and sets of numbers;
- It is advisable to change your password periodically.
The Internet is an integral part of the modern lifestyle. You can access the digital web through mobile applications and Wi-Fi waves. But the quality of reception and signal level directly depends on the device carrying out the transmission, in our case the router. D-link models are most popular according to consumer requests. The most important aspect when creating an outlet to the Internet space is the correct configuration of the D-Link DIR 320.
Creating a connection between the router and computer
In order for the D-Link Deer 320 to reliably perform all tasks, it will need to be installed correctly. Usually, the kit comes with detailed instructions, but not in all cases. Before proceeding with the connection to the computer, you need to check its characteristics:
- Open the terminal control panel.
- Click on the “network status” item.
- Go to the page for changing properties.
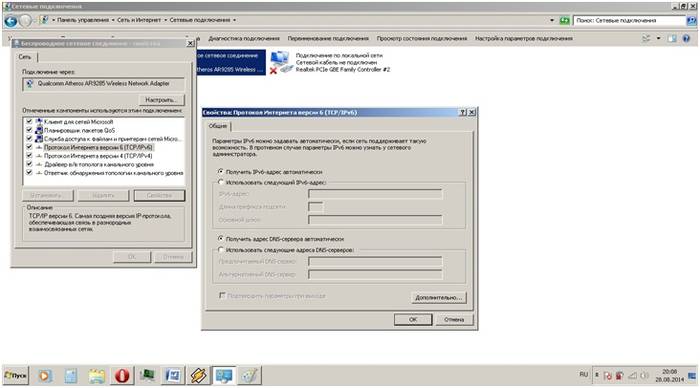
- In the new menu, open the properties of the local grid.
- A list of radio buttons will appear. Define "TCP/IPv4 protocol".
- In the menu that appears, allow the determination of IP numbers and DNS servers automatically.
- Save.
The connection is made using the wires included with the device. Among them: a cable and a five-volt power supply, a LAN cable. The router has seven functional connectors (for power, USB input, network socket, LAN sockets). Connect the cable supplied by the service representative to the INTERNET socket. Connect the wire supplied with the router to the LAN socket on the PC, and the other end to the router (this scheme is typical for a PC without a Wi-Fi adapter). If you distribute traffic via Wi-Fi waves, there is no need to use a LAN wire. Plug the power supply into a power outlet.
Video on setting up a D-Link router:
Next, to log into the Wi-Fi router, you need to launch any standard browser and enter the numbers 192.168.0.1 in the search bar. A menu will open where you will need to authorize (enter your login and PIN code). When using the router for the first time, this information is standard, the name and pin code are “admin”. But if you already have an account and you have forgotten the combination of numbers, click on the “Reset” button on the back panel.
Cable connection
There are several types of communication:
- PPTP;
- PPPoE;
- L2TP.
All manipulations are performed in the device service. To adjust PPTP you will need:
- Open the menu, router settings, select “Wan”.
- On the next page, click on the add button.
- Assign the method “PPTP dynamic IP”.
- Check the box for automatic connection in the VPN section.
- Specify the user's personal information (login, pin and confirmation), and mark the VPN properties. All this information is provided by the provider company that connects to the Internet. The client's data is included in a bilateral agreement with the provider. If they are missing, contact support.
- Apply.
- Go to the system properties of the interface and click on the “save and exit” button. The new changes will take effect.
Debugging L2TP parameters:
- In the front window, under the “Network” tab, find the “Wan” value.
- In the next menu, click on the add switch.
- Set the type to “L2TP dynamic IP”.
- Check the box for automatic detection.
- Enter the owner's confidential information (nickname, code combination and confirmation), indicate the VPN server address.
- Go to the system section of the interface and click on the save panel. The new settings will take effect.
The method for adjusting PPPoE connection is identical to the above methods. The only difference is in the protocol. But there are also protocols PPPoE, L2TP, PPTP with a static IP address. The debugging procedure is identical for all protocols and consists of the following steps:
- On the work field, under the “Network” tab, select “Wan”.
- In the window that appears, confirm the addition.
- Select the format “L2TP, PPPoE, PPTP static IP”.
- In the ID parameters section, enter the IP address, DNS server, default gateway, netmask.
- Specify user information (login, security code and code repetition).
- Go to the system interface parameters and save and reboot. The new settings will take effect.
Video on setting up a PPPoE connection on a D-Link router:
Typically, services with static protocols when setting up D-LINK DIR 320 are provided to legal entities and companies, or to individuals upon special request.
Access to the Internet via a USB modem
There is a USB socket on the rear panel. The router can operate using mobile Internet. Such modems are produced by almost every telecom operator (beeline, MTS, megafon). To establish communication with an external adapter. You need to go to properties in the router interface. Set the USB adapter value in the first section. Write the name of the telecom operator. If it is not in the default list, select the “custom” option. Fill in all the required fields with personal characteristics (user name and code), find them out from your provider or telecom operator.
Video to help with step-by-step router setup:
Go to the “USB modem” tab, go to the information section. In the window that opens, select the modem device type and wireless generation (4G, 3G, E). Allow connection to the mobile Internet network. Click on the action button. Some modem devices use a default password when logging in. To avoid constantly entering a password when turning it on, go to the “Pin” tab in the USB section. Enter the code provided by your provider.
Wireless connection
To change Wi-Fi characteristics, you need to go to the “network” tab and select the “wireless transmission” section. In this window, the user can stop wireless traffic transmission. Specify the network authentication method.
Factory settings are not designed to encrypt information. To protect traffic from interception, specify a method other than “Open”. Create a PSK code - this is the password that will be requested when finding a Wi-Fi network.
Software update
It is recommended to constantly monitor for new updates and install them. Each update adds new features to the router and increases the level of network protection against unwanted hacking. In the “support” tab you can find the latest current version of the software.
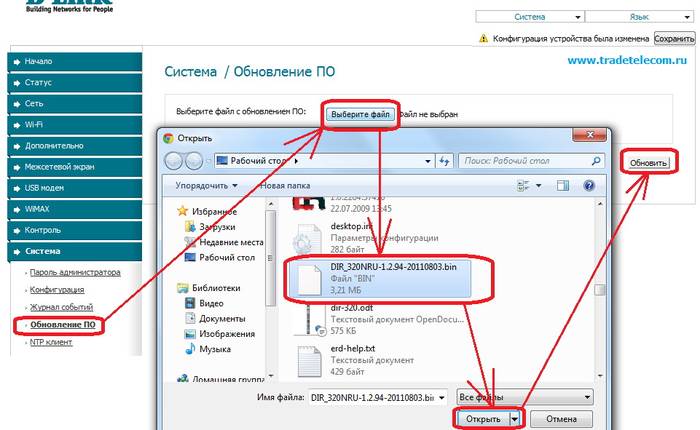
To update the device software, you need to go to the “system” section and open the “software update” section there. A window will appear in which you need to click the “browse” button. Specify the path to the current firmware file, which is located on your computer (downloaded in advance from an Internet resource).
Establishing a Wi-Fi connection
When all the required settings have been made, the last stage of adjustment begins. On a PC running Windows 7, the order is as follows:
- On the right side of the taskbar is the “Internet access” icon. Click on it.
- A window will open showing all wireless Internet distributions detected nearby. Click on the appropriate channel.
- Click on the “connection” icon.
- If a security code has been set, you must enter it.
After completing these steps, you will have access to the Internet.
Conclusion
Having completed the required debugging, the device will perform all its functions correctly. The process of setting up a router is quite labor-intensive, and not every user is able to cope with it. Therefore, when drawing up an agreement with a provider, he provides a specialist technician who will configure the router for high-quality operation.
In order to connect your computer to the Internet, the user needs to configure his router and himself. Only after this will it be possible to easily open various electronic pages of websites and download the necessary information.
Connecting a router
Setting up and connecting the D-LINK DIR-320 router begins with checking the functioning of important network nodes on the router itself and the computer.
To get started, you need to do the following:

If everything is done correctly, then you can start setting up the router itself and the connection.
Login to settings via web management
Before you start setting up D LINK DIR 320, you need to check the operation of network devices.
To do this, you need to perform the following procedure:
- go to start and select the “control panel” option;
- in the window that opens, you need to log in to the shortcut link “Network and Sharing Center” or “Network and Internet”, and then “Network and Sharing Center”;

- open the option “Change adapter settings”;
- Click on the “Local Area Connection” shortcut with the right mouse button;
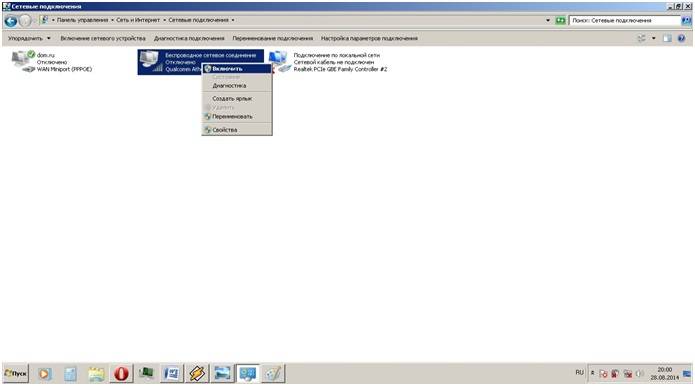
- if the “connect” option appears in the operational window, then click on it; if disconnect appears, then simply close the operational window;
- then you need to open properties in the same operational window to open a new window;
- in the new window, select the line “Protocol ... 6” and click on the “properties” option and in the next window select the automatic configuration option;
- perform the previous operation in a similar way, but with the line “Protocol ... 4”.
These steps are necessary to prepare the automatic configuration of the d-ink dir 320 wifi router and local network.
After setting up a local connection, you need to launch the disk included with the router. It is necessary to create a local connection to the Internet and configure the router itself. This is done according to the prompts that pop up in the installation window.
Particular attention should be paid when choosing the connection technology parameter - pppoe or l2tp. You should choose a connection format in accordance with the parameters specified in the Internet connection agreement.
The next step is configuration via the web interface. To do this, you need to type the IP address 192.168.0.1 in your Internet browser.

The login and password are in the instructions, which the system will prompt you to change after logging in.

After changing the login and password, an interface will appear on the screen in which all connection parameters will be indicated, including all possible settings parameters based on the provider’s technology.
Firmware update
The standard router kit includes a disk with software necessary for the correct operation of the network device, but this does not guarantee the uninterrupted and correct functioning of the D-LINK DIR-320.
How do I configure and install the latest version of the required drivers?
Software updates for the D-LINK DIR-320 router can only be done using the home Internet page – 192.168.0.1. This procedure should be carried out immediately after installing the basic software from the disk by following the link “ftp://dlink.ru/pub/Router/DIR-320_NRU/Firmware/”. Download and save the file to your desktop.
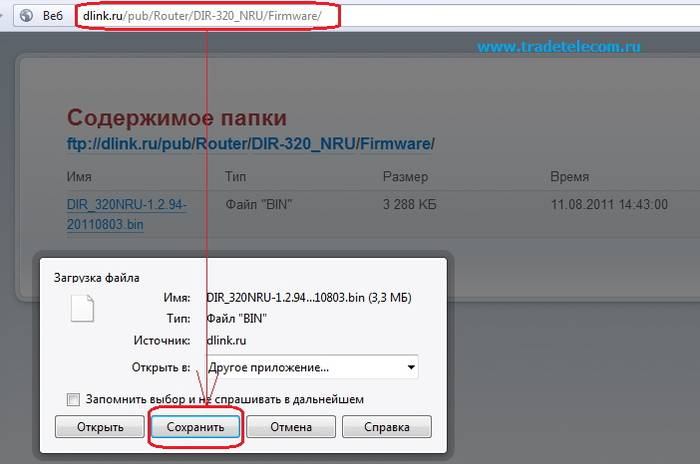
Thus, the path to the file is set, on the basis of which the router software will be updated. When carrying out this operation, you cannot turn off and restart the computer before it is completed, otherwise a failure may occur and you will have to start installation and configuration from the very beginning.

When the update is complete, the DIR-320 will reboot.
Setting up the D-LINK DIR-320 router from providers
The providers themselves often take advantage of the information weakness of users, most of whom are simply afraid to get into the hardware and figure it out on their own. In this regard, it is always possible to call an appropriate specialist to your home to carry out the appropriate work on setting up the Internet.
For example, setting up a D-LINK DIR-320 router from Rostelecom can be ordered by dialing the technical support number. The operator will listen to all your problems and offer a convenient time to call a company specialist at your home.
In fact, all these steps are simple, and you can do them yourself without additional expenses.
To do this, you must adhere to the following sequence:


This sequence of setting up an Internet connection is applicable to the Windows 7 and 8 operating systems.
Setting up for Rostelecom
To configure the D-Link DIR-320 router on the Rostelecom provider network, the user must go to the router’s home page (192.168.0.1) and perform the following steps:
- in the tab on the main page, select the “network” tab;

- click on the “Wan” option;
- the Wan connection setup wizard will appear in the updated window;
- when selecting the connection type parameter, select “pppoe”;
- click on the “next” option;
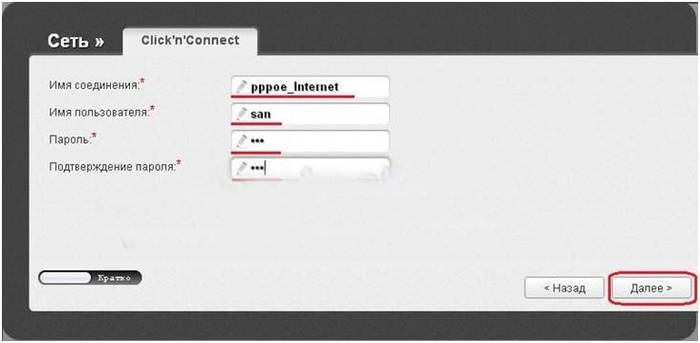
- in the updated window, indicate the name of your network (it can be arbitrary), username and password (specified in the contract);
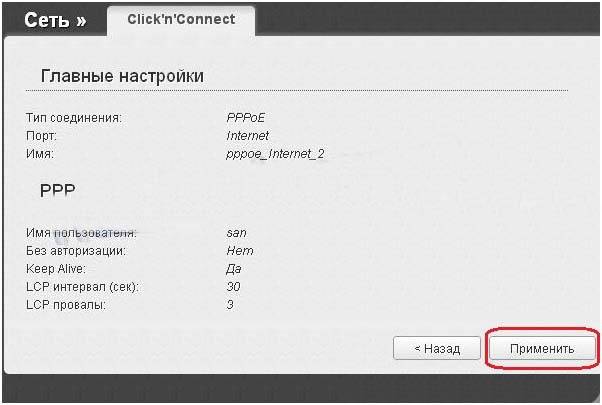
- then click “next” and “apply”. The parameters are saved in full and displayed in the updated window;
- after which we proceed to setting up a wireless connection using the dir320 router, where the name of the wireless network and password for entering it are indicated (indicated arbitrarily, but in accordance with the instructions of the router) and save

Setting up for Beeline
Setting up the D-LINK DIR-320 router for the Beeline provider differs from Rostelecom, because they use the connection type "l2tp".
So the user's actions should look like this:

If everything is done correctly, the user will be able to freely use the Internet.
Setting up for MTS
Connection to the Internet from the MTS provider uses pppoe technology.
Therefore, setting up the D-Link dir 320 router will proceed as follows:
- checking the operation of the network device;
- go to the home page of the router in the Internet browser 192.168.0.1;
- install drivers;
- update drivers;
- go to the “network” tab and select the “connections” line;
- in the window that opens, select the “add” option;
- connection type is set to “pppoe”;
- check the “allow” box;
- in the line “physical interface” set the parameter “port5”;
- in the user name and password lines we enter the corresponding data from the agreement with the provider;
- in the “NAT” and “firewall” lines, check the boxes;
- save the parameters and configuration.
Video: Setting up a D-Link dir router
Setting up Megafon
Internet from Megafon is mainly provided using 3G technology. Therefore, all settings are set manually:
- go to the router page 192.18.0.1;
- select the “Internet installation” column;
- in the updated window at the bottom, select the option “set up an Internet connection manually”;
- in the window that opens, select the connection type “3 GUSB adapter”;
- in the fields of login, password and dial number in accordance with the parameters issued by the provider under the contract;
- save the parameters.
Wireless connection
Network operation via the wi-fi module of the DIR-320 router is very simple and convenient. To set up a wireless connection, just follow the prompts during the initial installation of the driver on the router. If a corresponding message appears during the installation process, you should set the recommended parameters according to the prompts.

The main attention should be paid to the settings of the network card on the computer to support a wi-fi connection. In this case, you need to go to the control panel, and in it select the network and sharing center. Next, enter the option to change adapter properties and check the operating status of the wi-fi module. If everything works, then the connection to the Internet will occur immediately and without delay.
Wi-Fi connection settings in Windows 7
If the connection to the Internet does not occur automatically, and this only happens when using older versions of D-LINK DIR-320(b1) or the windowsxp operating system, then manual configuration will be required. To do this, you need to go into the settings of the wireless connection adapter and manually set the IP and DNS address. In this case, the IP address will correspond to the router address, and the submask (dns) will be 255.255.255.0.
Next, the user must create a new connection without changing the parameters. You only enter your login and password information to connect to the Internet, and a shortcut is created on the desktop, when opened, a direct connection occurs.
Thus, in order to fully configure your D-LINK DIR-320 router, you need to:
- carefully read the instructions for the router;
- check the operation of the network card and local network settings on the computer;
- install drivers and configure the connection according to the prompts during the installation process;
- update drivers to the latest version.
Experienced users can easily cope with such a task, but for beginners it will be difficult. But if they configure their router strictly in accordance with the indicated order, then the result will not be long in coming.
>