How to set email on Samsung phone. Step-by-step instructions - how to create an email. Adding and setting up a new account
Our man won’t go into his pocket for a word, but for mail he will. No, we are not talking about an envelope with a letter taken out of a box and stuffed into a pocket, but about a smartphone, which is our personal “postman” in a modern version.
Many people think that Android phones allow access, which is linked to a Google account, and iPhones only work with a mailbox that is associated with an Apple ID. And that other email accounts require additional programs. In fact, gadgets have enough capabilities for everything. Let's talk about how to set up email on your phone to receive emails from all your accounts in one mailbox - built into the system.
Setting up mail in the Gmail app on Android
Adding and setting up a new account
Mail client " Gmail", pre-installed on Android phones, can be used to assemble letters from various mail services, except those that do not support third-party applications, such as the highly secure ProtonMail and Tutanota. By default, it collects emails only addressed to the Google account associated with the device.
To connect another email account to the Gmail client, do the following:
- Launch the application. If anyone doesn’t know, his label is a white envelope with a red letter “M”.
- Tap the hamburger button and open the side menu. To access the account management section, tap the triangle circled in the screenshot.

- Select " +Add account».

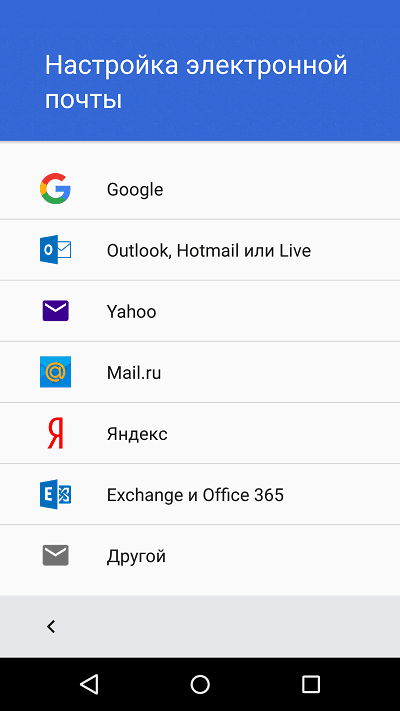
- Select the mail service you want to connect. For example, if the domain name of the server where your mailbox is located is yandex.ru or ya.ru, select Yandex; if gmail.com, choose Google, etc. If the service you need is not in the list, your choice is “ Another" We will analyze further actions using the last option as an example.
- Enter your email address. To set it to default settings, click " Next" If you want to specify your settings, tap the " Manually».

- If you choose manual setup, the program will ask you to specify one of three account type options. For personal mail, these are POP3 or IMAP protocols (you can find out what to choose from the user manual of your mail service). For mail on a corporate server - Exchange, unless otherwise used.

- Enter your login or full mailbox address and password again to log in.

- In the next step, specify the incoming message server. If the program does not detect it itself, you will have to once again refer to the manual of your mail service.

- Next, enter the address of the outgoing message server and, if desired, enable automatic login. Then you won’t have to enter a password every time you access your mailbox.

- The basic setup is almost complete. The only thing left to do is to allow or disable synchronization of the program with the mail server. If allowed, set the synchronization frequency (15 minutes by default), and also enable or disable notification of new emails and auto-downloading of attachments when the phone is connected to a Wi-Fi network.

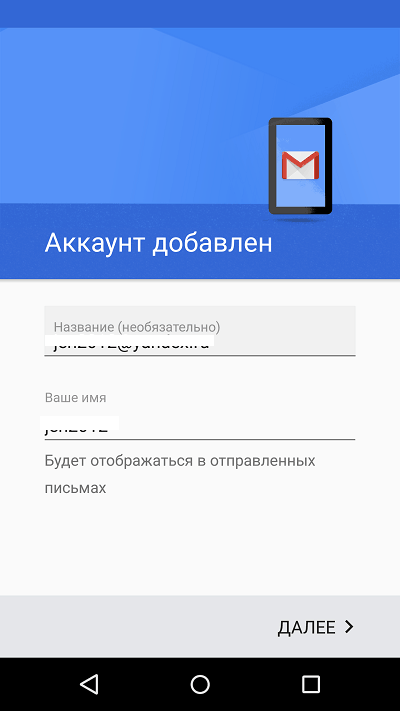
- Account added. At the final step, you can change your name, which will be displayed in sent letters. By default, the account login is specified instead of the name.
You can finish here, but if you want to customize the new box more subtly, open the side menu in the application again, scroll down and tap the button Settings».

Select the account you want to edit.

The following parameters are available for change:
- Account name (email address).
- Your name (by default, this is your account name).
- Signature in the letter.
- Linking an address to another Gmail account.
- Request to display images in emails (if your Internet connection is slow or is charged based on traffic volume, it is better to enable it).
- Synchronization with the mail server and its frequency (high frequency of synchronization increases the volume of traffic and speeds up the drain of the phone battery).
- Automatic downloading of files attached to emails when connected to Wi-Fi.
- Notifications about new letters.
- Sorting incoming correspondence by category (unsorted letters, social networks, forums, promotions and notifications). Not supported by all email services.
- Automatic reply to incoming emails. Not supported by all email services.
- Automatic substitution of quick answers. Not supported by all email services.
- Select a ringtone to notify you of an incoming message.
- Adding shortcuts.
- Vibrating alarm to notify you that a letter has been received.
- Incoming and outgoing mail servers (user name, address, port and encryption type), etc.

In exactly the same way, accounts for other mail services are added to Gmail. There are no restrictions on quantity. It is usually not necessary to use manual settings, as described above, except for connecting corporate or some exotic mail accounts. In other cases, the application selects the optimal parameters by default.
How to change and delete your Gmail account
By default, Gmail only displays correspondence from one account—the currently active one. To check another person's mail, you need to make it active.
All connected accounts are displayed in the top field of the main application menu (hidden behind the “hamburger” button). To switch between them, just touch the desired shortcut. And to simultaneously download messages from all your mail, select “ All boxes».

To delete an account from the Gmail application, click the triangle button in the main menu and open “ Account management».

Next, select the email service and account you want to delete. On the next screen, highlight the desired address again and go to the menu hidden behind the “three dots” button (top right). Tap " Delete account».

Setting up mail on iPhone and iPad
Connect and set up your account
Adding and setting up an email account on Apple mobile devices is no more labor-intensive than on Android, but, in my opinion, it is less intuitive. And they are executed not in the mail section, but in “ Accounts and passwords».
To use a different email account on your iPhone or iPad other than the one linked to your Apple ID, do the following:
- In the list, tap " Accounts» point « Add».

- Select the mail service where your mailbox is registered. If it is not in the list of suggestions, click " Other».

- Next, select the section “ Mail" And " New account».

- Enter your account information: username (by default the email account login is entered), email address, password and description (the latter by default matches the mailbox address). Tap the button Next».

- In the next window - IMAP, check " Mail" Paragraph " Notes» It is not necessary to mark. Save the setting.
- Next, if you think the settings are sufficient, click “ Ready" A new account will be added. If you want to edit settings that are not displayed in this window, click " Additionally».

In the section " Additionally» contains the following options:
- Behavior of boxes. Allows you to assign or change the roles of some folders - drafts, sent, archived and deleted messages.
- The place to move unnecessary letters is to the trash or archive box.
- Frequency of emptying the recycle bin (complete destruction of deleted messages). The default is one week.
- Options for receiving incoming mail: use SSL encryption, select an authentication method, IMAP server port number, and IMAP path prefix.
- Whether to use S/MIME encryption. Disabled by default, supported by most but not all email services.

After closing the settings window, you will be taken to the newly created account section. By the way, there is also a button to delete it.

Now the mail program built into the system will receive letters, including from this mailbox.
Setting up the mail application
The parameters of the built-in mail program are configured, as you probably already guessed, through the section “ Mail».
The following is collected here:
- Application integration with Siri and search system.
- Ways to notify about incoming correspondence (ringtone and sticker). You can assign individual notification settings to each mailbox.
- Message list display: number of rows to display when viewed, labels, swipe options (right, left, adding a flag, etc.), flag style and color.
- Actions when reading a message (request confirmation for deleting a message, uploading pictures).
- Sorting and processing of correspondence: grouping by topic, collapsing read letters, location of the last message (top or bottom), ending topics (showing a chain of letters that make up one topic, even if they have been moved to other folders).
- Options for the message being created: sending a copy of the letter to yourself, marking addresses, indentation when inserting a quote, signatures - general or separate for each account, and the default account from which new letters will be sent.

As you can see, the email program on Apple phones and tablets allows you to completely configure it to suit your own needs. Not every third-party application can boast such functionality. Another plus in the collection of mailers built into the system - both on Android and Apple - is the absence of advertising, which almost all free analogues are stuffed with. So both programs are quite good.
Enjoy it for your health!
class="eliadunit">
E-mail has become so firmly established in our lives that it is unthinkable to imagine how we would communicate on forums, exchange information, photos and videos without this useful service. Increasingly, there is a need to have two or three, or even five or even ten email addresses: for work colleagues, partners, friends, forums, mailing lists, etc. etc. Working with such an army of mailboxes through regular web interfaces on postal service websites takes a lot of time and significantly increases Internet costs. And here email programs come to our aid.
What is an email program? This is a program installed on your PC in which you can receive, write, send and store emails and their attached files directly on your computer without visiting the email site through a browser.
An email program is also often called a mail client, an email client, an email client, or a mailer.
Today there are many email programs. We will look at the most common of them, running on the Microsoft Windows operating system:
Windows Mail (installed by default in Windows Vista)
- Microsoft Outlook Express (installed by default on Windows XP)
- Outlook Office 2007 (included in the Microsoft Office 2007 software package)
- Outlook Office 2003 (included in the Microsoft Office 2003 software package)
We will analyze all the main points using the example of the Windows Mail program, supplied with all operating systems of the Windows Vista family. And then we will step by step analyze the process of setting up other email programs.
As an example, we will use a mailbox on mail.ru with the name and password password.
So let's get started.
How to Set Up Windows Mail in Microsoft Vista
Record ID: 32 does not exist!
1. First of all, let's launch the mail program.
In the Windows Vista Start menu, click “All Programs” and select “Windows Mail” from the list that appears.

2. Let's start creating a new email account. To do this, in the “Service” menu, select “Accounts...”.

3. In the window that opens, click the “Add” button.

4. Select the type of account to be added – “Email Account” and click the “Next” button.

5. Enter the name that will appear in the “From” field of all letters we send. For example, Anna S. And click the “Next” button.

6. Enter our email address, for example This email address is being protected from spambots. You must have JavaScript enabled to view it., and click the “Next” button.

7. Now the most difficult part of the work is setting up the reception and sending of mail. To do this, you need to enter the names of the corresponding servers - POP3 and SMTP. Let's figure out what it is.
POP3- from the English “Post Office Protocol Version 3”, translated as “post office protocol of the third version”. It is used by the email program to receive mail from the server. In our example, the server is mail.ru, because This is where the email account is registered.
SMTP- from the English “Simple Mail Transfer Protocol”, translated as “simple mail transfer protocol”. It is designed to transfer mail to a server (in our example to mail.ru) and from the server to the recipient.
For greater clarity, let's use an analogy with a postman. POP3 postman brings mail that comes to you from the post office, which is mail.ru. The SMTP postman takes your mail, takes it to the post office (mail.ru), and from there delivers your letters to the recipients.
Thus, if thanks to POP3 we receive mail, then thanks to SMTP we can send it. The operation of these protocols is invisible to our eyes. However, any email program must specify which protocols to use.
In our example:
Incoming message server for receiving mail: pop3.mail.ru (where pop3 is the protocol for receiving mail, and mail.ru is the system in which the mailbox is registered)
- outgoing message server for sending mail: smtp.mail.ru (where smtp is the protocol for sending mail, and mail.ru is the system in which the mailbox is registered)
Note: If you have a list.ru or bk.ru mailbox, then you need to write them instead of mail.ru. Then you get pop3.list.ru or pop3.bk.ru for receiving mail, and smtp.list.ru or smtp.bk.ru for sending mail. The same principle applies to any other mail systems: yandex.ru, rambler.ru, etc. Everywhere a dot and the name of the mail system are added to pop3 and smtp. For example: to receive mail pop3.yandex.ru or pop3.rambler.ru; to send mail to smtp.yandex.ru or smtp.rambler.ru.
So, we entered the server names for receiving and sending mail: pop3.mail.ru and smtp.mail.ru. Each field must contain only one name.

8. There is another interesting option in this window. For security reasons, many mail systems, including mail.ru, require your mailbox name and password when sending and/or receiving mail. In this case, be sure to check the box next to “The outgoing message server requires authentication.” Now you can click the “Next” button.

9. Now enter the mailbox name and password for it. In our example this is This email address is being protected from spambots. You must have JavaScript enabled to view it. and password. When entering the password, black dots will be displayed - this is how it should be, 1 dot = 1 character. This is done for security purposes so that no one can snoop on the password.
In this window, we will also check the box next to “Remember password” so that the mail program does not ask us to enter it every time we send or receive mail. Click the “Next” button.

10. Setting up your email program is almost complete. In the next window, we need to make an important decision: whether or not we want all our incoming letters to mail.ru to be downloaded to the computer in the mail program.
If we DO NOT want to, then check the box next to “Do not download email messages.”
Otherwise, don't check the box. However, remember that if you have a lot of emails in your inbox and they are large in size, you risk wasting a lot of bandwidth and time downloading them.
Having decided on the checkbox, click the “Finish” button and complete the setup of our mail.

11. The newly created email account will appear in the list. Click the “Close” button at the bottom of the window.

The mail program setup is complete. Now you can write, send and receive letters directly from your computer.
How to set up Outlook Express on Windows XP
1. Open the program by clicking “Start” – “Programs” – “Outlook Express”.

2. In the “Service” menu, select “Accounts”.

3. Click the “Add” button and select “Mail...”

4. Enter the name that will appear in the “From” field of all letters we send. For example, Anna S. And click the “Next” button.

5. Enter our email address and click “Next”.

6. Select the “Incoming message server” list - POP3.
In the “Incoming message server” field, enter pop3.mail.ru.
In the “Outgoing message server” field, enter smtp.mail.ru.
Click the “Next” button.

7. We keep the email address – This email address is being protected from spambots. You must have JavaScript enabled to view it. and the password to access this email account is password. Check the box next to “Remember password” and click the “Next” button.

8. To complete the account setup, click the “Finish” button.

9. Our mailbox appeared on the list. But setting up the Microsoft Outlook Express email program is not yet complete. For security reasons, many mail systems, including mail.ru, require your mailbox name and password when sending and/or receiving mail.
To configure this option in Microsoft Outlook Express, select the newly created email account and click the “Properties” button.

10. In the window that appears, go to the “Servers” tab. Check the box next to “User Authentication”

and click the “Settings” button. Let’s make sure that the “How to incoming mail server” item is highlighted there and click “OK” in all the windows.

11. In the Accounts window, click the “Close” button.
This completes the configuration of the Microsoft Outlook Express mail program.
Oddly enough, in the 21st computer century we still cannot do without mail, or rather, without email. Every newcomer, when getting acquainted with the global Internet, is faced with the task of creating and registering his own free mailbox, since without his Email he will not be able to register in any social network, various services, and using the email mailbox is convenient for sending messages anywhere Sveta. From this article you can learn: what email is, how to register a mailbox, which email service to choose for your email address, and many more interesting and useful things.
Email - what is it?
E-mail is a technology that allows you to transmit messages, pictures, videos and music files at a distance to other Internet participants (in English this is: electronicmail, abbreviated - e-mail oremail). In other words, e-mail is an analogue of regular “paper” mail, but only on the international Internet. The following concepts are also used here: letter, send, receive, attachment, signature, address. In everyday life, people usually say “electronic”, “soap”, “box”, “email”.
If you think that email is a fairly young creation, I hasten to surprise you - it is already more than half a century old! According to the most recent data, the appearance of e-mail is 1965 - it was then that Noel Morris and Tom Van Vleck (employees of the Massachusetts Institute of Technology) developed the program « mail", with the help of which it became possible to transmit messages between workstations connected to one large computer:

After the advent of the global domain name system (DNS), domain names began to be used for communication in the address, for example: box@ infomechanics.ru, it was then that the so-called “dog” appeared - @ .
And finally, in the mid-90s of the twentieth century, mass email services appeared:
- 1996 – Hotmail launched;
- 1997 – Yahoo! mail;
- 1998 – Russian service Mail.ru;
- 2000 – Yandex Mail;
- 2004 – Gmail Google.
The advantages of email include: ease of remembering the email address, which usually looks like this: mailbox_name@service_domain; another plus is the ability to send any information: text, files, images, audio, video, programs, etc.; independence of postal services; reliability and speed of mail delivery.
Among the disadvantages, it should be noted such a phenomenon as SPAM– mass mailing of advertising information without the consent of the owner of the mailbox; Like regular mail, email is also prone to delays in the delivery of letters; and the last minus is the limitation on the size of the sent attachment; usually it should not exceed 10 GB.


Yahoo.com(Yahoo Mail) is a mail service from the oldest search engine “Yahoo!”, quite popular in the West, but not very widespread in our country. There is a Russian interface. Can be used for secondary purposes. Register here: Yahoo.com

How to register an email - I share secrets
If you have read this far, then the issue of choosing a mail service (see above) has been resolved for you. The registration process for all mailers is basically the same and has been described many times on the Internet, so I won’t repeat this. I’d rather share with you some secrets that few newbies know about:
- You can register as many mailboxes as you like on different services (Gmail, YandexMail, MailRu, etc.). There are no restrictions on the number of email addresses for one person.
- To create an email, it is not necessary to indicate a phone number; you can do without it, then during registration you will be asked to enter a “secret” question, the answer to which only you know. Advice: If you are concerned about the safety of the contents of your mailbox, indicate your mobile phone number when registering, this will protect your mail from hacking by 99%. If you already have an email account, you can also link your phone number to it; this option is now available in most email services.
- Choosing name for your email do not create too long and complex, they are difficult to remember, here are examples of such “stupid” addresses: as.petrov_otdelserv@, alina1988.menedjer@, kri987456321@ - apparently people have difficulty with imagination... Of course, all the beautiful and short names have long been taken (in networks even sell such “beautiful” boxes!), but with some effort you can come up with something original and easy to remember, for example: 77box@, doctor77@, freemen@, infomehanik@ :-).
- Email password It is important that the more complex it is, the more difficult it will be for burglars to pick it up. But there is a flip side to the coin - the longer the password, the more difficult it is to remember. Therefore, I recommend making passwords 10-15 characters long and writing them down separately somewhere in a notebook. You can, of course, store passwords in a browser or in special programs, but this is less secure. Include letters, numbers, and symbols in your password. Sharing a trick– to make it easier to remember the password, type it in Russian words, but in the English keyboard layout, for example, your password "catboots" in English layout it will look like this: « rjndcfgjuf[». But don’t leave the password in such a simple form, complicate it by adding capital letters, several characters and numbers: “ Puss!in!Boots10"- in English it will look like this: « Rjn!d!fgjuf)