How to install the network driver? How to install a network adapter
On this page we will deal with the driver for the network card of a desktop computer or laptop. In the title I also wrote an Ethernet controller - this is a network adapter. It’s just that in the device manager, as a rule, the network card is displayed as an unknown device called “Ethernet controller”. This is when the driver is not installed on it. I will try to explain in detail how to determine the status of a network card (does it work, no, do I need to install a driver), then I’ll show you how to determine which driver is needed for the Ethernet controller specifically in your case, and where to download it.
I don’t often write articles specifically on solving problems with LAN adapters, for the reason that there are practically no problems with these adapters. They often burn, that's all. But as for drivers, Windows 10, Windows 8, and Windows 7 almost always automatically install drivers on the network card. The same cannot be said about the wireless Wi-Fi adapter. But today is not about him.
The Ethernet controller itself is almost always integrated into a laptop or desktop computer’s motherboard. Perhaps your system unit already has a discrete network card that is connected to a PCI slot. And there may also be a USB adapter, something like this, but this is rare. For greater clarity, let's look at the picture:
It doesn't matter which Ethernet controller you have installed. In any case, for it to work, a driver must be installed on it. You can check this in Device Manager.
Checking the network card in Device Manager
Let's go to the device manager and see what's what. If you don’t know how to enter the device manager, then press the keyboard shortcut Win+R, copy the command into the window devmgmt.msc, and click Ok. Or right-click on “My Computer” - “Properties”, and there “Device Manager”.
Open the tab immediately "Network adapters". If everything is fine with the network card, then there should be an adapter in the name of which you will see the words “LAN”, “Ethernet adapter”, “PCI...”, “Family Controller”, etc. I have an ASUS laptop, and adapter "Realtek PCIe GBE Family Controller".

If you don’t see a network card there, then there must be an unknown device (with yellow exclamation point). Most likely, it will be called "Ethernet controller". This is our network card, which does not work due to the lack of a driver. Windows without a driver simply does not know what kind of device it is and how to “communicate” with it.

We just need to install the driver on the network card. Or reinstall it if there is an adapter, but it works with errors or does not work at all.
Which driver should I download for the network card (Ethernet controller)?
We found out that we need to download and install the driver for the Ethernet controller. You probably immediately have a question about what driver is needed and where you can download it. Let's figure it out now.
The most correct way is to look for a driver for your laptop model, motherboard, or network card itself.
I understand that your Internet most likely does not work. If you had a driver disk with the adapter itself, laptop, or motherboard (if you have a PC), then you can try installing the driver from the disk.
If there is no disk, you will have to look for and download the driver from another computer, or even a mobile device. Then transfer it to the desired computer and install it.
If you have a laptop with a built-in network adapter
Everything is very simple here. First we need to find out the laptop model. It is exactly indicated on the sticker on the bottom of the laptop. Next, we type the laptop model into Google and go to the official website. Or, go to the official website of the manufacturer of your laptop, and through a search on the site we find the page for the model of your laptop. There we already look for the “Drivers”, “Support”, etc. tab, and download LAN Driver. Required for your Windows installation.
Depending on the manufacturer of your laptop, the process itself will differ. Therefore, I cannot give specific instructions. But the procedure will be the same. Since on the website of each manufacturer there is a page for a specific laptop model where you can download all the drivers.
I described this process in more detail in the article. In this case, everything is exactly the same, only in the end we download the driver not for Wi-Fi, but for the network card. Although, you will most likely have to download and install the driver for the Wi-Fi adapter.
Searching for a LAN driver for a desktop computer
If you have a desktop computer with a network card built into the motherboard, then you need to look for the driver on the motherboard manufacturer’s website for your motherboard model. You probably have a question about how to find out the model of your motherboard. There are many programs, such as AIDA64, or CPU-Z. But this can also be done via the command line.
Open a command line and run the following commands one by one:
wmic baseboard get Manufacturer
wmic baseboard get product
Only the last one is possible. After completing it, you will see the motherboard model.

Next, we search the Internet for the motherboard model, go to the developer’s website, in my case it’s MSI, and download the LAN driver. Just remember to select your operating system. There will definitely be such an opportunity.
If you have a PCI or USB network card
In this case, first check if there was a driver disk included with the card itself.
If not, then you need to find out the model of the network adapter and download the driver from the official website. The model can usually be viewed on the device itself.
Searching for an Ethernet controller driver by VEN and DEV
This is a backup case. There is one good site that has helped me out more than once. With its help you can find a driver for almost any unknown device.
First, go to the device manager, right-click on our Ethernet controller (or an unknown device that you think might be a network adapter), and select "Properties".
In the new window, go to the "Details" tab. Select "Hardware ID" from the drop-down menu. Copy the last line (if it doesn’t work, you can try others).

Go to the website http://devid.info. In the search bar, paste the copied line from the device manager. And click "Search".
Download the first driver from the list. Please note that next to the driver the system for which it is suitable will be indicated. You need a driver for your Windows operating system. There you can select the desired system and system capacity from above. For example, Windows 10.

And on another page:

Download the driver file to your computer. Now we will install it.
Installing a driver on a network card in Windows 10, 8, 7
So, we already have the driver. As practice shows, to install you just need to open the downloaded archive, run the setup.exe file, and follow the installation instructions.

If any error appears during the driver installation process, restart your computer and try the installation again. If the driver still does not want to be installed, then try downloading another one. But there shouldn't be any problems.
We update the driver manually (if there is no setup.exe file)
You can try another installation method. First, extract all files from the driver archive. You can go to your desktop.
Next, go to the device manager and right-click on the network card. More precisely, to an unknown device (or Ethernet controller), which you think is the network adapter, and select "Update drivers".
In the new window, select “Search for drivers on this computer.”


The system itself must find and install the driver. If you specified the folder with the correct drivers.
If something didn’t work out for you during the installation process, write in the comments. Describe the problem in detail and I will try to help you.
How to install a driver on a network card in Windows 7 10 XP? In the modern world, not a single user can do without access to the Internet, so a properly configured network plays an important role.
For the network to work correctly, you first need to install the correct driver on the network card of your personal computer, and we will look at how to do this later.
When installing the operating system, the network card driver may be installed automatically; to check this, you need to go to the “Device Manager” and open the desired network branch.
Call the context menu to do this by right-clicking on the “My Computer” icon and selecting “Properties” from it. In the window that opens, click on “Device Manager”.
Go to “Network adapters” and see if there are exclamation marks or question marks there. If any are present, you need to install the driver.

Next there are several options. The simplest one is when the driver disk comes with the motherboard or network card; here you just need to insert it into the drive and install the required driver.

In Device Manager, go to our network card, right-click to open the context menu, select “Update driver” and the next step is to search on this computer.

Next “Browse” and indicate our drive with the installed disk, click Next... Next... and wait for the driver to install.

But what to do if there is no drive, or the driver disk itself. The first step is to find out the model (brand) of the network card we are using; for this, the AIDA64 program will be useful. We launch the program, in the menu on the left we go to “Devices”, in it we select “Windows Devices”, in the window on the right we select “Network adapters”, and in them our network card. When we select it, the program will show us its make and model.
Next, we need a device that is already connected to the Internet. We go to the official website of the manufacturer, download the driver we need (indicating the model of the network card in the search). Transfer it to your computer and start the installation.
If the driver is loaded in the form of libraries without an executable file (usually setup.exe), then we use the first method only in the “Browse” field, instead of specifying the folder where the driver was written (it must first be extracted from the archive).

After installation is complete, you must restart your computer.
How to install a driver on a network card without the Internet?
In this article we will look at several ways to solve this problem.
Installation disk
Typically, motherboards, network adapters and other hardware are sold along with a disk containing drivers and installation instructions. Look among the disks lying around, maybe you will find a disk with the necessary drivers.
Found it? Insert it into the drive. Now you need to go to “Device Manager”. In Windows 10, you can right-click on “This PC” -> “Manage” and find the manager there. Find the network adapter among all devices and select “Update driver” in the context menu. In the window that appears, click “Search for driver software on this computer” and select the drive. The driver installation will start and soon you will have Internet access.
Download the driver using another computer
If the installation disk is lost, you can download the driver through another computer that has access to the Internet. But for this you need to know the exact model of the network adapter. Perhaps you still have the box from the network card, or a warranty card, which may indicate the model. If not, let's try to find out programmatically.
In the same device manager, right-click on the network card -> Properties -> Information and select “Hardware ID” in the “Property” drop-down menu. Copy the value and enter it into Google. The search engine will find many sites where you can download the appropriate driver for this device.
Previously, we wrote about how to check system stability using the Aida64 program. This feature-rich program can show all the devices connected to the motherboard. Launch Aida64 and go to Network -> Windows Network. There you can find out the manufacturer and model of the network card. Download the driver from the Internet.
Installing the driver from the .exe file should not cause any difficulties.
Creating a Backup
Before reinstalling Windows, it is better to back up your drivers. This will help restore the functionality of all devices in a few clicks. Windows has a built-in utility called DISM.exe. In fact, DISM.exe provides many options, but we will use the function of creating a driver backup.
Run Command Prompt as Administrator. To do this, right-click on Start and find this item there. In newer versions of Windows 10, it is called Windows PowerShell (Administrator).
Enter the command:
dism /online /export-driver /destination:E:Backup
E:/Backup - folder where to save drivers. Create it in advance. You can also save drivers to other media, such as USB flash drives. The export of drivers to the specified directory will begin. Wait until the process is completed and only then proceed to reinstall Windows.
When you have a “clean” OS in front of you, it’s time to restore all drivers. Just like with the installation disk, you need to open the device manager, find the network adapter and start the driver installation from your computer, selecting the folder where you saved the backup copy.
3DP NET program
There is a wonderful program that can install drivers on a network card without the Internet. This is a utility that contains many drivers specifically for network adapters. And with a 95% probability, the driver for your adapter is also there.
Download the current version of 3DP NET from the Internet in advance. I specifically do not provide a link, because the program is constantly updated, drivers are added for new devices. Launch 3DP NET. The drivers will begin unpacking into the specified folder. Then the program will automatically detect your network adapter and in 1 click you can install the driver. I strongly recommend recording this program on a flash drive so that you can install the driver at any time.
Select “Search for drivers on this computer.” If you don't have a driver disk? When might you encounter a problem installing a network device driver? If a driver is already installed on a network card or Wi-Fi adapter, they are displayed in the Network adapters section with the appropriate names. The network device driver code looks like this: PCI/TECH_xxxx&DEV_xxxx&SUBSYS_xxxxxx. 2) There is a driver, but Wi-Fi does not work.
Advice! We recommend downloading all the necessary drivers (not just the network one) to a separate directory on your hard drive and/or flash drive. This will avoid situations where, after installing the operating system, you will need to look for a drive or PC (tablet, phone) to download drivers from disk or the Internet. The first line will be the full name of the ID equipment. After we have found out the equipment identifier, we should copy its name (right-click - copy) and enter it into the browser search field.
Installing the network driver
Similar actions will occur if you update the network driver. We go to the directory into which we recently downloaded everything we need, using the “Browse” button, click “Next” and wait for the driver installation process to complete.
Important! To remove an already installed driver, you need to go to “Device Manager”, select the network adapter, right-click and select “Delete” in the context menu. Next, you should restart your computer and go to Device Manager again.
3. Installing and updating the driver for the Wi-Fi adapter
Setting up automatic search and installation of updates now automatically updates all devices. Get the correct drivers from the official websites, everything is correct there, you just need to know exactly the specifications of the device, the OS and everything will work out.
If this is a regular desktop computer, then the wireless network adapter (Wi-Fi adapter) is connected separately. There could be, for example, a USB adapter such as TP-LINK TL-WN721N, or an internal PCI adapter. It doesn’t matter what Wi-Fi adapter you have and on what device. We need it to work stably and not have any problems with connecting and working with Wi-Fi networks. I don’t remember exactly, but it seems to me that I have not yet seen a case where Windows 7 itself installed the driver on the Wireless Network Adapter.
You can install it from the disk that comes with the kit, or download the driver for the Wireless Network Adapter from the manufacturer's website. Just look for a driver for a specific laptop model, USB adapter, etc. Below in the article, I will show in more detail how to install the driver for a Wi-Fi adapter.
We check whether the Wi-Fi adapter is turned on, whether there are available networks to connect to, there may be a problem with the router, etc. If everything has been checked, then you need to try to reinstall (update) the driver.
As I already wrote above, the driver can be found on the disk that came with the device. Only this method has one drawback. The driver located on the disk may already be out of date. And on the website of the manufacturer of your device, there may already be a new version of the driver and it would be good to download and install the new driver. But if it’s not possible, or you don’t want to look, then the driver from the disk will also work.
We find the official website in the search results and go to it (we get to the page of our device). Or you can go to the website of your device and search the site, specifying the model. If necessary, we indicate for which operating system the driver is needed. That's it, we have the driver on our computer. If you just want to install, and not reinstall (update) the driver, then unpack the archive (if the driver is in the form of an archive) into a folder and run the installation file. Follow the instructions.
If you want to reinstall the driver, then I advise you to first remove the old one. That's it, the driver has been removed. You should see an unknown device (Network Controller) appear. After installing the driver, usually Wi-Fi should work even without rebooting. And I hope it will work stably. Specify the path to the driver folder and click Next. The driver installation should begin. If Windows reports that “The most suitable software for this device is already installed,” then try installing using the first method (from the installation file).
It didn’t help at all, my Wi-Fi adapter was ordered from Aliexpress. There is no disk included, the adapter does not have a name, the XP operating system does not install the firewood itself. Good afternoon After reinstalling the OS from XP to 7, the network adapter on the laptop constantly turns off completely and disappears at intervals of 1-1.5 hours. At that time, other devices work normally. The idea is that modern operating systems automatically find all the equipment and install the necessary drivers.
In order to download the driver you need an Internet connection. Remember where the driver disk that you were given in the store when you bought a computer is collecting dust. Create a backup copy of your drivers in advance, for example with Driver Magician Lite or any other program responsible for this function.
In the menu that opens, select “Properties”. Find your Network Adapter. Next, from a working computer (connected to the Internet), download the driver we need. Anticipating difficulties with the Internet connection, we download the program, “well” for example such a powerful and world-famous driver installation manager as DriverPack Solution. They call it 3DP Net. According to the developers, with one click of a button you can install drivers on network cards (including wireless ones) without access to the Internet.
But this is understandable. The utility includes network card drivers, which can be found for almost all adapters. In practice, it means only one thing: probably new network cards are not presented there. I suggest for informational purposes (who knows, maybe it will help someone) to get acquainted with this utility.
1. How do I know if the driver is installed on the Wi-Fi adapter?
It's like the hero of the occasion is 3DP Net. So is the second 3DP Chip utility. But let’s not clutter up the pages and watch everything that the second utility can do in the video clip. After 3DP Net has completed its useful work, and as you remember, we only need drivers from it for a network card without Internet access, the 3DP folder located in the root of the drive (C:) can be deleted.
Driver update program DriverPack Solution
Where the HOME tab and the network card are important to us. Unless, of course, 3DP Net detects it. By clicking once on the network card, the installation of the drivers we need will begin. Basically that's all. After the reboot and the Internet appears, you can download the second 3DP Chip utility and understand its advantages.
Another way to install a driver for a Wi-Fi adapter
Without this driver, it is impossible to start either a wireless or wired network. If you have the disk, there are no problems, just install the program. And if it is missing, you need to find, for example, a mobile phone/tablet with a connected network in order to download the driver.
The driver is the link between the operating system and the internal components of the computer, that is, this program connects the OS with the motherboard, video and network cards, and office equipment. These programs are developed by the same companies that produce PC equipment and electronic office equipment, which is what a personal computer interacts with.
In the next window, click “Browse this computer for driver software.” To do this, go to Device Manager (how to do this is written at the beginning of the article) and right-click on the Wireless Network Adapter device.
Drivers are usually supplied with devices on CDs or, now very rarely, on floppy disks. Insert the disc into the CD drive. When prompted by the system for search and installation parameters, click “Browse” and specify the network path for the drivers. Click Next. After installation is complete, agree to restart your computer.
Make sure the drivers are installed correctly. To open the context menu, right-click on the “My Computer” icon and select the “Properties” option. Go to the “Hardware” tab, click “Device Manager” and expand the “Network Cards” list. Right-click on the name of your adapter and activate “Properties”. On the General tab, under Device Status, there should be a message that says “Device is working normally.”
If you have installed a network adapter on the motherboard, but do not have drivers for it, go to the manufacturer’s website from another computer and download the drivers from there to a floppy disk or flash drive. Copy to a folder on your hard drive with a distinctive name so you can easily remember the network path, for example, D:DriversNetwork.
Go to "Device Manager", expand the "Network Cards" node and right-click on the name of the network card. Select the "Update Driver" command. When asked by the Hardware Update Wizard about connecting to the Internet, answer “no, not this time.” To continue, click “Next”. In the next window, check “Install from a specified source” and select “Next”.
Select the checkbox next to "Include the following search location" and use the "Browse" button to specify the network path to the desired drivers. Click “Next” to continue. After installation is complete, agree to restart your computer.
Network drivers for Windows XP
Quite often, many users of personal computers and laptops have to deal with the problem of installing the necessary drivers. Especially this problem often appears when it is necessary to configure a network adapter so that it can work with the network. Let's take a closer look at where you can download drivers for the network card for the Windows XP operating system.
The easiest way: use the DrivePack program. to update all drivers automatically and get rid of the problem.
What is a network driver
Network drivers are software that enables full operation of a network card. These drivers provide access to the Internet, local network, and Wi-Fi.
How to find out the type and name of a network card
Useful information about this can be found by following this link.
How to find out the system capacity
Typically, the network drivers for 32-bit and 64-bit systems are different. This, of course, is taken into account by driver developers who offer different drivers depending on the bit depth.
To find out the bitness of Windows XP. necessary:
Having found out the name, type and model of the network card, you can start downloading the necessary driver. The best way to do this is from the manufacturer's website.
By going to the site, find a driver that matches the bit size of your system and install it according to the instructions provided by the developer. After installation, restart the system.
Depending on the network card model, you can update drivers in several ways. The first method is suitable if you have a built-in network card. That is, you did not purchase a separate, more functional network card than the one already integrated into the motherboard.
Right-click on the “My Computer” shortcut and select “Properties” from the context menu. A menu will appear with the characteristics of your computer. Select the "Device Manager" tab. Find the line "Network equipment". Click on the arrow next to this line. A line with the name of your network card will open. Click on it with the right mouse button. In the context menu that appears, select the “Update driver” command. Next to the “Use Internet connection” line, check the box. The automatic update process via the Internet will begin. Upon completion, you will be informed that the driver update was successful.
The second option should be used if you bought a separate network card in addition to the one that was already integrated into the motherboard of your computer, because it is the one that works as the main one on your PC.
Look in the technical documentation for the model name of the network card. Write it down or remember it. Go to the website of the manufacturer of this network card and select the “Files” section. Next, select “Network Cards”. A list of network cards from this manufacturer will appear, including your model. Select the desired network card model. You will be prompted to select your operating system. Select your operating system. The driver download process will begin.
After saving the driver folder on your computer, open it. Find the "Setup" file. The driver installation wizard will launch. Use its prompts to install the driver. The driver has been updated.
you need to find out which network card is on your computer. To do this, open the Start menu and select Control Panel. In the window that opens, select “Administration” – “Computer Management” – “Device Manager” – “Network Adapters”.
You can get similar information using the command line. To do this, open the Start menu and enter “Run” in the search box. Open the result that appears. In the small dialog box, type “cmd” without quotes and press Enter.
A command prompt will open. Type the following command without quotes: “ipconfig /all” and press Enter.
Once the driver is downloaded, double-click it to launch the Installation Wizard. Install drivers in the same way as any other program. Once the installation process is completed successfully, be sure to restart your computer.
If you are faced with the need creating a home local network or a network for a small office, but do not have sufficient skills and knowledge for this, then this material is for you. You will need to complete only 5 steps, after which you will learn how to set up a local network for your home and small office.
This material is compiled in the form of step-by-step instructions with illustrations. All you need to do is follow these instructions.
We will look at 5 steps to build a local network in the office or at home.
Step 1. Network equipment necessary to build a local network.
To build a local network between computers we need to have:
- Switch(switch) or router(router);
- Twisted pair cable(patch cord);
- Availability of a network card on each computer(nowadays every computer is equipped with a built-in network card);
Switch D-Link DES-1008A
 |  |
| Front view | Rear view |
Twisted pair cable

Network card(on the right in the figure the built-in network card is shown)
 |  |
Now all that remains is to connect all the computers to the switch or router using a twisted pair cable.
We connect one end of the cable (twisted pair) to the computer’s network card, and the other to the switch (switch) or router (router).
And so with all computers that will be connected to the local network.

Connection diagram for computers on a local network

Step 2. Configure IP Address, Computer Name and Workgroup
Go to the menu Start > Control Panel > Network Connections, right-click on the icon Local network connection, then press Properties. In the list of components, select Internet Protocol (TCP/IP) and click on the button below Properties.
 |  |
In the window Properties: Internet Protocol (TCP/IP) put a tick Use the following IP address and enter the following data:
IP address: 192.168.1.2
Subnet mask: 255.255.255.0
It is advisable not to use IP addresses 192.168.1.1 and 192.168.0.1, as they are used by network devices
For those who use a router (router) to connect to the Internet in building a local network, you need to specify "Main gateway" And "DNS server addresses"(usually this is the IP address of the router itself). To ensure the Internet works.
Those who use a router (router) with a DHCP server enabled may not register IP addresses, you need to check the box "Obtain an IP address automatically". IP addresses will be assigned by the DHCP server.
After you have entered the “IP address” and “Subnet mask”, click on the button OK, then Close.
NOTE: The IP address of each computer must be different from the other computer! If the first computer has an IP address 192.168.1.2 , then the second one should have 192.168.1.3 etc., but no more 254 .
Computer name and workgroup
Now we need to specify Computer name And Working group. To do this, in the Control Panel, double-click on the icon System, go to the tab Computer name and press the button Change.
In line Computer name change the computer name if necessary. Each computer on the local network must have a unique name, i.e. should not be repeated. In my case, the name of the first computer comp-1, the next computer will be comp-2, comp-3, comp-4 etc. You also need to indicate the Working Group, in my case HOME.
All computers on your local network must have the same Workgroup!

After you have specified the computer name and workgroup, click OK. You will be prompted to restart your computer for the changes to take effect. We agree and reboot the computer. This procedure must be done with all computers on the local network.
The parameters of the local computer network should look like this:
| First computer | Second computer | Third computer |
| IP address: 192.168.1.2
Subnet mask: 255.255.255.0 Computer name: comp-1 Working group: HOME | IP address: 192.168.1.3
Subnet mask: 255.255.255.0 Computer name: comp-2 Working group: HOME | IP address: 192.168.1.4
Subnet mask: 255.255.255.0 Computer name: comp-3 Working group: HOME |
Now you can view the computers on your local network. To do this, double-click on the icon Network environment on the Desktop, then on the left in the navigation panel click Show workgroup computers. On the right, the local network computers that are part of your workgroup will be displayed.

Step 3. Setting up access rights and security
Computers on the local network are visible, but there is no access to them yet. If you double-click on any of the computers on the local network, a window will open Connection to comp-n (n- computer number) with a prompt to enter username And password.

This is due to the account being disabled on the computers. Guest and access rights are not configured. All that remains is to configure access rights and enable the guest account.
To enable a guest account, go to Start - Control Panel - User Accounts. Click on account below Guest, then press Enable "Guest" account.


All that remains is to configure access rights to the computer from the local network.
Let's go Start > Control Panel > Administrative Tools > Local Security Policy. Open in the left menu Local Policies > Assigning User Rights

Then in the right window, double-click on policy Denial of access to a computer from the network and delete the account Guest. That's it. If you now open Network environment and double click on any computer, you can view the shared resources of that computer.
Step 4. Set up sharing of folders and files
Our local network is working, all that remains is to open public access to the necessary files and folders for public use from the local network.
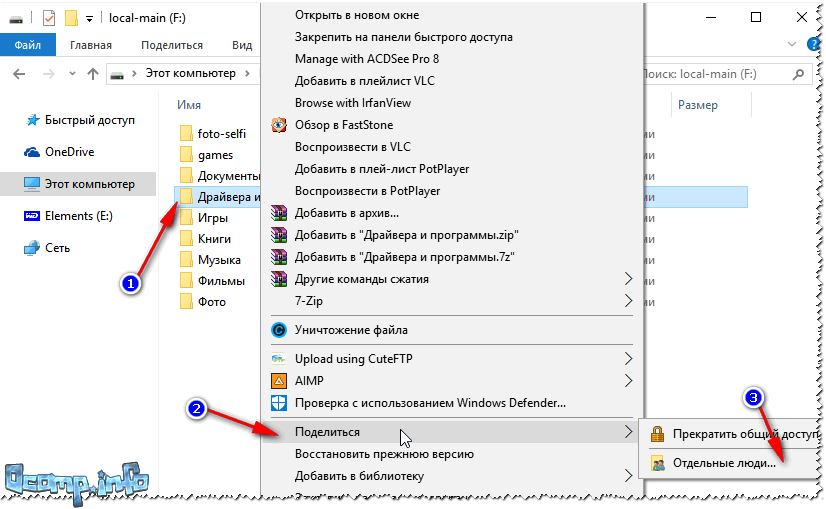
To do this, right-click on the desired folder (in my case, the Agreement folder) and select Sharing and Security


After this, the current folder and its contents will become available to everyone on the local network. In the picture below you can see that the folder "Treaty" on the computer comp-1 became available.

This way you can share folders on any computer.
Step 5: Share a local printer
We have come to the last step. All that remains is to provide Printer sharing connected to one of the computers (in my case comp-1).
Printer sharing will give you the opportunity to print from all computers on the local network to one printer.
In order to open Sharing access to a local printer, go to the menu Start - Control Panel - Printers and Faxes, right-click on our printer, select from the context menu Sharing.

In the window that opens, put a tick Share this printer and press OK. You can also enter printer network name, or leave it as default.

Now this printer can be connected to any computer on the local network. That's what we'll do.
Let's go to Network environment, double-click on the computer to which the printer is connected (in my case comp-1), then right-click on the printer and select Connect.

In the next window, where we are warned that drivers will be automatically installed on our computer, click Yes.
The same must be done with all computers on the local network to which you need to connect the printer.
Our printer is ready for use and you can print from your local network.
On this basic local network setup finished. Now you can exchange files on a local network and use one shared printer.
A network card or network adapter is needed to create a local network, with which you can connect several computers to each other, as well as to connect your computer to the Internet. Sometimes the card starts to work incorrectly, but you can restore it yourself using standard Windows 7 tools.
When to configure an adapter manually
You need to update drivers or change card settings if you have problems connecting to the local network or connecting to the Internet. Please note that such problems are not always caused by the network adapter, but sometimes it is because of it that errors occur that block access to the network.
How to find out the adapter model
The first thing to do is check whether the card is connected to the computer and whether it is recognized by it. The adapter is included with all laptops and computers by default, so if you didn’t assemble your device piece by piece yourself, you shouldn’t think about its absence. But there are times when the wires going to it become disconnected or come off.
A network card (or network adapter) is a device that allows a computer to communicate with other devices. On modern PCs and laptops, the components of this device are integrated into the motherboard.
You will need to open the computer case and check this only if the network card is not displayed in the “Device Manager”:
Card activation
If the network card is connected but not enabled, it must be enabled manually. There are several ways to do this. If the card is not damaged, turning it on will not cause errors.
Via "Device Manager"
The previous section described how to view the card model through the “Device Manager”. Find the adapter you need and right-click on it and select the “Enable” function. If the card is successfully turned on, the down arrow icon will disappear from its icon.
 Click on the “Enable” button in the “Device Manager”
 Using the Control Panel
- Using the Start menu or any other method, launch the Control Panel on your computer.
 Open the “Control Panel”
 - Go to Network and Sharing Center.
 Go to the “Network and Sharing Center”
 - Click on the sub-item “Change adapter settings”.
 Click on the sub-item “Change adapter settings”
 - A list will open, which will most likely contain several cards. One serves as a connection to the wireless network, and the other serves as a connection to the wireless network. There may be additional adapters in the list. Select the one you need and right-click on it and select the “Enable” function. Wait until activation is complete: the red cross icon on the card icon should disappear.
 Click on the “Enable” button to activate the adapter
Via BIOS
If the card cannot be activated using the previous two methods, then perhaps this can be done through the BIOS settings.
- Entering the BIOS is done using the Delete key, which must be pressed when turning on the computer. Perhaps the key that activates the BIOS will be different: this will be indicated in the hint that appears in one of the corners of the screen when the logo appears. If you find out the model of your motherboard, you can find on the Internet the button responsible for entering the BIOS.
 Enter the BIOS by pressing the Delete key
 - The design and location of BIOS items and sections may differ depending on its version and motherboard model, but the following algorithm of actions is approximately the same for all versions. Go to the "Advanced" tab.
 Open the “Advanced” tab
 - Go to the “Onboard Devices Configuration” subsection.
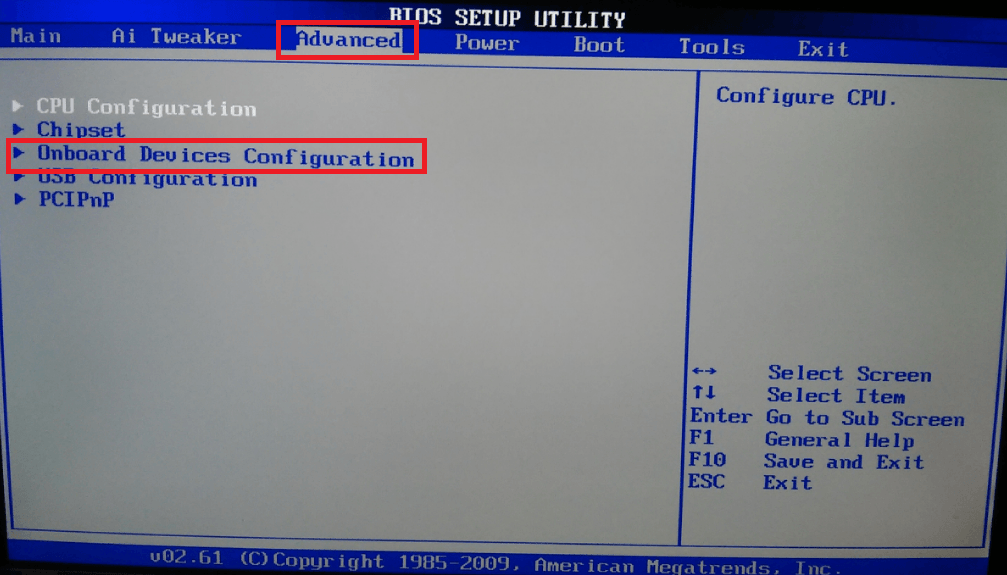 Open the subsection “Onboard Devices Configuration”
 - To enable the card, set the “Onboard Lan” line to “Enabled”. "Disabled" means the card is disabled.
 Set the “Enabled” parameter for the “Onboard Lan” line
Video: how to enable a network card in Windows 7
You can disable an extra card using the same methods that allowed you to enable it: through the “Device Manager”, “Control Panel” and BIOS. Only in the last step of the method through the “Device Manager” you need to click the “Disable” or “Delete” button, in the “Control Panel” click the “Disable” button, and in the BIOS change the value from “Enabled” to “Disabled”.
 Disable the card through the “Control Panel”
 Updating and installing drivers
Drivers are necessary to ensure that the card does not conflict with other components and fully performs all its functions. Usually they are installed automatically when you first connect the computer adapter, but sometimes the drivers fail or become outdated. In both cases, you need to reinstall them yourself. This is done through the “Device Manager”.
Automatic update
The positive side of this method is that you will not need to search for drivers manually, the negative side is that you will need an Internet connection, which may not be available if the network card does not work. But if you have the opportunity to connect to the network, then you can update the drivers in the following way:

Manual update
The advantage of this method is that you can download the card drivers manually from another computer that has Internet access, and then transfer them to yours and install them. It is recommended to download card drivers strictly from the official website of the company that created it.

What to do if drivers are not installed
If at any stage errors occur that prevent you from installing drivers, you must remove the adapter from Device Manager and restart the computer.
 Removing the card from the “Task Manager”
 After the reboot, open the list of connected devices again, and in it there is the “Other devices” sub-item. It will contain the “Network Controller”, which is your card. Install drivers on it using one of the methods described above.
 The network controller is located in the “Other devices” sub-item
 Video: how to update the network driver
View map options
If you want to find out the physical address, IPv4 parameters, gateway address and other possible information about the adapter, then follow these steps:

Additional method
You can also find out the card parameters through the “Command Line” using the “ipconfig /all” command. “Command Prompt” can be found by going to “Start” - “Accessories” - “Command Prompt”. Running this command brings up information about all physical and virtual adapters recognized by the computer.
 Run the command “ipconfig /all” to obtain information
 How to change card settings
The previous paragraph described how to view information about the network adapter. But you can not only see it, but also change it by following these steps:

Video: how to configure a network card
Updating the network card
The only way to update a network card is to install more recent drivers on it, in which the developers have corrected some previously made errors. New drivers are installed directly on top of the already installed ones. If you cannot install on top, you should remove the device, restart the computer and repeat the procedure. How to do this is described in the section “Updating and installing drivers.”
Can I use two cards?
Two network cards can work simultaneously and relieve each other if one of them is aimed at working with Internet traffic, and the second is aimed at working with a local network. To do this, you need to correctly set the IP, DNS and router parameters for both adapters.
Resetting the adapter
You can reset the adapter settings, namely TCP/IP and DNS, using standard Windows tools or using a third-party program from Microsoft. Conditions under which a reset must be performed:
- Internet connection speed is low or unstable;
- files are downloaded broken, this happens due to the same instability of the Internet;
- When connected, the Internet works fully, but after a few minutes problems begin;
- Manually changing the adapter settings led to other problems with the Internet.
Standard method
Launch “Command Prompt” by going to “Start” - “Accessories” - “Command Prompt”, and enter the commands “netsh int ip reset c:\resetlog.txt”, “netsh int tcp reset” and “netsh winsock reset” which will perform a factory reset. Done, the registry branches and system files will see changes, and you may need to restart the computer.
 Execute the commands “netsh int ip reset c:\resetlog.txt”, “netsh int tcp reset” and “netsh winsock reset” in the “Command Line”
 Through a third party program
You can download the NetShell program from Microsoft, which does not require installation, from their official website. Once you launch it, follow the instructions that appear on the screen to reset all changed settings.
 Download the program to automatically reset the card settings
 Solving adapter related errors
During setup or use of the adapter, the errors described below may occur, which will prevent you from using the Internet or local network. Most of them can be fixed without replacing the card.
The card does not have valid IP settings
You may encounter a similar error when setting IP parameters or scanning a network module using standard Windows tools designed to automatically resolve errors.
Manually obtaining settings
If you have not changed the settings of the adapter, that is, it obtains an IP address automatically, then manually requesting an IP may fix the problem:

Reset settings
Resetting settings to default values is the most reliable way. How to do this in several ways is described in the “Resetting the adapter settings” section.
Manual adapter configuration
If the previous methods did not help, you should try setting the settings yourself:

Error "This device cannot start"
This error appears in the “Device Manager” not only with the adapter, but also with other connected devices, and has code 10. To fix it, you need to update the card drivers. How to do this is described in the “Updating and installing drivers” section.
The adapter does not work, does not install, or does not appear
If the adapter does not work, does not install or is not displayed, then the reasons may be the following:

Changed map settings disappear
If, after you close the window with the changed settings or restart the computer, all the changes you made disappear as if you never made them, then there are two ways to solve this problem: set the settings by running commands and change the incorrect values in the registry.
Making changes via the Command Line
Launch “Command Prompt” with administrator rights and sequentially execute the following two commands: “route delete 10.0.0.0” and “route -p add 0.0.0.0 mask 0.0.0.0 X”, in the second command “X” is the IP of your router, which usually looks like "192.168.0.1", but in your case it may have a different meaning.
Changing registry settings

A network adapter is needed to connect to the Internet and other computers. If it does not work or is not displayed, check its connection to the computer with wires, and then the status of its drivers and settings. Don't forget to make sure that the network card is enabled in the BIOS.
Good day!
Eh, if in the 90s of the last century a computer was a luxury, now many people have not one, but several computers/laptops at home. If you connect computers to a local network (even if there are only 2 devices), you can get undeniable advantages:
- the ability to open files located on another PC, work with them, etc. Now you don’t need to run back and forth with a flash drive or disk;
- the ability to make a network printer (scanner, CD/DVD drive, etc.), and use it from all PCs on the local network;
- the ability to play online games (this is a separate and most interesting opportunity that I could talk about for a long time).
In this article, I wanted to look at the issue of building a home local network (and setting it up), which will be useful to all novice users. I’ll take the path of a step-by-step analysis, I’ll start with the question of connecting one PC to another, then I’ll look at setting up Windows, and how, in fact, to share (make available on the local network) folders, printers, etc. So...
When creating a home local network, two options are most often used:
- connect two computers (PC to laptop, PC to PC, etc.) using a cable (often called twisted pair);
- buy special "box" called a Wi-Fi router. A PC is connected to the router using a network cable, and laptops, phones, tablets and other devices get access to the Internet via Wi-Fi (the most popular option today).
Option No. 1 - connecting 2 PCs using twisted pair
Pros: simplicity and low cost (you need 2 things: a network card and a network cable); ensuring a sufficiently high speed that not every router is capable of producing, less radio waves in the room.
Cons: extra wires create confusion and get in the way; after reinstalling Windows OS, the network needs to be configured again; In order for Internet access to be on the second PC (2), the first PC (1) must be turned on.
What is needed: each PC must have a network card and a network cable. If you plan to connect more than 2 PCs to a local network (or for one PC to be connected to the Internet and at the same time be on the local network), one of the PCs should have 2-3 or more network cards.
In general, if both PCs have network cards, and you have a network cable (also called an Ethernet cable), then connecting them using it is not difficult. I don't think there's much to consider here.
Note: Please note that usually the green (yellow) LED on network cards starts to light up when you connect a cable to it.

Another important point!
Network cables on sale are different: not only in color and length. The fact is that there are cables for connecting a computer to a computer, and there are those that are used to connect a PC to a router.
For our task needed crossed network cable (or cable crimped cross method- here who calls it what).
In a crossover cable, the yellow and green pairs are swapped at the end connectors; in the standard one (for connecting a PC to a router) - the colors of the contacts are the same.

In general, if two PCs are turned on and working, you connected them with a cable (the LEDs on the network cards blinked), the network icon next to the clock stopped displaying a red cross - this means the PC has found the network and is waiting for it to be configured. This is what we will do in the second section of this article.
Option No. 2 - connecting 2-3 or more PCs using a router
Pros: most devices: phones, tablets, laptops, etc. will have access to the Wi-Fi network; fewer wires under your feet; after reinstalling Windows, the Internet will work.
Cons: purchasing a router (after all, some models are far from cheap); "complex" device setup; radio waves from the router, lower ping and freezing (if the router cannot cope with the load).
What you need: a router (it usually comes with a network cable to connect one PC to it).
As a rule, there are no big problems with connecting the router either: the cable coming from the Internet provider is connected to a special one. router connector (it is often called “Internet”), and local PCs are connected to other connectors (“Lan ports”). Those. the router becomes an intermediary (an approximate diagram is shown in the screenshot below. By the way, in this diagram there may not be a modem on the right, it all depends on your Internet connection) .

By the way, pay attention to the LEDs on the router case: when you connect an Internet cable from the provider, from the local PC, they should light up and blink. In general, setting up a Wi-Fi router is a separate big topic, and for each router, the instructions will be slightly different. Therefore, it is hardly possible to give universal recommendations in one separate article...
By the way, when connecting via a router, the local network is usually configured automatically (i.e., all computers connected via a network cable should already be on the local network, there will be a couple of small touches left (more on them below)). The main task after this is to set up a Wi-Fi connection and access to the Internet. But because This article is about the local network, I’m not focusing on that...
Setting up a local network (Windows 7, 8, 10)
In this subsection of the article, I will give universal instructions, regardless of how your local network is organized: connected via a network cable, or using a router. Where the settings relate to a specific option, there will be notes.
Note: all settings are relevant for Windows 7, 8, 8.1, 10.
Computer and workgroup name
Allegory: each person has his own name, surname, patronymic, date of birth, city, etc. - no two people are exactly alike. It’s the same on the network - there shouldn’t be computers with the same name...
The first thing you need to do when setting up a local network is to check and configure workgroup name And computer name. Moreover, this needs to be done on every computer on the local network!
To find your computer name, open the Windows Control Panel at: Control Panel\System and Security\System (screen below). Next, make sure the following:
- PC name and slave the group must be in Latin;
- Each PC/laptop on the local network should have its own unique name(for example: PC1, PC2, PC3);
- Every PC/laptop should have same working group (for example: WORKGROUP).
To change the name and workgroup, click the "Change settings" button.


Changing workgroup and PC name
In general, when you bring all the names in accordance with the requirements above, you can proceed to the next stage of setup.
Enable printer and folder sharing
Relevant both for connecting via a router and directly...
This innovation appeared in Windows 7 and supposedly provides greater security for the OS (in my opinion, it only creates the need for additional configuration of the local network). The bottom line is that, by default, Windows blocks and does not allow access to open and share folders, printers, etc., until the security policy is “softened.”
To remove this lock and enable sharing, you need to:

Setting up IP addresses, DNS, masks, gateways
For a network organized using a router
In general, for PCs connected to a local network using a router, you usually don’t need to configure anything (everything works by default). If something is wrong, just in case, I recommend going in and checking the connection properties.
To do this, you first need to open "network connections" . This is done simply:
- first open the window "Run"- combination of buttons Win+R;
- then enter the command ncpa.cpl and press Enter(works in all versions of Windows 7, 8, 10).

How to open network connections // ncpa.cpl

Local Area Connection Properties

To connect PC to PC via network cable
PC 1
By PC 1 I mean a computer that has two network cards: one of them is connected to the provider’s Internet cable, and the second is connected to a local network cable going to PC 2.
Note: although, an Internet cable from a provider does not have to be present. If it is not there, select PC 1 and PC 2 - randomly...
And so, we open LAN network connection properties(how this is done - see just above in the article).
- IP address: 192.168.0.1;
- subnet mask: 255.255.255.0 (see screenshot below);
- save the settings.

IN properties of IP version 4 (TCP/IPv4) second PC, you need to set the following parameters:
- IP address: 192.168.0.2,
- subnet mask: 255.255.255.0;
- default gateway: 192.168.0.1;
- preferred DNS server: 192.168.0.1 (see screenshot below);
- save the settings.

Actually, the local network setup itself is complete. Now you can start the fun part - sharing and using shared local network resources. Actually, that's what we were going for...
Sharing Internet access on a second PC
Relevant for PCs connected directly with a LAN cable...
We need to configure PC 1 (i.e. the one to which we have the provider’s Internet cable connected).
First we open network connections : press combination Win+R, enter ncpa.cpl, further Enter .
How to open network connections //ncpa.cpl

Next, open the tab "Access", and check the box next to the item "Allow other network users to use this computer's Internet connection" . Save your settings.

Allow other users to access the Internet
If everything was done correctly, the Internet will be on both computers.
Note: naturally, for the Internet to be on PC 2, PC 1 must be turned on! This, by the way, is one of the inconveniences of such a local network; when connected via a router, the Internet will be available no matter which PC is turned on/off.
Sharing folders/files for public access
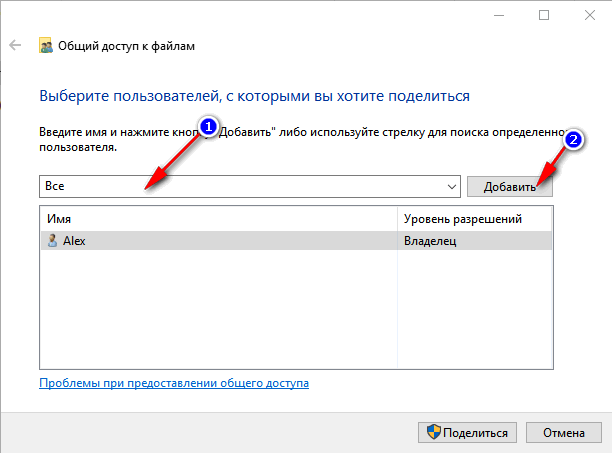
3) Set the resolution: read or read and write.
Note:
- read enabled: users will only be able to copy your files to themselves (they will not be able to delete or change them!);
- read and write enabled: Local network users will have full control over files in folders: they can delete all files, change any of them, etc. In general, I would not recommend providing such access to important and large folders (to transfer files, it is better to create a separate folder to which you give full access).


5) After a few seconds, Windows will report that the folder has been opened for public access. So everything went well.

6) To access the folder:
- open the explorer;
- then open the “Network” tab (on the left, at the bottom of the window);
- open computer name, on which the folder was shared. As you can see in the screenshot below, it is shared, you can go into it and start copying (reading) any files.

Sharing a printer (shared network printer)
1) The first thing you need to do is open the control panel: control panel/hardware and sound/devices and printers.
3) Then open the tab "Access" and check the box "Share this printer" . Save the settings (see screenshot below). Actually, the printer is now shared and can be used by other PCs/laptops/tablets and other devices on the local network.

How to share a printer
4) To connect a network printer, open conductor, select computer name , on which the printer is shared. Next you should see it: click on it right mouse button and select the option from the menu connections .

How to connect a network printer
5) Then you can open any document, press Ctrl+P (File/Print), and try to print a page.
Note: By default, Windows usually specifies a different printer (not the one you connected over the network). Don't forget to change it when printing.
Regarding the local network printer, I recommend reading my detailed article on this topic. It describes some points in more detail. Link below.
"Creating" a network printer -
This is where I end this article. Happy and quick setup everyone.