Flash drive as internal memory for Android. How to replace internal Android memory with a memory card
Many smartphone users sooner or later face the problem of low memory. This is especially true for budget phones. 16 GB is not much. Moreover, if the ROM is even smaller - 8 GB (yes, there are such models).
Buying a microSD only partially solves this problem. We advise owners of Android phones to use the Adoptable Storage function, which allows you to combine the ROM and memory card into a single logical partition.
Unfortunately, the Adoptable Storage feature only appeared in the latest versions of Android (starting with Android 6). We will show you how to correctly combine memory and microSD in Android 7 (in other versions of Android this procedure is similar).
Before merging, you have two memories: the phone's internal memory (ROM) and external memory (microSD). Even if you set the memory card to be the default write drive, some data will still be written to ROM. And the smartphone’s memory will fill up over time (even if there is a lot of free space on the memory card). You'll have to clean it up.
But after merging, you will get a single memory. Its volume will be equal to ROM + microSD.
Step 1
Turn off the smartphone, insert a memory card (microSD). The phone must be charged at least 15-20% (do not let it discharge during the setup and pairing procedure!).
Step 2
We turn on the phone. If the memory card is clean, an SD card detection message will appear and you will be prompted to set it up.
In my case, information arose that the SanDisk SD card is not supported. That's how it should be. The fact is that it was previously used on another phone and was already combined. During this operation, all information is encrypted and the data will not be visible on another phone.

Step 3
You will be prompted to configure the card as Portable media(standard use), or as Internal memory. Choose the latter.


Step 4
Please note that once setup is complete, this card will only work on that phone. All information that was previously on the card will be destroyed.
- After formatting, the memory card will be encrypted. Access to data will only be possible from this smartphone. After a factory reset, you will also lose access to your data.
- If the memory card fails, you will lose data, so take care to set up a backup (especially since Google already advises doing so).

Step 5
After formatting was completed, a message was displayed stating that the SD card is slow, which can cause problems and reduce data transfer speed. You can ignore this message, but try to use high-speed Class 10 cards.

Step 6
Transfer the proposed part of the data from the internal memory to the memory card.
Almost all phones and tablets released in 2018 have a large amount of built-in memory, which is expandable using a microSD card of 32 GB or more (in mid-range and flagship models). But among owners of old and inexpensive devices with internal storage of 4 GB or less, the issue of lack of free space on a smartphone is especially acute. In this article, we will look in detail at all the ways to transfer applications to an SD memory card in Android.
The instructions are intended for both beginners and experienced users, so it talks about transferring applications not only using standard means, but also using special programs that require root rights.
You can also free up space in the internal memory by deleting system applications.
How to transfer applications to a memory card using accessible means
Since the earliest versions of Android, the system has had the ability to transfer most installed applications to an SD card. Instead, in Android 6.0 Marshmallow it became possible to use a memory card as an internal drive (this method is also described in the article).
Let's look at the function using the example of a Samsung phone running Android 5.0:
Go to Settings and select Apps. Depending on the manufacturer and firmware, the item may be called “Application Manager”, “All Applications”.

Select the downloaded game or program. If the application can be moved, the “Move to SD card” button will be active. Click on it.

If the button does not work, the developer has prohibited installation of the application on the memory card and it will not be possible to move it using standard means.
AppMgr III (App 2 SD) for transferring applications
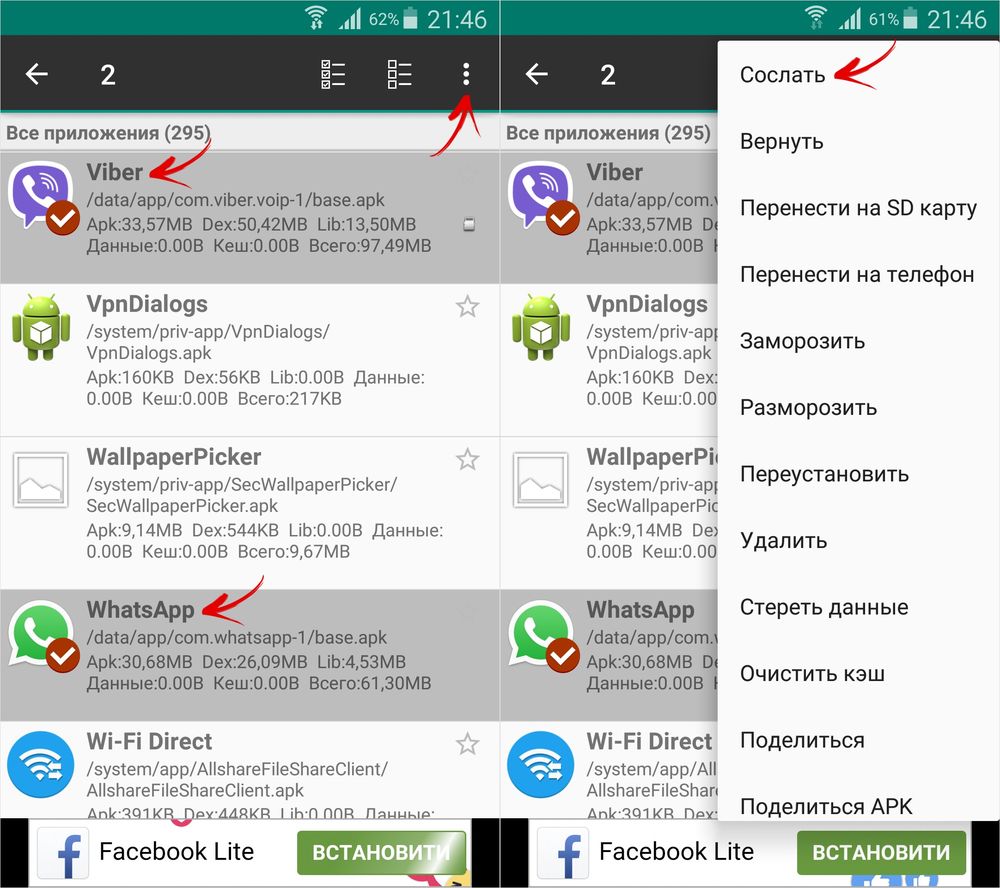
In order not to open the settings of each game or program and not see whether they can be transferred or not, use the AppMgr III (App 2 SD) utility - in it, the moved applications are collected in a separate tab.

Hold your finger on app cards to mark them. Select the ones you need and click on the folder icon at the top. In the new window, click on the red arrow, which will take you to the application details page. To go to the settings of the next selected program or game, press the Back button.

AppMgr III will also tell you which applications should not be installed in external memory so that all their functions work correctly.
Using an SD card as internal memory
This feature was introduced in Android 6.0 and works in Android 7 Nougat, Android 8 Oreo and Android 9 Pie. It allows you to use a memory card as a built-in storage device. Since SD replaces internal storage, it makes sense for the flash card to be larger than the internal memory. And for applications to work quickly, the SD card must have a high write speed.
Data from a memory card formatted as an internal drive will not be read if you install the SD card in another smartphone or tablet. To use the card in a new device, you will have to format it as portable storage.
After connecting, a message will appear in the notification shade that a new memory card has been detected. Just click “Configure”, select “Internal memory” in the window that opens and follow further instructions. Don't forget to transfer files from the SD card to another storage device, as they will be deleted during the formatting process.

Detailed instructions for setting up the card:
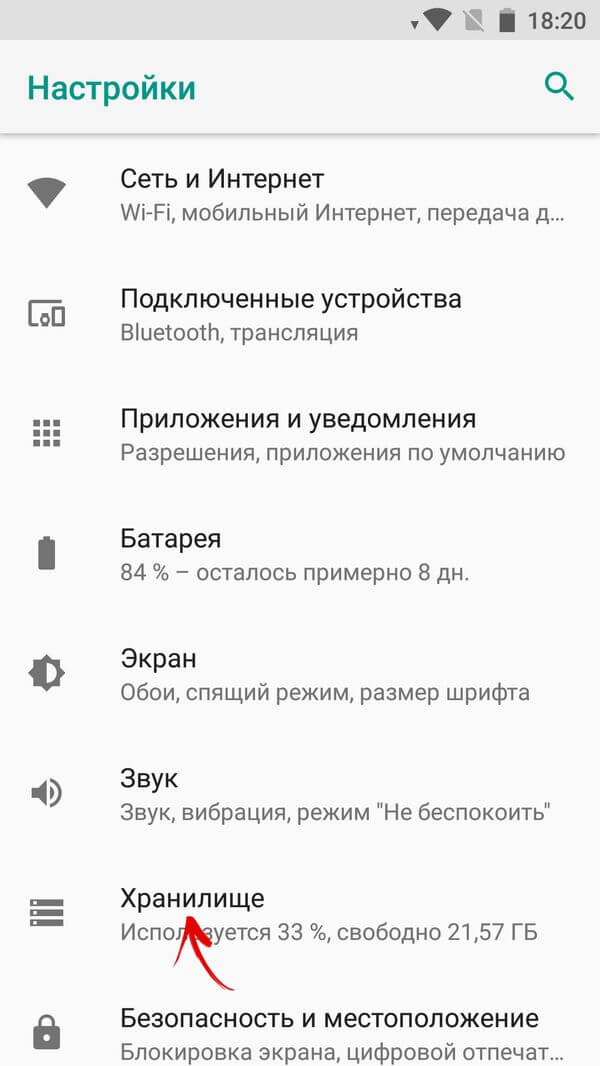
1. Go to “Settings” → “Storage” (may be called “Storage and USB drives” or “Memory”).
2. Click on "SD Card".

3. In the upper right corner, open the menu, select “Settings” (in some firmware “Memory”).

4. Click Internal Storage.

5. A warning will appear on the screen that all data saved on the SD card will be deleted during the formatting process. So first copy them, and then click “Clean and Format”.

6. If your smartphone uses low-class SD (for example, microSD Class 6), a message will appear on the screen that the memory card is slow.

7. Before completing the formatting process, you will be prompted to transfer some files and applications to the SD card. Select the option you want, click Next and then Transfer.

8. Finally, click “Done” and manually restart your phone.

Now open “Settings” → “Applications” → “Application details” (if this item is not there, proceed to the next step) and select the installed program or game.

Click “Storage” (may be called “Memory”), then click the “Change” button and select the SD card.
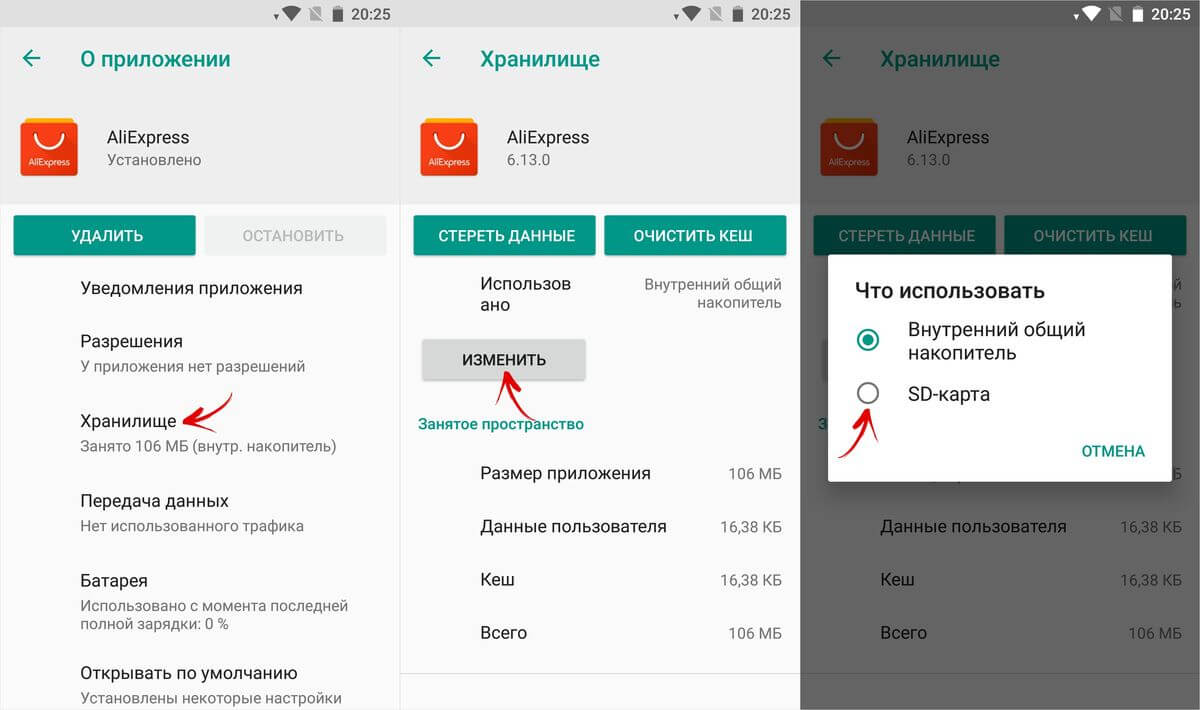
In the window that appears, click “Move” and wait for the transfer to complete.

Formatting a memory card as an internal drive using ADB
If your smartphone has Android 6, 7, 8 or 9 installed, and there is no option to format the SD card as internal storage in the settings menu, the manufacturer has not added such an option to the firmware. But users can format the memory card themselves using the utility.
To do this, activate on Android, connect your mobile device to your PC and run ADB from the command line or from Windows PowerShell if one of the latest builds of Windows 10 is installed on your computer. Enter the following command and press Enter (in Windows PowerShell, add ./ before the command).

The console will launch and the “$” sign will appear in it. Type the command and click Enter:

The line below will display the view's SD card ID disk:NNN,NN. Replace NNN,NN to the value of the received identifier and run the command:

Wait for the command to complete. Then go to Settings → Storage and select SD card. Expand the list of options by clicking on the three dots at the top and click “Transfer data.”

Select "Transfer" and wait for the process to complete. Finally, click “Done.”

How to move multiple apps to SD card in Android 8 Oreo and 9 Pie
To avoid performing the same steps to transfer applications separately, use the AppMgr III (App 2 SD) program, which was described at the beginning of the article. Only on Android 8 Oreo and Android 9 Pie you will have to give AppMgr III a couple of permissions.
Launch the application. A notification will appear that the program needs access to your usage history. Click Allow, select AppMgr III from the list of applications, activate the switch and return to the program. You can also configure access to your usage history by going to “Settings” → “Applications and notifications” → “Advanced settings” → “Special access” → “Access to usage history”.

Select the games and programs that you want to move to the flash card and click on the image of the folder with the arrow inside. In the "Move to Map" window, click on the red button below.

A message will pop up saying that AppMgr III needs permission to change system settings. Click on the switch and you will be taken to settings. Activate the toggle switch and return to the application. The options for this permission are located under Settings → Apps & notifications → Advanced settings → Special access → Change system settings.

You will then be prompted to allow AppMgr III to automatically perform actions without manual confirmation for each application. Click "YES", go to the "Accessibility" section, select "AppMgr III", switch the toggle switch to the "ON" position and confirm by clicking "OK". Then return to the program.


Application transfer will begin immediately. Just wait for it to complete.

At the end it will show that the applications have been moved to the memory card.
Transfer games to SD card in Android
Most of the user memory is occupied by the cache of installed games. To move it, we will use the FolderMount program, which can mount directories from internal memory to external memory. It requires .
Download FolderMount from Google Play, launch it and provide Superuser rights.

In the “List of Pairs” tab at the top, click on “+”.

Come up with and enter the name of the folder pair in the first line.

Click on the second one, after which the built-in file manager will open. The game cache is located in the “Android/obb” directory, and the application cache in “Android/data”. Go to the folder you want to mount and click on the checkmark.

The screen will ask if you want to create the destination folder automatically. Click "YES" if you agree. In this case, FolderMount will copy the path from the internal storage and create the same on the external drive. Click "NO" if you want to manually set the mount end point and select the folder where to move the files.

To start copying, click on the checkmark and confirm the transfer by selecting “YES” in the next window.

The process will be displayed in the notification panel.

Once copying is complete, switch the toggle switch in the “List of Pairs” tab to mount.

At the bottom there is a button with a pin image, clicking on which will mount all directories at once.

To move files back from the destination folder to the source folder, first unmount the pairs: to do this, turn off the toggle switch or click on the crossed out pin, then hold your finger on the pair and click on the trash can icon.
How to move apps using Link2SD
Link2SD is a program that can mount application data onto a memory card. In order for it to work, it is necessary to create an additional partition on the SD in the ext3/ext4 file system on the mobile device. Partitioning a memory card into sections is done in one of the following ways.
(!) Before creating a new partition, copy all the files located on the SD, as they will be deleted after partitioning the memory card.
Memory card partitioning on Android via TWRP
If installed on your smartphone, partition the SD card through it. To do this, click “Advanced”.

Select "Partition SD card".

Check "Micro SD card" and click "OK".

Select the file system of the ext-partition to be created and specify its size. For example, 2048 MB - this memory will become available for transferring applications and the volume of the SD card will be reduced by that amount. Leave the Swap partition size (paging file) equal to 0.
Drag the slider to begin SD marking.

At the end, click “Reboot System” and “Do Not Install” if you do not want to download the official TWRP application.


The device will reboot. If you go to “Settings” → “Memory” (or “Storage” in the latest versions of Android), you will see that the SD size has decreased. The second section “sees” only Link2SD, App 2 SD and similar applications.
Create a hidden partition on SD using AParted
The second way to split a memory card into 2 partitions if you have Superuser rights, but no TWRP:
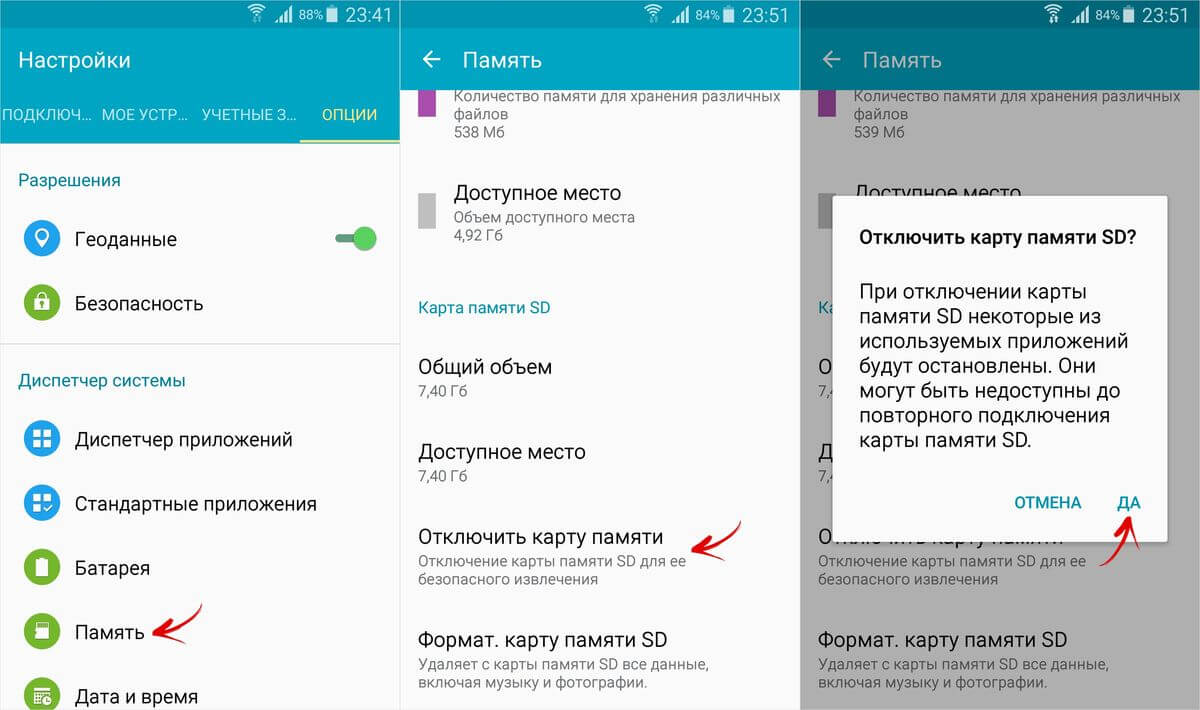
Go to “Settings” → “Memory”, click “Disconnect memory card” and confirm the action.
Launch AParted and grant root access.

There are 2 bars in the Create tab: the top one will display the new partition, and the bottom one shows the current SD size and its file system.
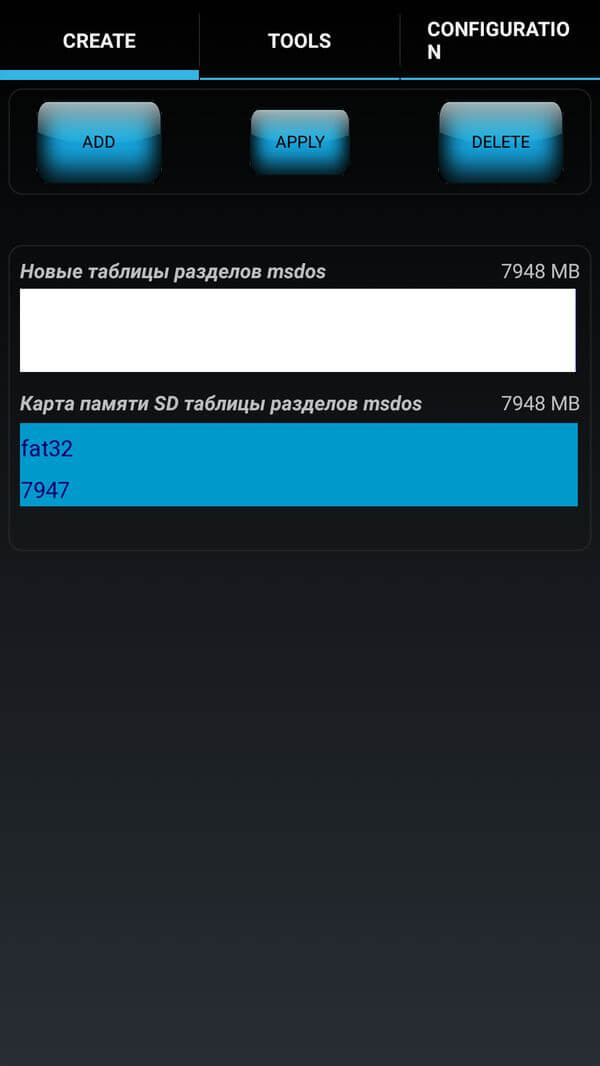
Click "ADD" to create the first partition. This will be the new size of the memory card where you can save photos, music, videos and other files. Leave the checkbox next to “Format”, the fat32 file system and select the size with the slider. To set it more precisely, click on the number next to MB, enter the desired value and click OK.


Click “ADD” again and create a second hidden partition to which games and applications will be transferred. Pull the slider all the way, leave “Format” checked and select the ext file system.

Click “APPLY” and select “OK” in the warning window that appears.

The SD partitioning process will start.

When completed, the second line will display 2 sections.

Now connect the memory card through “Settings” if this does not happen automatically. The new SD size should be displayed there.
Working with Link2SD
Open Link2SD and grant the program Superuser rights.

A window will immediately appear asking you to select the file system of the hidden partition of the SD card. Check the appropriate ext version and click OK. If the window does not appear, expand the menu on the left and click “Recreate mount script.”


Then click "Restart device" to mount the second partition of the memory card. The device will reboot.

Once Android is launched, go to Link2SD, click on the 3 dots in the top right corner and select "Multiple".

Select the applications you want and open the menu again. Click "Send".

There is also a "Move to SD Card" feature that moves apps using the standard Android method that is not available to users without a Link2SD.

If you need to move one game or program, find it in the list, click on it and select “Send” or “Move to SD card”.


Let me make a reservation right away that we are not talking about programs like link2sd. The principle is similar, but we will link not program directories, but the data directories of these programs, for example /sdcard2/Navigon -> /sdcard/Navigon or /mnt/extSdCard/Books -> /sdcard/Books, etc.
In addition, we need root (where would we be without it). By the way, after I found out about this program, this is another argument for me for root.
Many owners of Android smartphones or tablets with small built-in memory have probably encountered the following problem: a large SD card is inserted (for example, 16, 32 or even 64 GB), but after installing several heavyweight programs, our device or another program boldly declares that there is no memory on the card. enough space. Sometimes the program itself is small, but after installation it goes online and pulls gigabytes of data onto your smartphone.
Once again, having received the message “No space” and looking at the card, we see that it is almost empty, but the internal memory of the device is filled to capacity.
This is because internal memory is often used as the default directory for many programs. The fact is that it is mounted as /sdcard, which historically has always been an external SD card (it used to be the case on all smartphones). The external SD card is mounted in this case as /sdcard2, /mnt/sdcard2, /mnt/extSdCard or even /sdcard/.externalSD. As I understand it, this is done by the manufacturers so that the device works out of the box, i.e. no SD card at all.
Many “unscrupulous” programs always want to read/write data from/to the /sdcard/NameInsert directory. Rarely can this be changed in the program settings.
As a result, we have what we have, and several opportunities to improve the current situation:
The last two methods are also not a panacea, because... require certain skills from the user, in addition, they are not “clean” enough, for example, problems are known when connecting a smartphone to a computer via USB (cannot be unmounted), etc.
The DirectoryBind program, which a good person slig from xda wrote for himself and posted on the forum for public use, will help improve the situation.
QR code
Although the audience here is technically savvy, a couple of explanations need to be made for inexperienced readers of the habr. As he himself wrote (the not idiot-proof program), i.e. unlikely to pass the fool test.
After installation, run the program (the first time, naturally, we permanently allow Root rights), click the menu, then “Preferences” and set the default paths to the external memory “Default data path” for example /sdcard/external_sd/ and the internal memory “Default target path” /sdcard/ . We exit the menu.
Click menu, then “Add new entry” 
Now let's create a new directory link, for example, move the CamScanner folder to an external card. Long pressing on the folder path opens a small built-in file manager where you can create and/or select a folder. The folder on the external card should be created (and empty). 
By checking the “Transfer files from target to data” checkbox, files and folders will be transferred from the /sdcard/CamScanner/ directory to the /sdcard/external_sd/CamScanner directory. 
It should be noted that connections are not automatically activated after creation (gray floppy disk icon, as in the screenshot below for gameloft). To complete linking folders, select the required links by checkboxes and click menu -> “Bind checked”. The active (linked) folder icons should turn green. 
By the way, if you want to attach the entire external card, I fully recommend doing it not with /sdcard/externalSD/, but with a dot in front /sdcard/.externalSD/. This will save you from such troubles as double thumbnails in galleries, etc. True, it will not help for all galleries and players, because... some also search for media in hidden directories.
After suffering, I decided for myself to link only individual directories.
UPD. By the way, an external SD card is much slower than the internal memory, so transferring program data to an external SD naturally slows down the operation of this program. This should be especially remembered by those who decide to completely change the mount points of internal and external memory, because... Chances are your entire device will run slower than before.
I hope this program will complement your collection of useful utilities for Android devices.
If you decide to swap internal and external memory, i.e. reassign the external sd card to /sdcard and there is no such option in the device settings - if you have root, this can be easily done by performing the following operation:
In Root-Explorer we mount "/etc" as R/W (if R/O), find the file "/etc/vold.fstab", save a copy and open (long click) it in the Text Editor.
In the next two lines we change the names of the mount points: dev_mount sdcard /mnt/sdcard emmc@fat /devices/platform/goldfish_mmc.0 ... dev_mount sdcard /mnt/external_sd auto /devices/platform/goldfish_mmc.1 ... to dev_mount sdcard /mnt/external_sd emmc@fat /devices/platform/goldfish_mmc.0 ... dev_mount sdcard /mnt/sdcard auto /devices/platform/goldfish_mmc.1 ...
You can read more. They also suggest, as an alternative, to use another interesting program Root External 2 Internal SD.
I will add that in both cases, before switching, you need to copy the entire contents of the /sdcard folder to an external SD card.
Remember that after the switch, your entire system may work better than before.
Be careful- you need to understand that everything you do as root is done at your own peril and risk, and for example, saving the wrong “vold.fstab” can lead to the inability to boot the device and for treatment you will need to boot into recovery and edit “vold.fstab” already there.
This method can be used in conjunction with DirectoryBind, only now it’s the other way around: “Default target path” (/sdcard) and all connections created in DirectoryBind will point to an external card.
Let me make a reservation right away that we are not talking about programs like link2sd. The principle is similar, but we will link not program directories, but the data directories of these programs, for example /sdcard2/Navigon -> /sdcard/Navigon or /mnt/extSdCard/Books -> /sdcard/Books, etc.
In addition, we need root (where would we be without it). By the way, after I found out about this program, this is another argument for me for root.
Many owners of Android smartphones or tablets with small built-in memory have probably encountered the following problem: a large SD card is inserted (for example, 16, 32 or even 64 GB), but after installing several heavyweight programs, our device or another program boldly declares that there is no memory on the card. enough space. Sometimes the program itself is small, but after installation it goes online and pulls gigabytes of data onto your smartphone.
Once again, having received the message “No space” and looking at the card, we see that it is almost empty, but the internal memory of the device is filled to capacity.
This is because internal memory is often used as the default directory for many programs. The fact is that it is mounted as /sdcard, which historically has always been an external SD card (it used to be the case on all smartphones). The external SD card is mounted in this case as /sdcard2, /mnt/sdcard2, /mnt/extSdCard or even /sdcard/.externalSD. As I understand it, this is done by the manufacturers so that the device works out of the box, i.e. no SD card at all.
Many “unscrupulous” programs always want to read/write data from/to the /sdcard/NameInsert directory. Rarely can this be changed in the program settings.
As a result, we have what we have, and several opportunities to improve the current situation:
The last two methods are also not a panacea, because... require certain skills from the user, in addition, they are not “clean” enough, for example, problems are known when connecting a smartphone to a computer via USB (cannot be unmounted), etc.
The DirectoryBind program, which a good person slig from xda wrote for himself and posted on the forum for public use, will help improve the situation.
QR code
Although the audience here is technically savvy, a couple of explanations need to be made for inexperienced readers of the habr. As he himself wrote (the not idiot-proof program), i.e. unlikely to pass the fool test.
After installation, run the program (the first time, naturally, we permanently allow Root rights), click the menu, then “Preferences” and set the default paths to the external memory “Default data path” for example /sdcard/external_sd/ and the internal memory “Default target path” /sdcard/ . We exit the menu.
Click menu, then “Add new entry”
Now let's create a new directory link, for example, move the CamScanner folder to an external card. Long pressing on the folder path opens a small built-in file manager where you can create and/or select a folder. The folder on the external card should be created (and empty).
By checking the “Transfer files from target to data” checkbox, files and folders will be transferred from the /sdcard/CamScanner/ directory to the /sdcard/external_sd/CamScanner directory.
It should be noted that connections are not automatically activated after creation (gray floppy disk icon, as in the screenshot below for gameloft). To complete linking folders, select the required links by checkboxes and click menu -> “Bind checked”. The active (linked) folder icons should turn green.
By the way, if you want to attach the entire external card, I fully recommend doing it not with /sdcard/externalSD/, but with a dot in front /sdcard/.externalSD/. This will save you from such troubles as double thumbnails in galleries, etc. True, it will not help for all galleries and players, because... some also search for media in hidden directories.
After suffering, I decided for myself to link only individual directories.
UPD. By the way, an external SD card is much slower than the internal memory, so transferring program data to an external SD naturally slows down the operation of this program. This should be especially remembered by those who decide to completely change the mount points of internal and external memory, because... Chances are your entire device will run slower than before.
I hope this program will complement your collection of useful utilities for Android devices.
If you decide to swap internal and external memory, i.e. reassign the external sd card to /sdcard and there is no such option in the device settings - if you have root, this can be easily done by performing the following operation:
In Root-Explorer we mount "/etc" as R/W (if R/O), find the file "/etc/vold.fstab", save a copy and open (long click) it in the Text Editor.
In the next two lines we change the names of the mount points: dev_mount sdcard /mnt/sdcard emmc@fat /devices/platform/goldfish_mmc.0 ... dev_mount sdcard /mnt/external_sd auto /devices/platform/goldfish_mmc.1 ... to dev_mount sdcard /mnt/external_sd emmc@fat /devices/platform/goldfish_mmc.0 ... dev_mount sdcard /mnt/sdcard auto /devices/platform/goldfish_mmc.1 ...
You can read more. They also suggest, as an alternative, to use another interesting program Root External 2 Internal SD.
I will add that in both cases, before switching, you need to copy the entire contents of the /sdcard folder to an external SD card.
Remember that after the switch, your entire system may work better than before.
Be careful- you need to understand that everything you do as root is done at your own peril and risk, and for example, saving the wrong “vold.fstab” can lead to the inability to boot the device and for treatment you will need to boot into recovery and edit “vold.fstab” already there.
This method can be used in conjunction with DirectoryBind, only now it’s the other way around: “Default target path” (/sdcard) and all connections created in DirectoryBind will point to an external card.
How to swap memory on Android and why is it even needed? Should we engage in such manipulations at all and are they capable of causing irreparable harm to our device? Such questions are often of interest to people who are in control of a device with a small amount of built-in memory. If your smartphone has a corresponding capacity of, for example, four gigabytes, then you know that using such a device is nothing short of a pain. Because loading a sufficient number of multimedia files onto it is very, very problematic. So how can you swap memory from internal to external on Android?
Introduction to the problem
By the way, you should not think that only the Android operating system suffers from such a problem as a small amount of built-in memory. It is also available on iOS. These two systems constantly compete with each other. From time to time, “Windows Fawn” also intervenes in the combat, but it soon finds itself thrown out behind the tatami. What does the IOS topic cover? There are facts that invariably prove the “exposure” of this operating system to users. Initially, its code was a mystery. Nevertheless, a similar trend does occur. But the Android operating system, developed by Google specialists, is currently becoming more and more closed to potential developers with each update. This is exactly what bothers people who are so accustomed to this operating system.
Why do you need to know the answer to the question of how to swap memory on Android?

Currently, the OS we are talking about no longer gives users the opportunity to install applications with the corresponding software - the so-called cache - on an external memory drive. In our case, let it be a MicroSD memory card. Probably, owners of devices with a capacity of 32 gigabytes and above will grin, but what should people do who have at their disposal from 4 to 8 GB, part of which (note this!) is spent on maintaining the operating system? The only way out of this situation is to perform certain manipulations. And here it is more important than ever to know the answer to the question of how to swap memory on Android. Actually, this is not difficult to do. However, extreme attention and, by the way, straight hands are required. If you have these parameters, then we will move on to consider the meaning of the operation in order to understand what will be performed and why.
How to swap memory on Android 5? What to do with other versions?

There is a way out of the current situation, when we have only a couple of gigabytes at our disposal to host a multimedia contingent. It consists, firstly, in acquiring an external one and secondly, in software replacement of a certain code that can convince our device that the internal one is external. Well, and, of course, vice versa. Thus, the smartphone will treat the MicroSD card as an internal board. I would like to note that the question of how to swap memory cards on Android sounds completely incorrect, since several external drives cannot take part in this process.
What is needed for replacement?
Regardless of what version of the operating system you have installed and what manufacturer’s device you have, we will need the same set of utilities. These are programs called Total Commander (which is known by a huge number of users). Additionally, you will need to obtain one for the device.
Replacement process
In order to begin the operation, open the Root Explorer program. We move to the address /system/etc. There you need to find a file called vold.fstab. In it you should find lines and parameters that are responsible for the mount points of external and internal memory. They are called, respectively, like this: SDcard and extsd. After this, you will need to swap the parameters. This will complete the active phase of the operation. Be sure to back up your files, and remember that such operations are performed at the user's own risk.