Changing line spacing in a MS Word document. How to reduce the space between lines in Word
To reduce line spacing, Word has a lot of functionality. Use them and “comb” your text document.
When working with large text documents, many small marks may occur, which then spoil the appearance of the text. To fix this, you may need to learn how to reduce the space between lines. This is a simple procedure that even a person with little knowledge of text formatting can perform in Word 2007 and 2010.
Ways to remove intervals
First, look to see if there is an extra paragraph character between the lines. To check this, there are two options: visual or programmatic.
- With the first, everything is clear - you just need to see if there is an extra paragraph somewhere;
- In the case of the software option, it means using the built-in Word function. It can show characters that are not visible in regular text. Let's talk about it in more detail.
Hidden Characters Feature
Uneven spacing between lines and paragraphs is best removed using this diagnostic tool. This speeds up the time of text editing in Word 2007 and Word 2010.
To find spacing, in Control Panel, on the Home tab, look for the Paragraph section. Then press the button with the “¶” icon. This is the icon of the symbols being displayed. By activating the function, you will see a dot appear between the spaces. Other characters, including paragraph marks, will be visible. This is a very useful option. It does not change the text in printed format, but it allows you to study the text more carefully before sending it to print.
If the space between the lines is too large, there may be spacing between them. Open the "Home" tab and in the "Styles" menu set the value to "No spacing". If this option is not visible, it means that it is not visible on the taskbar. To open it, click on the arrow button and select the desired item.
If you need to reduce the space between lines in the middle of a paragraph, select the required fragment. To do this, you don't have to use the left mouse button, as many are used to. Just hold down the Shift key and move the cursor with the right/left arrows. If you need to select all the text, on the “Home” tab, open the “Editing” menu and click on the “Select All” button.
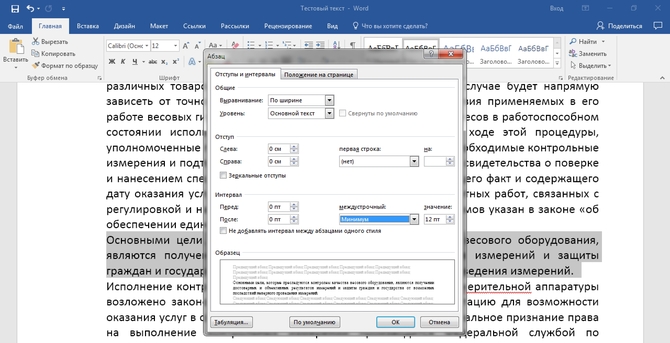
With the desired fragment selected on the Page Layout tab, select the item with the small arrow icon. You can do it differently: right-click on the text and select the “Paragraph” section from the menu that opens (this can be done in any version of Word: 2003, 2007, 2010).
A window will appear in which go to the “Indents and Spacing” item. In the “Interval” item, specify the desired type of interval (single, minimum). You can also select the “multiplier” or “exact” mode, then you will need to specify the value. To enter a value, use the up/down function buttons directly in the window or enter it using the keyboard. Click OK to apply the settings. Now the distance between the lines will be the same everywhere.
Description of intervals
When working with line spacing in Word 2007 and 2010, the following knowledge may be useful to you:
- "Single" spacing is the same as the largest font that was used in the selected piece of text;
- “One and a half times” is a distance that exceeds the previous interval by one and a half times;
- “Double” – accordingly, exceeds the indicators of a single interval by 2 times. That is, the font size will be twice as large as the maximum font in the selection;
- "Minimum" is the minimum value. There is enough space left in the interval so that a letter corresponding to the font in the text can fit in it;
- “Exactly” – you can adjust the interval value yourself;
- “Multiplier” – this distance is proportional to a certain coefficient. In accordance with it, the interval will decrease or increase. For example, if you set a multiplier of 1.4, then the distance between lines will increase by 40%.
Removing spaces between lines in Word 2007 and 2010 is a routine procedure that can be performed even by a person who has just installed Word on their computer. Using the interval setting, you can quickly edit your document to suit your needs. And with the help of the non-displayable characters function, you can reduce the distance between lines.
A business document recently received by e-mail, or rather the text of this document (the technical side) served as a kind of impetus for the conversation about line spacing.
As an example, we will use the title of the topic of today's conversation and part of the text that we are reading now.
To get to the line spacing settings, we don’t need to make additional efforts in the form of opening window after window and selecting option after option to ultimately end up in the line spacing settings window.
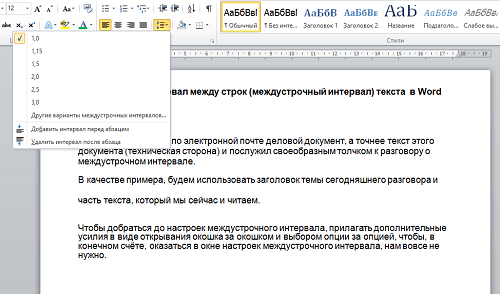
Let’s turn to the top menu and if the “Home” tab is not open, then open it and direct our attention to the “Paragraph” section:
Even looking at this section alone with the many icons of the various and necessary options included in it, you won’t immediately be able to figure out which option we need at the moment. Our instinct will help. Let's move the cursor over the icon with small horizontal stripes and blue up/down arrows:

If we do not immediately click on the arrow of the icon after hovering the cursor, but take a short pause, we will be able to see a hint that will appear that will confirm the correctness of our choice:

Amazing! We are on the right track. Click on the arrow next to the option icon:
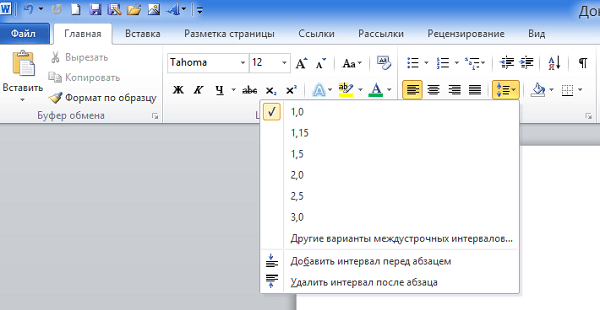
A window opened for us with line spacing values already offered to choose from, and three additional options. Depending on what we need (want) to do with the text as a whole or its parts, we will make a choice.
Most often, when setting line spacing in business texts, values from 1.0 to 2.0 are used.
We write such business texts at work and while studying at some educational institution. So, by selecting one of the interval values configured by the program in the window, we can quickly edit the text of most created or supplemented documents.
Let's practice.
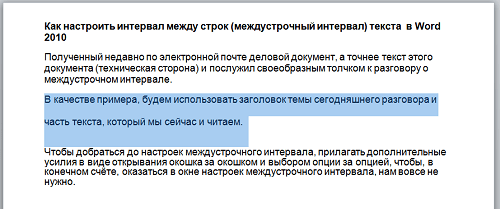
We have text like this:

The spacing at the title is lame. The 2010 numbers don't seem to belong in the headline. The text itself consists of three paragraphs and each paragraph has its own individual line spacing, which is visible to the naked eye. If you place the cursor at the beginning of each paragraph one by one, and then open the already familiar window for interval values, then the value that is applied to this paragraph will be highlighted.
Let's see if this is so, using the example of two paragraphs - the first and last. Place the cursor at the beginning of the first line of the first paragraph (counting from top to bottom):

Then click on the arrow icon in the “Paragraph” section of the “Home” tab of the top menu:
So, we found out that the spacing between the lines of the first paragraph is 1.0. Now, let’s conduct an experiment with the last paragraph, repeating the familiar steps:

We do not see more than one highlighted value in the window. The line spacing of the last paragraph is less than 1.0. The fact that there are no values less than 1.0 in the value selection window is very good. Text with such spacing as in the last paragraph is not only difficult to read, but moreover, harmful to vision.
Let's say, based on the express analysis of the line spacing of the existing paragraphs, including the heading, we decided that the best value for the entire text as a whole would be 1.15. Then let's get started.
Click the left mouse button to place the cursor at the beginning of the title. Then press the Ctrl key and, holding it down, click the mouse again - the title will be highlighted:

We can use this highlighting technique to highlight sentences.
Now let’s open the window for interval values and select with a mouse click the one that was considered suitable for this text, that is, 1.15:

The 2010 numbers became closer, that is, they went up, but we, suppose, did not like the interval with a value of 1.15. And we decide that 1.0 is the best value for the header line spacing. Let's apply it.
And this is what we get:

We also changed our original decision regarding the line spacing of the text. Let the spacing between lines be the same as the heading, that is, with a value of 1.0.
We remember and know (we analyzed the spacing of each paragraph) that the line spacing of the first paragraph has a value of 1.0, so we will not edit this paragraph.
Let's move on to the second paragraph (counting from top to bottom).
Place the cursor at the beginning of the paragraph:

Now we use a computer keyboard instead of a mouse. Press the Shift key and, holding it down, hit the down arrow key once - the first line of the paragraph is highlighted:

While continuing to hold down the Shift key, press the arrow key one more time. The second line also stood out:
If you use the combination Ctrl+Shift+arrow button, paragraphs will be highlighted.
Very good! The second paragraph is highlighted, and to set the interval value to 1.0, the hand reached to the side, already quite missing our warm palm of the mouse... But we nevertheless decided to continue selecting lines without interruption:

And thus we proceed until the end of the last line of the third (bottom) paragraph. And now the last two paragraphs of text are highlighted, and we can set the line spacing value to 1.0. Even at the moment when we just hovered the cursor over the value, the text had already noticeably changed:

And all we have to do is make one regular mouse click, confirming the choice, and then look again at the updated text:

Let's make a neutral left-click anywhere to reset the selection:

Why didn’t we immediately select all the text and set the spacing value, but rather select paragraphs and even lines? We’ll start with the answer to this question next time.
To be continued…
When you start typing text in Word, you may encounter a problem when the space between the lines is quite large. This nuance can greatly spoil the document, making it unaesthetic. This can often be observed by downloading a document from the Internet. In both cases, the problem is incorrect formatting. In this article we will talk about in Word: how to reduce or, conversely, increase it. We'll tell you everything in detail and give you the three easiest ways, so that everyone will find something for themselves.
First method: for all versions of Word
As mentioned above, there will be three ways to make line spacing in Word smaller or larger. They are not very different from each other, but they are not suitable for all versions of the program. Therefore, the first method presented will be universal; it will be suitable for both Word 2003 and the 2016 version.
Now we will set the default line spacing parameters. This is done so that when you create a new document, you do not change these values each time.
You need to create a new document in Word. After this, on the “Home” tab, you need to find a column called “Styles” in the toolbar (it is located in the very right corner). In this column, you need to click on the arrow icon, which is also located in the lower right corner. As soon as you do this, a small panel will appear with the ability to change the document style, but we don’t need this. In this panel, at the very bottom, there are three buttons - click the right one.
In the window that opens, you need to go to the "Default" tab. There is a column "Interval". It is there that the line spacing can be both reduced and increased. In general, use the presets in the dropdown list, enter values manually, increase, decrease until you find the value that suits you. Click OK after checking the box next to "In new documents that use this template."
Second method: only for new versions of Word
We continue to talk about interline We have already figured out how to reduce or increase it, but this is just the only way. Now let's move on to the second. It is intended only for programs 2007 and higher. It will not work in Word 2003.

You also need to open a blank Word document, only this time pay attention not to the “Styles” column, but to the “Paragraph”. Click the same icon as last time and a settings window will open. In it you will see the same column - “Interval”, with the same parameters. All you need to do is specify the line spacing in Word (you already know how to reduce or increase it).
After that, click the button located at the very bottom - “Default”. In the window that opens, select "All documents based on the Normal template." Click "OK" and get started.
Third way: one click
Now we will look at how to change line spacing in Word in one click. This method only works if you need to change the values in a separate piece of text.

So, in the "Home" tab, in the "Paragraph" section, find a button called "Spacing". By clicking it, you will see a list of all available intervals. Select the spacing you like, and it will change in the pre-selected text area. Also in the list, you can click “Other line spacing options” and the familiar “Paragraph” window will open.
Set line spacing before you begin. If you want to create a document with one standard line spacing, set it before you start (to save time later). To change the line spacing, go to the Home or Page Layout tab.
Change the spacing on the Home tab. On the Home tab, find the Paragraph section. Here, click on the Line Spacing icon to open the Line Spacing menu. The icon has 4 small lines with an arrow pointing up and down. From this menu you can select general line spacing options.
- If you don't see the Line Spacing icon, it's most likely missing because the window isn't large enough. You can change the spacing by clicking the arrow icon to the right of the word Paragraph. This will open the Paragraph menu.
- In the Paragraph menu, you can adjust the line spacing using the "line spacing:" drop-down menu under Spacing.
Change the spacing on the Page Layout tab. On the Page Layout tab, click the arrow icon to the right of the word Paragraph. This will open the Paragraph menu. In the Paragraph menu, you can adjust the line spacing using the "line spacing:" drop-down menu under Spacing.
Change the spacing between paragraphs. In addition to changing the spacing between lines, you can change the spacing before and after each paragraph. On the Page Layout tab, look for Spacing in the Paragraph section.
- "Before" will add space before the beginning of the paragraph.
- "After" will add space every time you press Enter to start a new paragraph.
Line spacing options. By default, line spacing is set to 1.15. If you want to set single spacing, you need to select 1 from the drop-down menu of the Line Spacing or Single icon in Paragraph-Spacing-Line Spacing.
- “Exactly” will allow you to set the exact distance between lines, measured in points (72 points in an inch).
- "Multiplier" will allow you to set a larger interval, such as a triple interval.
Change the default interval. If you want to change the default interval (1.15), specify the values you want and click Default.... Word will ask you to confirm changes to the default values.
Change the spacing for certain parts of text. To do this, select the text you want to change and then adjust the spacing as described above.
- You can change the spacing of the entire document by selecting all the text. To quickly select all text, press Ctrl+A (PC) or Command+A (Mac). This will not affect headers, footers or text fields. To change the spacing in them, you will need to select these sections separately.
The Microsoft office suite is widely used, and its DOC format has practically become the standard for formatting text documents. Unfortunately, most users end their acquaintance with this word processor by learning to change the font typeface and mastering its alignment on the page.
Meanwhile, in many organizations there are rules for working with text documents that prescribe certain parameters their design. They usually define the type font, used by default and the required line spacing in the document.
Change intercharacter distance, also called kerning, is required mainly to give the formatted text a more harmonious and aesthetically complete look. Its main area of application is typography, or artistic layout.
How to change and adjust line spacing
There are several ways to change line spacing in Word. ways:
The last item is called up by clicking right mouse button and allows you to manually adjust line spacing in a wide range of values.
Line spacing values
Line spacing is distance between hypothetical lines passing through the middle of letters in lines and is equal to the default font size. Standard sizes, available in Word, are 1, 1.15, 1.5, 2, and 3 values of this distance. 
Drop-down list, in the item " Paragraph", allows you to use line spacing options in the text that differ from those indicated. In addition to the standard set of single, one and a half and double, you can also find the following here:
Changing the letter spacing
Each character, in any font, is allocated a certain space, but, depending on the style, the letters can fill it in different ways. To accurately adjust the space they occupy, they use kerning. In Word, it can be specified in three different options. In addition to standard, available sparse And compacted.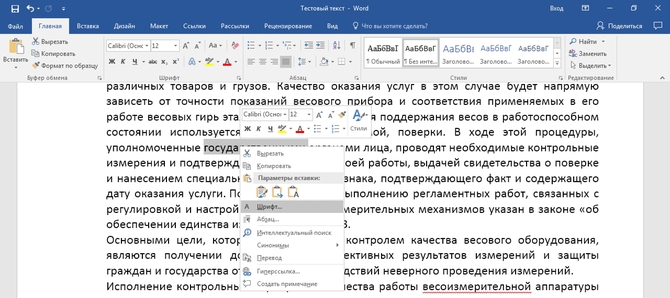
Adjustment is carried out in increments of 0.1 points. This parameter can be accessed in two ways:

To give the text an aesthetically complete look, sometimes it is necessary to apply visual separation between paragraphs. Keystroke Enter, which is normally used for this operation, does not have this effect, since it simply moves the cursor to the next line. Login edit menu can be done in two ways: 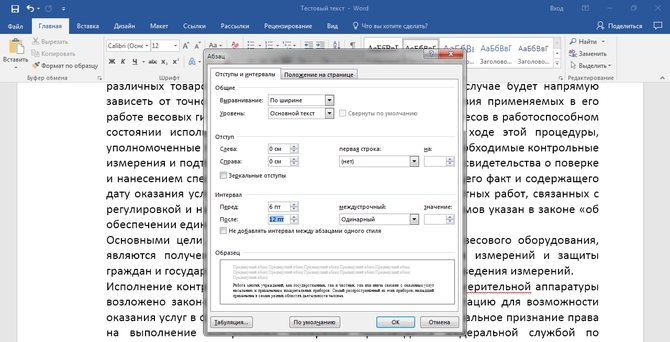
- Using the context menu " Paragraph» called by pressing the right mouse button;
- Using the command group " Paragraph" on the " tab Home» Word.
In both cases, an additional window opens in which, using the “ Interval» you can set the indentation before And after paragraph. The adjustment, regardless of the selected font typeface, is performed in a fixed increment of 6 points.