How to enable hdmi digital audio. Problem: There is no sound coming from the TV via HDMI cable
 The fewer cables the better, and it’s hard to argue with that. HDMI is a universal interface that can not only transmit high-quality images, but also output sound. This allows you to reduce the number of wires, because instead of a pair of cables (for audio and video), one universal one is enough. And if you consider that there are plenty of ready-made HDMIs, several meters long, on sale, and a long cable with two audio connectors will have to be soldered yourself, this also saves time.
It would seem that outputting sound via HDMI is not a difficult task, but it also has its own nuances. Not always, after connecting the wire, not only the picture, but also the sound begins to be broadcast. In some cases, this requires some more effort.
From a computer that was released not very long ago (no more than 3-5 years ago), outputting sound via HDMI is quite simple. You need to connect the cable at one end to a TV or monitor equipped with speakers (or a 3.5 mm jack for connecting speakers/headphones), and at the other end to the picture source (PC video card, or pins on the motherboard if integrated graphics). The picture will be transmitted immediately, but with sound it’s a little more difficult.
Modern video cards are equipped not only with a graphics processor, but also with a sound processor. It is designed specifically to output sound via an HDMI cable. You can see if your computer has a second sound card (built into the video card) in Device Manager. To get into it, you need to right-click on the computer icon on the desktop and find this item in the left column of the window that opens, or simply enter the search in the Start menu. 
In order for sound to be output via HDMI without additional devices, the system must display at least two audio devices. One of them is built into the motherboard, the second is built into the video card. The exception is motherboards equipped with an HDMI output (if graphics integrated into the processor are used): they can have one sound device, and the audio outputs of the HDMI connector are connected to it.

On a computer with a video card integrated into the processor, the procedure is simple. Before outputting sound, the HDMI cable only needs to be connected to the monitor/TV and to the connector on the back of the board.
How to configure audio via HDMI on AMD video cards
To output audio via HDMI to a PC that has AMD Radeon discrete graphics installed, you will also have to dig a little into the settings. To do this, you need to launch the “Control Panel” and find the “Sound” submenu there, or simply enter this request into the “Start” menu.

To output sound through the HDMI connector of the video card, you should select the sound processor of the video card (AMD Audio) and click the “Default” button on it. If two screens are connected to the PC in parallel in picture duplication mode, this is not necessary (everything switches automatically).
The disadvantage of this solution is that when audio is output from a discrete video card, the audio connectors on the front panel of the system unit stop working. To fix it, you need to open Radeon Settings (usually the icon is located on the right side of the taskbar, next to the network status, clock and language). 
In the menu that opens, you need to open the “Settings” submenu, select “Advanced settings” and find the “Sound” tab on the left. Then you need to connect headphones or speakers to the jack on the front panel. In the additional settings window, find the output corresponding to the sockets on the panel (if headphones are connected, it will be colored), right-click and select “Set as default” and click the “Apply” button. 
Now, when the front connector is connected, sound will be sent to it, and when disconnected, it will be sent to the monitor/TV.
This disadvantage is not present on laptops, just as it is not present on PCs with integrated graphics.
Connecting your computer to your TV to play your favorite game or watch a movie is a great idea. To do this, the user will need a computer, TV, etc. In fact, there are no problems connecting one device to another. Just connect the cable to the computer and turn them on and select the hdmi section. This completes the connection procedure, but what if after connecting these devices the sound disappears (or only comes from the computer speakers)?
How to solve the problem with no sound on the TV?
Perhaps many people have encountered a similar problem when trying to synchronize these two devices. First you need to find out the cause of the problem. First you need to check the audio playback device on your computer or. Quite often it happens that the TV connected to the computer is not used as a sound playback device, which means it needs to be configured as the default device. This is done as follows: you need to right-click on the sound icon, which is located on the taskbar in the lower right corner and select “Playback devices”. The window that appears will display all playback devices, including the TV itself. Next, you need to select it and right-click, then in the context menu “Set as default”. Once confirmed, the TV should be used as the default audio output device.
Sometimes the TV may not appear in this window. Don't be afraid or panic ahead of time. If your TV is not displayed in the window or has the “Inactive” status, although the hdmi cable is already connected to both devices, just restart the computer with the hdmi cable connected. When the PC starts up again, go to this menu again. The TV should appear in the window and become available for use. Otherwise, you will need to download and install special drivers, which can be found on the official website.
If the problem is not solved, try checking the sound, it may be simple. The problem may lie in the hdmi cable itself. For example, the wires in it may oxidize or become damaged. In this case, only a new hdmi cable can solve the problem.
Many users who are trying to connect a TV to a computer or laptop ask what to do if there is no sound to the TV via HDMI. Unfortunately, this problem is so common that questions related to it are asked almost every day. In this article we will talk about how you can solve this problem.
So, first, make sure that your laptop or image is being transmitted normally. You also need to check the sound on the TV; to do this, simply turn up the volume using the remote control.
After that, open the “Control Panel” and find the “Hardware and Sound” section there. This section has a subsection called “Sound”. This is what we need to open.
If you cannot find the “Sound” subsection, then you can use the search in. Just enter “sound” in the search bar and the operating system itself will prompt you to open this subsection of the “Control Panel”.

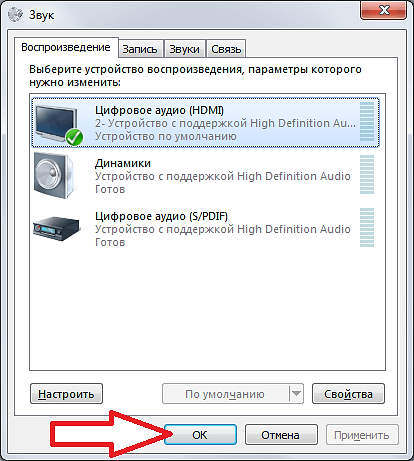
After opening the “Sound” subsection, a small window with four tabs will appear in front of you. We are only interested in the first tab, which is called “Playback”. This displays a list of audio devices to which audio can be transmitted. If you have, then most likely in the “Sound” window there will be a green mark opposite the “Speakers” item.
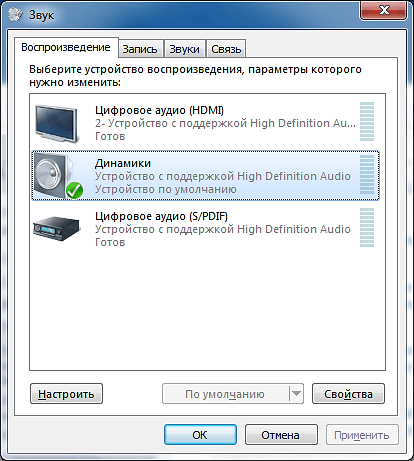
This means that the audio is sent to your computer (or laptop) speakers instead of being sent via HDMI to your TV. In order to correct this situation, you need to select the “Digital Audio ()” item in the “Sound” window and click on the “Default” button.

After this, a green mark should appear opposite the “Digital Audio (HDMI)” item, which means that the sound will now be transmitted to the HDMI output. In order to save the settings, close the “Sound” window by clicking on the “Ok” button.
Today, almost everyone has large LCD TVs, which have successfully replaced the anachronism in the form of old CRT models. Their huge advantage is not only the highest image quality, but also the ability to connect to a computer. Using a regular laptop, you can make an excellent media center for very little money.
It’s just that, in principle, there is nothing complicated about this, but sometimes there are minor problems that require a little time to resolve. No need to worry, as almost all problems can be solved relatively easily, and the reward for your efforts will be a movie in excellent quality that you can enjoy on your home TV screen!
General information
So, to connect, you need a TV itself that supports this mode, as well as a computer or laptop, which can also be connected via an HDMI connector. Of course, you also need the cable itself. So how do you set up your TV via HDMI? To answer this question, you will have to conduct a small educational program on the most basic concepts.
Types of HDMI connectors and cables
By the way, what is this? This is a relatively new interface for transmitting high-definition video and audio. Its peculiarity is that it uses exclusively digital transmission of encoded data, which ensures excellent picture and sound quality. It is not surprising that this interface is one of the most popular in the world today.
There are three types of standard HDMI connectors:
- Type A. Standard, found in any modern technology.
- Type C (micro HDMI), as well as Type D (mini HDMI). These connectors are familiar to all owners of modern cameras, smartphones and tablets. Being smaller, these modifications have all the advantages of their predecessors.
- Type B. It differs in that it is capable of transmitting video with a resolution higher than 1080p, but is still rare.
Of course, among such a colorful “hotbed” of connectors themselves, no less varieties of cables have appeared that can connect them:
- Standard. It is most common and can be used to transmit video with a resolution of up to 1080p.
- High speed. You can watch 3D and other ultra-high definition formats.
- Standard/Ethernet. It not only supports audio and video transmission, but can also be used to connect to a local network. Rare, however, as are devices that support this feature. In any case, connecting a computer via HDMI to a network is almost impossible to see in our country.
- High Speed/Ethernet. Everything is the same as was said regarding the modification described above, only it is even less common and supports all high-definition video formats.
- Automotive. As the name suggests, it is used to connect devices that support this interface in cars.
Choosing a cable
Beginners usually have difficulties not only with how to connect a computer to a TV via HDMI, but also with the issue of choosing the right cable. What you don't hear in stores! And about oxygen-free copper and gold-plated contacts! Some of these stories are relatively true, but you definitely shouldn’t believe everything.
So, remember one simple rule: if you are not going to watch 3D movies on TV, and the cable length in your case does not exceed 1.5-2 meters, you can take any model, even a Chinese one. In this segment there is no difference between a cable that costs six thousand and one that costs 200 rubles. If you just need 3D, then you should choose a cable with a specification no lower than HDMI 1.4. If there is none, you will not be able to watch a 3D movie via HDMI, since the cable simply cannot cope with such a volume of transmitted information.

However, even then you shouldn’t run to the store to buy a cable, paying 500 or more (!) dollars for it. Any cord of the required specification will be sufficient. Forget about the myths that talk about “better signal transmission” and other nonsense. The specificity of digital transmission is that it either exists or it doesn’t exist at all. Simply put, if the cable is capable of transmitting a signal, then it will transmit it in any case, and the quality of the image and sound will not suffer in any way. But when the computer stubbornly does not see the TV via HDMI, it still makes sense to replace the cable. It may happen that it was manufactured in violation of technology.
And now a few words about where the connectors are.
If we talk about a TV, then most often they can be found on its back panel. However, in the latest models, HDMI connectors are often located on the side wall. It's easier with computers. All necessary inputs are on the video card. If we are talking about a laptop, then in the standard case the desired input is located close to the USB 3.0 connector. Before connecting your laptop via HDMI, it won’t hurt to look at the instructions for it again. It will also not be superfluous to visit the manufacturer’s website, where you can familiarize yourself in detail with all the specifications that this device uses.
Connection
So how to connect your computer to your TV via HDMI? Everything is very simple here. Connect the plug to the connector on the TV, and then insert the other end into a similar port on the computer’s video card. Attention! Both devices must be turned off at this moment, otherwise they are likely to break!
Here's how to connect your computer to your TV via HDMI. If only one TV is connected to the computer, then everything should work immediately after they are turned on. But if you need it in conjunction with a monitor, then numerous and varied problems are possible, the occurrence of which is associated with several factors at once.
Connection problems
So, at first you may find that all the icons and controls on your TV screen appear stretched or warped. This is due to incorrect resolution. As a rule, modern operating systems set the appropriate value automatically, but this is not always the case.
To adjust the resolution, you need to right-click on any free space on the desktop, and then select “Screen Resolution” from the context menu. Keep in mind: it is better to set the recommended values, since otherwise no one can guarantee good image quality. This applies to both maximum and minimum values.
In addition, it doesn’t hurt to click on the “Advanced Settings” button, and then go to the “Monitor” tab. There you should click on the “Screen refresh rate” drop-down list. You need to make sure that under this item there is a checkbox “Hide values that may harm your equipment.”
Important! All of the above especially applies to laptops, in which damage to the screen will lead to the replacement of the entire laptop assembly. Only after you make sure that all parameters fully comply, you can connect the laptop to the TV via HDMI.
The minimum suitable value is 60 Hz. However, the more, the better. Of course, the color rendering quality must be set to 32 bits. If after clicking the "OK" button the system does not work normally, just wait 15 seconds, after which everything will return to the default settings.
Setting up the connection of multiple displays
If not only a TV, but also a monitor is connected to the system unit, the system will consider all devices to be displays. The specific type of equipment in this case is completely unimportant. Windows 7/8 has two main modes for this case: duplication and cloning. You can choose between them in the same dialog box in which you set the required display resolution.
Screen mirroring
As you can guess from the name alone, your two desktops will be displayed in front of you on all connected displays. Important! Alas, standard Windows tools (and Windows 8 is no exception) do not allow you to set your own value for each monitor. Imagine what the image will look like on a large TV and an old 4:3 monitor!

Simply put, to use this mode comfortably, you will have to use devices with the same resolution, since otherwise some display can be turned off altogether. Since we are talking about connecting a TV, this option is still unlikely. However, you can simply pair a widescreen monitor with your TV. In this case, it will be possible to experimentally find the most suitable resolution, and there will be no annoying black bars on the sides of the desktop on the computer.
Here's how to connect your computer via HDMI using this mode.
Expanding the screen
This method is much more interesting. In this case, the TV can be made into one desktop, and the laptop or computer monitor can be made into a second one. Simply put, you can use your mouse to select the currently active monitor on which the application will run.
The OS will automatically number the displays, and you can see their serial numbers in the same “Screen resolution” section. If you have gone too far with the number of TVs and monitors, and therefore no longer understand which one is which, just click on the “Detect” button, after which the devices will be sorted in order, and the currently active monitor (or TV) will be highlighted.
Manual distribution
If you don’t like the order of automatic distribution of display numbers, you can simply grab them with the mouse and put them in the right place. So, it is preferable to place the TV in the front rows, since in this case it will be much more convenient to display content on it. After all this, you can click on “Apply”, after which the desktop will be expanded to multiple monitors. Using the “Make Primary” button you can set the priority.
Roughly speaking, the monitor you select will have a Start button, and all other connected displays will be considered slaves by default. As practice shows, setting the TV as the main monitor is not very wise. Of course, except for those cases when it will “officially” replace your work computer monitor.
Other options

If you installed control programs for your video card (NVidia, AMD), then connecting via HDMI can be done using the methods suggested by their developers. For example, in the first case, you need to right-click on an empty space on the desktop, and then select “NVidia Control Panel” from the context menu that appears. Go to the “Display” section and make the settings you are interested in. AMD programs are managed in a similar way. In general, all setup steps are similar to what we described above, so it won’t be difficult to figure them out.
How to output sound to TV via HDMI
What about sound via HDMI? Don't forget that an HDMI cable is a very functional thing. Not only images are transmitted through it, but also sound. Many novice users completely forget about this, and therefore spend a lot of time trying to fix “problems” that actually don’t exist. For sound to be transmitted correctly, you must have the most current versions of drivers installed on your video card. Of course, the same applies to drivers for audio output devices (the Realtek core integrated into the motherboard or a discrete audio card).
Let's learn how to set up sound via HDMI. To understand whether you have a sound output module installed through it, you need to open “Device Manager”. It's easy to open. Right-click on “My Computer”, select “Properties” in the context menu, and in the dialog box that opens, on the far left side, click on the desired item. A new working window will open in which you need to find the “Sound, game and video devices” section. It should contain a line like High Definition Audio, which indicates support for digital quality audio playback.

Next, go to the “Control Panel” (search through the “Start” button), select the “Sound” item there. It should also have something similar to "HDMI Device". If everything is in order, turn off the computer, connect the TV, and boot the system again. The device should change its status to “Ready”. You need to right-click on it, and then select the “Use as default” option in the context menu that opens.
Pay attention!
Alas, not all models can transmit sound to a TV via HDMI in principle, as this is due to the characteristics of the connectors. As a rule, the first connector, which is specifically designed for connecting computers, laptops and other reproducing equipment, should in any case have such capabilities. In addition, it doesn’t hurt to dig deep into the TV settings. There you can often find a lot of useful things - setting up sound output, for example. However, connecting a TV via HDMI largely depends on the manufacturer and model of the device. Remember this. Therefore, it won’t hurt to read the instructions again.
That's it, after this the audio must go via HDMI. To be sure, reboot the entire system again, and then start enjoying high-definition movies streamed from your computer or laptop. Here's how audio is transmitted over HDMI.
Don't forget about the remote control!
It happens that you have already tried all the methods, but the image stubbornly refuses to appear on the TV screen. Why is there no signal via HDMI? In this case, it won’t hurt to take a closer look at your TV’s remote control. There is probably a small Source button there, with which you can select the signal source.
Click on it, then in the selection menu that appears, activate the HDMI port to which your computer is already connected. Most likely, after such a simple action, everything will work perfectly. Here's how to connect your TV via HDMI.
And again about the problems
Alas, Windows would not be itself if everything was so simple. As a rule, many users encounter problems associated with duplicating images from a PC monitor to a TV screen. So, very often people complain that they are unable to display an image on a TV unless they make it their main monitor. As you can understand, this is not advisable in all cases.
As a rule, a TV is used as a media player, and a regular monitor is used for work. If it is not active, you will not be able to work fully or watch movies normally. Unfortunately, the creators of Windows are once again “behind the times,” and therefore there are simply no standard tools for properly managing a configuration with multiple monitors. We have to look for third-party alternatives.

The most powerful and flexible program of this type is the excellent Actual Multiple Monitors application, which we will talk about now. The program is paid, which is important for our region, but its capabilities are worth the stated price. Of course, there are a number of completely free utilities, but their capabilities are not always comparable to those of the program described below.
Actual Multiple Monitors - assistant in connecting a TV
Of course, when creating this utility, the developers were unlikely to focus exclusively on connecting a TV via HDMI, but the program really simplifies its use when connecting to an existing computer/monitor pair.
Unlike standard utilities, this application can make the desktop on a computer monitor and TV absolutely identical, but you can easily set a different resolution on each of them! This is an ideal solution for those users who are quite happy with the old 4:3 monitor, but who would like to use a TV as a second display.
But that's not all! You can easily determine which application windows will be displayed where. Simply put, you can only display the window of the player you are using on the TV screen. Agree that this option is extremely convenient and useful! And one more pleasant circumstance. The application allows you to use a separate desktop image for each monitor, which will certainly be appreciated by all aesthetes. The program is paid, it costs around 40 dollars, but it works out its cost in full.
How to connect two TVs if the video card only has one HDMI connector?
If you have the opportunity to connect two TVs to the system at once, one of which will be used for its intended purpose, and the second you will work on, then that’s great... But most modern video cards only have one HDMI connector. What to do in this case?
This problem can be solved in two ways. In the first case, you will need to find a DVI/HDMI adapter. Connect it to the analog output of the video card, and then use a cable to connect the system unit to the TV. However, if you are using an old monitor that is connected to the system unit only via an analog connector, you will not have such problems at all. Important! Through such an adapter, sound is not transmitted to the TV via HDMI, and therefore the issue with acoustics will have to be resolved separately.
The problem is that the quality of the signal that is output to it is not very high. What to do if you have a high-quality monitor and TV that you would like to connect through a normal interface? In this case, you will need to buy a so-called HDMI splitter, which allows you to connect several devices to one output at once.
Important! As with cables, don't try to buy the most expensive products of their kind. In stores you can see models costing $500, but practice clearly shows that they do not have any significant advantages over the “Chinese” ones for 300 rubles. An exception should be made only for cases when you plan to view “heavy” 3D video. If this is really the case, you will have to buy a more expensive model, since cheap modifications rarely support such signal density.
In conclusion

Here's how to connect your computer to your TV via HDMI. There is nothing complicated about this, you just need to be a little more careful. We warn you once again - all devices must be turned off at the time of connection! It is not uncommon for ports to burn out if this instruction is ignored!
This unfortunate circumstance is due to the fact that this cable is actually under quite high voltage. Surely everyone knows stories about flash drives that caused USB ports to burn. And this despite the fact that the voltage on the ports is negligible (compared to HDMI)!
Connecting audio from your computer to your TV expands its capabilities, improving the sound quality of music or movies. There are several ways to do this, they all have their pros and cons, so it is necessary to give preference to one method or another, taking into account the characteristics of the equipment and its capabilities. Before you connect audio from your computer to your TV, you need to make sure that your devices have one of these connectors.
Main types of connectors
Almost all modern equipment is equipped with one of these types of connectors. They are designed for connecting external storage media, video and DVD players, as well as other digital equipment, which includes a computer.
The most used types of connectors are:
- HDMI;
- Wi-Fi;
- RJ45;
- RCA cable.
Ways to connect sound from a computer
Via HDMI connector
Audio output through this connector is the most popular, since problems and malfunctions are less likely to occur with it, and the sound quality remains good. This cord can be supplied either with some digital devices or sold separately.
There is no need to purchase an overly expensive cord, since regardless of the price, the same materials are used in its manufacture, which do not change the sound quality.
To connect your TV to your computer, you first need to disconnect both devices from the power supply and then connect them using a cord. This connection method does not require any additional settings; you just need to specify the HDMI output on the TV as the audio source.

Possible problems when connecting devices
- If the sound does not play, then you need to use your computer to set the TV as the sound source. To do this, right-click on the sound icon in the lower left part of the taskbar and select “Playback devices” from the pop-up menu. From the list you need to select your device, right-click on it and check the box next to the “Set as default” menu item.
When setting up, the devices must be connected to each other. If the computer does not see the TV when the HDMI cable is turned on, then you need to restart it and repeat the setup procedure again.
- You also need to make sure that the video card supports audio playback via the HDMI output. Often all modern devices are equipped with this function. However, some of them include a special jumper that helps create a connector for connecting the SPDIF out connector on the motherboard with the SPDIF in connector on the video card.
- You can solve the problem if you reinstall or update the drivers for the video card.

How to connect sound from a computer to a TV via a Dvi cable?
The second most popular method, which is used when it is impossible to connect via HDMI output. Connectors of this type are divided into three types: digital, analog and combined. However, transmitting sound through this connector is not as simple as with the previous one, since it all depends on the video card used in the computer, because not all of them support audio playback through the DVI output.

In the case of transmitting not only audio, but also video signals to the TV, you must use a DVI - HDMI cable or connect devices using DVI-D - HDMI adapters, and then an HDMI-HDMI cable. This complex connection system is explained by the fact that the video signal does not always pass through the DVI cable.
The disadvantage of this method is also the complex setup process compared to the previous option. To begin, in the TV menu you need to select the DVI connector as the signal source, and the computer and TV must be connected to each other.

Connection via VGA cable
This is an outdated method that is inferior to the first two in terms of ease of connection and playback quality. Therefore, it is often used in older devices where it is not possible to connect using other cables.

What problems may arise during connection?
Very often, the VGA output is already occupied by a computer monitor, so in order to connect another device you need to purchase a special adapter, and then a cord for audio playback.
Main disadvantages
VGA is not intended for audio transmission; it can only be used as an additional element, to which a special cord must be connected. This option is not only expensive, but also more complex and of lower quality compared to other methods.

How to transfer sound from a computer to a TV via WI-FI
This method places additional requirements on the TV - support for DLNA technology and the presence of a multimedia file player. Modern plasma models are equipped with this function, so this connection method can be considered as an alternative to HDMI.

Connection setup
After making sure that the TV has a built-in WI-FI module, you can start setting up.
- First, you need to configure the router so that it can work in DHCP mode.
When setting up, you must assign a password that will protect the local network from unauthorized entry.
- In the TV menu you need to find the “Wireless Connection” item, and then find your network and enter it using the password.
- To transfer sound to a TV, you need to install a special program on your computer - a media server. This program then allows access to files and folders containing music or movies.
- To switch audio from your computer, you need to open the media server and select Ethernet as the playback source on your TV.
What is the disadvantage of connecting via a WI-FI router?
When playing audio to a TV, there is a large load on the local network, which can lead to slower speeds.
Connection via RJ45
When connecting using this method, a special network cable is used, which can be found in stores under the name “twisted pair”. As in the previous method, the TV must support DLNA data transmission technology.
It also uses a router, which is configured in the same way as through a WI-FI connection. However, using this device may result in reduced speed. Therefore, it is better to give preference to an additional network card.
The setup follows the same principle as via WI-FI, but you need to connect through a media server.

How to output sound from a computer via an RCA cable
This method allows you to connect even the most outdated models of computers and televisions. Such a cable is called a “tulip”; it can have two or three sockets, each of which is responsible for transmitting a separate signal. Yellow – video, white – left channel of stereo audio signal, red – right channel of stereo audio signal.
Devices must be disconnected from power before connection. Then, you need to attach the tulip connectors to the corresponding holes (often color coded). After this, in the computer settings you need to expand the desktop to fit the size of the TV screen, and switch the TV to “Video” mode.

The most preferred methods among all those described above are connections via an HDMI cable and via a twisted pair cable or WI-FI router. It is these options that can ensure sound quality and connection reliability at the proper level.
The video shows in detail how to connect a TV to a desktop computer via HDMI and MPF. First you need to select a cable without adapters and make sure that the necessary connectors are available on the devices. Then the connectors are connected, and the TV and computer are configured.
Classmates
sovetexpert.ru
How to connect sound from a computer to your TV
Many music lovers store digital recordings of their favorite tracks on their personal computer, but it is better to listen to them using a modern audio system. An excellent option is a home theater - surround sound, the subwoofer produces excellent low bass sound. But how to connect so that the sound goes from the laptop to the TV, and then spreads throughout the room through high-quality speakers? There are quite a lot of different ways to solve the issue of how to connect sound from a desktop computer or laptop to a TV.

Main connectors
Each household appliance has connectors for connection, the main and quite often used ones are the following.
- High Definition Multimedia Interface, abbreviated as HDMI. Its purpose is to transmit digital video and audio data. Recently, connecting to the World Wide Web through this port and cable has become fashionable.
- Digital Visual Interface or DVI. It is designed to transmit video signals to all modern monitors and LCD TVs.
- A video adapter with 15 pins or a subminiature VGA connector transmits the audio signal line by line and is used on all modern television and audio equipment.
- Wireless communications or the well-known abbreviation Wi-Fi, which has become firmly established in the lives of modern youth - you can connect to it and transfer data without a cable.
- Registered Jack (connector) or RJ45 is a connector for connecting a computer or laptop to household appliances.
- A composite RCA connector patented in the early 1940s to switch the sound from the phonograph of that era to an amplifier. It is still used today.
All modern equipment has several connectors of various types in its arsenal to make connections easier. A DVD player, laptop or other digital media connected through these connectors is ideally combined with the TV for exchanging information.
Connection options
Today there are a huge number of cables on the market that allow you to connect different types of connectors. Each type of connection has its own characteristics.
HDMI cable
This method is considered the most popular because it rarely causes problems and malfunctions, and the quality is at the highest level. A cord of this type is sometimes supplied with digital equipment, and can be purchased retail at any store.

When connecting, you need to turn off the power to the product, connect the cable to the laptop and TV. This connection does not require separate settings; only when you turn it on, specify the source of the audio signal in the TV receiver menu section.
Advice! When buying a cable, do not chase the most expensive analogue - they are all made of the same material, which does not affect the sound range.
During preparation and execution of such a connection, a problem may arise: the sound does not come through the TV acoustics. Go to the laptop settings, select the TV as the audio source, and check the “Use as default” checkbox. Also check your video card - it should support similar playback. True, many manufacturers include a special jumper in the package that helps create the connection; this should be displayed in the instructions. In order for the video card on the TV to work properly, you need to update the drivers, but only from the official website.
When setting up, both products must be connected; if for some reason the laptop does not see the TV when the HDMI cable is turned on, restart the computer and repeat all the settings.

DVI
This type is used when you need to switch audio from a computer to a TV. There are three main types of such connection:
- digital version;
- analog method;
- a symbiosis of both options.
The only problem is that this connector does not always transmit sound correctly - the reason is the video card of your PC. Experts advise using a special DVI - HDMI cable or using a DVI-D - HDMI adapter together with a cable where both connectors are identical, i.e. HDMI type. Such a complex diagram of the entire structure has a very simple explanation - the video signal does not in all cases pass freely and without changes through a cable of this type. In addition, the settings have a more complex system than with the first option.

VGA
This is quite an ancient method - it is rarely used and mainly on products with an old layout, where it is not possible to connect modern cables. This connector is always occupied on the system unit by the cord from the monitor, so you also need to purchase a special adapter and an audio playback cord.
The disadvantages include the fact that this outdated cable, connected to products, does not transmit sound according to its characteristics - it is used as an additional element. The option is considered costly in monetary terms, difficult to implement and does not have the necessary quality.

Wireless technologies
Many users often ask the question of how to transfer sound from a home computer to a TV using WI-FI and what needs to be purchased for this. Your TV must support DLNA technology - an alliance of digital networks located in the home. This modern project allows the user to solve all problems - download any applications and updates, receive and transmit video images, digital music and distribute it among compatible home devices.
Today, every flat-panel TV of the plasma model family is equipped with such functionality, so this method of data transfer is an alternative to an HDMI cable.
The settings are not complicated, but to complete them you need to buy a high-quality router that works in the DHCP system - a technology that allows you to automatically assign an IP address to any device. When you are convinced that the TV is equipped with a special module, proceed with the step-by-step setup.
- We configure the router to operate in the mode In this case, it is necessary to set a very strong password (at least 10-12 characters) to protect the device from unauthorized access.
- In the TV menu, look for the “Wireless Connection” section, find your network and enter it.
- To transfer sound from a laptop to TV, you need to install the “media server” program on your PC/laptop, then use it to open access to the necessary virtual media in which the music is stored.
- To switch sound from a PC, you need to open a previously installed program and select “Internet” as the playback source in the TV settings.
Experts attribute a significant load on the local home network to the disadvantages of this type of connection - this can affect the Internet speed.

RJ45 network cable
This type of cable is sold in retail networks as “twisted pair”. For such a connection, the TV must support data transmission technology similar to the previous option. Additionally, you need to purchase a router, which leads to a slower connection speed - you need another network card. The setup is similar to a wireless network.

PC+TV via RCA
This method is useful for connecting outdated models of PCs, laptops and TVs, to which modern cables simply will not fit. Experts call this type of connection a “tulip”; the cord may have two or three connectors, each of which is responsible for transmitting specific data or a signal. Standard marking:
- yellow plug - video signal;
- white is the left channel of the stereo audio signal;
- red color - right channel.

Professional masters advise using the HDMI option or a wireless connection; in second place is an RJ45 cable, because only these options can provide high-quality output sound and exceptional reliability.
Some connection options can be seen in the attached video:
Tehnika.expert
How to connect sound from a computer to a TV
A large number of people face the need to connect a computer to a TV every day. This is a very good opportunity, since the size of the monitor and its location do not always allow you to comfortably watch movies and other entertainment programs. In addition, the TV can be used as a monitor if the latter fails.
- 1 Connector types
- 2 HDMI
- 3 DVI, VGA
- 4 Wi-Fi, RJ45
- 5 S-Video/SCART
Connector types
Modern devices for connecting a computer to a TV allow you to do this very quickly, while the image and sound will be of high quality. Almost any model is suitable for such a connection, including old picture tubes. The definition of the process algorithm is directly determined by the type of connectors with which the connected devices are equipped.
The most popular interfaces (connectors) are:
- HDMI;
- RJ45;
- Wi-Fi;
- S-Video/SCART.
After a thorough inspection of the devices and identification of one or more connectors from the above list, you can begin the process of connecting the devices.

HDMI
This connector is considered the most convenient and, accordingly, the most popular. In addition to clear images, it delivers high-quality sound. To connect your computer to your TV, you just need to have a special cord with the appropriate outputs.
First, the connected means of communication are disconnected from the power supply and the cord is connected. Next, the computer and TV are turned on, HDMI is indicated as the source in the latter’s settings. The image and sound will be reproduced without auxiliary operations.
When choosing an HDMI cable, you need to understand that the materials used in its manufacture and, accordingly, the cost do not affect the sound and image quality. Therefore, it is not at all necessary to buy an expensive wire.
DVI, VGA
To connect image and sound from a computer to a TV, you can use other interfaces - DVI or VGA. The first option is more preferable. It is recommended to resort to the VGA-related method only if it is impossible to work with DVI. Often, when a user tries to connect devices using VGA, he finds that he is busy with a computer monitor. This problem can be solved using a DVI-VGA adapter, which makes it possible to make an auxiliary VGA from free DVI. Using these interfaces you can only transmit images; to connect sound to the TV you will have to buy a special audio cord.
Wi-Fi, RJ45
To connect a computer to a TV via a network connector or Wi-Fi, the latter must meet two basic requirements. The first is the presence of a multimedia player, the second is the ability to support DLNA technology. This technology gives devices the ability to exchange files online. Thanks to it, the TV can work with files directly from the computer’s hard drive, without the use of removable hard drives or flash drives.

The connection procedure via DLNA includes two steps:
- connection of communication means;
- installation of the DLNA server and its further configuration.
The first stage depends on whether the TV has an RJ45 network connector or a Wi-Fi module. Some models have both of these options at the same time. It is best to use a network cable to connect video and audio.
To connect the network connector of the TV to the router, you will need a “twisted pair” cable - a special cable. Finding such a cord is not difficult. However, the router option is not possible in all cases. Reason: video and sound on the TV puts a large load on the router, which leads to Internet failures (reduced speed or loss of connection). Solving the problem by purchasing a more productive, expensive router cannot be called optimal. It is better to install an additional network card, which will save money.
After connecting, proceed to install the “Home Media Server”, making the appropriate settings. To play video and sound, you need to open the “Home Media Server” on your computer and launch it. Next, you need to select Ethernet as the playback source on the TV, after which the explorer opens and the desired file is selected.
S-Video/SCART
Using this method, you can connect sound and video even to an old TV. The main condition here is the presence of an “s-video” connector on the computer, and a twenty-one-pin wide scart connector on the TV. You also need to buy an “S-Video” cord and a “SCART–audio/video/s-video” adapter.
The connection process algorithm is as follows:
- The adapter is inserted into the TV connector. If there is a switch, the latter is placed in the Input position;
- connection of connectors;
- to transmit sound from a computer, you need to connect a special “two tulips” cord to the appropriate connectors of the adapter;
- the TV turns on;
- The computer turns on. After turning it on, the “Properties” item is called up, where “extend the desktop to the selected monitor”;
- After switching the TV to “Video” mode, the computer desktop is visible on the screen. Next, open the file and use the mouse to move the player window onto the TV, switching it to “full screen” mode.
TechZnatok.com
How to connect sound from a computer to a TV: 3 nuances
 To connect sound from a computer to a TV, you don’t need to buy expensive technical devices We all love to watch the latest in the film industry, but a standard PC monitor screen is clearly not a replacement for a large flat-screen TV. That is why today more and more craftsmen connect a computer to a TV and watch movies on the big screen. In general, the connection task is quite simple, but problems with sound often arise. A trivial but very problematic question - how to output sound from a computer to a TV?
Let's first figure out in what cases you should switch the sound from a laptop or PC to a TV. So, if you have both a computer and a TV nearby in one corner of the room, then it is not necessary to switch the sound to the TV. The picture can be displayed on a large screen, while the sound will continue to flow from the computer to the speakers. It’s a completely different matter when the computer speakers and the TV are in different corners, or, what’s even more trivial, you don’t have a good audio system and the sound from the TV is much better. It is in this case that you need to connect the sound from the computer to the TV, in other words, output it to another device.
 To output sound from a computer to a TV, you need to connect them together using a cable
The completion of the task depends on the following nuances:
- Your software. Connecting sound on older operating systems often occurs in automatic modes. In new systems, such as Win 7,8,10, you only need to manually transfer the sound to another channel.
- Connection type. Outputting sound, like pictures, to a TV can occur in a number of ways. We will look at each option in detail later.
- TV type. Depending on the model, you can make the connection active through the device menu or in automatic mode.
How to connect audio via HDMI to your TV
In general, connecting sound and pictures from a computer to a TV can occur in three main formats - via HDMI, DVI or so-called tulip cables. The very first type of cable is the newest, it is compact, easy to use and versatile - high-quality video and audio are carried through one connector. All you need to do to transfer sound from your computer to your TV is turn on the desired movie and set the appropriate settings in the menu.
Before playing the movie, you need to turn off both devices, connect one end of the cable to the HDMI socket on the computer and the other end to the corresponding socket on the TV panel.
Depending on the model of the latter, you need to either switch to HDMI mode or wait until the device itself recognizes the connected computer. Next, everything that is shown on the TV should be displayed on the TV screen.
What surprises could there be? In general, the problem with sound in almost 90% of cases boils down to one thing - you need to enable audio playback via hdmi on your computer. Otherwise, the video will go to the TV, and the sound, for example, to headphones connected to the PC.
The solution to the problem is simple:
- Right-click on the sound volume icon in the lower right part of the WIN taskbar (next to the time);
- Go to the “Playback Devices” menu;
- Select HDMI or TV from the suggested sources (the PC often detects the device to which it is connected);
- Right-click on the desired device and select it as “default device”. At the same moment, the sound will start coming to the TV.
 You can buy an HDMI cable at any store that sells computers or household appliances.
If you connect your PC to your TV via a VGA cable, the procedure is the same as with an HDMI cable, but the picture quality will be slightly worse. However, in the case of connection through the so-called tulip, everything is a little more complicated. Let's look at this type of connection in more detail.
Using a tulip: how to connect a PC to a TV
In general, all modern TVs have long had connectors for connecting with new types of cables. However, if you have an old TV, you will have to connect it to the computer via the so-called “tulip” cord. It is a bundle of three cables of different colors - yellow, red and white. The cable was jokingly nicknamed a tulip because of its multi-colored appearance. So, in this bunch of “colors” the yellow cable is responsible for the sound, white for the left speaker and red for the right. This is one of the very first systems for outputting sound and video from one device to another.
The connection is as follows: insert cables of a certain color into the corresponding sockets on the TV and PC (sockets of the same color). Switch the TV to Video or RCA mode and switch the audio output on the computer via RCA.
The downside is that you won’t be able to output a high-quality HD picture through such an outdated cable, and you’ll have to forget about surround sound – a maximum of two speakers. The second problem is that most computers no longer have cinch connectors. And while sound can still be output through the tulip, for example, through a headphone or speaker jack, modern video cards do not transmit video in this way.
Everything in its place: how to switch sound from TV to computer
If you have finished watching a movie and want to return to PC mode again, you must first disconnect the cable through which the devices were connected, and then switch the computer to play sound through speakers or headphones. This can be done in the sound control manager, where you select the desired channel as the default device, for example headphones.
 After connecting the cable, you need to turn on the sound in the corresponding menu
It's worth noting that it's easiest to make the switch if your computer and TV have connectors for an HDMI cable.
In this case, you won’t have to disconnect the wires for a long time and worry about settings, sound and video quality. All you have to do is unplug the cable and switch the sound source. By the way, on new Windows, most often when the cable is disconnected, the PC itself will switch to standard playback mode.
Instructions: how to connect sound from a computer to a TV (video)
Well, getting sound from a computer to a TV is not difficult these days. There are several types of connecting a PC to a TV - HDMI, DVI and tulip. The first method is the newest and allows you to transmit a picture in high resolution and surround, multi-channel sound; in addition, the connection via HDMI occurs with one cable. DVI is a slightly more outdated technology, the picture quality will be average, but the connection is also made with one cable. A tulip is three cables at once, and not all PCs already have connectors of this old type. You need to switch sound from your PC to your TV in new operating systems in the sound manager menu, which can be found in the taskbar in the lower right part of the monitor screen, next to the time and date.
2 When connecting via DVI, some video card models also support audio transmission; then, when using a DVI-HDMI adapter, both video and audio will be supplied to the HDMI TV input. If you have only digital DVI on your video card (then written with the letter D), then you won’t be able to connect an adapter to VGA to it, because there are no analog signals there. But if the video card has two DVI connectors, then they are written with a prefix in the form of the letter I and mean a universal port that transmits both analog and digital video signals. You can connect receivers of both analog and digital signals to such a video card. Visually, the digital-only connector is missing four pins around the horizontal slot. In universal DVI-I connectors, all contacts are present. DVI-D connectors are rarely found on modern video cards; they mostly come with universal DVI-I connectors.
3 When connecting via a DVI connector, you need to pay attention to the presence of the HDCP (content copy protection) function. Some TV models will refuse to work with this type of connection without HDCP. This is especially true for playing Blu-Ray discs.
4 If you connect your TV to your computer as a second monitor, then the monitor and TV must be configured separately. In this case, the correct screen setting would be “Extend the desktop onto this monitor.” You can display the settings of the program playing the video on the monitor, or continue working on it while watching a movie on the TV screen.
5 Blu-ray and HD-DVD discs are currently actively replacing DVDs. These discs contain films in a special film format – 24 frames per second. Moreover, if the computer uses a frequency of 50-60 Hz, the image “slows down”. The picture will be as clear as possible if you switch the video card to a refresh rate of 24 frames per second. However, this can only be done if the TV supports 24p mode.
Connecting audio from a computer to a TV
1 To get sound from AMD/ATI video cards, in the “Sounds and Audio Devices” control panel settings of your operating system (WinXP), you need to select the default audio output device “ATI HD Audio rear output”.
2 When connecting some video cards, there may be no sound with an HDMI-HDMI cable. There may be no sound on the video card itself, and you need to connect sound to the video card from the motherboard from “SPDIF out” (motherboard) to “SPDIF in” (video card) using a special short cable (must be supplied with the video card). After that, connect the HDMI cable to the HDMI ARC input of the TV, and in the computer settings “Start-Control Panel-Sound-Digital Audio” make S/PDIF used by default. Uncheck the “disable digital output” checkbox. And carefully read the manual for the motherboard and video card.

3 If the sound quality is poor, check the sound card or player settings for stereo or 5.1 or some other sound output. Try changing the output from one mode to another.
4 When connected via DVI, sound can be supplied from the miniJeck on the computer to the “Audio DVI in” input, not to be confused with the Audio in input for a composite signal. If after this there is no sound, then look at the sound settings on the TV, maybe you need to switch the input.
5 In some models of sound cards, in rare cases, in order to supply sound to the TV, you need to pull out the speaker and headphone connectors from other connectors.
6 When connecting a video signal via a DVI-HDMI cable, some TV models will also take sound from the HDMI input, but the computer does not produce sound via DVI and, according to all the rules, the user connects the sound with a separate cable. So, to play sound, you may need to additionally specify in the TV menu that for a given HDMI input you need to take sound from another input.
7 When using DVI-HDMI adapters, it is better to use it on the computer side and connect an HDMI-HDMI cable to it. This is the case when using video cards that mix the audio signal into the DVI using S/PDIF. If you use a DVI-DVI cable and there is already a DVI-HDMI adapter on the TV side, then the sound may not pass through, because there are three types of DVI connectors (digital, analog and combined) and the cables are different and where the video card mixes the sound, to which We don't know the contacts. Or maybe the cable just doesn’t have the contacts that are needed to transmit sound? The DVI-I dual link cable has the most complete set of conductors inside, but the rest need to be looked at.
8 Some TV models have an “Audio HDMI” menu item. When enabled, audio will only be taken from the HDMI input when an HDMI cable is connected. You need to know this if you are using a DVI-DVI cable, and there is a DVI-HDMI adapter in front of the TV and the sound is supplied via a separate cable. So, with this connection and the “Audio HDMI” item is active, there will be no sound on the TV. When you disable this menu item, the sound should work.
9 Sound, if not on the video card, is taken from the output of the sound card.
10 It happens that the sound does not pass through due to incorrect input/output settings in the sound manager on the computer. One inconspicuous item in the menu can ruin everything, look carefully at all the settings of the video card, sound card and player.
11 In Windows XP, problems often arise with the SPDIF setting. The fact is that in this OS the digital output is not displayed as a separate audio output device. Therefore, where the sound goes depends on the driver. As a rule, analog and digital outputs are either duplicated, or when a digital output is connected, the analog output is disabled.
12 ATI video cards already have their own sound controller built-in, so no other sound devices are required. In case of audio output via the DVI connector, you must use a proprietary DVI->HDMI adapter. Check the availability of the adapter in the kit directly at the store where you make the purchase - equipment may vary! You must use the adapter that comes with your video card. Left adapters, as well as DVI->HDMI cables, will not work. The "correct" adapter contains a chip with a number sewn into it.
13 NVidia mobile video cards 8xxx series and higher support audio transmission via HDMI according to the same principle as ATI discrete video cards, i.e. have their own sound controller, which is defined by the system as a separate audio output device (Realtek HDMI Output). As for the supported formats, it is reliably known about the output of 5.1-channel audio.
14 If you are sure that you have configured the system correctly, connected the bridge in NVidia, installed the driver for ATI, but the sound still does not appear, open the instructions for the TV and check whether you need to specifically select audio reception via HDMI in the TV menu, and what formats digital audio supported.
15 If we want the sound to go to the TV only when watching a movie, then select the analog output as the default device (as usual). And in the settings of your player through which you watch movies on your TV, select SPDIF (for NV) or Realtek HDMI Output (for ATI), respectively.