Android virtual machine for windows 7. The best android emulators for PC. Launch Android after installation
There is often a need to test the operation of a newly written application on a device. But it may well turn out that the device is not at hand. Or there is no device with certain parameters (although this is more related to screen size/resolution). What to do in this case?Fortunately, there are alternatives. The Android community and various companies offer several options for replacing Android devices for different purposes.
I will briefly talk about the following:
- Emulator included in the SDK
- Genymotion
- Android x86
- Bluestacks
Emulator included in the SDK
Genymotion
Website: http://www.genymotion.com/
A proprietary implementation that grew out of the AndroVM project.
Essentially, a virtual machine on VirtualBox with additional features like its own controls, advanced settings, etc.
Quite convenient, fast, many possibilities, commandline tools, Java API for tests.
When a device is created, its image is downloaded from the network.
APKs can be installed by dragging them onto the window with the virtual machine.
Screenshots
Window of a running device 
Creating a virtual device 
Main application window 
Pros
- Cross-platform solution
- Fast
- Many additional tools (charge control, accelerometer, API for tests, etc.)
- Plugin for Eclipse, easy access via adb
Cons
- Paid for companies, and this is the main disadvantage
- Not ARM
- Quite a long time to release current versions of Android
Android x86
Website: http://www.android-x86.org/
A project to port Android to the x86 platform. It is distributed as an iso image, can be run/installed in a virtual machine, and if desired, can even be installed on a live machine with an x86 processor (on a laptop, for example).
It works fast, but there are a lot of problems due to the fact that it is a virtual machine. For example, binding a mouse inside a virtual window, accessing adb only over the network, etc.
To use it in VirtualBox, you need to disable Mouse Integration, otherwise the cursor will not be visible in the virtual machine.
To connect adb you need to run
adb connect ip.add.res.s
You can find out the IP address by pressing Alt+F1 in the machine and entering netcfg. Return to graphic mode - Alt+F7.
Screenshots
Main window: 
Console with IP address: 
Pros
- Cross-platform solution (wherever VirtualBox is available)
- Fast
Cons
- Inconvenient access to adb
- Cons associated with using VM - mouse binding for example
- Not ARM
- Very long release of current versions
Bluestacks

Website: www.bluestacks.com
Positioned as an application player for Windows, Mac and TV. Can run applications and has access to the market. Inconvenient for development and testing - apk is installed using the tool from the kit, but access to adb can be obtained. However, it may be useful for running applications.
To connect via adb:
adb connect 127.0.0.1
Screenshots
Launch: 
Main window: 
Pros
- Cross-platform solution (though only Mac and Windows)
- Fast
Cons
- Inconvenient to install applications
- It’s not clear what happened with the android versions (2.3 for OS X, 4.0 was installed for Windows)
- No for linux
Conclusion
It turns out that for some situations you can do without a device. However, we should not forget that in many cases the hardware of emulators differs from the real one, and the firmware of real devices can also throw up surprises. Therefore, emulators are just for initial testing.New version released in March 2016 Android 7 Nougat Not all mobile devices were able to be received. Many old and budget gadgets were left behind, the manufacturers of which did not consider it necessary to worry about adapting the updated platform for these devices. The market for modern mobile technologies is cruel: do you want the latest version? Android– buy a new smartphone or tablet.
Well, or take a risk and install custom firmware. Is it worth the risk, or more precisely, for what, in fact, to risk it - all this can be found out by establishing Android 7.1 to a virtual machine. The virtual environment, of course, will not provide the full sensations as if testing were carried out on a real physical gadget. Nevertheless, it will be possible to get an idea of some basic functional innovations. Below we will look at how to install Android 7.1 Nougat to a virtual machine.
1. Download the distribution
Download installation ISO -image Android 7.1 let's go to the site of a famous project Android-x86.Org. On this project, enthusiasts post various kinds of assemblies completely free of charge. Android, adapted to work on physical PCs and laptops. This is approximately what is needed for virtual machines. Download links ISO -images are posted directly on the main page of the project. As of the date of writing this article, the latest build is custom firmware CyanogenMod 14.1. But our goal is to explore a clean platform, so we will download the latest stable build Android 7.1.
2. Create a virtual machine
Let's launch. On the home page of the hypervisor, click start of the operation to create a new virtual machine. Select the normal configuration type.

Specify the path to what was downloaded in the previous paragraph ISO -image.

Give the car an arbitrary name.

At the stage of setting up a virtual hard disk, you don’t need to change anything special. By default, its optimal size is suggested in 20 GB. Unless you can choose to create a disk in one working file .

The machine has been created, now it is necessary to correct something in its equipment.

In the tab "Memory" set the size RAM For Android-cars 2048 MB. If the physical computer has only 2 GB RAM, we are limited to a size of 1024 MB.

Switch to the tab. Here we activate the acceleration option 3D -graphics. For the screen, choose to use the node monitor settings.

Now in the finishing window we can press "Ready".

3. Preparing the disk and installing Android
The machine will start with ISO -image. In its menu you need to select installing Android on your hard drive.

First, let's prepare the disk. After all, a new virtual disk is connected to the new machine - without initialization, with unallocated space. To prepare the disk, we are offered a built-in installation process Android console utility for working with disk space. It is controlled by navigation keys, and selection is confirmed by pressing Enter. In the console utility window, select and press Enter. Then select "No", thereby confirming the refusal to initialize the disk as GPT .

Let's get into the console environment for creating disk partitions. Here we confirm each choice made by pressing Enter.
And you need to choose the following sequentially:
"New";
"Primary";

"Bootable";
"Write".

Now enter the value on the keyboard "yes". And finally we exit the partition creation environment by selecting the item "Quit".

The result of our above actions was a newly formed partition on the disk - sda1. Select it and press Enter.

Let's format our section in ext4.

Then select three times "Yes" for, respectively, three requests:
Do we want to format the partition to the selected file system;
Do we want to install the Grub bootloader;
Do we want to make it possible to write data to disk?

We wait until all the necessary operations are carried out with the virtual disk and files are copied to it Android. Then we reboot the machine.

Launch Android will be the first item in the boot menu Grub, therefore, if the steps described above were done correctly, the operating system itself will start in the virtual machine window. And it will start at the stage of setting up our personal data. Select the Russian language, click and, following the settings wizard, go through all the necessary preparatory stages. In particular, if desired, we connect Google-account.

4. Subtleties of setting up virtual Android
For guest Android in the environment You cannot install guest OS add-ons the same way as is provided for guest desktop systems. As for the screen resolution, it will already be optimal - 1280x768. Files can be transferred using cloud storage. And if you need to implement a common clipboard, you can resort to software AirDroid. This is a messaging system between mobile and desktop devices, providing both file transfer and a cloud clipboard. On Wednesday Android you need to install the client application AirDroid, and in the Windows environment - a client program AirDroid. Either use web-project interface in a browser window.
In virtual Android 7.1 We may encounter a problem switching keyboard layouts. The English-language layout is present in the operating system by default, and the Russian-language layout is automatically added when you select the Russian language at the initial setup stage. When testing the operating system, in our case, the software option for switching layouts did not want to work with the Russian language.

The solution was found in the physical keyboard settings.

We replaced the pre-installed keyboard for the Russian language with one with a mark in brackets "Mac". After which everything worked successfully.

System hotkeys Android To switch layouts, there is a hardware button "Search", which is not found on a physical computer keyboard. The application can offer a solution to this issue Russian Keyboard. While involved in the keyboard settings, Russian Keyboard will begin to be responsible for input from the physical keyboard, in particular, it will ensure changing layouts using the hot keys Shift + Backspace.
Well then. We have come to the most important part of the review, but can we choose an emulator that we can call the best without any twinges of conscience? Let's think about it.
- Firstly, it is worth noting that most of the presented software are solutions from Chinese developers who quickly “cool” towards the project and stop supporting it. This is actually why not everyone supports Android versions higher than 4.4, and the same software testing should be carried out on several versions of the OS.
- Secondly, it is impossible to name the best of the best for one simple reason - different software is designed for different categories of users. Let's try to distribute it wisely.
BlueStacks, Andy, Nox, MEmu– popular emulators, free, approximately equal in capabilities, functions, with similar implementation. All of them are designed for ordinary users, which need to install, run, press a button and get the result. Here you won’t have to set up anything for a long time - virtual reality will load immediately, and the user interface will delight you with its intuitiveness.
Looks good compared to its peers Nox App Player. The application player installs quickly, works stably, and supports all modern games. Provides the most convenient control and is not demanding on PC resources. It’s nice that the computer program is equally convenient for both gamers and ordinary users, and also does not bother you with advertising, unlike some popular alternatives. Another plus is that you don’t need a Google account to install “computer games” from a company store!
And a few more words about BlueStacks. The developers offer a fairly high-quality product with a package of essential services. For example, video streaming on Twitch.tv, as well as access to adapted versions of games with controls modified for PC. Among other things, BlueStacks performs very well in games. The emulation is of quite high quality, and there are minimal brakes, since the creators of the program removed unnecessary processes in the OS, reducing the load on the computer’s RAM and central processor.
Windroy is our winner in the “simple emulator” category. Its undemanding nature deserves special honor and praise. But if Windroy allows a maximum of “throwing birds”, then Droid4X you will pass demanding games that once migrated to Android from PC without discomfort. With this emulator you will want to conquer all the tracks in Asphalt, destroy all the enemies in Gangstar, and, of course, be nostalgic for Infinity Blade, but on a personal computer. Root access for using cheats is included.
There are as many as three emulator options on our list that are suitable for professional testing.: BlueStacks, Genymotion And LeapDroid. The first contender got here for the quality of his workmanship. The second is for the variety of images - almost any top-segment cell phone is emulated, and the third is for the number of settings.
Note that Genymotion And LeapDroid do not contain the virtual machine engine, but simply create images for VirtualBox. But Genymotion clearly does it better. The program database contains profiles of several dozen smartphones and tablets on different OS, up to Nexus on Android 7 Nougat. Moreover, the set is constantly updated - this is suitable for developers and testers.
As for LeapDroid– this is software for geeks and advanced users. If you want to spend a lot of time, but use trial and error to configure the emulator to work perfectly, we recommend downloading it for free. Support for opengl (hardware virtualization technology) will undoubtedly be an advantage when choosing among analogues. However, the development environment is not disabled. The product is more household than specialized. It’s too early to include it in the best Android emulators.
P.S. advanced users will probably ask, where is the youwave emulator, which is so praised on other sites? The answer is that we have not tested products based on ICS and older versions of the operating system. We will say the same thing if you came to download the Android emulator on your Amiduos or Koplayer Computer - the applications are clearly outdated and have not been updated for a long time.
In order to use the Android OS on Windows, you can install special programs - emulators. They are created so that people can test different mobile applications on a PC before installing them on a smartphone or tablet. Emulators are also needed by developers creating software for portable gadgets.
If you want to download an Android emulator for Windows 7, 8.1 or 10, be sure to check out this article. You can also search the Internet for information on how to run Android applications from a flash drive or using various virtual machines, for example, Virtual Box or Hyper-V.
Important: in order for Android emulators to fully function on a computer, AMD-v or Intel VT-x virtualization must be enabled in EUFI or BIOS. Most often, it is activated by default, but if problems arise with the operation of special applications, be sure to check the settings.
Top 10 best Android emulators for a computer running Windows 7,8,10
Below, we provide 10 of the highest quality Android OS emulator programs (in Russian) for PCs with Windows 7,8,10.
BlueStacks
This is the most popular program used by millions of people to run Android games in the Windiws environment. BlueStacks has good performance, a Russian-language interface and thoughtful settings that are easy to understand.
After installing the emulator, it will launch in full screen mode, but you can also turn it on in a window. In the program you will see a search for games and a list of applications available for download. To be able to install them, use a Google account. For these purposes, you can not use the old profile, but create a new one.
Do you have an Android tablet or smartphone? Then install the BlueStacks Cloud Connect app. Then you can synchronize applications between your computer and portable gadgets.
Various programs in BlueStacks work without problems, as do games, but in the second case the emulator may slow down a little. But it is good because it works not only in Windows, but also in Mac OS X.
You can download the BlueStacks emulator program (in Russian) for free on the developer’s website.
MEmu
The distinctive features of this emulator are the possibility of free use and the presence of the Russian language in the interface settings and shell parameters. MEmu works without lag, loads quickly and has good compatibility with games from the Play Market. It provides many useful options: binding keyboard keys to certain areas of the screen, organizing shared access to folders on a PC, replacing GPS.
New applications in MEmu can be installed from Google Play (you will need an account for this) and using APK files. In the second case, the user needs to press the corresponding button on the taskbar or double-click on the file, after which the program will appear on the display of the virtual device.
MEmu also provides the ability to transfer software from a computer to smartphones or tablets. To do this, you need to connect the gadget to the PC via a USB cable and press the corresponding key in the emulator.
You can download the MEmu emulator on the official website. The selection of the Russian language in the program occurs during its installation process.
Remix OS Player
This emulator is based on Remix OS, a modification of Android x86 designed specifically to work on laptops and computers. It has a taskbar and a Start button. In general, this is a full-fledged Android system. The bad thing about it is that it is intended exclusively for computers with Intel processors.
In Remix OS Player, Google services, in particular the Play Market, are disabled for security reasons. You can activate them at any time. We remind you that experts do not recommend using the main Google account in emulators - for these purposes it is better to create a separate account.
Some applications in Remix OS Player run in small windows, but they still usually expand to fill the entire display. Unlike Bluestacks and other programs, Remix OS Player is designed for use on a PC with a regular, not touch, display. There is always a cursor in the program window, and when entering text, a virtual keyboard does not appear on the screen, occupying almost the entire screen. To switch the cursor between windows in the emulator and Windows, you can use the Ctrl + Alt key combination.
You can download the Remix OS Player emulator (in Russian) on the official website page.
Nox App Player
According to many users, Nox App Player is the best Android emulator for Windows. It deserves special attention, because it has practically no shortcomings and copes with the assigned tasks perfectly. This program is intended for Windows 7, 8.1 and 10.
A few seconds after the program starts, you will see the Android screen on the monitor.
Nox App Player uses the Nova Launcher shell, has a browser and a file manager. In older versions of the emulator, the Russian language had to be enabled in the settings, but in the new one it is present initially.
The tablet resolution is enabled in the program settings - 1280x720. To change this setting, click on the gear icon in the upper right corner of the screen - this will take you to settings. By default, low performance is selected in Nox App Player, but even with this option, the emulator running on a weak computer runs without freezing.
The program's controls are completely identical to those used in Android devices. The video camera and sound work there; there are no problems with the functioning of the regular and on-screen keyboard. Nox App Player also has PlayMarket, from where you can download various software and test it on Windows.
For greater user convenience, the developers have placed icons for the following actions on the right side of the emulator window:
- installing applications from APK files;
- taking screenshots;
- location spoofing for GPS;
- export and download files;
- simultaneous launch of several emulator windows.
Do you run different Android applications on your computer, use Instagram and want the emulator to work flawlessly? Then use Nox App Player. Most programs run in it without freezing. Some “brakes” can only be observed when launching heavy 3D games.
You can download the Nox App Player emulator (in Russian) on the developer’s website page.
You can find complaints on the Internet that Nox App Player does not start after installation. To solve this problem, change the username and the name of his folder, using the Latin alphabet instead of the Cyrillic alphabet.
Leapdroid
Back in 2016, many users paid attention to the Leapdroid emulator. At that time it had just appeared on the market, but over time it became a serious competitor to software with similar functionality.
Main advantages of Leapdroid:
- Availability of Russian language;
- high performance;
- support for many applications and games for Android;
- ability to work without activating hardware virtualization.
When using Leapdroid, pay attention to the settings of the mouse buttons and control keys in games. Some gaming apps load these options automatically, while others require the user to manually assign individual keys and set the desired screen areas.
The developers of the Leapdroid emulator recently announced the end of support for it. The program can be found on the page. When downloading the emulator from third-party resources, do not forget to check the files for viruses.
Koplayer
Koplayer is a free emulator that allows you to run Android applications and games on laptops and desktop computers. It works quickly even on weak machines and has a large number of settings. In Koplayer, you can even choose how much RAM is allocated for use by the emulator. Its important advantage is the convenient setup of the keyboard for games. For each key, the user can assign ascelerometer actions, gestures and clicks on different areas of the display.
Other interesting features of Koplayer include buttons for taking screenshots and capturing video from the screen, and changing the display orientation (vertical and horizontal). In the program, the developers provide the ability to transfer data from different sensors, in particular, the same accelerometer. Thanks to its presence, users can comfortably play car racing and other games.
In the Koplayer emulator, the game control settings are configured as follows. Start an arcade or race, then click on the item with its image in the upper left corner of the screen. As a result, you will be able to create virtual buttons by clicking anywhere on the display and then pressing the desired keys to “bind” them to a specific action.
You can download the Koplayer emulator on the official website.
Droid4X
A good emulator that demonstrates high speed, a well-thought-out interface, and is easy to learn. Droid4X is quite fast. It has the Play Market, the ability to connect Windows folders and install APK files, as well as location substitution. In this emulator you can also bind the coordinates of points on the display of the emulated Android to the keys of the computer keyboard. This option is especially useful for customizing game controls.
When testing Droid4X, you can run, for example, the popular game Asphalt. You will see that it will work with virtually no lag even on a relatively weak computer with 4 gigabytes of RAM and a Core i3 processor.
The program emulates a fairly powerful device with 16 GB of internal and 32 GB of external memory. Considering that the largest applications from the Play Market take up about 2 GB, you can install about 20 games in the emulator, even demanding ones.
Droid4X boasts flexible customization. It provides the ability to change the screen orientation and resolution, and set the desired volume level. Using the emulator, you can take screenshots, record videos, and synchronize all data with your Android device. Droid4X attracted people due to its easy installation and configuration, moderate consumption of PC system resources. With its help, you can operate a virtual device as if you were actually working with a real tablet or smartphone.
You can download the emulator program on the official website page.
Windroy
The Windroy emulator was produced by Chinese programmers and has a number of fundamental differences from similar software. It does not provide emulation, but porting Dalvik and Android to Windows. This uses the Windows kernel and real PC hardware resources. Windroy works quickly, but since it appeared recently and is still far from perfect, it often freezes and produces various errors. For example, it does not run for all users and does not always switch from full-screen to windowed mode.
At the moment, Windroy cannot be downloaded from the official website (for some reason it does not work). You can find this emulator on third-party resources.
AMIDuOS
A high-quality program that is very popular. It was published by American Megatrends. AMIDuOS is a paid emulator, but you can test it for free for 1 month. If other similar programs are not suitable for you for some reason, you can install AMIDuOS. It will delight you with high performance and a wide range of functions.
The disadvantage of AMIDuOS is that the original installation package of the emulator does not contain Google Play services. Accordingly, the user has to download and install them independently.
Another drawback of the program is that its interface does not have a button for installing APK files. When installing packages, you have to use the Apply to AMIDuOS item from the Windows Explorer context menu.
You can download the YouWave emulator on the official website. The program has two versions - free and paid. If you are interested in new OS editions, use the paid YouWave Premium emulator.
Few people know, but the Android operating system can be installed on a VirtualBox virtual machine. If you are interested in this opportunity, then this article should help.
To get started, install it on your computer. The installation should not cause you any problems, since VirtualBox is installed just like any other program, that is, using the installer. You will also need an ISO file with Android. You can download such a file. In this article we used the .
After starting VirtualBox, the virtual machine manager will appear in front of you. First, we need to create a new virtual machine with parameters suitable for the Android operating system, so click on the “Create” button and follow the further instructions that will appear on the screen.
After clicking on the “Create” button, a wizard window will open for creating virtual machines. Enter the name of the virtual machine and select the following settings: type – Linux, version – Linux 2.6 32bit. After that, click on the “Next” button.

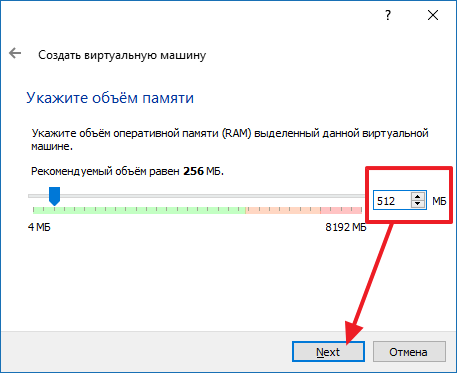
The next step is the amount of RAM. Please enter 512 MB or more.

After that, select VDI and click on the “Next” button.


The last step is the maximum virtual disk size. You can leave 8 GB, this space will still not be occupied and the virtual hard disk file will weigh significantly less.

After these manipulations, a machine called Android will appear in the virtual machine manager. Now right-click on the created virtual machine and select “Settings”. In the virtual machine settings, you need to go to the “Media” section, select “IDE Controller – Empty” and specify the path to the ISO file with Android. After this, save the settings by clicking on the “Ok” button.

Now you can start installing Android on VirtualBox. To do this, launch the created virtual machine using the “Run” button.

After this, the virtual machine will boot from the ISO file you selected. Then everything is exactly the same as with . In the boot menu you will need to select “Installation – Install Android-x86 to harddisk”.


And then “Primary”.


After this, save the changes by clicking on the “Write” button and exit this menu using the “Quit” button.


The next step is to prompt you to install the GRUB boot loader. We also agree.

Well, the last stage is to request permission to read and write to the system directory. Click Yes again.


After installation is complete, reboot the Android virtual machine by selecting the “Reboot” menu item.

After rebooting, you need to disable the ISO file, otherwise you will not be able to run the installed Android. To do this, open the “Devices – Optical Discs” menu and uncheck the box next to the ISO file with Android.

Then reboot the virtual machine again using the “Machine – Restart” menu.

After this, the download of the installed Android will begin. After loading, you will see the initial setup menu for your Android device.

After selecting the language and setting other system parameters, the Android interface will appear in front of you.

This completes the installation of Android on VirtualBox.