How to enter the mtk engineering menu. Android engineering menu
Today, the Android operating system is maximally adapted to the needs of the modern user. A wide range of settings and functions will satisfy almost any request. And yet, sometimes it seems that this is not enough, and you want to expand the functionality of the gadget. This is precisely the opportunity that the engineering menu provides. In this article you will learn how to configure the engineering menu and what it is.
How to enter the Android engineering menu
The engineering menu is a special program with which the user can make adjustments to the operation of the gadget, as well as conduct technical testing and evaluate the performance of sensors.
There are several options for entering the engineering menu. Namely:
- special command - *#*#3646633#*#*
- short versions of the command - *#*#4636#*#* or *#15963#*
If you were unable to log in using special codes or you have a tablet that does not support dialing, you can download special applications.

Restoring IMEI through the engineering menu
Quite often, when using a gadget for a long time, various errors begin to arise that significantly affect the operation. Both global manufacturers and Chinese counterfeits are susceptible to this. In order for the device to work properly again, it is often recommended to do a full reset or reflash it.
You can learn more about updates and select firmware from our article. And you can find out how to do a full reset to factory settings in the article -.
After such manipulations, sometimes the smartphone or tablet stops seeing the network. In such cases, you need to check the IMEI code of the device. This function is available in the engineering menu.

You can read how to restore IMEI through the engineering menu in our article.
Reset engineering menu
Changing the values of the engineering menu must be done extremely carefully, since incorrect settings can lead to incorrect operation of the device. Before changing anything, it is recommended to write down the original values in order to protect yourself in case something goes wrong and the new settings lead to poor performance of the device.
If you did not write down the initial settings, you can reset the developer menu to factory settings. This is available on any MediaTek processor. A prerequisite is the presence of root rights.
You can read how to get root rights in our article, selecting your smartphone model.
To reset you need:
- install Solid Explorer or any other explorer
- go to the root folder
- next is the data folder
- select nvram
- then go to the apcfg folder
- find aprdcl in it
And already there you will find all the changed settings of the engineering menu. Partitions can be deleted selectively. If you are not satisfied with the work of, for example, Audio, then delete all Audio folders. After this, be sure to restart your device. After a reboot, the system will automatically create remote files with standard parameters that are built into the processor. If you want to completely reset the settings to zero, then delete the aprdcl folder. After a reboot, it will be restored, and the phone will have the factory default values of the engineering menu.

Write in the comments any questions you have regarding the engineering menu. We'll be happy to help.
Many devices running the Android OS are additionally equipped with a special environment - the engineering menu. With its help, the user has the opportunity to test all the sensors and modules of the mobile device, as well as adjust certain parameters of the gadget for more comfortable use. In Samsung phones, Engineering Mode is hidden in the system by default. And in different models, entering it is performed differently. And the functionality of this area may also differ. Let's look at how to enter the engineering menu on the Samsung Galaxy A5, Galaxy S6, J3 and other smartphones from the Galaxy line.
Where to find the engineering menu on Samsung Galaxy
The main purpose of Engineering Mode is to fully test mobile devices at the final stage of their production. This environment was originally developed for debuggers on smartphones and tablets, but today anyone can use it. The main thing is to know how to open technical mode on Galax.
You can enter the engineering menu using a special combination (USSD code), which is written in the dial panel. However, these commands may differ in different phone models:
- in Samsung J7 and J1 the actual combination is *#*#0011#;
- for Samsung Galaxy A5, Galaxy S5, Galaxy S6, the dial *#*#8255#*#* or *#*#197328640#*#* is suitable;
- on Samsung Galaxy A3 the code is *#*#9646633#*#*;
- for Samsung Galaxy S3 – *#*#0#*#*;
- in Samsung Galaxy S7 Edge – *#*#8255#*#* or *#*#4636#*#*.
On other devices from the Galaxy line, you can use the service combinations *#*#4636#*#*, *#*#8255#*#* or *#*#3646633#*#*.
If you can’t open the engineering menu using the above commands, you can resort to one of the programs developed specifically for this purpose (EngineerMode, Mobileuncle Tools, Shortcut Master, etc.). To start the technical mode, just install and run one of the utilities. After this, you will automatically enter Engineering Mode.
All applications for opening the engineering menu only work with MTK processors (MT6573, MT6577, MT6589, etc.) and some Exyon chips. For phones equipped with a Qualcomm CPU (for example, Samsung Galaxy A5), such software will be useless.
Main features of the engineering menu on Samsung Galaxy
Having figured out how to enter the engineering menu on Samsung, let's look at its main features. A full-fledged Engineering Mode for MTK chips is equipped with a large number of tools with which you can perform a complete diagnosis and fine-tune the Samsung in many parameters.
However, many smartphones have a stripped-down version of the technical mode, which somewhat reduces its functionality. And in mobile devices based on a Qualcomm processor, through the engineering menu you can only view information about some modules and perform small tests of the main elements of the phone (display, modem, SIM cards and battery).
On the Samsung Galaxy A5 and Galaxy S6, the main sections of the engineering menu are:
- Telephony;
- Wireless interfaces (Connectivity);
- Testing mode (Hardware Testing).
In the Telephony tab, the user has the opportunity to:

The Connectivity section is intended for diagnosing and configuring Wi-Fi, Bluetooth and FM wireless modules. It is not recommended to change anything here, as this may lead to failure of the smartphone. 
The most popular tab in the engineering menu is Hardware Testing. This is where you can test the performance of the processor, battery, speakers, camera, display and GPS module. This area allows you to perform a complete diagnosis of Samsung during its purchase and identify possible malfunctions of the product. 
And interesting features hidden from prying eyes.
Why are they hidden? Firstly, so that an inexperienced user does not break anything, and secondly, they are needed in especially rare cases and are not used regularly. Today we will talk about the engineering menu - a section for programmers, testers, geeks, experienced users and those who want to get into the very “heart” of gadget settings.
What is an engineering menu?
We are talking about a special program or system section that developers usually use at the final stage of configuring the software platform of a mobile device. With its help, they make final changes to the operation of the device, check the functioning of various sensors and test system components. Also, the hidden functionality of the service menu is used to obtain a large amount of system information, conduct various tests (about 25 pieces) and configure any Android parameters - various sensors, mobile networks, equipment, etc.
The engineering, service or system menu is available on smartphones and tablets running on a MediaTek processor. On the Qualcomm chipset it is either reduced or absent altogether.
Attention! This section is intended for experienced users who bear full responsibility for the consequences. Careless actions can harm the file system and render the smartphone unusable.
How to enter the engineering menu?
To enter the engineering menu, you need to enter a special command in the dialing application: *#*#3646633#*#*. On some versions the code *#*#4636#*#* or *#15963#* may work.
If the engineering menu code on Android does not work, or there is no dialing application on the phone (relevant for tablets that do not support calls), the MobileUncle Tools or MTK Engineering applications, which can be downloaded for free via Google Play, will help.
After entering the command or launching the application, the desired section will open. It may close immediately - you need to have “Developer Mode” activated on your smartphone. To do this, go to the gadget settings, find the kernel version there and quickly click on it 5-10 times in a row.
Engineering menu functions
The engineering menu is divided into several categories, each of which will be discussed separately.
- Telephony. All settings related to mobile communications are located here. For example, you can activate or disable certain BandModes (frequencies for 2G/3G/4G operation), check the operation of SIM cards, and even disable mobile data transfer in the background.
- Connectivity: Configure Bluetooth, Radio, Wi-Fi and Wi-Fi CTIA settings. For example, in the radio settings you can specify the radio wave, antenna type (you need to use headphones) and sound format (mono or stereo). The radio will play straight from this section.
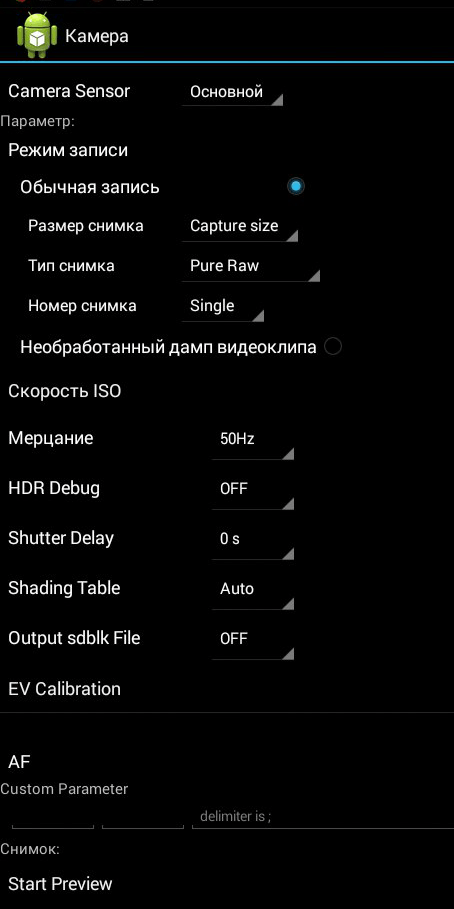
- Hardware Testing. In this section, you can configure the operation of various components of the device, in simple words, hardware: sound levels of headphones and speakers, adjusting microphone sensitivity, various camera parameters (photo aspect ratio, adjusting ISO, HDR, focusing and much more), operation of the touchscreen, sensors (calibration right there) and so on. This category is very large and global; you need to understand each section separately and have serious knowledge and skills.
- Location. In this category, you can configure GPS operation, see how many satellites the gadget has picked up, and simply conduct testing.
- Log and Debugging. Here, logs (logs) of the battery are kept (percentage of charge, voltage, operating time, temperature) and other functions little known to the average user.
- Others. Contains two functions also unknown to the average user.
Engineering menu settings
The engineering menu opens up enormous possibilities for customizing the phone; we will consider the most interesting ones in detail.
- SAR Test - determining the level of harmful radiation from a smartphone or tablet.
- Connections - testing available wireless connection types: Bluetooth, Wi-Fi, WLAN CTIA and FM receiver.

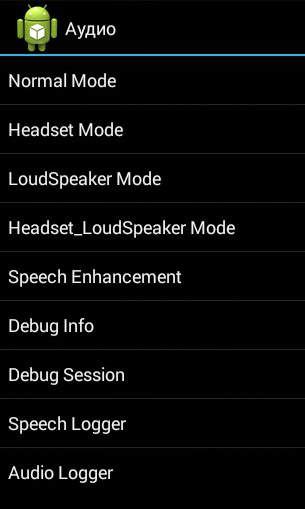
- Audio - adjusts the sound in the speakers, microphone and headphones. About how to increase the Android volume through the engineering menu.
- Camera - configure various camera settings.
- Turning on the current camera - the operating current of the camera is displayed (in our tablet it is 2 mA).
- Load test of the CPU (central processing unit) - checking the stability of its operation, identifying errors in the operation of the processor-memory channel, testing the cooling system and power supply of the processor.
- Device Manager - activate automatic SMS registration, manage configuration parameters.
- Disable detection - adjust the signal frequency.
- Display - Sets the pulse width modulation indicator cycle, which affects the perceived brightness of the screen by quickly turning the backlight on/off; backlight adjustment; controller behind the vertical and horizontal lines of the display.

- Wake mode - its activation will not allow the device to “go” into sleep mode.
- IO - management of data input/output operations.
- Memory - detailed information about the RAM module.
- To a certain extent - detailed information about the battery (the strange name of the section is most likely due to errors in the automatic translation of names in the application, but there is no option to switch to English).
- SD card test - the name of the tab speaks for itself.
- Touch screen - checking the sensitivity and response of the display when pressed, as well as setting its additional settings.
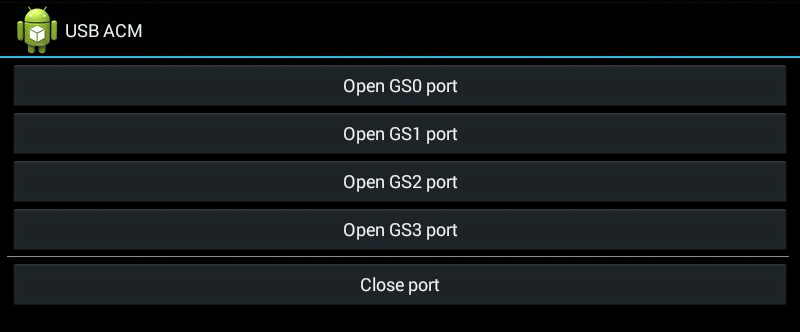
- USB - testing the operation of the USB port.
- UART/USB switch - switching between two data transfer modes.
- Sensor - calibration (adjusting clarity and sensitivity) of the touch screen. Standard methods.
- Location - testing the GPS performance and determining the exact location.
- Battery log - detailed information about the battery and the ability to activate the recording of battery consumption information.

- MTKLogger - collection of system logs (MobileLog, ModemLog and NetworkLog).
- Temperature sensor - shows the battery and processor.
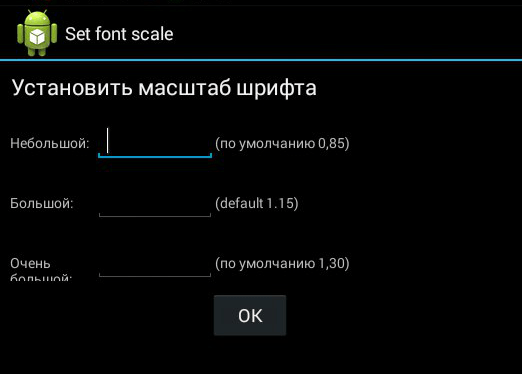
- Font parameter - change the font size.
When installing the application, some features may not be available without .
Xiaomi engineering menu
Despite the fact that our test Redmi 2 runs on a Qualcomm Snapdragon 410 processor, it also has the functionality that interests us. To enter it, you need to tap on the “Kernel version” item several times in a row.

The menu is represented by five items:
- Automatic Test. Automatic test of all device parameters.
- Single Item Test. Each of the 25 tests is taken separately. We will talk about this in detail below.
- Test Report. Report on the completed texts and their results.
- SW add HW version. Information about the smartphone version, IMEI and other numbers.
- Device View. Smartphone hardware data.

Of course, the most interesting point is the Single Item Test, where you can take a huge number of tests.

Let's make a reservation right away that there was no way to configure anything in the device we tested - only a functionality test. At the end of each procedure, you need to note its status: successful (success) or not (failed).
- Key - functionality of physical buttons. Interestingly, it was not possible to complete it successfully, since when checking the power button, the smartphone turns off.
- Backlight - display brightness.

- TouchPanel. The touch screen test includes two procedures: “Crossed calibration” and “Touch panel calibration”. The first checks so-called “swipes”, the second – single taps on the screen. An easy way to calibrate your display.

- TFlash. Testing a memory card with two results: either everything is fine, or the card is damaged.
- Bluetooth. Searches for available devices.
- SIM Card. Test for the presence of SIM cards.

- Vibration. The gadget vibrates - everything is ok.
- RTC (Real Time Clock) - operation of the built-in clock.
- Speaker. Testing the conversational speaker. We didn’t understand how to get through it. We will be grateful if you can tell us in the comments.
- Receiver. Translated as receiver, receiver, but music plays during testing.
- Headset. Testing the 3.5mm jack to detect headphones, play sounds, and support headset control buttons.

- LED. Notification indicator, everything is obvious here.
- FM (radio). Click Search, and if you hear noise in the headphones, then everything is working properly.
- Camera. Everything is obvious: a test of the main and front optics, as well as the flash.
- Battery. An informative section with information about the correct operation of the USB cable (charging), the condition of the battery, its charge level and temperature. Similar data can be obtained more.

- Wi-Fi. Detection of nearby access points. There are no settings.

- Torch (flashlight): shines/does not shine.
- The loopback test includes a test of the spoken microphone. First, click Recording, then Playing.
- LCD. Screen colors.
- GPS. Detection of available satellites.
- Gyro (gyroscope). Three parameters - X, Y, Z - change depending on the position of the device in space.
- G-sensor (Accelerometer). Rotate the gadget in all planes and turn it over. The three parameters should be ok.
- Proximity Sensor. It is usually located near the speaker and is designed to dim the gadget screen during a conversation, thereby eliminating accidental clicks.
- Optical and Magnetic Sensor (optical and magnetic sensors) - points we don’t understand, share your knowledge in the comments.
After passing all tests, you can go to the Test Report section. As you can see, our “animal” is in excellent shape and has passed all the tests, which is very pleasing.

Conclusions
Above we have listed the main sections of the engineering menu available on the tested devices. Now let’s summarize what features the user receives during installation:
- Formatting, restoring to factory settings.
- Testing the operation of individual elements of a smartphone or tablet, such as sensors, touch screen sensitivity and calibration accuracy.
- Detailed information about the device and its parts. For example, you can track battery consumption since the last charge and view statistics on the programs used.
- Energy optimization. Alternatively, unnecessary frequency ranges are turned off. In Russia, the standard indicators for working in 2G and 3G networks are 900 and 1800 MHz, while in the USA they are 850 and 1900 MHz.
The engineering menu is implemented and used by manufacturers of Android smartphones to test and configure various functions. This menu is hidden in the operating system shell and is called only by a special USSD command, or through third-party applications. On this page I will post information on how to enter the engineering menu and what data can be changed by the smartphone user.
What is the engineering menu in Android?
Engineering menu (Engineering Mode) is a hidden program in every Android device that allows you to manage the settings of your gadget. At its core, it resembles the main data processing center in a smartphone. With its help, manufacturers and developers check the operation of hardware parts and sensors and make adjustments.
Warning! When using the engineering menu, be careful when making changes. Rash and negligent actions can lead to malfunctions of the smartphone.
How to enter the engineering menu?
To open it, launch the Phone application, go to dial the number and use one of the USSD commands presented in the table below. Once you have completed typing numbers and symbols, the desired menu will open.
Important! The menu does not work on all Android smartphones! In most cases, these are devices with Android 4.2 and smartphones based on Android 5.1. Access to the engineering menu in the Cyanogen Mod firmware is completely blocked. Also, on many devices with Qualcomm Snapdragon, Intel or Tegra processors, access to the menu via the USSD command is closed.
USSD command table
The most common login code is *#*#3646633#*#*. Also, in the table you will find other teams from popular manufacturers: Samsung, Xiaomi, Meizu, Sony, ZTE, HTC, LG, Huawei, Lenovo and others.
Advice! Some smartphones running Android version 4.4.2 reset changes made in the engineering menu after a reboot.
As an alternative, devices with a Qualcomm Snapdragon processor have access to the login, which opens by repeatedly clicking on “Build Number”.
Third Party Application

For devices with MediaTek processors, you can use third-party applications, of which there are plenty in the play market. For example . But on gadgets with other processors, the application will not work!
Also, some devices will not respond to changes or save settings made by the program until they are installed.
What can you find out and configure?
Here you can find useful information, test smartphone parameters and change and configure device functions.
You can watch:
- - an identifier that is present in every gadget.
- The smartphone number is sometimes not specified.
- Network - information about the operator.
- Roaming - whether you are in it now or not.
- Network information - whether there is service, enabled or not.
- Call forwarding - whether used or not.
- Network type and index.
- Ring tone volume.
- Your location in the form of coordinates - with GPS turned on.
The "About the Battery" section provides information:
- state (charging or not);
- charge level (indicated as a percentage);
- elapsed time since last download;
- battery temperature and voltage;
Other sections help you find out information about applications - name, date of last launch, operating time. It is possible to view Wi-Fi data - connection status, data transfer speed, network name, etc.
Tests are also available to identify the problem area in the gadget:
- Automatic Test - tests every parameter in the device.
- Report - displays a report on the test performed.
- Screen test - checking sensitivity, brightness.
- Camera test - checking the flashlight, flash.
- Test of sensors and adapters - information on testing the accelerometer, gyroscope, etc.
- Test of connectors, vibration, speakers, mechanical buttons, SD cards and SIM.
Important! In Android devices, the presence of this or that information in the engineering menu may differ. In one case, there will be more parameters, data and functions than indicated in the article, in the other - only brief information.

You can configure the following parameters (change them thoughtfully and with caution):
- Cellular communications (Telephony)- withdrawal of frequencies on which the operator does not work in order to save battery energy consumption (Band Mode section), as well as set the priority of 2G, 3G, 4G networks (Network Selecting section). Here you can also configure GPRS and IMEI.
- Connectivity- changes to Wi-Fi and Bluetooth adapters.
- Sound volume (Audio)- decreasing or increasing the maximum sound volume threshold of the speaker, headphones, speakerphone.
- Camera- change the image format from .jpeg to .raw, set the image size, enable HDR shooting, change the video frame rate.
- R Recovery Mode- , firmware update, access to Root rights, creating a backup ().
Also, there are secret commands for android, which allow you to perform one or another engineering menu operation using a USSD code.
The engineering menu on Android devices is a special “built-in” application into the operating system that allows you to fine-tune the device. This is necessary to debug the operation of the hardware and, of course, the software. But often users want to change some settings at their own discretion. In this case, the question arises of how to enter the Android engineering menu. This can be done using special service codes or third-party software.
What options does the engineering menu have?
Settings and menu design on Android devices may vary depending on the phone manufacturer. In general, users resort to using the engineering menu for the following reasons:
- Setting up audio on the phone (ringer volume, interlocutor’s voice during a conversation);
- Changing camera settings;
- Using recovery mode;
- Setting microphone sensitivity;
- Disabling unused frequencies to save phone battery;
- Obtaining information about the device's MAC address;
- Setting up Bluetooth and Wi-Fi.
The Android engineering menu provides the user with almost limitless possibilities. But you should always remember that only advanced users can use it. Changing some settings may cause your smartphone or tablet to not work correctly. If you don't know what each menu item directly does, simply leave it alone.
The developer mode includes setting up Hardware Testing equipment and also contains the following items:
- Audio – volume control in the phone speakers.
- Camera – allows you to configure various camera parameters (image size, type, etc.).
- Diving current camera shows the current of the camera.
- CPU Stress Test performs a test load on the central processor.
- De-sense is a device manager that manages configuration parameters.
- Display – setting the frequency of the outgoing signal.
- IO – setting up input/output operations.
- Memory – key information about memory.
- Power – information about the battery.
- SD Card Test - testing a memory card.
- TouchScreen – setting up the touch screen, checking sensitivity.
- USB - Tests the operation of the USB port on your phone.
In the Connectivity tab you can get information about devices that work with the outside world. These include Bluetooth, Wi-Fi and FM module. The Log and Debugging tab allows you to view the battery log, set the debugger level and run a special MTK log. In the Others tab, you can change fonts, as well as view the temperature of the processor and battery.
How to enter the engineering menu: using code combinations
To enter the engineering menu as quickly and easily as possible, you will need special engineering codes. Each manufacturer has its own combination, which opens access to the engineering menu in Android.
To enter the menu you need to:
In most cases, this technique allows you to open the service menu. Below are some combinations for the most popular phones:
- Models from HTC - *#*#3424#*#*, *#*#4636#*#* or *#*#8255#*#*;
- Samsung devices - *#*#197328640#*#* or *#*#8255#*#*;
- Sony smartphones - *#*#3646633#*#*, *#*#7378423#*#* or *#*#3649547#*#*;
- Huawei phones - *#*#2846579#*#* or *#*#14789632#*#*;
- Mobile from ZTE - *#*#4636#*#*.
There is also a universal code that is suitable for most smartphones and tablets running on an MTK processor. You can look in the specifications of your device to see what processor you have installed. If this is a MediaTek (MTK) product, then try using the combination *#*#54298#*#* or *#*#3646633#*#*.
If it works, you will see the developer menu in front of you. Some engineering codes for Android do not work in operating versions 4.2.1 and 4.2.2.

What third-party applications can be used to enter the engineering menu
How to enter the engineering menu on Android if the Android codes do not work? There is a way. To enter the engineering menu, you will need one of the applications that will allow you to enter developer mode without entering a combination. There are several similar programs in the official Google Play store. One of them is “Launch the MTK engineering menu”.

To use it, you need:
- Go to the Play Market and enter the name of the program in the search bar.
- Download and install it.
- Launch on your phone.
After that, you will see a couple of tabs with different settings.

The application allows you to perform various tests (for example, a processor stress test), obtain information about the modem or memory, and much more. You can also make changes to the hardware. To do this, you just need to open the appropriate sections and configure the settings. In this case, the phone will be on all the time.
An alternative option is the Mobileuncle tools program. You can download it on the Internet. Install the application, and then go to the “Engineer Mode” submenu. Almost all developer menu items will be available in it.