VPN connection for android. VPN for Android: application and configuration methods
This instruction demonstrates how to connect to a VPN Gate relay server using the L2TP/IPsec VPN client built into the Android mobile operating system.


- Go to the application Settings.
- In the network settings section, click "More" and select the "VPN" option.
- Click the button.
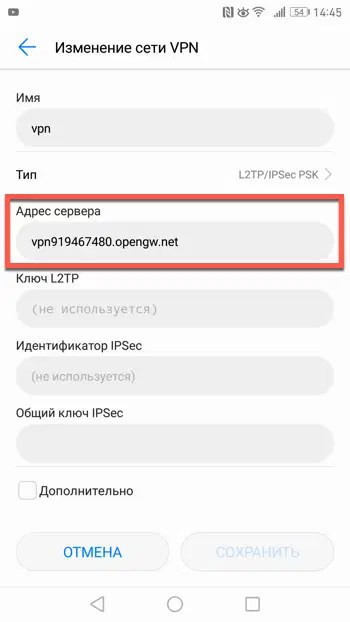
- The screen for setting up a new VPN connection opens. Enter a custom name in the name field, for example, "vpn" and select the connection type L2TP/IPSec PSK.
- On this screen you need to enter either the host name or the IP addresses of the server from the pool open servers VPN Gate http://www.vpngate.net/en/.
- Open the list public servers relay and select the VPN server you want to connect to.

Important information
- Copy the DDNS host name (an ID that ends with ".opengw.net") or IP address (the numeric value xxx.xxx.xxx.xxx) and enter it in the “Server Address” field on the configuration screen.
Note
- Scroll down and check the “Advanced” checkbox if available.
- Introduction vpn in the IPSec Shared Key field.
- In the Forwarding Routes field, enter 0.0.0.0/0 . Make sure you entered the value for this field correctly. Otherwise, you will not be able to establish a connection to the VPN server.
- After that, click the “Save” button.
2. Starting a VPN connection
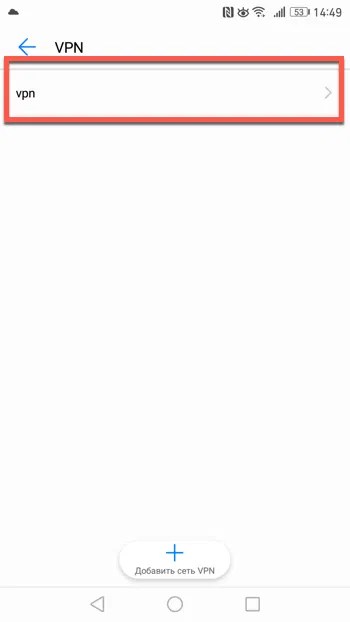
- You can establish a new connection to the VPN server at any time. Open your VPN settings and you will see the following list.
- Enter vpn in the “Username” and “Password” fields upon first use. Check the “Save credentials” checkbox. Click the button to establish a VPN connection
- Once a VPN connection is established, the corresponding entry from the VPN list will have the status Connected. On Android device a VPN activation notification may appear. Click on the message to view the status of the current connection.
3. Internet without restrictions
ip8.com
This instruction demonstrates how to connect to the VPN Gate relay server on iPhone/iPad using the L2TP/IPsec VPN client built into iOS.


1. Pre-configuration
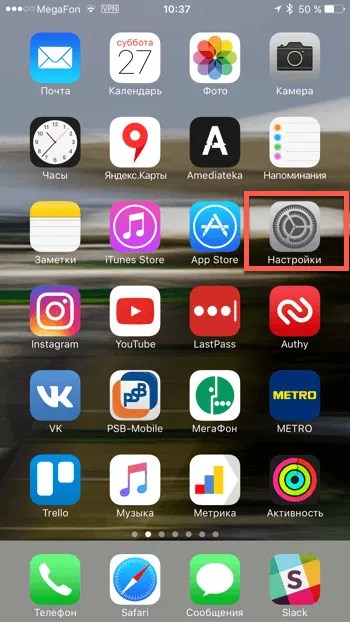
- On the main iPhone screen/iPad select app Settings.
- Select an option VPN(or go to General > VPN), then click Add VPN configuration.
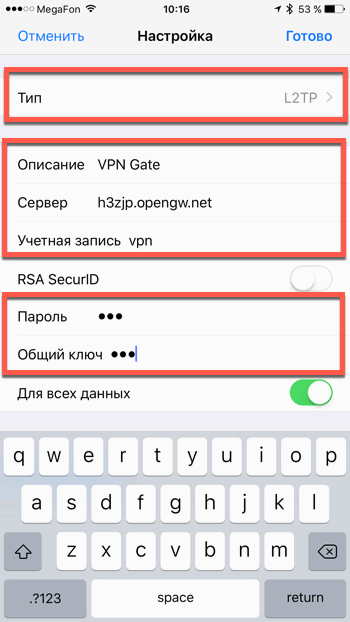
- On the Settings page, select Type > L2TP and add the connection name in the field Description, for example "VPN Gate".
- Next on this screen you need to enter either the host name or IP addresses of the server from the pool of open VPN Gate servers http://www.vpngate.net/en/ (for the L2TP/IPsec column Windows, Mac, iPhone, Android No client required in the list of servers must be checked).
- Open the list of open relay servers and select the VPN server you want to connect to.
Important information
For the L2TP/IPsec Windows, Mac, iPhone, Android No client required column, the list of servers must have a checkmark that indicates support for the custom L2TP/IPsec protocol.
- Copy the DDNS host name (the ID that ends with ".opengw.net") or IP address (the numeric value xxx.xxx.xxx.xxx) and enter it in the field Server on the configuration screen.
Note: It is recommended to use the DDNS name - you can continue to use it even if the corresponding DDNS IP address changes in the future. However, in some countries you may not be able to use a DDNS hostname, in which case you must use an IP address.
- Enter vpn in the Account, Password, and Shared Key fields, then click Finish.
2. Starting a VPN connection
- You can establish a new connection to the VPN server at any time by selecting the required configuration in the settings menu VPN and setting the switch Status to the "On" position.
- iOS shows "VPN" indicator in top panel, if a VPN connection is established.
- By going to the configuration, you can get the following information: assigned IP address and connection time.
3. Internet without restrictions
Once the connection is established, all traffic will go through the VPN server. You can also go to ip8.com to view your global IP address. You will be able to see your web-visible location, which will be different from your actual location.
When connected to a VPN, you will be able to visit blocked websites and use blocked applications.
Found a typo? Press Ctrl + Enter
One of the most simple ways Protect yourself and your privacy while using the Internet with a VPN. Filtering traffic and tunneling through an anonymous service is not something most people can set up themselves, and there are many companies that want to do it for you. We've reviewed several services and their Android apps, so if you don't already have a VPN subscription, here's where you should start!
We recommend not to waste your time on VPN selection since we chose one of them ourselves best networks, but of course the choice is always yours! You can install the application using the link below after you create an account.
IPVanish is one of the easiest VPNs to use, thanks to the app user interface, which attracts both beginners and experts. In my review, I gave IPVanish a four-star rating for their strong encryption, excellent performance, and large selection of servers. Even though it is based in the US, the company promises not to store any logs other than payment information, which you can also avoid.
IPVanish has over 40,000 shared IP addresses on over 1000 servers in over 60 countries. That's some serious variety, and there's no limit to how many times you can switch servers. You can move around substantially until you find the fastest one. Throw in a kill key, IPv6 and DNS leak protection, and manual port selection, and this becomes a very attractive option. Yearly plans start at around $6.50 per month.
The next step is to set up a VPN on your phone, and it's very simple for the most part. VPN access is built in network settings on Android and we'll look at how this native integration works, but most of the time there is best way: The company's Android application.
If your VPN company has an Android app
We will use IPVanish VPN for our example. Once you have an account set up with IPVanish ( follow the banner above and create an account) you need to visit Google Play. IPVanish VPN has published its own application and you can install it like any other.

Once installed, open the app and follow the installation instructions. At some point you will be asked to grant app view permission for your internet activity and you will need to say " Yes" to make it work. And that's all!
You can check the app's settings so you know how to turn it on and off or how to switch servers. The app does all the hard work and you can simply use it like any other app on your phone.
If your VPN company doesn't have an Android app
It's a little more complicated, but still easy enough that most people can follow along. There are a few settings you need to know that your VPN company will provide. Everything is pretty standard, and the settings you need for your computer are the ones you'll need here.

Again, we'll use IPVanish as our example:
- Open settings on your phone.
- In the section " Wireless networks» Click Advanced.
- On the next screen, select VPN.
- In the top right corner, click the + icon.

On the screen that opens, you will need to specify several settings. These are the settings you will find on your VPN companies website:
- Name. Give your VPN connection a name.
- Type: Select the connection type. Your VPN company will tell you what to use here, and IPVanish allows us to set up a PPTP (Point-to-Point Tunneling Protocol) or L2TP (Layer 2 Tunneling Protocol) connection. Be sure to read any documentation from your VPN company if you need help choosing your connection type.
- Server Address: Here you must enter the server address provided by your VPN company.
- DNS settings. DNS domains and DNS servers are also provided by your VPN company if needed. They probably don't see the documentation, but if they're required, you put them in there.
- Route forwarding. Again, you probably won't need to enter anything here. If so, it will be in the documentation your VPN company provides.
- Username and Password: Your phone may have these entries here, or they may be in the next step. Use the login provided by your VPN company in any case.
- If your phone has a setting for Always-on VPN, checking it will always activate the VPN.
- After entering these options, click Save.

If you did not previously have a section to fill out your username and password, a window will open asking you to connect to your new entry VPN. Use the username and password provided by your VPN company. Click " Connect" to save your login and start connecting. If you return to the VPN Connections page, you will see the entry you just created. Clicking it starts or stops the VPN connection.
Your new VPN works with everything on your phone—web browsers and other apps. If your VPN has a data cap, you'll need to be mindful of when it's turned on. You can find out when the VPN is active by looking for the key icon in the status bar. You can add as many VPNs as you like, but only one can be active at a time.
We hope you can use these instructions and be safer online with your new VPN!
VPN - what is it on a phone? This question is probably asked by everyone who first saw this icon in the curtain on their gadget or found the corresponding item in the settings of their phone or tablet. Other users encounter advice " use VPN on your phone» searching on the Internet for ways to open sites blocked by Roskomnadzor. Also this advice is relevant in light of recent mass blockings of popular IP addresses by this organization Telegram messenger, For normal operation which in this case many had to use VPN connection on your phone. Let's figure out what a VPN is in general terms, why it is needed, and how to set it up and enable it on Android.
This abbreviation comes from the English Virtual Private Network, which literally translates as a virtual private (or private) network. This technology allows you to load websites and use any Internet services (mail, instant messengers, etc.) via a bypass encrypted channel, the key link in which is an intermediary server, the so-called VPN server or VPN service. When creating a VPN connection on the user’s device, the entire flow of data (traffic), both receiving and sending, occurs over an encrypted channel to the intermediary server, which processes requests from the device, accesses the resource needed on the network and transmits the requested data back to the device user.
Another advantage of a VPN is high user privacy. Even the user’s Internet provider cannot view the encrypted traffic: all that the curious will see is a meaningless data flow between the user’s device and the VPN server.
In addition to encrypting the data stream, the VPN server replaces the user’s IP address with its own, thus allowing access to sites and services to which access is blocked on a territorial basis. For example, some Western video and audio services restrict access to their collections to users with Russian IP addresses. When visiting such resources, you may encounter the message “Content is not available in your country.” By establishing an Internet connection, for example, through a German VPN server, a Russian user will have access to such resources without any problems.
Where is a VPN connection used?
An encrypted connection is usually used where it is necessary to guarantee maximum protection transmitted information from unauthorized viewing. Here are 3 main areas using a VPN channel:
- Corporate networks connecting remote branches or remote employees via the Internet.
- A VPN on your phone, tablet, or laptop must be used when connecting to the Internet through public hotspots. Public WI-FI is unsafe because... the administrator of such a network can easily view your traffic (including transmitted passwords) using special software.
- A VPN connection is used to bypass access restrictions to websites and Internet services. For example, on phone VPN will help you work without problems with the blocked Telegram application.
Now let's look at how to use a VPN on your phone.
VPN on your phone: where to get it, how to set it up and enable it?
First of all, you need to have access to the intermediary server. After all, the phone only has tools for setting up and connecting to a VPN, but access to the server itself must be somehow obtained. Where can I get it? Now exists large number both paid and free services offering to use their services. If earlier use VPN servers for the Internet was the lot of the “chosen few” and presupposed the presence of certain qualifications to work with it, and also entailed additional financial costs for using the service, then at the moment even a novice user can obtain access data and easily set up a secure connection on their device.
For novice users, it is recommended to use the free services VPN services, although they reduce the connection speed or limit the total traffic, they are quite suitable for learning how to set up a secure connection on your phone, as well as for bypassing blocks or connecting to the network through public WI-FI access points.
To search free VPN services you can use Google by typing into search bar"free VPNs"
Tip: choose those services that have an Android application. In such cases, connecting a VPN on your phone will be as easy as shelling pears - you just need to install proprietary software from the Google Play catalog on the device and you can use the services of the service right away, without delving into the technical details, as when creating a secure connection with manual settings in the phone settings.
Let's look at creating a secure connection on your phone using popular service Hide.me, which includes a free plan with a traffic limit of 2 GB per month. This resource has its own client application called hide.me VPN. Just install it on your phone, launch it, log into your account in the application and press the “ Enable VPN"so that your gadget works over a secure channel.
To start using Hide.me services, you must first create a account to have a login and password to connect to the server. This can be done directly in the application when you first launch it, but in this case a trial account with a time limit will be created. It is best to create an account through a browser on a computer or smartphone by selecting when registering tariff plan « Free" Registration is extremely simple - follow step by step instructions, do not forget to write down your username and password created during the account creation process, because... You will need to enter this information the first time you launch the hide.me VPN app.
After creation personal account, in the service you need to configure the connection by clicking the “ Start installation" in the panel " Establish a VPN connection", during which you must follow the instructions of the installation wizard. After completing the setup, you can already use the application on your phone or tablet.

When you first start the program, be careful, the button to open the login/password entry fields is “ LOGIN WITH YOUR ACCOUNT» (Login to your account) is dimly lit and located below the bright blue button for registering a trial account. The cunning owners of the service in this manner clearly push the user to register a temporary account, in the hope that after its expiration, he will pay for its renewal.


Enabling or disabling a secure channel via client application happens by pressing the button Enable VPN" (enable) and " Disable VPN"(disable).


If desired, the Russian language can be enabled in the program settings by tapping on the 3 vertical dots in the upper right corner and selecting the appropriate settings item. There you can also see the remaining traffic limit.


The fact that your device is working through a VPN will be indicated by the key icon in the line Android states up.
Now let's consider manual installation VPN connections in the phone settings. This method is suitable in cases where the selected service does not provide a proprietary client application.
Manually setting up a VPN in Android
To manually set up a VPN in Android, you need to do the following:

The settings are saved and now to access the Internet via a secure channel, you just need to slide the switch to the right. Reverse position – off. In some Android shells The VPN enable/disable icon is in the curtain, which is undoubtedly more convenient.
Basically that's all. We hope that we have answered the question “VPN: what is it on a phone?” If something is not clear, then ask questions in the comments to this topic.
Let's figure out how to set up a VPN on Android phone or tablet so that you can use prohibited programs or visit blocked sites. Let's consider popular apps, their configuration.
This article is suitable for all brands that produce phones on Android 9/8/7/6: Samsung, HTC, Lenovo, LG, Sony, ZTE, Huawei, Meizu, Fly, Alcatel, Xiaomi, Nokia and others. We are not responsible for your actions.
Enable VPN in Android settings
For this method no need to install additional applications. The user needs to work with the settings to be able to use the VPN. Before connecting to private VPN You should obtain access credentials from the administrator of this network.
We follow the instructions:
- Go to the “Settings” of your tablet or phone, there select the “More” tab. Increase
- We indicate the “VPN” item.
- A window will appear where you need to click “OK” and then set a screen lock password or PIN code.
- We apply one of the proposed methods. For example, select “Password”.
- Specify the password and click on the “Continue” button. Then we duplicate the password again.
- Now, on the locked gadget, select the notification mode. We do this at our own discretion.
- A window will appear as in the screenshot below. There you need to click “+” in the upper right corner of the screen, then add new VPN net.
- Enter the name, for example, Legat. Leave the default type PPTP.
- Enter the server address provided by the network administrator. In our example, this is us.justfreevpn.com. Click on the “Save” button.
- After this, the VPN will be shown in the list new network. Tap on it, enter the username and password received from network administrator. Next to the “Save credentials” line, check the box so that you don’t have to enter them again. Click on the “Connect” button.
- The network status will now read “Connected” and the key icon will appear at the top of the command line.
 Increase
  Increase
  Increase
  Increase
  Increase
  Increase
  Increase
  Increase
  Increase
  Increase
 After this, the real location and IP address will be hidden from prying eyes. Other methods are simpler to implement, but they require downloading additional applications.
Application "Hide.Me VPN"
If the above method seems complicated to you, then you can use a simpler way. Many popular VPN providers offer native applications for Android, which greatly simplifies the process of setting up a VPN connection.
As an example, consider a program from the company Hide.Me. You should go to the Google Play application store and find the “Hide.Me Vpn” software there. Install it on your Android tablet or phone.
Then launch the programs and click on “Log in with your account.”
 Increase
 Now you need to enter the login and , which were received during the registration process on the VPN provider’s resource.
 Increase
 When you enter the application, click on the “Enable protection” button.
 Increase
 We confirm the connection to the VPN.
 Increase
 After this, the Android device will work via VPN connection.
Turbo VPN app
The application does not require entering passwords, and it is free for messengers, web surfing, etc. Instructions:
- Download the application and install it on your gadget.
- During the first start, you should press the big red button.
- After a three-second wait, all traffic will be redirected to a server that the application will choose independently.
- In the settings you can select servers to work from a specific country. Just click on the flag icon in the upper right corner.
- You can also set the function in the settings automatic connection during program startup.
- Advertising. To recoup costs, operators of free services show paid ads and advertisements to their users.
- Low reliability. No one guarantees that the free server will be available around the clock. Users have to change servers periodically because they are overloaded with clients or are closed.
- Low speed work, traffic limitation. The work of other programs that require a large amount of transferred data is often blocked. In this way, operators of free servers reduce the load on equipment and encourage users to switch to paid plans.
 Increase
  Increase
  Increase
  Increase
 Opera VPN
The Opera VPN app allows you to connect to a private network in one click virtual network. The advantage of the program was best tool to bypass access and blocking of blocked applications. The software is entirely in Russian. There is training, so even beginners should not have problems using it.
Full encryption
This implies that all traffic will be encrypted via VPN, and it will also be additionally encrypted via TOR networks. Application "Orbot!" includes TOR client and VPN, which allows you to provide root rights for owners full encryption. This is the safest and reliable way, the cost of which is low - you need to get root rights.
Limitations of free VPN services
Free services It’s quite enough to work on the Internet using a web browser, access instant messengers and other applications that do not actively consume traffic. U free servers there are a number of restrictions:
4.8 (95%) 8 people.
Let's start with the theory, what is a VPN? This term stands for Virtual Private Network and is translated as “Virtual Private Network”. More to the point in simple language, then it's virtual local network, which can connect devices from different parts of the planet. Domestic users now have to use a VPN to bypass Roskomnadzor blocks. VPN is also a convenient corporate tool that allows employees from different cities to be connected to the same network. Typically, a VPN allows you to achieve greater security, but there are also opposite cases, which we talked about in. Next, we will tell you how to set up a VPN on Android.
Setting up a VPN using Android.
- Go to the settings of your smartphone or tablet and in the “Wireless Networks” section, click on the “More” item.
- Select the VPN item second from the bottom.
- Next, a message will appear asking you to enter your screen unlock PIN or password.
- We choose the method that is most convenient for you.
- Set a password and click "Ok".
- Now we select the mode for displaying notifications on a locked device.
- An empty VPN window will open in front of you, where you will need to click on the + icon to add a new VPN.
- Specify the name and type of VPN connection.
- Now you need to enter the server address. You can find it on the site where you looked for a VPN, or from the administrator of the virtual network.
- The next step is to enter your username (login) and password to access the VPN. This information must be obtained from your network administrator.
- If everything is done correctly and you have provided the correct information, you will see that your network status will be indicated as “Connected”.


Besides standard means operating room Android systems, there are other ways to connect and use a VPN, which we will discuss below.
- Using the application.
- Using Proxy + VPN application. This program is an analogue of Tor Browser for mobile devices, but to use it you will need Root rights.
- You can also use third party applications for VPNs, which have simpler and more convenient setup. One of the best is