How to recover hard drive files. How to recover data from a hard drive yourself
Hello friends! Today we had a small incident, because of which I urgently had to use free program to recover deleted files called R.saver, naturally I’m telling you all the details, so the information may be useful to some of the readers.
I decided a long time ago to do a review on our site. all free programs for recovering deleted files I was planning such an article, but here came the ideal opportunity to test another similar R.saver program in combat conditions.
The R.saver program is created on the basis of professional versions of very serious data recovery products UFS Explorer, website http://www.sysdevlabs.com/. The program can reconstruct damaged file systems, restore deleted files even after full formatting. Searching and recovering deleted files can be done even if the desired partition of the hard drive is completely deleted and consists of unallocated space.
Free program to recover deleted files
An acquaintance of mine collected for several years a “personal archive” consisting of his favorite films, photographs, music and e-books. All these files were located on his additional section(F:) laptop, this section also contained photographs of friends, an archive operating system, working documents and so on.My friend knew that it was unreliable to store what he had collected over the years only on a laptop, and he specially bought a portable hard drive for his collection. USB disk Having connected it to the laptop, he was about to copy the entire collection onto a portable screw, went to the disk (F:), selected with the mouse all the folders needed for copying and accidentally clicked “Cut” instead of “Copy”!

My friend didn’t know what to do next, since he had never used this “Cut” function in his life, he called me and in a panic, said that all his files, collected through long and back-breaking labor, had become translucent. I answered - you need to log into the USB portable hard drive, click on empty space right mouse and select the "Paste" function from the menu. My friend couldn’t remember exactly what happened next, except for the fact that during the process of transferring files, for some reason he turned off the computer and decided to wait for me.
Arriving at his place in the evening, I turned on my laptop. Even if you turn off the computer during such a transfer, some of the cut files should remain where they were, and the other part should be transferred to another specified location, but the result was completely different.
The laptop was missing almost all the files my friend needed, which is about 100 GB! Most importantly, the folder called "Personal Archive" with all the archived files disappeared, only the folder " Home video"I was able to find only 5 GB of video files on a portable USB hard drive.

So, let’s get to work and save the collection with the free program for recovering deleted files R.saver. Let's go to official website of the R.saver program and download it.

Note: Friends, if you want to temporarily retrain as a data recovery specialist from various media, you must follow security rules. What are the rules?
The first rule is not to restore deleted files to the same hard drive where they were located. In our case, you can connect a portable USB hard drive to your laptop and restore files there. Or you can connect a simple hard drive to your laptop using . Or, if the case is very serious, you can remove the laptop hard drive and connect it to to a simple computer and restore deleted files with a special program, but this method, of course, is primarily for repair specialists. Let's launch our program R.saver.

The program is not complicated and we will figure it out as we work. In the main window you need to select from the list of partitions the one on which the files were deleted. You may ask the question: - What if suddenly hard disk partitions are completely deleted, what to choose then and how to restore deleted information. We will also discuss this case at the end of the article. I will delete all existing partitions from the hard drive and try to recover deleted files located on them.
But first of all, we will select for recovery the partition (F:) of the laptop from which my friend’s files disappeared. “Disk management of our laptop”, here is our section (F:),

On which there is only one folder "Home Video" remaining from the entire collection.
In the main window of the R.saver program, right-click on the F: drive and select “Search for lost data.” Attentive users may notice that there is also the “Recover after formatting” option, later (in the appropriate situation) we will use it.
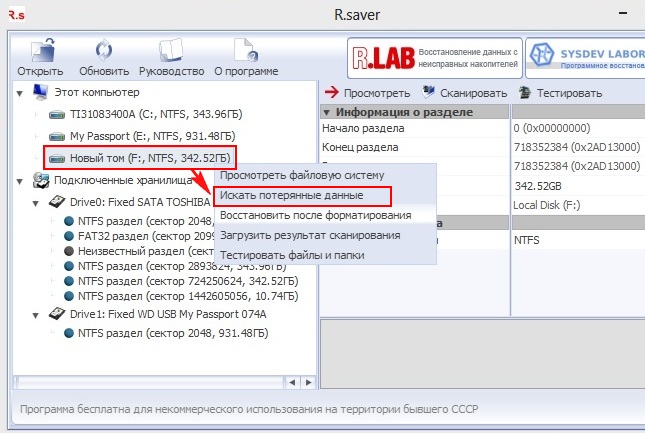
We answer “Yes” because we want to perform a full scan of the partition (F:) for the presence of deleted files.

In progress file system reconstruction based on signatures using the IntelliRAW algorithm.
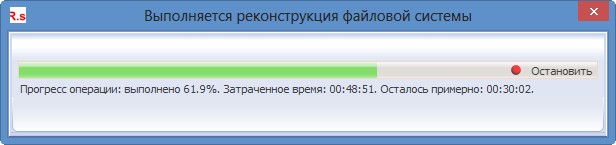

We wait for a little over an hour and see that the program did not restore all the files, but oh well, more than half of the necessary files were restored, most importantly, the very necessary “Personal Archive” folder was restored. I didn’t understand one thing in the program, why the size of all files is 0 KB.
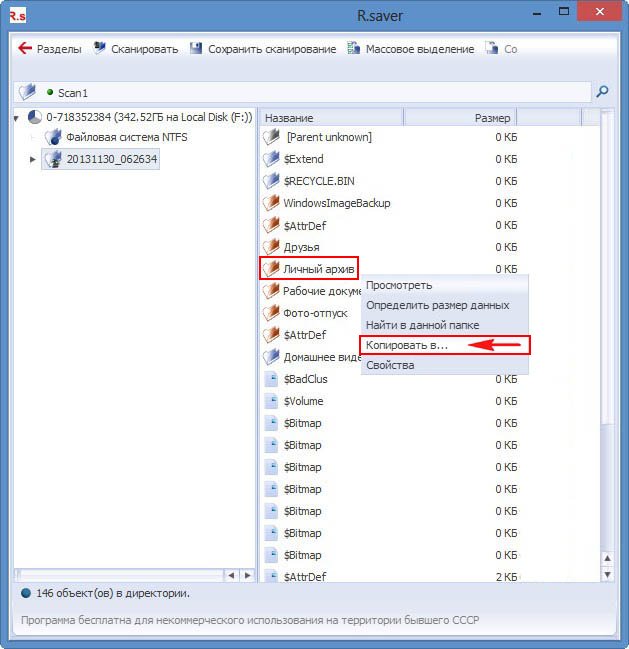
So, we restore the found folders with files. I wonder whether the files will be readable; it happens that the information recovery program will restore the files, but they will not work.
We right-click on the folder we need to restore and select (you can click “View” before restoring and see all the files located in the folder to be restored). Select "Copy to..."
Explorer opens, select the folder into which we want to copy the files applying for recovery, then click “Select”

The file recovery process begins.


In the main window, right-click on the formatted partition and select "Recover after formatting"

The file system is reconstructed for an hour, then a search (lasting 20 minutes) for file systems on a formatted partition (volume 50 GB) occurs.

In the window that appears with a list of found file systems, we need to select the file system of the type we need with the minimum positive offset, in our case it means the first one.

This hard drive belongs to another friend of mine who accidentally formatted his hard drive. So, the R.saver program found a bunch of hundred-year-old files on it and only two necessary folders.

Restoration occurs in exactly the same way as in the previous case, select “Copy to...”, Explorer opens, select the folder into which we want to copy the files applying for recovery and click “Select”, the file recovery process begins.
Recovering files from a hard drive on which all partitions have been completely deleted
Now, friends, let’s completely delete all partitions from the Samsung 120 GB hard drive (which we have already mocked in our articles) and see if we can recover deleted files in this case. We delete all partitions from our hard drive and run the R.saver program.

In the main window of the program you can see that all our hard Samsung drive 120 GB is the "Unknown Partition". Right-click on it and select “Find lost partition”

Click on the "Find Now" button

The program scanned our 120 GB hard drive for 40 minutes. Save your search results just in case. Among the partitions found, there are two partitions that match the size of those that previously existed on this hard drive, this is the drive (C:) with a capacity of 55, 24 GB and the drive (G:) with a capacity of 56, 43 GB; we mark them with checkboxes and click on the “Use selected” button.

The main program window opens,

We right-click on the found first partition 55, 24GB and select “Browse file system” (if you select “Search for lost data”, the search will be repeated, but personally this did not give me anything and there were no more found files).

In the window that appears, we see all the files located in the root of the disk (C:), let's try to go to the desktop C:\Users\users\Desktop and restore the files located there.


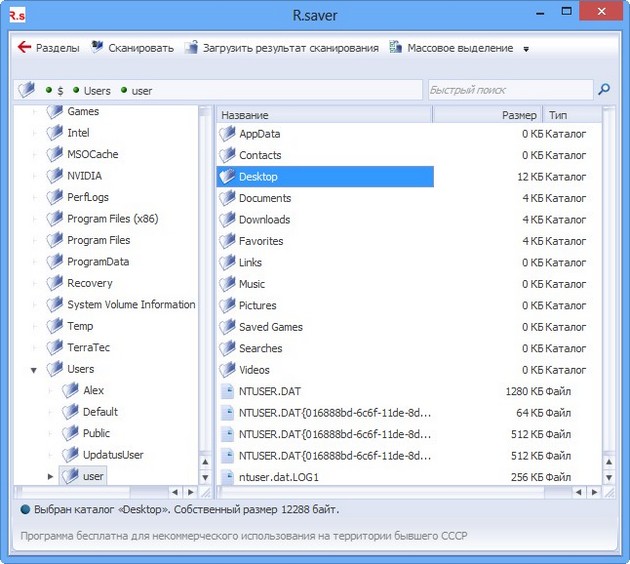
Please, all deleted files on your desktop are available for recovery. Click on the desired folder right mouse and select "Copy to...,

In the explorer that appears, select a location on your hard drive and click “Select”

Files are being restored.

With the disk (G:), things didn’t work out so smoothly; the program couldn’t find the deleted files I needed.


But as I already said, in general for free program she worked well.
Friends, while working with the R.saver program I might have missed something, I will be grateful for any help in the comments.
Many of us have deleted them by mistake at least once. necessary files from PC. It is known that nothing fatal will happen when deleting it to the trash: the information is not physically deleted, but is transferred to a special place on the drive, and it is not difficult to return it if desired. Users often think that deleting using Shift+Del leads to complete “overwriting” of files. In practice, even after this, the data can be recovered. Let's try to figure out how to recover data from a hard drive.
In most cases, files can be recovered using special software
After a format operation or deliberate deletion of information, everything can be returned back; many convenient utilities have been developed for this:
- Recuva;
- Disk Drill;
- PhotoRec;
- the increasingly popular R-Studio package
The procedure is only available on a working device. If you try to recover data on a drive that creaks and makes clicking noises, then scratches may appear on its parts (there is a high risk of losing data forever).
With certain skills, information can be easily restored using one of the tools from the list above. If they do not help, use the services of computer services.
Such programs first scan all the information on the device, after which they create a kind of “map” that displays the location of the pieces of interest to us. Here connections between files and sectors, names, sizes, and many other features of the file system are built. At the last stage, the data we need is transferred to another disk. No writes are made to the source drive while packets are being resumed.
Let's take a closer look at well-known packages for restoring memory after formatting. Remember that after downloading such utilities to your PC, you need to check them with antivirus software: often hackers plant various viruses and additional, completely unnecessary software.
PhotoRec
The tool allows you to quickly return the necessary types of files to your PC. The software uses special operating algorithms, which puts it an order of magnitude higher than its analogues.
The first version was designed only to work via “cmd”, which was not very convenient for a novice user. The developers worked hard and started releasing a user friendly interface from version 7, which has become much easier to use.

You can get it for free from the Internet; to work, you should run the *.exe file inside the archive. The process of returning lost files looks like this:
- Launch the program;
- select the device on which the files you needed were previously located;
- specify the file system;
- specify the path where the recovered files will be stored;
- Click on “File Formars” to select the required type (video, disk image, photo, music);
- click on the “Search” button.

The utility in auto mode will transfer the information you are interested in to the previously specified folder; no additional steps are required.
Recuva
Recuva does not require paid subscription, she doesn't take away too much virtual memory, the logic of operation is elementary. Even a novice user will be able to take advantage of its capabilities, which is very pleasing. You can return data from a hard drive, microSD or flash drive. If you need to resume a specific file type, Recuva will tell you how to do it.

You can get the installation package for free by downloading it from the Internet. The built-in wizard will help you work with the utility; there is a Russian language. If we talk about efficiency, then the program works 100% only if the hard drive was not touched after removal. In other words, the utility helps you roll back a couple of steps.
File Scavenger
It is used to return files from flash drives and hard drives. The product is amazingly efficient and can be used in conjunction with RAID. The program is capable of returning information piece by piece after repeated rewriting and formatting.
The only drawback of the utility is its cost - for normal operation will have to pay complete package. In order not to spoil the physical hard drive, experts recommend initially creating an image and then working with it.
The product does not require mandatory installation; you just need to launch it by clicking on the .exe file after downloading. Stable job provided for users of systems 7, 8, 10 from Windows, as well as the good old XP.
There are only two steps to follow:
- In the “Look For” field, enter the type lost file(you can leave the “*” sign there, it works like in a regular search);
- In another free field, indicate the disk or specific partition on which we will search.

In addition to these fields, the program has a “toggle switch” for selecting the type of search. After pressing the “Scan” button, the program will begin to operate and display a list of required elements.
Performance: it took less than 30 minutes to work with a 16 Gb flash card.
After you find the required file, follow the instructions described in the utility.
R-studio
This package is respected by millions of users. The program is considered one of the most effective. Here is a list of the main features and functions:
- Return RAID;
- possibility of renewal from means of various configurations and types;
- receiving files when device partitions are erased or data is lost due to virus programs;
- formation of images for renewal, work with the image itself;
- works on Mac OS X, Linux, Windows.

The professional package makes it possible to return files that for one reason were damaged, were deliberately sent to trash or formatted. If the OS is not working, then you can run the utility from a disk or flash card.
Disk Drill
This type of software was previously available only for Apple products, but for Windows lovers it was recently released compatible version. The utility, like others, makes it possible to resume photos and important files from various drives. The advantages include the use of images, as well as a friendly interface.

Results
As you can see, there are many software tools that allow you to recover information from a drive. Some utilities are distributed free of charge, some options require payment, but they have wider functionality and quality. The choice is yours! If the issue cannot be resolved, contact a special service.
Software Features
Recuva allows you to recover data from hard drive, flash drives are quite simple, fast, and most importantly, free. File recovery software is provided without purchase or subscription, but you can pay for professional version with more powerful scanning algorithms and function automatic update. But in practice it is of little use. Free version also effectively recovers deleted files from media with file exfat systems, ntfs, fat32, fat16. True, it only works well if the objects were lost relatively recently, and reinstalling Windows after that it was not produced. So, to get started, open Rekuva and click next.
Selecting an object type
On next stage the step-by-step wizard will ask what type they were erased files. There are different items for music, photos, documents, videos, audio. Selecting a specific type of information allows you to increase scanning speed. If they were lost as valuable graphic files, and documents, select “Other”. The search will take longer, but will show all lost files.
Choosing a storage location
Now you need to show the application the place where the information was located. If you need to restore data on your hard drive, select the partition on which it was located (the desktop is on drive C). You can also select a memory card of a mobile phone, player, user folder or trash. After specifying the location, Rekuva will ask how to scan - quick or thorough. Fast is suitable for recently deleted, and deep scan for complex cases, but lasts much longer.
Saving the result
Upon completion of the scan, the utility will show all found objects, including compressed and encrypted ones. Unfortunately, it does not display the full directory structure, so the file names are displayed as a regular sorted list. You look through it and look for the targeted ones. Data recovery from a hard drive is possible in full only if it is highlighted with a green icon - red ones are unrecoverable. To start saving, check the boxes and click on the corresponding button. At the end, Rekuva will ask which folder to put the objects in. Choose any one not on drive C.
Often, novice users delete from a laptop or accidentally lose the necessary data without knowing whether it can be recovered deleted files including on the desktop and how to do it. There may be quite simple situations here, when lost documents are literally a couple of clicks away, but there may also be more serious problems, for which you have to use special applications.
Recovering from the Recycle Bin
All files after deletion when saving standard settings computers fall into the so-called. cart - special folder on the desktop, by opening which you can easily restore any deleted information by highlighting the desired object and selecting the appropriate item in the menu. But files can be deleted permanently without being placed in the trash.
Inexperienced users often accidentally delete application shortcuts and documents from the desktop, believing that if they are gone, then the rest of the program has also been deleted entirely. In this case, many people do not know how to recover deleted files. This is very easy to do, even if the basket is empty. There are two options:
- Roll back the system to the nearest restore point;
- Find the program in the main menu of the Start button and drag the desired shortcuts to the desktop.
The second option is preferable, but if lost programs and the documents have disappeared from the list of the main menu on the computer and you do not remember the directory in which they were installed, you will have to use the first one.
If you decide how to restore remote folder from your desktop, and the erroneous action was performed recently, then you probably won’t even have to go to the trash can. Deletion can be canceled by simultaneously pressing hot Ctrl and Z.
Using a restore point
It is important to understand that rolling back to a previous restore point will not return the program, documents and files if they were deleted. In this way, only erased shortcuts on the desktop can be returned to their place. Here's how it's done using Windows 8 as an example:

A window will open in which, by default, you will be asked to restore to the most recent checkpoint. If necessary, you can specify any other existing restore point.
We use third-party applications
If data and documents from the laptop hard drive are completely deleted and standard means The OS can't return them, you'll have to use them special utilities to recover deleted files. It is important to remember the main rule that increases the chances of successful data recovery - do not write anything to the disk partition that you will be working with later.
Recuva is a simple free utility
The most famous and simple application, with which you can recover deleted files, is . When installing, select the partition of the disk on which there is no data to be recovered. The principle of operation of Recuva and other similar utilities is approximately the same:

After the scan is completed, the recovery wizard will display on your desktop a list of all the lost documents that it was able to detect. Those that are marked with a green circle can be restored by the utility without any loss.. If the icon color is red, then this file most likely it will not be possible to return it - a recording has already been made over it and most of the data and information about the file are completely gone.
All that remains is to select the files (you can use the corresponding function to search for specific photos and documents), select the directory to save and click “Recover”.
PhotoRec is another functional free utility
The name of the program should not be misleading. The utility recovers not only photos, but also most other types of files. Its advantage is that there is no need for installation - it can be downloaded from the office. site in the form of an archive, unpacked, after which you can work with it. This is an important property for such applications - the program can be immediately downloaded to a flash drive and worked with it.
The scheme for returning long-lost information is as follows:
- After launching PhotoRec, the main window immediately opens, in which the drive is selected in the top drop-down menu - you will have to work with it during data recovery. The program also works with img format images created in other applications.
- Below in the window there is a list in which you can select a full disk scan or individual sections.
- Below, you can set the file type to scan by clicking File Format. If you skip this step, the program will try to recover all accidentally deleted data that it can detect.
- You can specify a folder to save the recovered information by clicking the Browse button. In addition to this on the menu File System type will require you to select a file system. If you work in Windows environment, mark the second point. Ext 2-4 system is the standard for Linux.
Let's compare the considered applications
For novice users, the PhotoRec program is no less suitable than the above-described Recuva. It is more powerful - it often extracts data from the computer better, but it still has one unpleasant feature. Free PhotoRec does not allow you to view the found files after scanning and select something specific from them. This must be taken into account when working with large hard drives- if you do not specify in advance which files are to be restored, everything will be saved.
The simplest ones were discussed above free apps to retrieve accidentally deleted information on the desktop or lost documents after formatting flash drives, hard drives and other media.
It is important that PhotoRec, unlike Recuva, is also a cross-platform utility, i.e., capable of working in any operating environment.
Recovering files from a hard drive is an issue that worries many personal computer owners.
This includes the loss of valuable information and the time required for its successful recovery.
Specialized services charge a lot of money for this, but if the media is in good condition, it makes sense to try to recover the data yourself.
Reasons for losing information
If the storage medium is undamaged, the main reason may be:
- errors that occurred in the partition table or file system devices. Most often this happens due to incorrect shutdown personal computer, failures, malfunctions in hardware and software;
- the harmful effects of viruses, as well as user errors, often lead to the loss or corruption of data. With such failures, the information usually remains on the disk, but data about its location is lost. This is expressed in the loss of several disk partitions, displaying the partition as unformatted;
- Inaccurate file system records can also lead to partial or complete loss separate files and catalogues.
The main causes of malfunctions that lead to loss of information
Or maybe files, important data were accidentally deleted or the partition in which they were located was formatted. Information recovery is carried out using certain software in manual or automatic mode.
When using the appropriate programs, all information that exists on the media is scanned. Based on the detected information, a “map” of fragments of recovered data is created. It contains information: which file belongs to which sector, names, sizes and other parameters of the elements of the system being scanned. The selected data is then transferred to another drive.
What to do if data is lost?
If nothing was written to the sectors from which information was deleted, then the data was not physically destroyed, but information about its location was distorted or lost. First of all, it is necessary to determine exactly where the sectors that store the necessary information are located, and also to reproduce it in the correct sequence.
If information was written to the disk from which the files were deleted, for example, formatting and installation of a new operating system, there is a high probability of physical destruction of the data. In these cases, the feasibility of successful information recovery depends on the ratio of lost and recorded data. For example, if you delete 2 gigabytes of databases and write 100 gigabytes of music and movies in their place, the probability of successful recovery approaches zero.
Data recovery mechanism using programs
- media scanning;
- Based on the scanning results, a map of the location of pieces of information is compiled, based on the detected service records, and a directory tree is built;
- the map contains data about which file belongs to which cluster, the name, size and other parameters of the file system elements;
- if the information received is not enough, then certain extrapolation methods are used;
- folders and files that need to be recovered are selected in accordance with the compiled map and transferred to another medium.
This article will review a variety of programs, both paid and free, and analyze their strengths and weaknesses so that the reader can quickly choose the most suitable software for his request.
5 Best Data Recovery Software
Recuva
Recuva is one of the most common programs for recovering lost data or formatted disks. The high demand for this program can be explained by its simple and intuitive interface. Recuva does not require experience or special knowledge in the field of data recovery, it is very convenient and easy to use. You can download it from here
The program scans the selected hard drive(both various hard drives and flash drives are supported). Information can be restored even if the drive has suffered any physical damage or was formatted using a standard system command.
It is recommended to perform recovery using the program without changing the standard settings, unless, of course, you are an expert in the field of data recovery. This utility has simple interface and will provide effective recovery information, even if the user does not have the necessary knowledge.
The program will prompt you to select the type of file to be restored. When searching for a specific file (music, picture, document), it is worth specifying the category to save time necessary for the recovery operation. But, if you do not know the file type or want to find data from different categories, specify “Other” and the program will search for all deleted information.
Choosing WHAT to look for
Next, you need to select the location where the file was located before deletion. You can select not only a separate folder, but also more extensive areas, for example: “My Documents” or “On a memory card”, and the program will check the selected area for the presence of the necessary data. If the exact location is unknown (the file was deleted using special programs or simply disappeared), you should leave the “Exactly unknown” default so that the utility scans the entire surface of the media.
We choose WHERE we will look
A window appears when you are ready to perform the restore operation. It is recommended to conduct an in-depth analysis: it takes longer, but its efficiency will be many times higher.
It is worth waiting a while while the program searches for files. If you did not choose in-depth analysis, the operation will take very little time.
Selecting information to restore
A window will open indicating the deleted data found. From this list You should select the information that needs to be restored, after which the program will prompt you to select a folder for recovery.
It is important right choice folders where our files will be restored, because this will affect the efficiency of their recovery. Restoration should be carried out to a drive other than the one from which the recovery is being carried out. This is especially true when it comes to returning large quantity files. You can connect an additional hard drive or flash drive to return data to them. The space should be slightly larger than the size of the files being restored.
The recovery procedure will not take much time and depends on the number and size of files.
R-Studio
R-Studio is a convenient and functional program to recover information from different drives that was deleted by mistake. With its help, you can scan various media and recover lost data not only from hard drives, but also from flash drives. You can download the utility from the website http://www.r-studio.com/ru/Data_Recovery_Download
Initially, you should decide on the choice of version: demo or full. If you do not perform data recovery on a regular basis, it is better to choose the demo version. A 20-day period is more than enough to restore all information.
If you are not a pro, it is better to use the demo version
In addition to recovery, the utility can also perform a preliminary scan. This operation will speed up and increase the efficiency of the recovery procedure. Please note that you can scan your device third party programs, and upload a file with a report on the work done into R-Studio. The utility always conducts a detailed scan by sector. It may take certain time, depending on the size of the partition being scanned.
We scan the selected partition
After the scan is completed, it will be possible to view all the files that it was able to detect and then select those that can be restored. In order to restore a file, you need to right-click on it and select the “Recover” command.
R-Studio is convenient and multifunctional
If you don’t know exactly what was deleted from the device, and you are going to recover all lost files, in this case, right-click on the desired media and select “Recover all files.”
At the end, simply select the partition where to restore
At the end, you will need to select a folder where the seized information will be restored. Important! It is imperative to take into account that the folder must be located on a different hard drive from which information will be returned, because during the recovery of some files, others may be completely overwritten by them.
After selecting a folder, you need to wait while the program diagnoses the drive and restores lost information.
Easy Recovery
Easy Recovery can safely be called a high-quality program for professionals, which even regular user. It has gained popularity due to its excellent efficiency and, at the same time, ease of use in comparison with similar utilities. The advantage of this program is that it can also perform preliminary diagnostics of the media. Download the program
Click on “Disc Diagnostic” and select the required command. If the utility was downloaded in order to recover data, then we conduct a deep scan “SmartTests”. In addition to scanning, the program will perform diagnostics and determine whether the hard drive has problems, for example, unreadable sectors or any others, in order to prevent troubles.
Diagnostic menu
After selecting the command, the type and number of media that are currently running on the device are determined. We choose which one we will work with and where to restore the information.
For the most accurate and full diagnostics select “Run extended” SMART test" First of all, you should be patient: the verification will take a lot of time.
Be patient and choose scanning
To restore files, go to the section “ Data Recovery” and select the mode that interests us. In this program, modes are selected depending on the specific situation.
For example, if you accidentally formatted your hard drive, select the “Format Recovery” category. Next, select the file system of the drive and the partition that was formatted.
If there is a need to recover deleted files, then select the “Deleted Recovery” function - the disk selection menu opens and the formats of the recovered files are determined.
Recovering lost files
If the data is lost as a result of a software failure or the reason for the loss is unknown, select the “Advanced Recovery” option. After scanning, the program will find information that was deleted within a certain period of time.
We choose what we need to restore. Typically, the diagnostic and recovery procedure does not take much time. This will depend on the amount of data that needs to be returned.
PhotoRescue Pro
PhotoRescue Pro is a utility that will help you perform recovery deleted photos or video recordings. Current digital devices provide ample opportunities for recording, dubbing and optimizing media files. If you accidentally deleted the necessary files from digital gadget– this utility will solve this problem.
Using this program you can recover data from any type of flash drive, hard drive or mobile phones. It is possible to recover data even from damaged and formatted media.
Working with PhotoRescue Pro is very convenient and accessible. You can download it from here. The program supports many languages, including Russian. After selecting the language, a window appears in which we click the “Next” button and the registration window appears. If you just want to recover a few photos, there is no point in registering the program, but if you constantly work with the camera, and this problem occurs quite often, it is worth purchasing the full version.
First, we select the drive from which we will return information. The utility works with several file systems at once, which is very beneficial. Click “Next”.
Analyzing the content
After selecting the drive we need, click “Next”, wait a couple of seconds - the utility will check the partition we have selected. A list of folders is displayed, we need to select the one that interests us. If the location of the file is unknown, click on the checkmark at the very top to highlight all the data found. "Next"
Select the desired folder
We select the formats of the files that interest us. To avoid mistakes, it is better not to uncheck individual formats so that the utility can find as much information as possible. Next, select the required files. Click “Next”.
Select the desired folder
Once you have completed selecting formats, the scanning operation will begin. The verification time will depend on the volume of data and will take from a few minutes to a couple of hours.
Scan duration depends on data size
The advantage of the program over analogues is that it simultaneously checks the drive for the presence of unreadable sectors. Thanks to this, you can not only restore lost information, but also carry out diagnostics and troubleshooting.
All that remains is to restore the data
After scanning is completed, a list of files opens. It is possible to search for files by categories (video, photo, audio) and formats, and not by sections and various folders.
The program shows how much data was found and what was deleted. Thanks to this, you will quickly find out which files were found and which were irretrievably lost.
GetDataBack
GetDataBack is one of the most effective and most powerful. With its help, you can recover data in almost any situation. The developer divided the program into two subtypes: the first for file NTFS systems, and the second is for FAT. Download it from here: https://www.runtime.org/data-recovery-software.htm
We recover all deleted files for effective results
Install this utility necessary for a foreign hard drive. You cannot restore to the media from which files will be restored, because necessary information will be overwritten.
After opening the program, a menu of four items appears. For maximum efficiency, it is recommended to select the fourth option – “I want to recover deleted files” (I want to recover deleted data).
Select the required section
In the list that opens local disks, which the utility will find while scanning the hard drive, you need to find the partition where the deleted files were located. The program provides many possibilities in the field of data recovery, but if you just want to return information from the drive and do not know where it was, you should select the “Physical drives” category.
A file system window opens and you need to select the one that supports this version programs (in our case NTFS). IN modern computers different file systems are used simultaneously, so check the box next to “Show recommended”.
Select the file system we are interested in
After a detailed scan, the utility will open a folder explorer, simple and easy to understand. The contents of the selected folder will be displayed on the right; if the information was deleted, after recovery GetDataBack will show the files in strikethrough font for easier classification. Each file is equipped with a special marking, with which you can determine the type of information found.
Data recovery is easy and convenient
As a result, we select the data we need and start the recovery. Once finished, the recovered file will be available in the editor
Recovering files using this program in file system FAT is carried out in a similar way.
Conclusion
This article discussed, in my opinion, the most popular and effective programs to recover deleted data from a hard drive and various media. For beginners, the popular Recuva with a simple interface is suitable; if you lose media files, you should choose PhotoRescue Pro, it can recover data from almost any modern gadgets; For permanent job with information return, GetDataBack is ideal - it has powerful functionality, is efficient and at the same time has an ergonomic main menu.
If for some reason you were unable to recover your data, but the information is valuable, it makes sense to contact specialists. They have more powerful software and can help where these utilities are powerless.