Bios reinstallation of Windows. Installing Windows XP is an installation process via BIOS. Setting up Bios to work with a bootable USB flash drive
Do you want to install Windows 7 on your computer or laptop, but don’t know how? It's not as difficult as it seems. Although the first time, of course, will be difficult. But, once you figure it out, you will become a real “IT master” and will be able to independently install Windows 7 on any computer or laptop.
Before installing Windows 7, print this page. This will make your task much easier. After all, during the installation of Windows 7 there will be no access to the Internet. The only exception is when you have a second PC, laptop or smartphone, from which you can, if necessary, access the site again and see what to do next.
When is Windows 7 installed?
- You bought a new laptop or computer. Everything is clear here. In most cases, laptops or PCs either do not have any operating system at all, or do not have the one you need (for example, the ancient MS-DOS).
- You didn’t like Windows 10 or 8, and you want to install the good old “seven”.
- There was a malfunction, a virus or ransomware advertising banner was caught, the computer or laptop does not turn on, etc.
Let's dwell a little on the last point. If problems occur with your computer or laptop, do not rush to reinstall Windows. Firstly, reinstalling the operating system is done as a last resort when other methods have not helped.
Secondly, remember that after installing Windows, all data is erased, at least on local drive C. And these are all your programs: browsers, video players. And you will have to install everything again.
Thirdly, there are no guarantees that reinstalling Windows will help solve the problem. But the files on local drive C will be deleted permanently in any case.
Therefore, first, try to look for other solutions to restore your PC or laptop. For example, the following articles may help you:
You can also always look for other articles on this blog or through Google/Yandex.
Preparing to install Windows 7 OS
The first thing you need to do before installing Windows 7 on your laptop is to copy all important information. At least from local drive C. After formatting, all data on it will be erased.
If you bought a new computer or laptop, you can skip this step. In all other cases, this is a prerequisite!
Therefore, save all files, documents, pictures, audio tracks and videos from your desktop and from the “My Documents” folder. It is also recommended to look at the local drive C - important information is also written to it quite often. Where to save? On a disk or flash drive. Another option is to upload files to online services (Yandex.Disk, Google Drive, etc.).
By the way, sometimes you can copy some programs along with the settings. For example, bookmarks and passwords from the browser you used.
The second point that needs to be made is to determine what bitness of Windows 7 you need - x86 or x64. Everything is very simple here. If you have 4 GB of RAM (or more) installed on your laptop or computer, then you need to install Windows 7 x64, and if less, then x86.
Why is this so? The fact is that the x86 version does not see 4 GB of RAM. The maximum that it shows is 3.25 GB.
How to find out the amount of RAM? If you have a new computer, look in the documentation. And if it’s a laptop, then the characteristics are indicated on its case (or on the box).
If you already have Windows installed, then the amount of RAM can be viewed as follows:
The third thing that needs to be done before installation is to burn a digital copy of Windows 7 to a disk or flash drive.
If you already have a boot disk (bought or given in a store along with your PC), then skip this step.
Burning a DVD is easy. After all, you've probably already recorded films, music, games? This can be done through Nero, Alcohol 120% and other programs.
As for the USB flash drive, there are some difficulties. Therefore, in this case, I recommend reading -.
Where can I get a Windows 7 image or installation disk? Can be purchased in store or online.
And the last thing you need to do before installing Windows 7 is to prepare drivers for your laptop or PC. Driver discs are usually included with your computer. If you have them, then you can skip this point.
Laptop owners are not provided with disks, so you need to install drivers from the manufacturer’s official website (search by the name of your model).
If you skip this step, you may be left without internet. After all, you need to install a driver for it. USB ports may also not work. That is, a mouse. And in the end you will have to go to a friend or acquaintances and download the drivers from them.
This completes the preparatory process. Check again that you have saved all the important data, then connect a USB flash drive or insert a DVD with the Windows 7 installation image and restart your laptop/computer.
Setting up BIOS for installing Windows 7
Perhaps setting up the BIOS is the most difficult stage for most users. Especially for beginners.
In addition, the difficulty here is that the BIOS versions may differ on different PCs and laptops. And the buttons to enter the BIOS too. As a result, some users cannot even enter the BIOS. Therefore, to avoid problems with this, let’s consider in detail what needs to be done and how.
So, when you have prepared everything, restart the computer, and immediately when the screen turns on, repeatedly press the Del button (for PCs) or F2 (for laptops). If you did everything correctly, you will see the BIOS screen. Something like this:

Or this:


There are 4 devices displayed here – First Boot Device (first), Second (second), etc. By default, the first one is the hard disk (Hard Disk or HDD). And you need to put the CD-ROM (disk) or USB-HDD (flash drive) on the first line - depending on which device the seven will be installed from.
How to do this? On a PC, you usually need to highlight the first item, press Enter and select the desired option from the drop-down list.

On laptops, the boot priority of devices is changed using the arrows or buttons F5-F6. Control keys are usually located on the right or at the very bottom of the BIOS screen.

When you select the desired device (CD-ROM or USB-HDD) in the first item First Boot Device, be sure to save the settings and then exit the BIOS. Which save button? This is also written at the bottom of the screen (usually F10).
If you have BIOS UEFI (new version), then simply drag the desired icon (disk drive or flash drive) to the first place with the mouse and click “Exit” in the upper right corner.

After this, the laptop or computer will reboot and the installation of Windows 7 will begin.
If all this is too complicated for you, there is another option to configure booting from a disk or flash drive without going into the BIOS. For this you can. But this method only works on new PCs and laptops.
Step-by-step instructions for installing Windows 7
Immediately after rebooting, you will see a black screen with a single line.

Here you need to press any button - for example, Space.
If this message does not appear, it means that you did not save the BIOS settings. Check them again. If everything is fine there, then either you did not write the bootable USB flash drive correctly, or the disk is damaged and the computer/laptop does not see it (the disk drive may not be working).
After clicking the button, you will see a black screen with the words “Windows is downloading files...”.

Wait for the system to copy everything. After this, a new window will appear on the screen. Select Russian language and click “Next”.

In the new window, click the “Install” button.

If there are several versions of Windows 7 recorded on a disk or flash drive, you need to choose the appropriate one. We have already figured out the x86 and x64 bit depth, so decide for yourself here. As for the version, it is better to choose “Maximum”. Although there is almost no difference between it, “Home”, “Beginner” and “Professional”, so this is not so important. Select the desired item and click “Next”.

Agree to the license terms (check the box) and proceed further.

Choose the full installation.

A window will open asking you to select a partition for installing Windows 7. But here it’s worth going into more detail.
How to partition a disk during first installation?
If the installation is performed on a new computer or laptop (i.e. for the first time), then you will see only one line - “Unallocated disk space”.

And in this case, you need to split the hard drive into 2 partitions - local drive C and D (more is possible, but this is not necessary). To do this, select this line, click the “Create” button, indicate the disk size (in megabytes) and click the “Apply” button.

Don't know how much 50 GB is in megabytes? Write a number at random - for example, 50000. And then see what volume the system will show for the created partition. If it turns out too little, select it, click the “Delete” button, and try again, specifying a larger number.

For Windows 7 to work properly, you need to create a special partition with a capacity of 100 MB where boot files will be stored. So when the next window pops up, just click OK.

When you specify the required volume for local drive C and create it, “Partition 2” will appear. This is him.

After that, select the “Unallocated space” line again, click “Create”, and then the “Apply” button. After this, local disk D (“Partition 3”) will appear.

If you forget to do this, then after installing Windows 7 there will be only one local drive C. And partition D will “evaporate” into thin air. You'll have to reinstall Windows again. Therefore, before moving on, make sure that the “Unallocated Space” option is no longer there.
To install Windows on local drive C, select “Partition 2” and click “Next”.

If you reinstall Windows 7, then the following window will appear on the screen:

In this case, you need to select “Section 2” and click the “Format” button. This will delete all data on it. When the formatting process is complete, select this section again and click “Next”.
By the way, if you want to distribute the space between local drive C and D differently, you can delete them and create them again, specifying a different size. How to do this is written in the previous paragraph. But remember: in this case, the information will be deleted on the local drive D too! As a result, your PC or laptop will be clean, as if you had just bought it. Therefore, perform this procedure only if you have saved all the necessary files.
Continue installing Windows 7
So, you were able to partition your hard drive or format it before installing Windows 7 and clicked the “Next” button. After this, the operating system will begin to install. Wait until the files are copied.

After this, the computer/laptop will reboot and you will again see the familiar black window with a single line.

Under no circumstances press anything on the keyboard, otherwise everything will start all over again.


After this, the computer or laptop will reboot a second time.
Well, the main thing is already behind us, all that remains is to fill in some fields:
- Indicate the username and computer name (if you plan to play games, it is better to write in Latin).

- You don’t have to set a password - in that case, just move on.

- If you have a digital copy, you also don’t have to specify the activation key (usually Windows 7 is activated automatically when you connect to the Internet). To skip this step, click Next. And if you bought a disc, then enter here the code that is written on the sticker.

- Here it is recommended to select the “Delay decision” option (you can change these settings later).

- Select your time zone, specify the time and click “Next”.

- If Windows automatically finds drivers for the Internet, then in the new window select “Home Network”.
- Wait while the desktop setup is completed.

- Congratulations – you have just been able to install Windows 7 on your laptop or computer yourself.

What to do after installing Windows 7?
First of all, reboot your laptop or computer, go into the BIOS and change the device boot priority back. That is, put the hard drive (Hard Disk or HDD) in first place, and lower the CD-ROM or USB-HDD to second or lower.
Also, after installing Windows 7, the Internet and USB connectors may not work. This is because there are no drivers. Therefore, at the next stage you install them.
This is precisely why you need to prepare all the necessary drivers in advance before installing Windows 7. Especially for the Internet. After all, how will you download them if you don’t have access to the network?
And one more nuance - when you turn on your computer or laptop, you may see two Windows 7 (during boot).

The first one was installed by you, and the second one was saved in a hidden section (“reserved by the system”). However, the extra line can be deleted. To do this, do the following:

Ready. After the reboot, the second Windows 7 will no longer exist, and you will not see the operating system selection menu.
If you have any questions, ask them in the comments.
Today I will tell you how to enable booting from a flash drive in the BIOS of various manufacturers. No matter what version you have, the order of body movements will be as follows:
1. We insert our bootable USB flash drive into the USB connector of your computer. I recommend inserting it into a port located directly on the motherboard, i.e. from the back of the system unit.
2. Turn on the computer and press the key Delete(or F2) to get into the BIOS. Depending on the manufacturer and BIOS version, other keys (Esc, F1, Tab) may be used, so you need to carefully read the prompts on the screen.
In Bios, we can only navigate between tabs using the keyboard.
Below I will describe this process in detail using the most commonly used BIOS versions as an example.
Attention! Keep in mind that if you are installing the operating system from a flash drive or CD and have selected the boot device in the BIOS rather than in the boot menu, then after the first automatic reboot of Windows you will need to enter the BIOS again and return booting from the hard drive. If this is not done, autoboot from a flash drive or CD will work again, and Windows will begin the first stage of the procedure again installations.
Setting up Award Bios to boot from a flash drive
Award Bios:
First, let's check if the USB controller is enabled. Let's go to “Integrated Peripherals”. Use the arrow on the keyboard to move down to the “USB Controller” item. Press the “Enter” key and select “Enable” in the window that appears (also using “Enter”). Opposite “USB Controller 2.0” there should also be “Enable”.
 Exit this tab by pressing “Esc”.
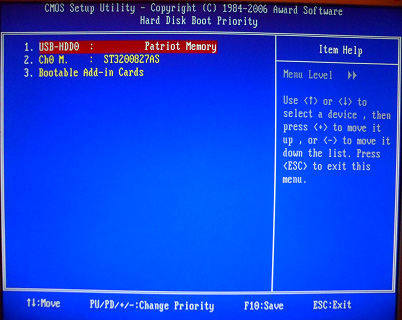
Then we go to “Advanced BIOS Features” – “Hard Disk Boot Priority”.Now in my example the hard drive comes first, but the flash drive should be there.
 We stand on the line with the name of our flash drive (Patriot Memory) and raise it to the very top using the “+” key on the keyboard.
 We exit here by pressing “Esc”.
Setting up AMI Bios to boot from a flash drive
If, after entering Bios, you see such a screen, it means you have AMI Bios:
 First, let's check if the USB controller is enabled. Go to the “Advanced” – “USB Configuration” tab.
 Opposite the items “USB Function” and “USB 2.0 Controller” should be “Enabled”.
 If this is not the case, go to this line and press the “Enter” key. From the list that appears, select “Enabled” (also using “Enter”).
Then exit this tab by pressing “Esc”.
Let's go to the tab “Boot” – “Hard Disk Drives”.
 Now my hard drive is in first place, but I need to put a flash drive here. We go to the first line, press “Enter” and in the window that appears, select our Patriot Memory flash drive.
 It should be like this:
 We leave here via “Esc”.
Select “Boot Device Priority”. Here, the first boot device must be a flash drive.
 Press Esc.
Then we exit the Bios, saving all the settings made. To do this, go to “Exit” – “Exit & Save Changes” – “OK”.

Setting up Phoenix-Award Bios to boot from a flash drive
If, after entering Bios, you see such a screen, it means you have Phoenix-Award BIOS :
 First, let's check if the USB controller is enabled. Go to the “Peripherals” tab – opposite the “USB Controller” and “USB 2.0 Controller” items there should be “Enabled”.
 Then go to the “Advanced” tab and opposite “First Boot Device” set “USB-HDD”.
 After that, exit the Bios, saving the changes. To do this, go to “Exit” – “Save & Exit Setup” – press the “Y” – “Enter” key
 That's practically everything you need to know in order to boot from a flash drive. In my article, I described the process of setting up the BIOS of the most popular versions: Award And AMI. The third example presents Phoenix-Award Bios, which is much less common.
The described procedure may differ slightly in different BIOS versions. But the main thing is that you understand the principle of setting itself.
By the way, I would also like to add: in order to choose which device to boot your computer from, it is not necessary to change the settings in the BIOS. You can immediately call up a special menu after turning on the computer to select boot devices (this can be done by pressing the F8, F10, F11, F12 or Esc key). In order not to guess with the keys, look carefully at the monitor immediately after turning it on. We need to have time to see an inscription like this: “Press Esc to selest boot device.” In my case, it was necessary to press “Esc”.
You can install and reinstall, download, restore Windows using a flash drive, CD or DVD, and the correct actions during installation will lead to high-quality and fast results.
The BIOS is the foundation that is the input/output (I/O) base on the motherboard. Using it, you can configure certain parameters and adjust them on the computer. The I/O system may vary depending on the motherboard.
Step by step instructions
You can understand exactly what settings are in the BIOS by looking at the motherboard's passport. Incorrect BIOS parameters can reduce the power of a PC or completely destroy it.
Installing Windows from a flash drive or disk using BIOS depends on certain values set in the Boot Menu.
Installation steps

So, all BIOS settings for installing Windows are ready. As soon as you restart your computer, the system itself will direct you to install Windows from the device you selected. In order for the installation to begin, you must restart your PC.
Possible problems
- There is a black screen on the monitor, nothing happens and the process of loading Windows via a USB flash drive does not work.
- UEFI mode is working.
- The flash card was formatted using the NTFS system.
- BIOSE only supports UEFI and NTFS partitions.
 In the updated version of the BIOS for installation from a flash drive, permission is requested to enable automatic mode. It would be best to refuse this system offer, otherwise the software may load into the wrong partition that you need or may lead to partial deletion of your personal files.
Before you start setting certain parameters In the BIOS settings, you need to use the + and - keys to select the tab called Boot.
After the necessary parameters have been set, you need to save them by pressing the F10 key, which allows you to save and exit the system. You can also use a system parameter called Exit Saving Changes instead of F10 (that is, save the changes made and exit the system).
Once the boot priority has been set and all necessary parameter changes have been made and saved, you must reboot for the changes to take effect.
For inexperienced and novice users who need to install Windows using the BIOS, experts in this field have developed certain recommendations to ensure that the process goes as smoothly as possible. In order to correctly configure the BIOS for installing software, it will be useful to carefully study these recommendations.
Requirements for your computer to successfully install Windows 7:
- Driver for video card DirectX 9 minimum
- Processor power 1 Hz minimum
- 1 gigabyte of memory minimum
The process of installing and configuring a new Windows will depend on the following parameters of your computer:
- Cores, that is, the number of cores in your PC's processor.
- Clock Speed, that is, the speed of your PC.
- Main frequency of your PC. You can have 1600, 1333, 1066 or 800 MHz.
The average installation time for Windows 7 or Windows 8 on most modern PCs is an hour of your time.
Types of installations
 There is a “Clean Installation”, which involves starting the device with the Windows system manually when starting the PC. Next, start and press any key as soon as an inscription appears on the monitor called Press any key. After this, the process of specifying the location of the new software in the BIOS system occurs. For example, on a CD or DVD, so that the version that was installed before was no longer used or was deleted from the system. This “Clean Installation” option can be used with absolutely any operating system, for example: Windows 8, 7, XP, Linux, Unix or even DOS.
The “Easy installation” option is used quite rarely and it is not recommended for use, because the new OS is launched from media on an already installed “old” OS. Thus, the simple installation method involves superimposing a new version of the OS on the old one. During a “Clean Installation”, all partitions are formatted, as well as old files and OS versions are deleted.
If it is important for you to reinstall the system, while dividing several disks with important files, it is possible to leave these files unchanged. It is not necessary to format the D drive; however, the C drive with the old version of the operating system will be formatted.
In cases of a faulty operating system, before starting the Windows boot process, you should try to take the last chance to restore the system and clean it of various viruses and malicious software. If glitches and failures in the operating system are obvious, you must first check the hard drive itself , look at how its segments work. If you do not take this factor into account, the formatting process may freeze during the installation of a new OS or simply not work stable.
Saving personal data
 Saving personal information and data is a rather important point when reinstalling the OS, since it is not always possible to restore data that has been formatted. For this reason, you should take care of the safety of your personal data in advance, even before the process of reinstalling Windows. In order to do this, you can copy all important programs, folders, documents and files on any portable storage device, for example, to a flash drive, disk, portable hard drive, etc. It will also be important to save passwords. To do this, you can use a program called Backup, or you can do it with a pen or pencil and a piece of paper.
Thus, following the instructions, recommendations and tips given here for installing new software through BIOS, it is quite possible, without any experience or special skills, to carry out all the installation processes yourself, without resorting to the help of familiar specialists or paid computer help. To install Windows correctly through the BIOS, it is important to accurately follow the steps in the step-by-step guide provided here. It would obviously not be amiss to also find some video courses that would more clearly demonstrate all these processes.
When purchasing a new computer or laptop, as a rule, in specialized stores, the buyer can immediately take advantage of the paid service of installing an operating system on the purchased PC, as well as some programs, including anti-virus programs.
Working according to the standard scheme, the specialist in this case will install the default OS, without dividing the hard drive into partitions. As a result, the system local disk will contain the OS, a software package, and all kinds of multimedia files that are completely unrelated to the system.
And when the time comes for the next OS reinstallation, the user may forever lose all data on this computer. Of course, before this you can copy the contents of the disk to another medium, but you need to take into account that the decision to reinstall the OS is not always made in advance, as in the case of a sudden failure, the so-called ““ (complete system failure without the possibility of its recovery).
Therefore, you should learn how to install Windows yourself. In fact, this is not as difficult as it might seem to a beginner, and even more so it will save money, gain the necessary knowledge in working with a computer and protect yourself from troubles with the loss of valuable information on your hard drive.
How to remove windows 7 and install windows 7: necessary steps before installing the OS
So, it is important to emphasize that during the installation process, immediately before changing the OS, all information located on the system local drive C will be erased. Therefore, the necessary data will have to be transferred either to another local drive or to an external storage device (CD, flash drive, removable drive or backup hard drive).
Accordingly, all files displayed on the desktop will also disappear, and the work of previously installed programs will be impossible in the future, since before installing a new OS, drive C must be completely formatted, thereby eliminating not only old data and system errors, but even unwanted, virus software, if any (and often it is viruses that cause system failure; in fact, they are developed for these purposes).
The next step is to have a Windows OS (in this example, Windows 7) recorded as an image on the media. On the question of where to purchase this software:
- buy a licensed version at a computer store;
- download the OS distribution from the Internet;
- rewrite the OS image from another external media or borrow it for a while from friends.
You should immediately determine the bit depth of the operating system: 32 or 64 bit.

To find out which of them is currently installed, go to the Start menu - Computer - right-click on the general background - Properties.


Also, you need to write down or remember the total size of the local drive C and the amount of free space on it. This is done so as not to confuse the partitions with each other when reinstalling the OS.

Then, it is advisable to make sure that disks with drivers for the equipment are available (or driver versions may be stored on the PC, on another local drive).
A driver is the necessary software for launching and further stable operation of special PC equipment: input-output system (monitor; manipulators - keyboard, mouse, gamepad, etc.; sound and video card), external equipment (printer; scanner; uninterruptible power supply unit, etc. .)
If there are no drivers, you can successfully download them from the network even after installing the OS.
In case of reinstalling the OS, the user should know that Windows, recorded as an image on the media, gives the latter the name “bootable” (boot disk or bootable USB flash drive). And, since the operating system image is recorded in a special mode, the entire memory capacity of the bootable media is intended exclusively for Windows, and installation of the system is possible only through displaying and changing the settings of the “heart of the computer” - the BIOS.
The initial stage of installing Windows 7: BIOS settings
If the OS image on the bootable media has already been purchased and the system bit depth is known, then you can begin the installation process.
When working with a boot disk, we use the disk drive; if the OS is on a bootable USB flash drive, plug it into the appropriate USB connector and reboot the system.
As soon as the familiar title image of the motherboard logo appears on the monitor, we begin to repeatedly press a certain key to display the BIOS, most often it is the “Delete” or “F8” key. However, there are other options: “F1”; "F2"; "F3"; "F10"; "F12". In any case, in order not to waste time guessing the right button, just look carefully at the commands indicated at the bottom of the screen when the computer boots, where the “hot keys” for calling not only the BIOS, but also the general system management menu are located.

If the user did not manage to press the BIOS key at the right time, you should wait until the system boots and reboot it again, trying again. A successful press is accompanied by a special sound signal and displays the general BIOS menu on the monitor screen.
So, the BIOS menu has opened, now you need to select the “Advanced BIOS” item.

In the next window we find a list of priorities when loading the PC system, as well as connection statuses of individual equipment. In this list, it is important to select the primary priority column “First Boot Device”, opposite which is written “Hard Disk” (hard drive), that is, the settings determine that when the system boots, priority reading of information occurs through the hard drive data, in particular the registry and local drive WITH.
But in order for the PC system, bypassing loading the old copy of Windows, to start scanning and processing information from the boot disk, for this you will have to change the primary priority of reading data. We replace the “Hard Disk” request with “CDROM” if the image of the new copy of the OS is written to a CD and to “USB-HDD” if we are installing the operating system from a flash drive.


As for the older version of the BIOS, the changes in the settings are almost the same, although the overall appearance of the interface is different.

There is also an “Advanced” menu here, and switching the priorities for the primary reading of information is in the “Boot” menu.

Selecting a volume to install Windows 7
Now you should wait for the Windows 7 installation menu to appear while the system copies data from the boot disk.

As soon as it appears, select “Install Windows 7”;

architecture (bit size) - in accordance with the currently available one (or based on the performance of the processor and video card during initial installation);

installation type - complete;

We accept the terms of the license agreement.

In the menu that appears with partitions for installing Windows, by volume type and size, we find the one that is currently the local system drive C (just for this purpose it was necessary to record the volume of this disk before installation).

Let's start formatting it: select the required volume and click on the "Disk Setup" - "Format" button - in the warning message, click "Ok" and "Next".

Provided that the OS is being installed for the first time, in the menu with partitions, only one of the main volumes will be indicated with a size equal to the volume of the entire hard drive. In this case, using the “Disk Settings” button, you will need to delete this partition and in its place create a new one with a size of 100 GB, which will later become a system local disk. You should install a copy of Windows on it. The remaining large part of the hard disk capacity will fill the niche of another volume, which we will also create next to the first. Thus, we were able to divide the hard drive into partitions.
When you click on the “Next” button, the automatic process of unpacking OS files and installing components and updates will begin, which will take approximately 30 minutes until completion. Each further stage of installation will be accompanied by a reboot of the PC to save and accept the data.
Completing the installation of OS Windows 7
At the final stage, before the new copy of Windows 7 is displayed on the desktop screen for the first time, in the system settings windows that appear, you will need to enter: user name; OC product key; your account password, optional; interface language and keyboard layout. Next, the system will reboot again and then the desktop will open in a low resolution of 800*600 pixels. After this, you can remove the boot disk (or bootable USB flash drive).
Then, in order for all components and system updates to take effect, we find a shortcut with the Windows activator on the desktop and open it.

After activating the OS, we reboot the system manually and call the BIOS again, where we return the priority to the “Hard Disk” in the reverse order; save the changes using the “F10” key and confirm the actions with the “Y” and “Enter” buttons.
So, the new operating system is installed on the PC, all that remains is to connect the necessary drivers and update them to more recent versions via the Internet.
There will inevitably come a time when the operating system will need to be reinstalled. For most users, this situation is not a very favorable moment. Some take the problem calmly, while others, on the contrary, are horrified because they do not know how to reinstall Windows via BIOS. As a rule, the unlucky person settles on the option that saves the situation: “Hello, is this a computer help service?” As a result, he loses time, patience and money. From now on everything will be different. Right now you will learn the “great secret” that Windows OS installs itself. The user only needs attention and a few confident presses on the appropriate buttons. Are you interested? Then go ahead!
Meet the chief PC manager - Mr. Bios!
Incredibly, the Bios firmware, the abbreviation of which stands for “basic input/output system,” is primarily responsible for the functionality of the computer. If any of you, dear reader, thought that Windows was responsible for the “omnipotence” of the PC, then you were mistaken. Accept the paragraph title as an important fact of reality. You will soon understand that resolving the question of how to install Windows will first of all require turning to a certain Bios program preinstalled by the motherboard manufacturer. Moreover, you should know that the basic system may have different versions, since competing companies in the IT industry each have their own idea of the beauty, convenience and efficiency of the ROM (read only read only memory) chip, the “micro-monster” Bios. Yet, despite the individuality of the graphical shell of each separately existing program for controlling the hardware of a computer, the functioning of embedded “hardware” systems becomes intuitive when directly entering their environment, since they all use the same notation in the form of standard terminology.
How to reinstall Windows via BIOS: thumbs up!
We won’t rush, because you know that “rush is only needed when fishing...”. Before you get into the PC, that is, when the Bios interface opens in front of you, know: carelessness in actions, which is expressed in mindlessly pressing keys and changing “incomprehensible” parameters, is critical, and in poetic language it’s even like death!

However, you still have to do some “editing” yourself.
The only correct choice: one among many
You can activate the BIOS firmware when you turn on or restart your computer. In order to do this, you need to press the corresponding button on the keyboard several times at short intervals. As a rule, this is the “Delete” or “F2” key. If it doesn’t work, the user will always be able to see the name of the “responsible” button on the initial loading screen (lower part of the display or upper left corner).
Why “boot”?

The most common method of installing an OS is a practical solution to the question: “How to install Windows from disk?” However, the method of implementing the system via a flash drive is becoming increasingly popular, but more on that later.
- Depending on the Bios version, the tab responsible for boot priority may have different names. However, the English word "Boot" will mean that you are on the right track.
- Having opened the above menu or activated the “Advanced BIOS Features” item, pay attention to the “Boot Device Priority” item. Or lines that indicate the order in which devices are loaded. Typically these are Floppy, HDD and CDROM (DVD R/RW).
- Set the boot priority to your disk drive (drive).
- You can save the changes by pressing the F10 hotkey or simply agree: “Yes” (if you used the “Esc” button).
We reboot and proceed to the next stage of the project “How to reinstall Windows via BIOS.”
Where does Windows come from?
Perhaps some of you will feel that this point should have been placed at the beginning of the process being described. Meanwhile, this “discrepancy” in the presentation of the material does not in any way disrupt the sequence of actions; moreover, it is the most acceptable option to learn how to do everything according to the rules. Now insert the Windows distribution disk. If you are using licensed software, and the disk with the system image you purchased is original, then you have nothing to worry about. When you have free Windows, downloaded from a dubious Internet resource, the chances of long-term and fruitful “cooperation” with the OS are negligible.

However, there are exceptions. Perhaps you will be one of the lucky ones, and the “cracked” system will turn out to be quite suitable for work. But do not forget that the final result—the success of the OS installation—depends on the correctness of the changes made to the BIOS settings. It is the microprogram that monitors the “fairness of the game” of the user. Therefore, installation of a system distribution from a Windows environment is often fraught with software failures and, as a rule, does not proceed correctly. As a result of using a “treacherous” method when solving the question: “How to reinstall Windows XP?” the efforts of an uninitiated user simply become wasted time. Moral: install Windows from DOS, that is, through BIOS!
When the disc “whispers” - the user is drinking coffee
Once you've designated the drive as boot device #1, then inserted the Windows disc and restarted the computer using the Alt+Ctrl+Delete key combination, it's time to observe. As promised, the system will “become” automatically.
- When the message “Press any key...” appears, press any button.
- After the initialization process, a window will open in which you need to assign the OS installation directory.
Attention: do not mindlessly press “Enter” on a non-functional Windows OS, which usually takes up space in the system partition of the HDD and is designated by the letter “C”. “How to reinstall Windows XP?”, you ask, if the required disk area is occupied by an old copy? Easily! To do this, simply format the partition, first erasing the old data.

- On the highlighted OS, press “D”, which means delete.
- Then use the "L" button to confirm your intentions.
- After the unallocated area appears, press “Enter” and format the created partition to the NTFS file system.
You don’t have to do anything else, except at the end of the installation to make some adjustments regarding the system language for using the operating system, as well as user data. As you have probably already seen, everything is quite simple and transparent, and the solution to the question “How to install Windows through BIOS?” - not a labor-intensive process at all.
Spectacular Windows 7 and royal flush download
Now the time has come to enlighten the attentive reader about the method of installing the operating system using a flash drive. The promised installation method is something more practical, since it does not require participation. However, the feasibility of this method greatly prevails over the traditionally used boot from a CD or DVD. Especially today, in our age of compactness, when modern electronics take on ultra-thin features, and technology gets rid of devices that unnecessarily “devour” time and energy.
Modern solution to the problem: via BIOS?

First of all, it is necessary. This is not difficult to do; it is worth considering that the capacity of the compact storage medium must be at least 4 GB. "Why?" - you ask. The thing is that the standard distribution kit of the seventh OS “weighs” almost 3 GB, so the minimum size of the flash drive must correspond to the above value.
From words to deeds
- Format the Flash media using standard Windows tools. The file system should be NTFS.
- Then you need to prepare the system distribution for recording. That is, if the installation files are on an optical disk, insert it into the drive; when the data is in the form of an image, download it to a virtual device.
- The next step is to use the “WinSetupFromUSB” program. This software is freely distributed on the Internet, you should not have any difficulties downloading it. After installing and launching the specified program, you will be literally two steps away from the moment when you can consider yourself a professional in solving the question: “How to install Windows?”
- In the top checkbox, select the flash drive installed on your PC.
- Check the corresponding box (Windows 7) and, by clicking the button, specify the path to the OS distribution next to it.
- After activating the “GO” toolbox, all you have to do is wait a few minutes. Upon completion of the process, the program will display a corresponding message.
It's time to start a practical solution to how to install Windows through BIOS!
Flash start!

Setting up boot parameters is done in almost the same way as in the case described at the beginning of the article. The only difference is the choice of media. With this installation method, your choice is a USB Drive, that is, a flash drive. There is another way to boot from the desired data source, bypassing the main thing. This scenario of action is possible when the user presses “F8” to call up the Boot menu, so to speak, a hot version of the base system. Of course, on different PCs this option can be activated using a different key.
After reboot, follow the instructions:

You must now understand that the previously described method of installing Windows from a disk is somewhat outdated. Flash drives are an incredibly convenient invention of mankind!
In conclusion
The article described the two main methods of the Windows family. It's up to you to decide which one is optimal. However, there are a lot of programs that allow you to make backup copies of working systems, that is, if the operating system crashes, the user has the opportunity to restore a clean copy (duplicate) of the OS with working programs and previously made settings in a matter of minutes. Incredible convenience, since the user does not need to install the software again and remember forgotten passwords. However, a new question will appear: “How can I launch Windows through BIOS?”, which, in principle, can be solved just as easily as in the case when reinstallation is necessary. But this is a topic for another article. Don't learn from your own mistakes...