What is needed to receive digital terrestrial television? How to receive a signal and watch T2? How to set up channels on a digital television set-top box. How to connect digital television
Instructions
Transfer speed – 6900 sim/sec.
If you want to search for HD quality channels, change the frequency value to 338 MHz.
After installing and launching any of the above programs, you will see a menu for accessing hundreds of channels, to view which you do not need to make any additional settings - just select any of the channels and start watching. The interface of all programs is intuitive and it will not be difficult for even novice users to get used to it.
Video on the topic
Sources:
- how to set up internet tv
Those who use the Internet can perform network scanning. This will make the job safer and more reliable. carried out using special programs. For example, The Network Mapper, or Nmap for short, is an excellent utility for scanning networks. It has several scanning methods.

You will need
- Personal computer, The Network Mapper program
Instructions
To specify the hosting to be scanned, specify its name or address on the command line after specifying the options. To scan IP subnets, enter the parameter "/" after the name or IP address of the host that will be scanned.
You can search manually: select the “Manual channel search” subsection in the “Menu”. The “Reset Channels” function will delete all previous channel settings. You can also sort channels, group lists, or move a channel to . This is done through the “Sort Channels” option. Confirm each innovation with the “OK” button.
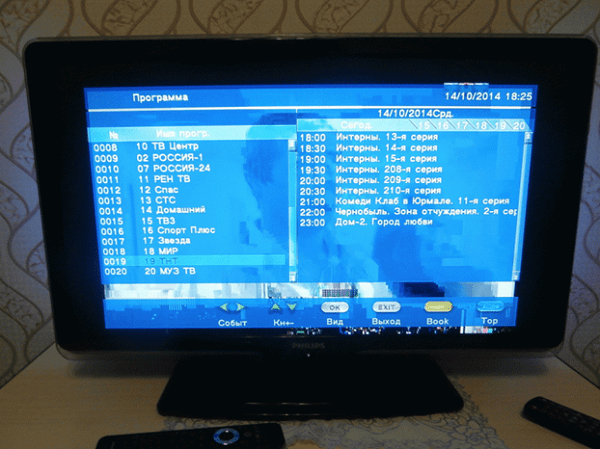
If you want to watch Electronic Program Guides (EPG), press the "EPG" button on the remote control. The screen will show 2 lists: at the top - a list of channels, at the bottom - a list of programs for the channel. To move through the list, use the control buttons on the remote control “up” and “down”. To exit the “EPG” menu, press “Exit” on the remote control.
Please note
Some TVs do not have an RCA connector, then select the SCART/SCART connector.
Sources:
- set up digital channels on your TV
TV- tuners are special devices that allow you to view cable or broadcast television on a personal computer. Currently, you can see many types of TV tuners on sale, but the setup for all of them is almost the same.

You will need
- - TV tuner;
- - driver;
- - a program for viewing a TV signal.
Instructions
Select TV tuner. This stage is perhaps the most important in setting up the device. The fact is that not all TV tuners may be suitable for your computer, especially if they do not have their own video viewing program. There is a device with an internal board, connected through a free Ethernet port on the router, and connected to a USB or IEEE 1394 port on the computer. Determine which type is suitable for your PC or laptop. If necessary, purchase a special adapter.
Connect the TV tuner to your computer or laptop. This step depends on what type of device you purchased. If you doubt your actions, read the operating instructions that should come with the TV tuner. Check that the connectors are connected correctly.
Turn on your computer or laptop and insert the driver disk that came with the TV tuner into the drive. If there is no such disk, then you can download the necessary files on the Internet on the device manufacturer’s website. If you have the Windows 7 operating system installed, then in some cases it will prompt you to download the required updates.
Install software to watch TV channels. It is on the disc sold with the TV tuner. If you don't have one, you can configure your device for Windows Media Center or download a suitable viewer on the Internet. In the first case, you need to check the compatibility of the TV signal transmitted by the TV tuner and received by Windows Media Center. You can find similar information on the website http://windows.microsoft.com/.
Connect the TV tuner to your cable TV or antenna. Launch the program to receive a TV signal and press the channel scan button. If you completed all the previous steps correctly, a list of television channels will appear. Otherwise, check that the TV tuner is connected correctly.
Video on the topic
Sources:
- setting up a TV tuner
On computer can be viewed TV any type - cable, satellite, Internet TV. Each of these types of TV has its own advantages and disadvantages, but if we talk only about the quality and stability of the video image, then we can arrange them in this order in descending order of characteristics - cable TV, satellite, Internet TV.

You will need
- - computer;
- – TV tuner;
- – DVB card;
- – satellite equipment;
- – unlimited high-speed Internet connection.
In most apartments and even private houses within any even small city, there are now almost no problems with the quality of television signal reception, since cable television is installed almost everywhere. Most apartment buildings in cities with a population of over a million may have several cable TV operators, which gives residents a pretty good choice.
But as you move away from the city center, the availability of high-quality cable TV gradually disappears. And outside the city, as a rule, cable television completely absent.
Therefore, most summer residents are content to watch at most a few channels of terrestrial television, which they can catch on. Moreover image quality often leaves much to be desired. Especially if the summer cottage is located far from the emitting terrestrial television station, then on the TV screen you can see a lot of interference from “snow” to “stripes” and black and white instead of color.
In most of Russia, terrestrial television is still transmitted to analog format. This method of signal transmission has one significant drawback: the signal-to-noise ratio drops significantly with distance from the emitter.
With distance from the television center, noise (interference) begins to dominate more and more over the main signal. This is precisely what manifests itself in the appearance of “snow” on the screen. If the cottage or village is very far from the transmitting station, then the noise will eventually interrupt the signal completely, and It becomes impossible to watch a TV channel at all.
Now the country is introducing the transmission of TV signals in digital format, and over time it is planned to completely abandon the transmission of television programs in analogue format.
What is the advantage of digital TV over analogue?
Transmission of a signal “digitally encoded” compared to direct transmission in analog format gives a number of advantages:
- Increasing the noise immunity of transmission and recording paths of television signals.
- Reducing transmitter power.
- Significant increase in the number of TV programs transmitted in the same frequency range.
- Improving image and sound quality in TV receivers.
- Creation of TV systems with new standards of image decomposition (high-definition television).
- Creation of interactive TV systems, when using which the viewer has the opportunity to influence the transmitted program (for example, video on demand).
- Function "To the beginning of transmission".
- Archive of TV programs and recording of TV programs.
- Transmission of various additional information in a TV signal.
- Select a language (more than the usual two) and subtitles.
- Expanding the functionality of studio equipment.
- Possibility of adding radio to multiplexes
But there are also some flaws:
- Fading and scattering of the picture into “squares” when the level of the received signal is insufficient, the data is either received with 100% quality or restored, or is received poorly with the impossibility of restoration.
- Almost complete signal fading during thunderstorms.
- Even a transmitter with a power of 10 kW and a transmitting antenna height of 350 m provides reliable reception at a distance of 50 km, and as a result, the need for a larger number of transmitting centers than with analog TV (more frequent placement of transmitting antennas).
Since we are discussing from the point of view of an ordinary user mainly only image quality, then we can highlight only one main feature of digital terrestrial TV over outdated analogue:
Digital TV is very resistant to interference. To do this, the signal is encoded with some redundancy. A digital tuner will produce an ideal picture even in the presence of a lot of noise. And it will do this until the signal-to-noise ratio drops to a minimum, when the signal arrives at the very edge of the equipment’s capabilities.
That is, in analog broadcasting, as the signal level drops, you will see the picture worse and worse. In digital broadcasting, you won't notice the signal drop until the tuner is no longer able to restore the lost pieces of the image, and it "disintegrates into squares" and then disappears completely.
Types of digital television
Based on the transmission channel, digital TV can be divided into four types:
- Cable (DVB-C)
- Terrestrial (DVB-T2)
- Satellite (DVB-S)
- Internet TV (IP TV)
We will not consider cable TV and IP television in the country due to their great rarity. But satellite and terrestrial digital television broadcasting in the countryside is relevant.
Moreover, satellite DTV has been used by consumers for quite some time, and in particularly remote areas there are no alternatives to it at all. We will look at it in our separate article.
But on-air DTV began to enter the lives of gardeners and summer residents relatively recently. Let's talk about him in more detail today.
Terrestrial digital television in the country
The terrestrial digital television network in the Russian Federation is still in the process of construction and currently available mainly near large cities. But it already covers a significant part of the dacha areas. Therefore, the issue of connection has become very relevant lately.
How to connect to terrestrial DTV?
If you want to try connecting digital television to your dacha, first you need to determine does your site fall within the coverage area of one of the DTV transmitting antennas?. The location of the site will determine how your TV receiver will pick up the digital signal.The most reliable way to find out is to interview your neighbors in your summer cottage; perhaps some of them are already watching TV channels in digital form. Then you can be completely sure that “the signal is reaching you.”
If no one in the area has ever heard of digital TV, then you need to try to find out whether your site falls within the boundaries broadcast radius of a local emitting DTV station.
Coverage area
The broadcast radius of a DTV station usually lies within 20-50 km, depending on the terrain and building density. On average about 30 km is reliable reception zone.
Each region has its own local organization - DTV operator, which is responsible for building and maintaining the network. On their website you can usually see the locations of broadcast stations and even coverage maps. Or you can get information from them by phone or written request.
The DTV network in the Russian Federation is being built by the Federal State Unitary Enterprise Russian Television and Radio Broadcasting Network.
Each region has a division of this organization.
You can call and find out everything by phone numbers in your region from the page.
If you are lucky and you find out that your dacha is located in the digital broadcast zone, then it’s time to decide necessary equipment for DTV reception.
Equipment
So, you already have a TV in your dacha, a plot in the DTV broadcast zone. Let's start installing digital television at the dacha. What else is needed to receive a signal? At a minimum you need an antenna.
Antenna for digital television reception

Universal HF/UHF antenna for digital TV reception
If a digital TV tower is nearby, then it is enough indoor antenna. I will say even more, I personally confidently caught a DTV signal in the city of Ufa on a meter-long piece of wire.
If the signal level is not so ideal, then you will need to install an antenna at your dacha to receive digital channels. Nowadays, most antennas on sale are well suited for this, since they support reception of signals in the decimeter range (UHF/UHF).
For example, you can install the antenna “GAL”, “Locus”, “Zenith”, “Meridian”, “Ether”, etc. I bought my antenna in Auchan for 1000 rubles.
If you know the exact location of the DTV tower, then everything is simple: point the antenna on her and that's it. Usually this is enough to catch a signal and watch digital TV without problems.
If the exact direction is not known, then you need to gradually rotate the antenna until you find the best position. Most digital set-top boxes have signal level and quality indicator, which is displayed on the TV screen and from which you can find the best antenna position. This is usually done by two people: one person rotates the antenna, the second monitors the signal level.

When you have found the maximum possible signal level and the antenna is installed in the desired direction, you need to search for channels on the set-top box.

Setting up digital television at the dacha
The easiest way is to find the “Auto search for channels” item in the set-top box menu, and then the set-top box will do everything itself: it will find all available digital channels and number them in order.
List of digital terrestrial television channels
Now the interesting part: what channels does digital television show for free??
Since my dacha is in the suburbs of Ufa, and I am writing from my own experience, it means that I am considering digital terrestrial television in Ufa. But as far as I understand, list of channels throughout Russia will be the same with rare exceptions, so the information will be useful to everyone, not just residents of Bashkortostan.
At our dacha the DTV shows 20 channels: 10 at each multiplex.

List of digital television channels
Here full list of channels in Ufa:
| 1 | "Channel One" |
| 2 | "Russia 1" |
| 3 | "Match TV" |
| 4 | "NTV" |
| 5 | "Petersburg-5 channel" |
| 6 | "Russia K" |
| 7 | "Russia 24" |
| 8 | "Carousel" |
| 9 | "Public Television of Russia" |
| 10 | "TV Center - Moscow" |
| 11 | "REN TV" |
| 12 | "SAVED" |
| 13 | "The first entertainment STS" |
| 14 | "Home" |
| 15 | "TV-3" |
| 16 | Friday |
| 17 | "STAR" |
| 18 | "WORLD" |
| 19 | "TNT" |
| 20 | "Muz TV" |
I hope I helped you understand all the nuances of digital TV. If you have any questions, write, I will definitely try to help you.
The rapid development of technical progress in the field of television broadcasting provides great opportunities for digital television for better reception of television programs in comparison with outdated analogue. But in order to be able to watch digital TV broadcasts, you need to connect a receiver (special set-top box) to the TV. Before connecting a digital set-top box to your TV, you will need to decide on the choice of receiving device - antenna. So, in order to watch digital terrestrial television (DTTV) without any problems, you will need:
- antenna;
- receiver (set-top box);
- setting up channels.
The type of antenna is selected depending on the distance to the transmitting TV tower. Therefore, you should install an indoor or outdoor antenna. But, regardless of the type of location, it must operate in the decimeter range, namely, receive frequencies from 470 to 860 MHz. will work well within the city where the transmission tower is located.
If the distance from the TV receiver to the TV tower is more than 15 km, you need to use outdoor antenna.

Antenna for dvb t2 set-top box can be purchased at the same retail outlets where the tuners themselves are sold. In this case, high-quality TV signal reception is guaranteed, since the receiving device is designed specifically for the digital tuner.
If you are going to install a TV and set up a digital television, then before connecting the set-top box, it is recommended that you first consult with your neighbors. They can tell you what type of antenna you should choose for the area.
Set-top box (receiver)
As already mentioned, in order to be able to view DTV, you will need to buy a TV set-top box, which is also called a tuner or dvb receiver. There are so many devices of this kind on the electronics market that it’s easy to get confused and overpay for functions you don’t need in the device. It is recommended to choose a tuner model based on your needs, since they all pick up a TV signal, in principle, the same way. The difference may be, perhaps, in the established additional options.
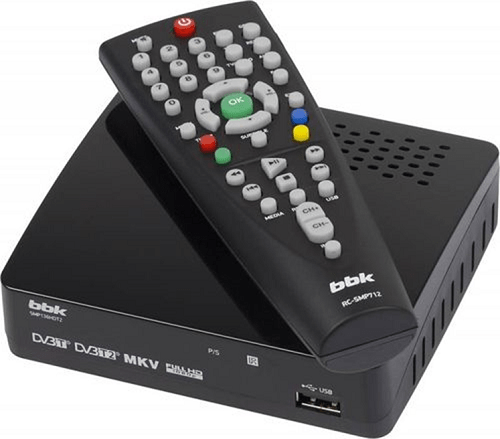
For example, if the set-top box will be used not only as a CETV receiver, but also to watch video from a flash drive, then this is the model that needs to be purchased. But if you don't need it, buy a simpler model. The figure, for example, shows a model of an inexpensive bbk receiver.
More expensive models of digital TV tuners have “Scheduler” and TimeShift options “on board”. These features allow you to record any broadcast at a given time, and your presence is not required. You only need to set the start time of recording the program on the desired channel, and the time when the recording should stop.
Currently gaining popularity set-top boxes from Rostelecom, which have modern filling: large RAM and a powerful processor. The Rostelecom tuner is connected to the TV in the same way as other similar devices. The kit includes one that can be configured to control both the set-top box and the TV itself.
If you are going to buy a TV, then look in the technical specifications to see if it supports DVB-T2. Most modern TV models already have a built-in tuner for watching DTV, and you don’t need to buy a set-top box.
Types of connections
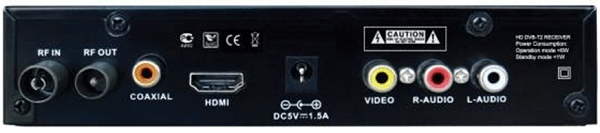
Connecting a dvb t2 set-top box to a television receiver is not much different from connecting a satellite receiver or AV receiver. There are several methods for connecting T2, and they depend on the types of connectors located on the two mating devices. The tuner can be connected via:
- RCA cable (popularly called “Tulip” interface);
- antenna cable.
The figure shows a general diagram of connecting the tuner to the television receiver.

RCA cable
This is the simplest and most standard way to connect a digital tuner to a TV. The picture quality, of course, will differ from the connection via HDMI, but the difference will be unnoticeable on television receivers with small diagonals.
So, before connecting the cable, you need to turn off the power to both devices. After turning off the power, insert the cable plugs into the sockets on the set-top box. Since each plug has its own color, they are inserted into the connectors of the corresponding color. The cable with the yellow plug carries a video signal, and the white and red plugs carry 2 audio channels. Next, connect an outdoor or indoor antenna to the tuner into the appropriate socket (on the set-top box it is designated “RF IN”).
There are times when the TV does not have a “Tulip” interface, but there is SCART connector, which is popularly called “Comb”. The figure below shows what it looks like (for example, a Samsung TV receiver is taken).

How to connect the receiver to the TV in this situation? In this case, you need to purchase a special adapter from RCA to SCART. In the same way, you can connect a satellite receiver.

The HDMI interface is capable of transmitting a high quality signal. For example, the quality of the transmitted video signal can be up to 1080p, and the audio signal – 192 kHz. These capabilities meet the highest standards in the field of multimedia content.

If you have a modern TV receiver and it has an HDMI connector, then it would be more correct to connect the receiver to the TV through this interface. The same recommendations apply to a satellite tuner to watch TV in high definition.
Antenna cable
This type of connection is used to connect a digital receiver if the TV receiver does not have any other connectors other than the antenna input. For example, you can connect a tuner to an old TV this way by plugging the cable into a socket called RF OUT.

Before you can connect the t2 digital tuner to your TV, you will need to purchase the cable shown in the picture below.

This method of connecting to the receiver cannot provide a good quality picture, and it is not worth comparing it with the image transmitted via the connected HDMI interface. But given that the TV is old, the image can be considered acceptable for this situation.
Setting up channels
After connecting the receiver to the TV, it's time to think about how to set up TV channels. Many users, when connecting a receiver to a TV, have a question: how many channels can they watch if they set up a digital tuner? In reality, it all depends on whether you will use a paid package of services from a certain provider, or whether it will be enough for you on-air television broadcasting. About 20 free TV channels are available for CETV. If these 20 TV programs are not enough for you, then to watch encoded broadcasts you will need to purchase one, which is inserted into the TV receiver.

And the card of the CETV provider you have chosen is inserted into the CAM module. In this situation, you get access to a huge number of television channels for a certain monthly fee.
So, in order to start configuring the DTTV, you should turn on the TV (the set-top box must be connected), switch it to AV mode and go to the tuner menu.

Since the default set-top box does not contain a list of TV channels in its memory, you will have to find them yourself. For this it is recommended use “Autosearch”.

After a while, you will see that the receiver has found from 10 to 20 TV channels.
When the search is completed, the tuner will offer to save the list of found broadcasts, after which you can start watching ETTV. The detailed configuration algorithm is similar for different manufacturers, however, there are certain nuances of settings and.
The most reliable TVs of 2018
TV LG 43UJ634V
TV Samsung UE50MU6100U
TV Hyundai H-LED24F402BS2
TV LG 22LH450V
TV Samsung UE22H5600
television: setting up_digital_channels
Setting up a TV receiver to receive digital channels
To be able to receive digital channels on a cable television network Infolink support for digital broadcasting standard is required DVB-C your TV receiver, as well as the compliance of the subscriber wiring with the requirements GOST R 52023-2003.
A list of broadcast digital channels, as well as their broadcast parameters for manual configuration, are posted on the website.
List of TV receivers that are guaranteed to support DVB-C, you can see. If your model is not listed, make sure the standard is supported DVB-C your TV receiver before tuning in to digital channels. If the TV does not support the standard DVB-C To receive digital channels, you can purchase a digital DVB-C receiver (set-top box). You can purchase from us a digital receiver with DVB-C support and a built-in conditional access system DRE-Crypt, which is necessary for viewing encrypted channels on the Infolink cable television network (you can see the description)
Our network has implemented the “Quick Search” function, which significantly reduces the time it takes to set up TV receivers. In order to use this function, you must select the “Network” search type, then use the following parameters:
Network ID (Network ID) - 999
Frequency - 450 MHz (450000 kHz)
Symbol rate (s/r) - 6875
Modulation (QAM) - 256.
If for some reason the channels do not appear in the list of available channels, try using a manual search.
LG
47LE5500, LD420 and analogues
Menu → Options → Select the country Finland (or Switzerland) → Cable → Full search.
Philips
Episode 7, 9
1. Update the firmware to the latest version.
2. “House” icon, select “configuration”.
3. Select the “installation” menu.
4. Select “preferences”, then “studio”.
4. Go back to the “installation” menu, select “channel settings”
5. Select “automatic”, “start”, “reinstall channels”.
6. Select a country: either Switzerland, or Finland, or Germany. Next, select “cable”, “installations”.
7. Set the speed mode to “manual”, set the symbol rate to 6875, Frequency scanning - “full scan”, click “ready”, “start”. We wait 30-40 minutes - analogue channels are found.
8. Turn off the TV using the remote control. Then turn it on, then in the menu “configuration → installation → channel settings → digital mode reception testing” set the transmission speed mode manually (6875). Then search.
9. Enter the frequency 450.00 MHz. click search. There are digital channels, click “save”.
10. Return to the “installation” menu, then “preferences”, select “home”.
Samsung
LE40C550J1W and analogues
1. Enter the menu (green button).
2. Select the “Channel” menu (the “Satellite dish” icon).
3. Select “Auto Configuration”.
4. Select the signal source - “Cable”.
5. Choose what to look for - “Digital and analogue”.
6. Click “Start”.
After 15 minutes, autotuning is completed.
General algorithms for setting up digital channels for various models of LCD TVs:
1. Click on enter the menu - (green button)
2. Select in the menu - “Channel” (icon “Satellite dish”)
4. Select the signal source - “Cable”
5. Select - “Digital + analog”
6. Search mode – “Full”
7. Click - “Start”
First, we read the stickers on the back wall of the TV, where separately for each tuner (DVB-T and DVB-C) there is a list of countries in which, according to Philips, there is digital broadcasting (at the time the TV was released, but if you update the firmware through their official website, this list may change in subsequent firmware). If our country is not there, then we will have to put some other one from this list. For Philips TVs, the step between frequencies should be eight. Search mode – “Full”
2. Select - “Configuration”
3. Select - “Installation”
6. Select - “Digital mode”
7. Select - “Cable”
8. Select - “Automatic”
9. Click - “Start”
Setup takes approximately 5-10 minutes.
Philips TV models 2011
1. Click on the icon - “House”
2. Select - “Installation”
3. Select “Search for channels”
4. Select - “Reinstall channels”
5. Select - “the country indicated on the sticker on the back panel” (usually France, Finland or Germany)
6. Select digital mode – “Cable (DVB-C)”
7. In the “Network frequency” line, enter the frequency
8. In the “Transmission speed” line, enter “6875”
9. Next, select the line “Scanning frequencies”
Setup takes approximately 5-10 minutes.
1. Press the button - “Menu”
2. Select from the menu - “Options”
3. Select - “Auto-tuning”
4. Select the country - “France, Switzerland, Sweden or Finland”
5. Select the signal source - “Cable”
6. Select - “Digital”
7. Click - “Search”
Setup takes approximately 5-10 minutes.
If your TV model provides for the reception of digital channels, but does not have the “DTV MENU” item, then first select another country - France, Switzerland, Sweden or Finland.
1. Press the button - “DTV”
2. Click - “DTV MENU”
3. Select - “Installation”
4. Select - “Auto-installation”
5. Click - “OK”
Setup takes approximately 5-10 minutes.
Since not all SONY models are equipped with a digital tuner for cable TV (DVB-C), you need to check the model of your SONY TV. Models equipped with a DVB-C tuner are marked KDL-*EX* or KDL-*NX* - for example KDL-32EX402R2, the first 3 letters in the model name (KDL) indicate that the TV is “digital”. In models KLV-*BX*, etc. There are no DVB tuners.
1. Press the “MENU” button (for some models it is called “HOME” on the remote control (hereinafter referred to as the remote control). This button is usually blue.
2. Select the “Settings” item.
3. Find the “Digital Configuration” menu in the list of settings and enter it
4. Select “Auto search for digital stations”
5. A source selection window will open - select the TV connection type. Select "cable"
6. In the scan type selection item, select the “full scan” mode
Or select “Manual”
Next, enter the frequency
Leave the access code as “Auto”. Next, enter the symbolic rate
7. Click "start"
8. Wait until the TV finishes searching for channels.
Pay attention to the bottom of your TV's OSD menu. The bottom menu bar displays hints on which remote control buttons to perform certain actions in the TV menu.
Panasonic
1. Press the button - “Menu”
2. Select “Settings”
3. In the window that appears, select “Menu analogue. settings"
4. In the window that appears, select “Add TV signal”
5. In the table that opens, put a tick in the “DVB-C” line and go below and click “Start auto-tuning”
After searching for all digital channels, going to the main menu in the “Settings” item, the line “DVB-C setup menu” appears. By selecting this item, you can adjust the settings manually (set the frequency and speed).
The menu on your TV may differ from the model shown. In this case, you need to find tabs that are similar in meaning. If your TV asks for a search step, enter 8 MHz.
television/setting up_digital_channels.txt · Last changes: 2017/10/24 16:51 - tychina
The advent of digital television caused a kind of excitement, as content in digital quality became available to a wide range of users. Recently, this particular area of television has been developing very actively; a large number of offices have appeared that will provide services for connecting and setting up digital television for a fee. The good news is that you can set up digital television on your TV yourself.
So in this article we will look in detail at all aspects of setup, both in general and for TVs from specific manufacturers. It is worth noting that there are different types of digital television. All proposed schemes relate to cable “digital”.
General instructions
First, let's look at the general scheme for setting up digital television reception. In different TV models, the sequence of operations and names of items may differ slightly. Don’t worry, next we will look at the configuration features for specific brands, all points will be illustrated.
1. Using the remote control, enter the menu of your TV. In the window that appears, select the “Options” item. In order to go directly to the configuration, you must select the “Auto Configuration” item. A window should appear on the screen asking you to select one of the signal sources: cable or antenna. Select the first option, and then click the “Start” button.
2. After the operations have been completed, a window should appear in which you must select “Digital” as the signal source and then press the “Start” button again.
3. We are at the final stage of setting up digital television. In the window that appears, we find the “Search Mode” item, several options will appear, we need the “Full” item. Click and fill in all fields with the data indicated below.
Frequency (kHz) - 314,000 (314 MHz).
Modulation - 256 QAM.
Transfer speed - 6875 kS/s.
Please note that some TV models support network search. This means that you do not need to manually specify the above parameters. Simply, after selecting the desired search mode, press the “Search” button. As you can see, setting up digital television on your TV is quite simple. For those who are confused, read on for the illustrated instructions.
LG
It is logical to assume that different TV models from the manufacturer LG use their own firmware and menu. However, in general, the menu of all TVs has characteristic similarities. Find the “Menu” button on the remote control, press it and a window appears on the screen in which you need to select the “Options” item.

In the “Options” tab you will see several parameters available for change. In the “Country” item you must indicate either Germany or Finland.

After this, you need to go to the “Settings” menu, there select the “Auto search” item in which you specify “Cable” as the connection method.

After the completed manipulations, a window should open in which you need to select the “Settings” item and specify all the values as in the figure below.

If you followed all the instructions correctly, then after searching, the TV will detect all available channels, as well as radio stations.

Please note that LG TVs use an automatic channel update function, which resets the existing channel list at certain intervals and starts a new search. For convenience, it is advisable to disable this feature. To do this, you need to go to the “Digital cable settings” tab and turn off automatic updating. Thus, setting up digital television on LG TVs is quite simple. All it takes is a little care.
Setting up digital television on TVs Philips
So, find the “Menu” button on the remote control and use it to go to the menu of your TV. Next, you need to go to the “Configuration” section.

In the window that appears, click on the “Install” item, after which a secondary menu will appear on the TV screen, in which you need to select the “Channel setup” section. Another submenu will appear, in which we select the “Automatic” item. Settings". If you have completed all the transitions correctly, a message should appear warning you about the upcoming update of the list of all channels. Click “Start”.


Go to the section"Country" and select either Finland or Germany from the list.

For connection method, select"Cable".

Before you start the channel search process, go to the “Settings” item and make the settings according to the images below.


Now you have managed to set up digital television on your Philips TV. You can start directly searching for channels; to do this, click “Start”.

Setting up digital television on TVs Samsung
On the remote control, press the “Menu” button. Your TV menu should appear on the screen. Go to the “Channel” section (shown as a satellite dish). Several tabs will appear on the right, select “Antenna” and select “Cable” as the connection type. Next, you need to go to the “Country” tab and specify the “Other” parameter. In this case, the TV should request a pin code. If you did not change it yourself, then enter 0000 (default value).

Go to the “Auto Configuration” tab and select “Cable” as the signal source.

Set all parameters as in the image below, then click “Search”.

After all operations, your TV will detect all available channels.

Setting up digital television on TVs Toshiba
Using the “Menu” button, go to the TV menu and select the Russian menu language.

Find the "DTV Manual Tuning" tab.

Manually enter all the parameters as in the image below.

After that, click “Ok”, the search for channels will begin.

Conclusions
We have discussed in detail the diagram of how to properly set up digital television on your TV. We supported all sequences with images for better perception. If you have any questions, use the feedback form on our website or ask a question in the comments.