Clockworkmod recovery installation from a flash drive. Installing firmware, updates, kernels and more on an Android device using ClockworkMod. Installing recovery via PC via ADB
Each smart device, be it Windows, Android, iOS or others, has a special mode that turns on without using the main operating system. And if for Windows this is Bios and partly “Safe Mode”, then all Linux systems, which also include Android and Apple mobile devices, have a special “Recovery Mode” or simply Recovery. Using this mode, you can install operating system updates and perform a factory reset. To enter recovery, a special key combination is usually used, the standard one is Power + Vol-/Vol+, which is pressed while the smartphone is turned off.
For users who want to make the most of their device's resources, the pre-installed Recovery is not enough. Modifications and redesigned recovery modes have been developed especially for them, which completely open access to the smartphone’s file system, resulting in the following possibilities:
- complete reinstallation of firmware
- installation of individual firmware elements;
- flexible system cleaning;
- creation ;
- restore from Backup;
- creating or formatting partitions in flash memory;
- connecting to a PC via USB in ADB or flash drive mode
Despite the significant expansion of the basic functionality of the recovery mode, installation requires certain knowledge and skills.
Incorrect actions or omission of important details may result in device malfunction. You should also be aware that the instructions below can only serve as a general guide, and the necessary files and drivers must be selected for a specific device, for a specific version of Android and processor architecture.
Installation methods for Custom Recovery
ROM Manager
The simplest method that does not require much experience in non-standard work with the device. The only thing that is necessary is, which will not be difficult to obtain if you follow our guide.The essence of the method is to install a special application - . Next, do everything strictly with step-by-step instructions:
You can check the success of the operation by returning to the main menu of the utility and clicking " Boot into Recovery mode"If everything went well, then the newly installed modified recovery mode will start. If it fails, the phone simply won’t turn on and you will have to restore it using the FastBoot mode, but this is in most cases, but if you’re really unlucky, then go to a service center or secured for a new phone.
TWRP rom manager
Almost the same as ROM Manager with the only difference that a recovery modification from another developer will be installed - .
The application has a narrow functionality, which consists in identifying the device and downloading the required installation file with subsequent installation. Understanding the utility will not be difficult even for a beginner.

In addition, there is a useful function for creating in just a few clicks. True, this opportunity will appear only after installing TeamWin Recovery Project.
Firmware Custom Recovery via FastBoot
A universal way to set a modified recovery mode that is suitable for most devices. It differs from the first two methods in its increased difficulty in mastering, as well as the ability to install not only ClockworkMod and TWRP, but also other Recovery modifications, for example, PhilZTouch.
Before you begin the actual installation, you need to thoroughly prepare. First of all, you need to install a driver on your PC to connect your mobile device to your computer via USB. Below are links of drivers for major smartphone manufacturers:
- Sony Android USB; (https://developer.sony.com/develop/drivers/)
- HTC Android USB; (https://www.htc.com/us/support/)
- Samsung Android USB; (https://www.samsung.com/us/support/downloads/)
- LG Android USB; (https://www.lg.com/us/support/cell-phones)
- Motorola Android USB. (https://support.motorola.com/us/en/solution/MS88481)
In the case of a different brand of phone, you need to look for a USB driver on the official website of the vendor.
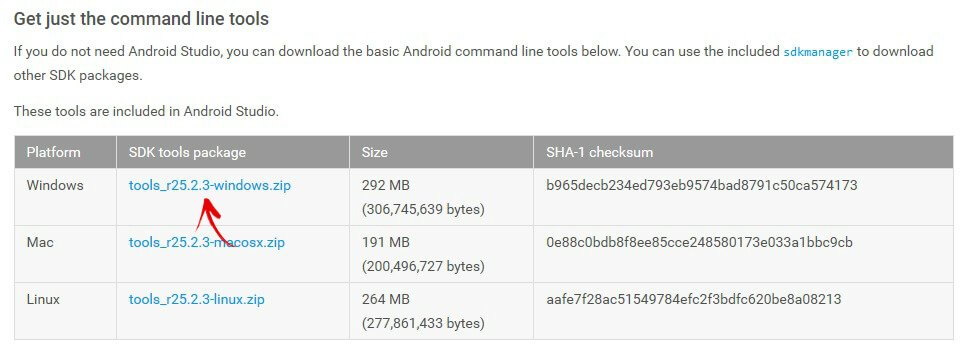
Next, you will need to visit the official resource of the operating system developers to download and install the Android SDK platform (Android SDK from Google) on your PC. After launching the SDK, you need to download the Android SDK Platform tools, Android SDK Tools and Google USB Driver packages. In its full form, the distribution takes up quite a lot of space on your hard drive, and also takes a long time to install, so you will have to wait.

The last step is to download the recovery file, rename it to update.img and copy it to the platform-tools folder, which can be found in the directory with the Android SDK. It is best to take the necessary recovery for a specific device in specialized forums, since the wrong choice of recovery image and its subsequent installation can lead to dire consequences.
When the preparation is complete, you can proceed to the actual firmware: 
You can enter recovery mode using the key combination described above or use the application, which is much simpler and more convenient.
Finally, it is worth noting that these instructions are suitable for many devices, but not all. Therefore, this guide should be used with caution, since flashing Custom Recovery firmware is a potentially dangerous procedure, after which the device may stop working.
Data-lazy-type="image" data-src="http://androidkak.ru/wp-content/uploads/2017/06/maxresdefault1-300x169.jpg" alt=" smartphone firmware" width="300" height="169">
!}
 Users who are dissatisfied with the operating system on their mobile device are often interested in how to flash Android through Recovery. The installation procedure for most known firmware (ROM) looks identical. The guide below will help you download any ROM or app from a ZIP archive to your Android device using the recovery feature.
Preparing for firmware
The firmware procedure consists of several stages, which include preliminary steps such as rooting the smartphone and creating backup copies. You need to keep in mind that the terms “installation”, “installation” and “firmware” are interchangeable (they can mean the same thing). Some of the steps listed below may not be necessary for experienced users who have a good understanding of smartphone software.
Official ROM updates from device manufacturers are released in the form of convenient installation files that you can run on your computer after connecting your Android device. But firmware from third-party developers usually looks like compressed ZIP archives, rather than EXE installers or APK files.
Before you start flashing the firmware, you need to make sure that the device's battery is fully charged. Under no circumstances should you proceed with the operation if the charge level is less than 50%. Failure to take this warning seriously may result in irreversible consequences.
There are known cases when a smartphone's battery ran out of charge during the firmware process, resulting in the device being locked and unusable.
The next step only applies to devices equipped with the stock Android operating system. We are talking about devices such as Nexus One and Nexus S. If you are using other smartphone models, you can skip this step. The owner of a stock system must unlock his bootloader before starting the firmware process. This process will be the same for all Nexus models. After activating the bootloader, you can proceed to the next step.
Read also: How to install custom Recovery CWM or TWRP on Android
Now you need to access the Root of your mobile device. If your smartphone has already been rooted, you can skip this step. Before installing the firmware, you must make sure that you have access rights to Root. Rooting is a mode of access to the gadget's system settings, necessary to perform complex tasks such as installing ROM. The process of gaining access to Root usually does not vary much between different device models. After successful routing, you can proceed to the next stage.
Installing the recovery function
To flash the firmware, the phone must have a recovery function installed (for example, Android System Recovery 3e). Rooting provides the user with the necessary level of access to perform administrative tasks on their device. .jpg" alt="Android System Recovery 3e" width="300" height="189" srcset="" data-srcset="http://androidkak.ru/wp-content/uploads/2017/06/56687731-300x189..jpg 400w" sizes="(max-width: 300px) 100vw, 300px">
!}
 Recovery offers the tools needed to actually perform these tasks. Every Android smartphone comes with a built-in recovery feature, but its functionality is usually very limited, so you will need a third-party Recovery to perform additional operations.
The installation process for this feature is usually not very different on different device models. After installing the recovery, you can proceed to the next step.
Now that the recovery feature is installed, you can perform additional operations, including flashing the firmware or installing an application from a ZIP file. The procedure is not much different for most ROMs, although some firmware require a special approach. Since the process may vary for some ROMs, it is recommended to find detailed instructions specifically for your firmware through a search engine.
Installing new firmware
There are 2 ways to install ROM. You can use ROM Manager to determine the steps you need to perform through Recovery, or manually reboot your phone into Recovery mode to complete these steps yourself. The first method seems preferable. If you previously used the rom manager to restore ClockworkMod synchronization, then it is already installed. If this application is not on your device, it can be downloaded for free through the Android Market.
Since the topic of firmware for Android devices is very relevant, I decided to write about installing CWM Recovery on an Android smartphone or tablet. There are several ways to do this: for some, all actions are performed on the device itself, but this requires root rights, while for others, a computer is used to install custom recovery. Whatever seems easier or more convenient to you, use it.
Method 1. Installing CWM Recovery via ROM Manager
The first way to flash Recovery firmware is to use the ROM Manager program, which we already talked about in the article:. This application has a separate item that allows you to install ClockWorkMod Recovery in a couple of minutes.
I would like to note right away that ROM Manager requires root rights to work. You can read how to get them and.
After that, go to the official page https://clockworkmod.com/rommanager and see if your device is in the list of supported ones.
1. Now open the ROM Manager and select the first item “Recovery Setup”.

2. In the next window, in the “Install or update Recovery” section, select “ClockworkMod Recovery”.


4. At the bottom, click on “Install ClockworkMod”.

5. The download process will begin. With a good Internet connection it lasts a couple of seconds.

6. At the end of the download, you will be asked to grant root access to the application. Select Grant.

7. That's it! You will see a notification “Successfully flashed ClockworkMod recovery!” Just click "OK".

This is how easy it is to flash CWM Recovery via ROM Manager. Now you can open it and you will find new items in it that were not in the standard one.
Method 2. Install custom Recovery on Android using the FastBoot utility
All the steps described below are the same as installing TWRP Recovery:.
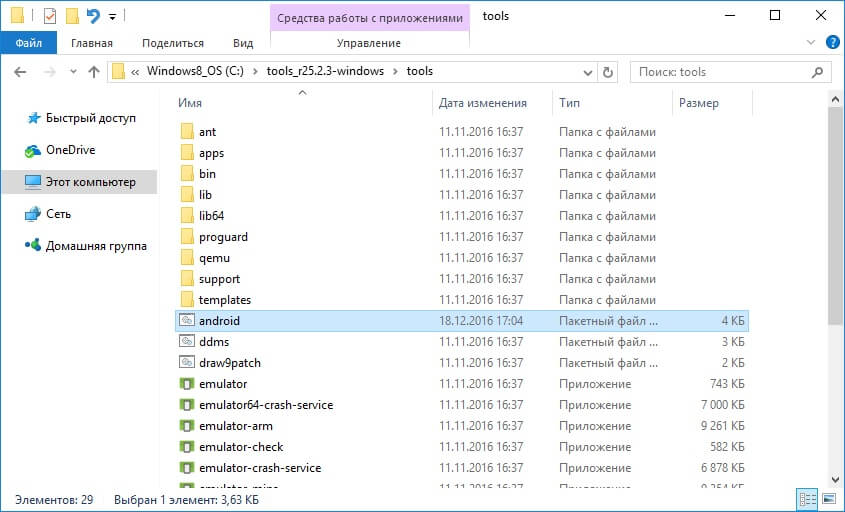
Unzip the folder to the “C:” drive – there will be “tools” inside, and the “android” file in it. Launch it.
Select "Android SDK Platform-tools" and click "Install package".

Check the “Accept License” checkbox and then click “Install”.

After installation is complete, in the “tools_” folder version-windows" "platform-tools" will appear, and it contains "fastboot" and "adb". They will be useful to us later.

UPD: The “platform-tools” folder on my computer is in a different directory than yours. The fact is that this article was written back when there was an installer for the Android SDK. Starting from version 25, installation is carried out only from a ZIP archive: because of this, part of the instructions had to be edited. Therefore, the path to ADB and Fastboot is different from mine, everything else remains unchanged.
If you have a Sony, HTC, Nexus, Huawei or LG device (some models), then Bootloader is blocked. How to unlock it is described on our website:
- For HTC: ,
Let's start flashing the Recovery firmware:
1. First of all, go to this page and download the version of the “recovery-clockwork.img” file for your device. Please note that most devices have both a touch and classic version. Download the one you like best.
2. Now place the CWM recovery file in the “platform-tools” folder. I also renamed it to “recovery.img” (later you will understand why). I recommend that you do the same.

3. Connect your tablet or smartphone to your computer using USB.
In this case, the device must be booted into fastboot mode. Typically, to do this, with the device turned off, you need to hold down the key combination: Power + Volume Down. But this combination may differ depending on the device manufacturer.
UPD: It’s much easier to switch to fastboot mode as follows: turn on the device, go to the command line (step 4 below tells you how to get into it) and enter the commands sequentially, pressing “Enter” after each one.
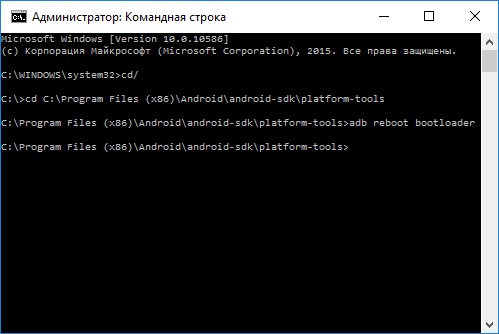
CD path to "platform-tools"
I got it like this:
Your path will look different. If you acted exactly according to the instructions, it will come out (in any case, look at the path in the corresponding line of Explorer):
cd\tools_r25.2.3-windows\platform-tools
In the screenshot you can see how I entered the same commands. As a result, the device will boot into fastboot mode.
4. Now open the command line (or skip this item and continue working with it if you just switched Android to fastboot mode through it). The easiest way to get there is to press the key combination “Win” + “R” and enter:
After that, click "OK".

5. You will be taken to the command line.

6. Now you need to specify the path to the folder with the firmware. Type the following command to go back to the folder.
Press "Enter".

7. My path to the recovery folder is: “C:\Program Files (x86)\Android\android-sdk\platform-tools”. So I enter (you enter yours):
cd Program Files (x86)\Android\android-sdk\platform-tools
And press “Enter” again.

8. All that remains is to enter:
recovery.img“recovery.img” is the name of the file being flashed. Remember I advised you to rename the recovery file? We did this for convenience so as not to enter something like “recovery-clockwork-6.0.4.7-flo.img”.
After entering this command, press “Enter” again.
9. As a result, we receive the following message.

Congratulations! You have successfully installed custom recovery (CWM) using the Fastboot utility!
Method 3. Flash Recovery via the Rashr application
This method is also incredibly simple and convenient, but requires root rights. How to obtain them is written at the beginning of the article in “Method 1”.
1. Install the Rashr - Flash Tool application from Google Play, open it and provide Root rights.

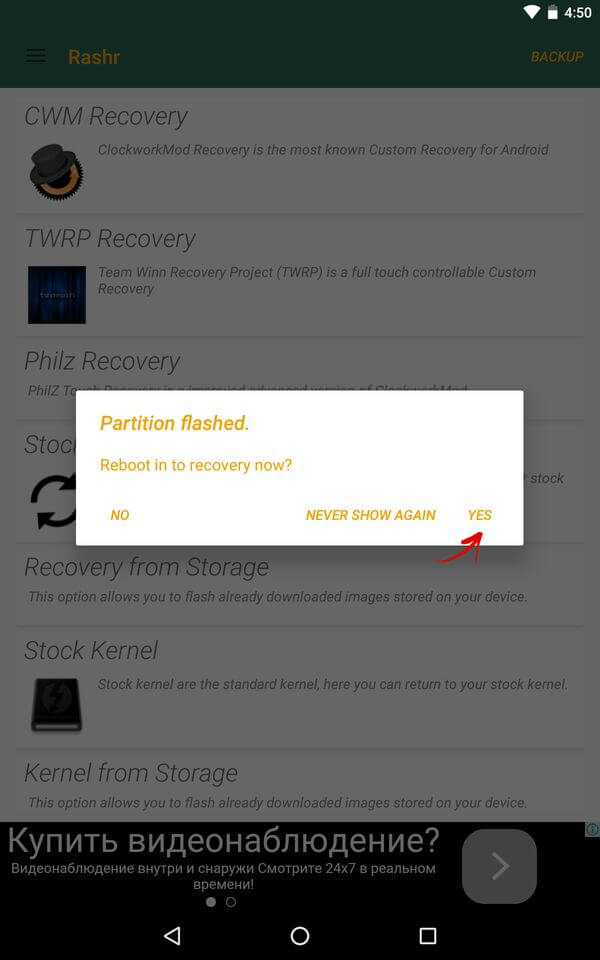
2. In the list of options, select “CWM Recovery”.

3. Then the program will display a list of available Recovery for your device. In my case, Rashr showed 2 options: ClockworkMod with support for taps on the screen and the classic option (controlled by the volume and power buttons).

4. When you see the download prompt, click Yes.

5. Then the download of CWM Recovery for your Android smartphone or tablet will begin.

6. At the end, a notification will appear that the firmware was successful and you now have a modified recovery installed. You can reboot into it and try it out. To do this, click “Yes”.
Perhaps this installation method can be called the simplest. The only thing it needs is root rights.
Method 4. Install Recovery on Samsung in Odin
If you have a Samsung device, you can install ClockWorkMod Recovery on Android using the proprietary Odin utility. Here I will briefly tell you what to do. I recommend reading our article: . It contains detailed information about using Odin.
Today we will talk about how to install custom recovery on your Samsung Galaxy device. I will only talk about TWRP recovery, since it has a huge number of advantages over its analogues. Also, the developers of this project offer a simple and convenient installation method, which involves using the Odin utility. You don't even need superuser rights (Root). This instruction is suitable for all smartphones and tablets from Samsung: Galaxy S5, S6, Note 4, Note 5 and any other models.
It is worth noting that after installing a custom recovery, you will not be able to install official Samsung updates downloaded over the air. Back up your data on your mobile device so that if problems arise, you won't lose it forever. I recommend saving your contacts in the cloud of your Google account, and photos, videos and documents on your computer.
What you need to do before installing TWRP recovery via Odin:

Check before starting installation to make sure you haven't forgotten anything. Each of the above steps is very important.
How to install TWRP recovery on any Samsung Galaxy smartphone or tablet:

Ready! To enter TWRP recovery, you need to hold down the “Volume Up”, “Home” and “Power” buttons while the device is turned off, and release the buttons after the logo appears.

Now you can use the new recovery to install custom firmware, backup and restore installed firmware, and much more. Through TWRP, you can also clear the cache memory, perform a factory reset, or completely clear the internal memory of the device.
Or otherwise experiment with the Android system, then custom TWRP recovery is what you need. If you are wondering how to install TWRP recovery on Android, then this article is definitely for you.
Your phone's "recovery environment" is a piece of software that you rarely see. It is used to install Android updates, restore to factory settings, and also perform other tasks. Google's default recovery environment is very simple, but third-party developers offer their own solutions, for example, Team Win Recovery Project (or TWRP) - allows you to make backups, install custom firmware, gain superuser rights, and much more useful. So if you want to change your smartphone, then you will need TWRP. You can also read what custom recovery is on Android and why it is needed. Today we will tell you how to install TWRP recovery on Android.
Step 1: Unlock your device and make sure it's compatible
You must be sure that your bootloader is unlocked. So, if you have not done this yet, we recommend reading the article on how to unlock the bootloader on an Android smartphone. When you're done, let's go back to installing TWRP. If your phone's bootloader is not unlockable, then you will have to install TWRP in another way.
Also, make sure that TWRP is available for your device and check out the TWRP and XDA Developers website to make sure you don't encounter any problems along the way. For example, Nexus 5X phones are encrypted by default, but when TWRP first came out for the Nexus 5X, it did not support encrypted smartphones. Therefore, Nexus 5X owners had to either decrypt their smartphone themselves in order to install TWRP or wait for an update, after which TWRP began to support encrypted smartphones. Make sure you know all the quirks of your device before proceeding.
Also back up anything you want to keep. This process will not delete your data from your smartphone, but creating a backup before changing the system is a good habit.
Step 1: Enable USB Debugging
Next, you will need to enable several options on your phone. Go to your phone settings and select "About phone". Scroll down to Build Number and click on this item 7 times. A message should appear indicating that you are logged into developer mode.
Return to the main settings page, you should see a new “For Developers” item. Enable “OEM Unlocking” if this option exists (if it doesn't, don't worry - only some phones have this option).
Then enable “USB Debugging”. Enter a password or PIN if required.
Once you do this, connect your phone to your computer. You will see a window on your phone asking “Do you want to enable USB debugging?” Check the “Always allow this computer” checkbox and click OK.
Step 2: Download TWRP for your smartphone
You need to go to the TeamWin website in the devices section. Find your device model and click on it to download TWRP.

This page usually contains Important information about the device that you should know. If you don't understand something, you can find more information on the XDA Developers forum.
Go to the “Download Links” section and download the TWRP image. Copy it to the folder where ADB is installed and rename the file to twrp.img. This is necessary so that the installation command can be written more quickly.
Step 3: Enter Bootloader Mode
To install TWRP recovery on Android you need to enter bootloader mode. This is done differently on all phones; perhaps a search on Google or Yandex will help you to find out how this is done on your device. On many devices, this method helps: turn off the phone, hold down the power button and volume down key for 10 seconds, then release them.
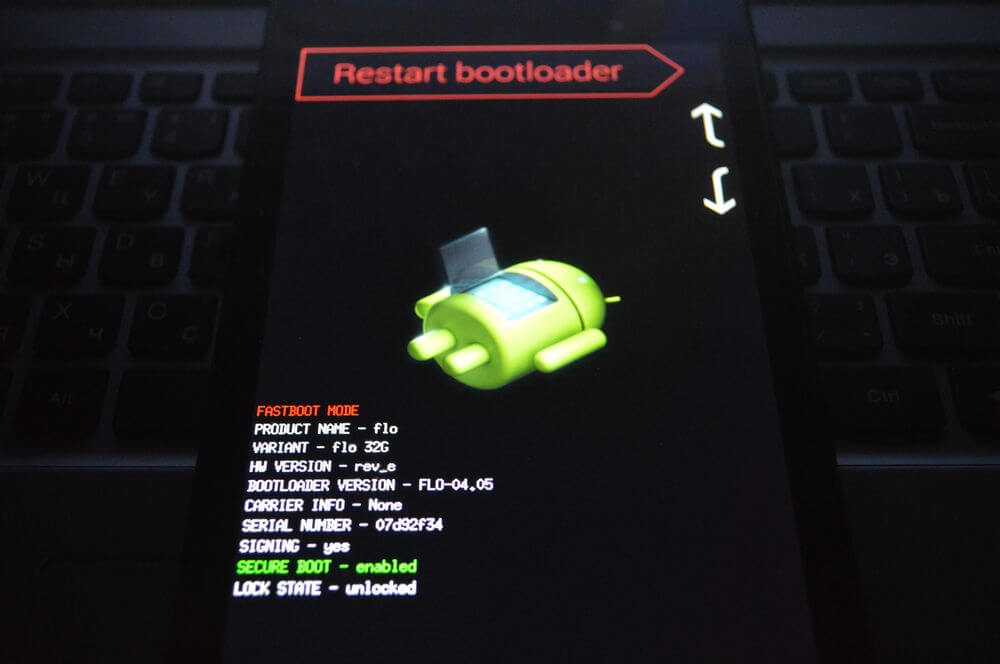
You have entered bootloader mode if you see an image similar to the following:

Your phone's bootloader may look slightly different (in HTC on a white background, for example), but, as a rule, it contains approximately the same text.
Step 4: How to install TWRP Recovery on Android
Once you enter bootloader mode, connect your phone to your computer using a USB cable. Your phone should show that the device is connected. On your computer, open the folder where you installed ADB and press Shift+right mouse button on an empty space and select “Open Command Window”. Then run the following command:
fastboot devices
The command should return your device's serial number, indicating that it is recognized. If the serial number is not found, then return to the first step and make sure that you did everything correctly.
If your device has been recognized, then it's time to install TWRP. Run the following command:
fastboot flash recovery twrp.img
If everything goes well, you will see a success message on the command line:

Step 5: Boot into TWRP Recovery Mode
Disconnect the phone from the computer and use the volume down key to navigate to the “Recovery” item. Press the Volume Up button or the Power button (depending on your phone) to select it. Your phone will boot into TWRP.
If TWRP asks for a password, then enter the password or PIN code that you use to unlock your phone. This is necessary to access memory.
TWRP may also ask if you want to use it in Read Only mode. This mode means that all changes will be deleted after a reboot. If you are not sure, then click on “Keep Read Only”. You can always repeat step 3 and 4 of this guide to reinstall TWRP when needed.
When you're done, you'll see the TWRP main screen. You can use it to create a Nandroid backup, restore a previous backup, install custom ROM and much more.
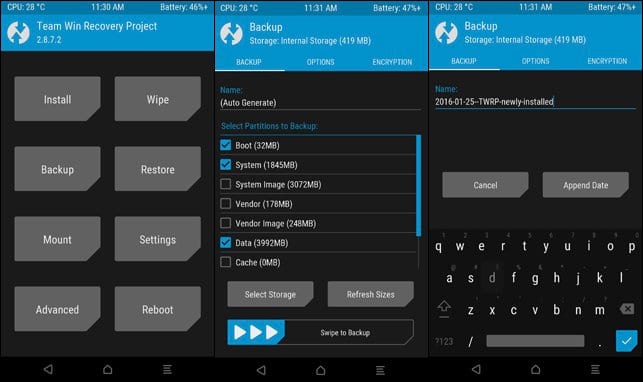
The most important thing now is to back up your phone before making any changes.
Click on the "Backup" button in the TWRP main menu. Select "Boot", "System", "Data" and swipe the slider at the bottom of the screen. You can also change the name of the backup by clicking on it.
Please wait while the backup is created. When the process is finished, return to the backup menu. Uncheck all options and scroll down. If you have a special partition after "Recovery", such as WiMAX, PDS, or EFS, then check them and make another backup. This section usually contains your EFS or IMEI information, which is very important. If this information ever becomes damaged, your data transfer will not work, and with a backup copy you can restore everything.
Lastly, if TWRP asks if you want to gain root privileges and install SuperSU, click “Do Not Install”. It is better to install the latest version of this application yourself than the one offered by TWRP.
Once you've made a backup, you can start exploring TWRP, gaining root privileges, installing custom ROMs, or booting into Android OS. Remember: Make a backup before making any changes to TWRP, it will help you restore your phone if something goes wrong.