Canon PIXMA G1400 color inkjet printer. Color inkjet printer Canon PIXMA G1400 Canon pixma g1400 print head
Canon PIXMA G1400 color inkjet printer
information pages
representative of the new line with a built-in “branded” CISS
On December 1, 2015, Canon presented three new models in the series in Moscow PIXMA - G1400, and , with which the new line begins PIXMA G. The first of them is just a printer, the other two are MFPs, and the younger models only have the ability to connect locally to a computer’s USB port, while the older one is also equipped with a Wi-Fi wireless interface. All three devices have a photo printing function, although they use only four colors of ink.
Their fundamental and most significant difference from other representatives of the PIXMA series lies in consumables: for the first time, Canon used a built-in continuous ink supply system ( CISS, or CISS, Continuous Ink Supply System).
The use of original CISS by manufacturers is not new: two and a half years ago we introduced readers to one of these printers, and since then we have had many different devices of this series; well, the more interesting it will be to compare them with the new Canon product.
Printers and MFPs from the PIXMA series have come to us infrequently in recent years: after a short break, we tested a multifunctional device, the main advantage of which is its very low price (however, for the buyer this factor can often outweigh any disadvantages). Therefore, there will be parallels with this model.
As usual, let's say a little about information support. On the site pages canon.ru, dedicated to, did not do without loud advertising phrases describing the capabilities of the device, but fairly detailed characteristics and information about consumables were also given.
Characteristics, equipment, appearance, consumables
As usual, we start with the characteristics declared by the manufacturer:
| Main characteristics of Canon MFP | |
| Functions | Color and monochrome printing |
| Printing technology, number of colors | Inkjet system with refillable ink tanks, drop size 2 pl (min.), 4 colors |
| Dimensions (H×W×D), mm | 135×445×330 (trays folded) |
| Net weight, kg | 4,3 |
| Power supply | < 12 Вт, 100—240 В AC, 50/60 Гц |
| Screen | No |
| Standard ports | USB 2.0 (Type B) |
| Print Resolution | up to 4800×1200 dpi |
| Print speed (A4, ISO/IEC 24734): black and white color |
up to 8.8 ppm up to 5 pages/min |
| Borderless printing | Eat |
| Supported Operating Systems | Windows XP SP3 (32 bit only), Windows Vista SP2, 7, 8, 10 Mac OS X 10.7.5 - 10.10 |
n/a |
| Warranty period | 1 year or 30 thousand A4 prints |
High Resolution Paper (HR-101N 1033A001) |
Compatible Cartridges | GI-490 C 0664C001 |
Regarding the warranty, the situation is the same as for many competitor models: its validity is calculated either by the period or by the number of printed sheets made. True, the limit of 30 thousand prints is much softer than that of many competing models.
If the printing or scanning resolution on two axes is different, then it has become an unkind tradition among different manufacturers to accompany the numbers with explanations “horizontally, vertically” - for PIXMA G this is stated in the manual. And no one bothered to think about whether a sheet of paper has unambiguously perceived horizontal and vertical lines.
Let's move on to the configuration. The box with the new device contains:
- power cable,
- four containers (bottles) with ink - black and three color,
- two print heads (black and three-color),
- CD with software,
- booklets in different languages with instructions for initial installation,
- other printed materials, including a warranty card.
You need to purchase the USB interface cable yourself.
Officially, consumables include bottles of ink (on the manufacturer’s website they are called ink containers). They have the same index - but, naturally, with an addition that specifies the color:
- black Black: volume 135 ml (pigment ink), designed to print 6000 A4 pages according to ISO/IEC 24711 standard,
- three color (dye-based water-soluble inks - Cyan, Magenta and Yellow), 70 ml each, designed to print 7,000 pages.

There are also two print heads - in fact, they look exactly like cartridges for the already known models of the PIXMA series, and they are made using the same FINE technology (although in the description on the manufacturer’s website there is the word “improved”), which provides for a minimum volume drops 2 pl.
Since these heads, unlike the models of their closest competitor, are not stationary, but are installed by the user, and just as easily as the cartridges in the well-known PIXMA models, there is a suspicion that their service life is quite limited. Moreover, this cannot be definitely considered a minus; everything will depend on three factors: how limited the service life will be (at least in comparison with competitor’s analogues, where the heads are changed in a service center), whether the owner can change them himself, and whether it will be easy to buy replacement heads and at what price.

Looking ahead a little, I have to say: in the instruction manual installed along with the printer software, the possibility of user-replaceable print heads is not mentioned. There are signs of their malfunction in the list of errors, but the only solution is indicated: contacting a service center. That is, hopes for replacing the heads on your own were not justified, but again: this is not a problem if the heads last long enough. The manufacturer promises a warranty of 12 months or 30,000 prints.
And don’t forget about the absorber or “diaper” - a device for collecting ink flowing from the heads, for example, during their cleaning using the appropriate service procedure. The absorber also needs to be replaced from time to time and its counter reset, but all manufacturers refer such actions for such equipment exclusively to the competence of service centers. Moreover, such a procedure will be paid: the warranty card directly states that the warranty does not apply to the waste ink collection.
Appearance
We received a test sample, even with a corresponding sticker on the back wall, so there was no design of the box, and we did not take a photo of it. The weight of the printer in the package is 6.8 kg - not much, but for ease of carrying, there are slots on the sides for gripping by hand.
Like the already familiar PIXMA E464 MFP, the printer has the appearance of a bar with rounded vertical ribs. The color is matte black; handprints will not stand out on the slightly rough surface of the case. The only bright spot is a sticker with information that the device can print up to 6,000 black and white and up to 7,000 color pages from one refill.

Since a printer with a single interface does not need any advanced control panel, there are only two buttons (Power and Resume/Cancel) and two LED indicators Power and Alarm.

The buttons are quite large, pressed softly, and operate clearly; Perhaps, this may be the only complaint against them, and even that should rather be attributed to nit-picking: the small free play does not exclude triggering from accidental touches. True, the location of the buttons in the far right corner of the upper plane of the printer, where the likelihood of accidental pressing is lower, will play a positive role in this regard.
As often happens in cases of a small number of indicators, their status is not limited to the options “on - off - flashing”. The blinking mode can also be important: for example, the Power LED, after the first turn on, until the system is filled with ink, shines in the “two flashes - pause” mode; Its steady blinking may indicate that the printer is performing a print job and that the top cover is open. A steady Power light indicates that the printer is ready to print.
For Alarm, the notation system is even more complex; it will help identify a variety of errors, and some are explained in the manual installed with the printer software. So, “three flashes - pause” means a paper jam, “five flashes - pause” - problems with the print head, “eight flashes - pause” - the absorber is almost full, but printing can still be continued.
There are also options for alternating flashing of Power and Alarm, but almost all errors that cause such an indication are eliminated by the service center.

At the back there is a cover of the feed tray, in the working position it tilts at an angle of about 45 degrees from the vertical. The receiving tray is horizontal, retractable, and is located at the bottom of the front panel. Thus, the bending of the sheet when passing through the printer mechanism is relatively small, which makes it possible to work with high-density media, including paper for inkjet photo printing.
Both connectors - for the power cable and the USB interface cable - are also located at the back, and the power socket is located on the side and in a small niche, and therefore the connector inserted into it practically does not extend beyond the dimensions of the printer. The USB cable extends backwards, perpendicular to the back wall, but it fits quite well into the area defined by the folded-down cover of the input tray, and therefore, when installing, it is enough to leave 11-12 cm of free space behind the printer.
The receiving tray is different than in the E464: it has one pull-out part, also without side and front stops, but with a folding element that lifts the front edge of the outgoing sheet. And, although the paper also does not fit very smoothly into the tray, the sheets do not jump far forward and do not fall. And the tray itself is not so “delicate”: it is, of course, possible to accidentally break it, but it will require a much stronger push than in the case of the E464.
When working with photo paper 10x15 or 13x18 cm, you can fold out the lifting element and push the tray itself in - the result is both convenient and compact.
The front part of the top panel is occupied by a cover that folds back, under which ink hoppers, print heads, connecting tubes, and a paper path are hidden. There is a sensor (an ordinary mechanical microswitch) indicating that the lid is open - as already mentioned, the Power indicator begins to flash evenly. And if the lid is opened during printing, printing is paused and will continue after the lid is closed.

The most noticeable design difference between the Canon PIXMA G line and its closest competitor is the location of the ink containers (the instructions call them containers, but the same term is used in Russian texts for ink bottles, so we will call them containers). If all competitive models known to us have capacities made in the form of a separate module attached to the side, then in PIXMA G they are built inside. In our opinion, this is a big plus: firstly, the width of the device does not increase, and secondly, the containers of similar competitor models can be accidentally damaged by grabbing them when carrying them, but this is excluded in the PIXMA G.
The containers are located in two groups: on the left is one large one for black ink, on the right are three smaller ones for color ink. Their necks are located under blue hinged caps and are equipped with rubber stoppers.

The containers are made of translucent milky-white plastic, and windows are made where they are placed in the body, allowing you to visually monitor the level of ink of each color. There are minimum and maximum level marks.
Despite the similarities between the printheads of the PIXMA G line and the E464 cartridges, access to their installation location is different. If the E464 cartridges are inserted from the front, which is very inconvenient, then the head holder (carriage) in the PIXMA G becomes easily accessible after lifting the top cover.
Preparing for work
The preparatory procedures are very simple, all steps are shown in the included getting started guides. These manuals are multilingual, but most of the steps are described using pictures and do not require verbal explanations.
After unpacking and removing the shipping fasteners, you need to install the heads, add ink and prime the system. These actions are also illustrated with quite clear pictures; we will add only a few words.
The design of the bottle necks does not allow ink to flow freely, which is very useful in terms of safety - the liquid will not spill out either with an accidental push or shake, or when placed over the filler hole of the container during refilling. There is also the other side of the coin: when refilling, you have to work a little - “milk” the bottle in order to force the ink to flow into the container. But there is no need to squeeze the open bottle until it is placed above the neck of the container, otherwise the ink may spill out.
The volume of the containers exactly corresponds to the volume of the bottles, so you need to pour out the ink completely when refilling for the first time, without fear of overfilling. During subsequent refuelings, you should focus on the maximum level mark. When finished, tightly close the necks of the containers with standard rubber stoppers.
When you turn it on for the first time, the procedure for initially filling the ink supply path (the photographs show that the tubes going from the containers to the print heads are empty at first) and the heads must be completed. This will require some time and a considerable amount of ink, so noticeable that the kit even includes a special booklet with a warning: the number of prints from the first refill will be less than declared.

Until the system is full, the printer will not be ready: as already mentioned, the Power indicator is not constantly lit, but blinks in the “two flashes - pause” mode. With the power on, press the Resume/Cancel button (Power stops blinking) and hold for about 5 seconds until the Power indicator starts blinking again. Filling begins, and at the initial stage you can see how the ink moves through the tubes.
When the process is finished (for us it lasted about 6 minutes), the printer will go into the “Ready” state: the Power indicator will be constantly on. The ink level in color bins has decreased by ten to twelve percent, in black bins somewhat less, and it can be estimated that 7-9 ml of ink of each color were used to fill it.
It is impossible to pour the ink back, but the possibility of transporting the refilled printer is still provided. For safety precautions, see the manual that came with the software, “Precautions when transporting the printer.” Among other things, it is recommended that when the printer is turned on, press the Resume/Cancel button and hold it until the Alarm indicator blinks 8 times, then release it - the printer will turn off and be ready for transportation.
Software installation, printing
Installing the software, which we carried out from the supplied disk, did not cause any difficulties. As usual, we’ll give a warning: the printer is not connected to the computer with a USB cable immediately, but only when prompted by the installation program.
First, the printer driver is installed, after which you are prompted to align the print heads and test print.
Then the installation of additional software is offered, and upon completion - an offer to register the product (naturally, you need Internet access), which we refused. As a result, the icon of the installed printer appears.
The driver settings are generally very similar to those we saw on the PIXMA E464, but there are also differences, sometimes significant.

Please note: for some reason, after installing the software, printing in shades of gray is set by default; for color printing, the “bird” in the corresponding field must be unchecked.
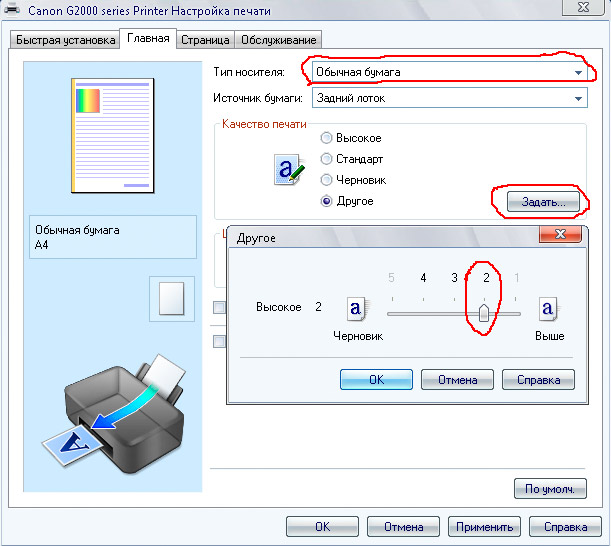
As before, there are three levels of print quality: high, standard and draft. On the “Home” tab there is still a fourth level “Other” with the ability to manually select from five quality levels (the lower the number, the higher the quality), but the available quantity varies for different media. So, for regular paper there are three gradations with numbers from 2 to 4:

Gradation 5, with the lowest print quality, is not available at all, and its presence remains a mystery.
Examples of mutual dependence of settings are not limited to this. So, it became possible to print without borders, but in this mode, the only quality available for regular paper is standard, and other options are possible either when working with photo paper or when printing with borders. And photo paper cannot be set to draft quality.
In addition, when changing the settings, the user must be very careful: choosing a different type of paper may lead to a change in quality gradation or to a change in the method of setting color and intensity from “Auto” to “Manual”.
The choice of media types is the same: paper, photo paper, envelope. But there are not two, but five, quite specific varieties of photo paper (naturally, this means the assortment offered by Canon itself), among which there are glossy, semi-gloss, and matte:

In addition, there is an undefined “Other photo paper”, as well as a certain “High Resolution Paper”:


The owner is also given the opportunity to independently set the size (item “Other...”).
On the “Page” tab there is a definition of the page size, where there are also formats such as A3, A3+ and even A2, but they relate to the format specified for the pages of the printed document, and therefore are marked with the word “Scaling” - that is, automatic changing the output scale to fit on the sheet format specified in the “Paper size” column just below.

There are still “dummy” settings that have no practical meaning for this model and only clutter the settings window: for example, selecting a feed tray is only one option.
![]()
Manual color correction is provided, as well as adjustment of brightness, intensity and contrast.

There is a lot of interesting and useful information on the “Maintenance” tab.

There are several points that are required for any inkjet printer: cleaning and aligning the print heads, printing a test sample to check the operation of the nozzles. There are also two points related to cleaning: the feed rollers and the internal components of the device (cleaning the tray), but their use is not explained in the current version of the manual.
Using the “Power Off” button you can remotely turn off the MFP (I think this is not the most useful function for a device with a local connection), “Power Management” will allow you to set the inactivity time after which the device will automatically turn off, as well as its auto-on whenever accessed from a computer - to change settings or when sending a print job. Note: the MFP does not turn off completely; the off state should rather be described as “deep sleep” with minimal energy consumption, only about 0.4 W.
But such a useful function as selecting the ink used for printing - only black, only color, or both, similar to the “Cartridge Parameters” item in the E464 settings, is missing in this case. Probably, for the significantly increased volumes of ink, the developers considered it not so relevant, forgetting that even the largest can of ink will someday run out, and it is not a fact that at that moment there will be a spare one at hand.
The silent mode remains, and you can also turn it on constantly or on a schedule; We are, of course, talking about reducing noise, and not about completely eliminating sounds during operation, and we will evaluate the effectiveness of this mode during testing.
Finally, in “Special parameters” you can, among other things, set a delay for ink drying - there are five conventional gradations for it.
The function of checking the printer status (“Print status information”) remains, but it can also be classified as “fictitious”: information about the remaining ink in the form of columns is not displayed, there is only an offer to look at the printer yourself.
But, of course, the remaining ink is monitored - at least the minimum level, and notification of its achievement can be turned on or off. Naturally, it is not at all necessary to wait for the corresponding message in order to start refueling; you can replenish the contents of the bunkers at any time, but if the notification about the level of the remaining stock is turned on, you should follow the steps provided by the instructions: reset the counter.

There is also some semblance of a counter for printed sheets: if you print a nozzle check test, then, in addition to the test images themselves, there will be the current counter value - however, with an accuracy of fifty and without specifying formats, etc. And here the words about 30 thousand prints of A4 format may raise questions when calculating the warranty “mileage”: such a counter does not see the difference between A4 and smaller formats. Most likely, the problem is not in small formats: the coupon is common for A3 and A4 machines, and for these formats the difference is important, and it is probably recorded by the corresponding counters.

We present to your attention also the print driver settings.
Additional software.
The list of additional software is almost identical to what we saw on the E464:

Therefore, we will not repeat the descriptions of all the components included in it, but will refer those interested to a recent review.
Tests
For testing, we use our own methodology, which is available for repetition, and the results we obtain may not coincide with those indicated on official websites. The basis was taken as previously used, revised and supplemented.
It is difficult to determine the moment when the printer is ready: the Power indicator starts to light constantly after 14 seconds, but after this the actions of the mechanisms continue for some time.
A4 print speed
Print speed test (PDF text file, monochrome printing of 11 A4 sheets, counting time from the moment the first sheet comes out to eliminate data transfer time), two measurements with averaging:
| Draft | Standard | High | Standard, silent | |
| Time, min:sec | 0:55 | 0:57 | 4:03 | 2:20 |
| Speed, ppm | 11 | 10,5 | 2,5 | 4,3 |
In draft and standard quality, the printing speed is almost the same and amounts to 10.5-11 pages per minute. When you turn on silent mode, the speed drops by 2.5 times, and with high quality by more than 4 times.
We will not compare the printing speed obtained in this test with the declared speed, since for inkjet printers it strongly depends on the degree of filling of the sheet. In this case, it is 5%, but the text is not distributed over the entire surface.
PDF file, printing 20 sheets of text with graphic design and illustrations in color.
| Draft | Standard | High | |
| Time, min:sec | 6:26 | 11:30 | 26:25 |
| Speed, ppm | 3,1 | 1,7 | 0,8 |
Here we can already note a significant, almost twofold difference in speed when printing with draft and standard quality, not to mention high. We will consider what you have to sacrifice for the sake of speed when analyzing the quality of prints.
Print a 30-page DOC file (default margins, 10 point Times New Roman text, 12 point headings, from MS Word), monochrome, other default settings:
| Print quality | Time min:sec |
Speed ppm |
| Draft | 4:24 | 6,8 |
| Standard | 4:46 | 6,3 |
As in the very first test with monochrome printing, the speed for the two quality gradations was again very close. And, as in the case of color printing, the resulting value is again noticeably less than the 8.8 pages per minute stated for black and white printing.
In all these tests it turned out to be slightly faster than the E464, although the difference is insignificant. True, the speed characteristics declared for these two models are also close.
Printing 10×15 photos in color:
Photo printing 10×15, high quality, with margins, Photo Paper Plus Glossy II:
The drying delay is set in “Maintenance - Special parameters”, the default value is set to the average value.

When set to maximum, the print heads move with noticeable pauses between forward and reverse strokes, and print time increases by 2.5 times.
Printing is always bidirectional, that is, it is performed both with forward and reverse stroke of the heads, which significantly reduces printing time, but under certain conditions can lead to distortions in the print. There is no option to disable bidirectional mode.
Photo printing 13×18, high quality, Photo Paper Plus Glossy II:
Average values for three different prints are shown.
Printing time for color photo A4, min:sec:
The transition from standard quality to high quality in this case almost doubles the printing time, and using photo paper and completely filling the format with equal quality actually triples it.
Noise measurement
Measurements are taken with the microphone positioned at the level of the head of a sitting person and at a distance of one meter from the printer.
Background noise level less than 30 dBA - quiet office space, with working equipment, including lighting and air conditioning, only a printer and a test laptop.
Measurements were made for the following modes:
- peak value when turned on,
- circulation printing, “Draft” quality,
- printing in silent mode, “Draft” quality,
- circulation printing, “Standard” quality,
- Printing in silent mode, “Standard” quality.
Since the noise is uneven, the table shows the maximum noise level values for the listed modes, and short-term peak values separated by fractions.
| Indoors | A | B | C | D | E | |
| Noise, dBA | 53,5 | 48,0 / 68,0 | 44,5 / 60,5 | 46,5 / 66,5 | 43,5 / 58,5 |
Peak values are usually associated with paper feeding, which is very energetic in inkjet printers, especially during rough printing, which is the noisiest. In silent (quiet) mode, paper feeds more smoothly, and when printing, the transition from the printed line to the next one is slower. Naturally, the printing speed decreases, and significantly - by 2.5 times, as shown by the corresponding test.
Feed path test
We have already mentioned the most important difference from the E464 in this regard: the new printer can use the entire area of a sheet of any of the allowable formats, while the E464 not only does not have borderless printing, but there remains a wide strip near the trailing edge on which printing is impossible. That is, the feed mechanism used is different; Most likely, it was borrowed in whole or in part from one of the many representatives of the PIXMA family, but certainly not from the E464.
Much also depends on the printing mode: with draft quality, the paper moves quickly, the stack of prints in the output tray turns out to be sloppy and may begin to crumble, and with standard and high quality, the paper moves slower and smoother, the printed sheets lie more evenly.
Since different types of photo paper can vary greatly in density and thickness, we will not give any tray capacity values for it. Let's just say that on the side format limiters in the input tray there are marks for maximum loading, and you need to focus on them.
During the testing process, about 250 prints were made on A4 office paper and about 40 on different sizes and grades of photo paper. At the same time, only twice was a problem recorded - feeding two sheets of office paper at once. For a completely new printer, this result is not ideal, but it can be attributed to an accident with much greater justification.
The specification states that the paper used should have a weight of 64 to 105 g/m², and only when using Canon photo paper does the upper limit rise to 275 g/m². At the same time, it is not explained how, in terms of possible problems with feeding, Canon paper differs from paper of equal quality and density from other manufacturers, and indeed: the printer coped perfectly with sheets of office paper with a density of 280 g/m² - a job sent for printing of 10 pages had no difficulties caused. We simply couldn’t find denser samples; even the photo printing paper was 255 g/m².
Among the acceptable media, there are also envelopes, and there are only two sizes: DL (98.8 × 179.5 mm) and No. 10 (93.5 × 200.8 mm). But the feeding tray allows you to use wider ones, which is what we took for the test, since we didn’t have either DL or No. 10. In reality, at least 10 envelopes can be placed in the input tray; with this number, there were no problems with feeding or printing.
Print quality
Printing documents
The quality of printing of text samples is very decent (of course, if you use not very cheap fluffy paper): 4-point fonts with and without serifs are reliably readable even with the “Draft” setting.
However, with this quality, the black color of the fill is less saturated, and the contours of the letters, especially small sizes, are somewhat torn. When you increase the quality to standard and high, the fill becomes denser and the contours are aligned. There is a difference between standard and high quality, it is visible even to the naked eye, although it is not justified by the fourfold increase in printing time - you can be quite satisfied with the “Standard” setting.
 From left to right: quality draft, standard, high; with increase
The same can be said about documents containing elements of graphic design - illustrations and areas with shading: with any selected print quality, texts, even on inexpensive class C paper, are readable at least normally. But with draft quality, stripes across the movement of the sheet are noticeable in the images:

Therefore, the “Standard” setting is also optimal in terms of print quality and time.
Test strip
Printing was carried out on grade A office paper with the settings set to “Plain paper”.
In this test it performed better than E464, especially on the neutral density and CMYK scales: when setting high quality, their discernibility is very good, from 2-3 to 99-100 percent. The fills are denser, but in some places there is still graininess and light spots; in photographic images this is almost invisible, since there are rarely large areas with uniform shading.
Multicolor stretching is smoother than that of E464, but still not ideal.
The combination of colors vertically and horizontally is very good; on thin curved lines there are practically no flows or gradation of the structure. Thin slanted straight lines also have no steps, even when zoomed in.
The maximum number of distinguishable lines per inch is 90-100.

Fonts with and without serifs are readable from point 4, but if printing is done inside out, then point 4 can only be called readable with a stretch. With decorative fonts the situation is worse: normal ones are readable from 5 point, reverse from 7 point.

In general, the print quality of the test strip can be assessed as good. We believe the results would be even better on Canon photo paper.
When printing in grayscale with high quality, the same can be said about the readability of scales, readability of fonts, and fine lines, but the graininess on fills is more noticeable.
A decrease in quality during color printing leads to the fact that prints become more faded, the legibility of scales and readability of texts decreases, and graininess increases.
Photos
When you set borderless printing mode, a warning appears:

And indeed: the image no longer fits on the sheet, some of its edges are cut off and disappear, and this must be taken into account if important details are located on the edges.
 Crop level: photo on the left is printed without borders, on the right - with borders
When printing without borders, the sheet will be filled completely in cases where the aspect ratio of the printed frame is the same as that of a sheet of paper. Otherwise, empty strips may still remain on the long or short sides of the sheet, but these are no longer margins; the width of these strips, depending on the frame format, can be either greater or less than the typical value for margins of 3.5-4 mm.
To make sure that there are no empty spaces on the print, the print preview function, which can be enabled in the driver settings, will help.

Now about the quality. As in the case of the E464, when using good paper for inkjet photo printing, the result is very decent: small image elements, details in highlights and shadows, memorable colors are reproduced quite decently for a device that, in essence, is not a photo printer, despite the presence such definition is in the description on the official website. Here are examples:


It is difficult to tell the difference between high quality and standard quality photo printing in many photographs:
 Quality: high on the left, standard on the right
Results and forecasts
If we consider it simply as a printer, then the story about it would turn out to be very boring: we did not find any noticeable shortcomings, but this is clearly not enough to distinguish it from a long line of similar devices from different manufacturers that were produced previously or are currently on the market.
The only highlight is the presence of a continuous ink supply system, but this fact alone creates real intrigue: if until now the models of the closest competitor competed only with amateur modified cartridge printers, equipped with CISS of varying degrees of handicraft and using “left-handed” ink, then the appearance of the line Canon PIXMA G created competition in the market for “branded” cartridgeless inkjet printing.
Of course, the most interesting thing would be a direct comparison with analogues from a competitor, primarily from the point of view of “which is cheaper”, since all sorts of additional functions and subtleties of analyzing the quality of prints are for “gourmets”. For the vast majority of potential buyers, the main issue is the price of the device itself; the more prudent will also inquire about the cost of consumables, and only approximately equal prices can force people to carefully study the characteristics tables.
However, at the time of writing this review there were no pricing details yet, so we can only try to make some predictions.
The volume of the color containers was clearly chosen by analogy with the competitor, and in order to make the buyer turn a favorable glance towards Canon, the volume of the black bottle was made almost twice as large. To be fair, we note: on the competitor’s website there are also references to large containers, 140 ml each, but until recently they applied only to monochrome printers and MFPs, and in color printers such a volume is now used only in one model L655, and only for black, absolutely like Canon PIXMA G.
If the price of a set of Canon containers (3×70 + 135 ml) is comparable to a competitor (4×70 ml), then there will be a very compelling argument “more ink for the same money,” and if the price is equal only in terms of per milliliter, then the argument in favor of Canon will still remain, but it will be much less weighty: black ink, the consumption of which is the greatest when printing documents, can be refilled less often.
We do not consider the option “Canon ink with the same volume to be noticeably more expensive than that of a competitor” to be probable: this would also be a compelling argument, but not at all in favor of Canon. However, you can hardly expect a significantly lower price: manufacturers usually prefer to offer the printing equipment itself cheaper, and then “take their share” on consumables. Therefore, the most likely scenario seems to be: Canon PIXMA G models will be cheaper than the closest analogues from a competitor, and the ink will be approximately the same price, more likely per set than per milliliter.
Of course, time will tell to what extent our assumptions were justified.
Yandex.Market data
| General characteristics | |
| Device | printer |
| Print type | color |
| Printing technology | thermal jet |
| Accommodation | desktop |
| Printer | |
| Maximum format | A4 |
| Maximum print size | 216 × 297 mm |
| Printing photos | There is |
| Number of colors | 4 |
| Minimum drop volume | 2 pl |
| Borderless printing | There is |
| Maximum resolution for black and white printing | 4800x1200 dpi |
| Maximum resolution for color printing | 4800x1200 dpi |
| Print speed | 8.80 ipm (b/w A4), 5 ipm (color A4) |
| Printing time 10x15 cm (color) | 60 s |
| Trays | |
| Paper Feed | 100 sheets. (standard) |
| Consumables | |
| Paper weight | 64-275 g/m2 |
| Print on: | photo paper, glossy paper, envelopes, matte paper |
| Color cartridge/toner life | 7000 pages |
| Resource b/w cartridge/toner | 6000 pages |
| Number of cartridges | 4 |
| Ink type | pigment |
| Cartridge/Toner Type | black GI-490 BK, cyan GI-490 C, magenta GI-490 M, yellow GI-490 Y |
| Continuous Ink Supply System | There is |
| Interfaces | |
| Interfaces | USB 2.0 |
| Fonts and control languages | |
| PostScript support | No |
| Additional information | |
| OS support | Windows, Mac OS |
| Minimum System Requirements | Intel Pentium III |
| Power consumption (operating) | 12 W |
| Power consumption (standby) | 0.8 W |
| Noise level during operation | 46.5 dB |
| Dimensions (WxHxD) | 445x135x330 mm |
| Weight | 4.3 kg |
| Peculiarities | Pigment black ink and dye-based color ink |
Reviews of the Canon PIXMA G1400 inkjet printer
Yandex.Market data
Rating: 4 out of 5
Alexey G.
Advantages: Price Print price Ink price
Disadvantages: Doesn't print A5 borderless!
Comment: I decided to try Canon. A previous joyful purchase was their sublimation printer. I was happy with the printer after purchasing it. Before purchasing, I was afraid whether it would be able to print photographs. As it turned out, it can and is very good for a home user. Having used up the 10x15 paper, I ran for my favorite A5 format (as close as possible to the standard 13x18 paper format). I was surprised to discover that the printer DOES NOT PRINT WITHOUT BRIDS! This fact was very disappointing. An excellent device, and the manufacturer saved money on supporting borderless printing on all formats available for the printer. P.S.: I’ve been using it for more than six months. The printer makes me happy
Rating: 4 out of 5
Gennady V.
Advantages: Everything is compact and convenient, the resolution is average, you can’t print high-quality photos or paintings, but for the unassuming citizen it’s just the thing.
Disadvantages: I had a lot of Kenons, so I knew what I would get from the G1400/
Comment: It eats a lot of ink when cleaning, which means turning it on, off, and during printing after a certain period, which is very short.
Rating: 5 out of 5
Advantages: cheap cost per print, borderless printing, convenient refilling
Disadvantages: no wi-fi
Comment: Easy to refill ink tanks are a great invention. And the fact that they are transparent and placed on the front of the case is simply convenient, because you don’t need any additional manipulations as before: turn on the computer and look at the ink level through a special utility. The design is simple, no frills, so, IMHO, it will fit into any interior. The manufacturer claims about 6 thousand pages of black cartridge. We have been printing at home and printing intensively for several months now, and we are not running out of ink at all. We tried thick paper several times for all kinds of applications - the printer did an excellent job. For the price, a good purchase. The device does not have wifi, but this is not critical in use if you place it near your workplace.
Rating: 4 out of 5
Igor Sergeev
Pros: Compared to the Epson L120, it’s simply wonderful! Colors are clear and print speed is fast
Disadvantages: Really noisy. From the other room you can hear the inside of the printer clicking. Sufficiently sized
Comment: By and large, I chose it based on the price-quality ratio, mainly for printing photos. I was pleased. I was choosing between printers with factory CISS, but after not the best time using Epson, I decided to change the brand and I was right! When printing on thick photo paper, previously it was necessary to insert each sheet manually, because the grip would misfire. Also, the printing time for one sheet of A4 format took 5 minutes. With Cannon I had to forget about this; it grabs the paper at once and prints in no more than 2 minutes!!! No loss of quality. In general, an excellent option for your money. I recommend
Rating: 5 out of 5
Advantages: Before the purchase, sofa analytics were made - a table with direct competitors of the Epson L line in the category up to 10 thousand 110, 120, 132, 312 models. in terms of quantity + canon was ahead in most positions, such as smaller drop, higher speed, larger black compartment. I also compared the prices of consumables and here the price for both original ink and analogues was more attractive than that of a competitor. In addition, even if the print head (cartridge) fails, you can replace it yourself, and not in a service center like Epson.
Disadvantages: there are none as such, there are little things that do not at all overshadow the impression of the purchase - while it is alarming how quickly the ink “evaporates” from the containers. The first refill + printed about a couple of hundred full-color A4 + a couple of dozen 10*15 photos consumed about a quarter of the color ink, but the black one dropped a few mm from the maximum level. If this continues, it will be enough not for 5-6 thousand prints, but for one thousand and a half. There was also some caution when filling the ink for the first time; there was so much of it in the factory supply that it came out slightly above the maximum level on the containers, which should have been avoided according to the instructions. - in not a single review did anyone write about the lack of printing photos on gloss. On the surface of the print, 8 stripes of microdots appear from the pressure rollers that hold the paper during printing. Enabling the "prevent paper scuff" mode in the settings also did not help. Not visible on matte paper. Yes, and on gloss it is visible not at a right angle, but when you turn it at a certain angle in front of the light source. - in the store there was a printer next to an Epson Elka, and it takes up significantly less space, if it’s important to anyone
Comment: despite the small flaw I found, I don’t regret the purchase at all. I bought it to print various educational and educational materials for children, and the photos are just pampering; anyway, we print the family archive in professional photo laboratories. I plan to disassemble and remove the dropper so that the diaper doesn’t get clogged, and I’ll probably switch to an analogue one to figure out the exact counter and the real cost of the 1st print.
Rating: 5 out of 5
Advantages: Promised resource of 7000 pages. Not expensive ink.
Disadvantages: No Wi-Fi.
Comment: I bought it for school to print documents, so I needed a model with cheap consumables; I have to print a lot. There were no connection problems. Prints documents with color elements perfectly. The photo turned out not very juicy and bright, but quite good.
Rating: 5 out of 5
Alexey D.
Advantages: Design, clarity (it’s convenient to monitor ink consumption), compactness of the device. Well, of course, the resource is a real printing factory. Although it will be interesting to see how the printer behaves after a year of operation. Borderless printing - tested on A4 and 10x15 photographs. The quality on photo paper is pleasing, it is difficult to distinguish it from printing in a photo studio. Original consumables are relatively inexpensive. 500 rub. bottle, i.e. a complete refill will cost 2 kilorubles. And another question: when will it be needed - in a year? Two?
Disadvantages: Printing on plain paper by default is very pale and unsightly. However, the large ink resource allows you to continue experimenting with settings. This is not a printer that costs 2-3 thousand rubles, in which 2-3 photos reduce the capacity of wildly expensive cartridges by 10% (we had one like this before).
Comment: First impressions are very positive. Unpacking and filling the containers (which are visible from the front) with ink did not cause any problems. The bubbles were a little worrying, but they disappeared over time. The ink may not seem to go through to the bottom at first, but don't worry. Eventually the entire container will be full. We left 10% of the ink from the starter kit and added it after the first start of the printer - just enough to fill the containers until they stop. In the first week, we printed two 10x15 family photo albums on matte photo paper (100 photos each) for ourselves and relatives, with a third one on the way. The “red” color sank a little (apparently, it was used more than others), but there is still sawing and sawing to the bottom. Black is generally unshakable. The output photos are darker than those on the screen, so it makes sense to brighten them by 10-15%, or even more. It doesn't matter whether the 10x15 photo is in horizontal or vertical orientation. Photo paper must be placed vertically in the tray. When printing 10x15 without borders, you set all the sizes correctly (both in the printer properties and in the built-in Windows printing), but at the end the edges are still cut off. It makes sense to make white margins around the photo in the editor (from 10 to 30 pixels), or crop the photo with a margin of half a centimeter on all sides so that the “heads” and “legs” are not cut off.
Rating: 5 out of 5
It's gone.
Pros: - Quite well made quality for the price! - not buggy, normal software and driver! - good quality of color and b/w printing on plain paper - good quality of photo printing for the inexperienced layman!, especially if you play around with the settings, but not the best, and the printer is not 6-color or more! - everything is easy to install, refill with paint. - a large resource of one refill, ink and non-native ink are normally digested! - replaceable separate print heads with temperature protection against overheating, which is very good for post-warranty self-service, not like Epson! - 1 year warranty, or 30,000 A4 prints, see photo below
Disadvantages: - there could be more settings in the driver! (maybe there will be an update) - not much noisy, but in fact, like most inkjet printers, nothing stands out in this regard! - it’s better not to buy if you need very good quality photo printing, it’s better to buy something more expensive and have 6 or more colors! - not the best option for removing diaper tubes and resetting them when they are overfilled, although it seems there is already a reset via a code (I just haven’t tried it myself yet!)
With regret, we observe a familiar trend; it seems that Canon, with its popular models with factory CISS, is following the path of the Epson L805. According to our observations, in the model with G1400... G4410, a planned failure of the SG has been introduced.The average lifespan of the latest versions of printheads has been significantly reduced. If earlier for the Gxxx series it was possible to talk about a resource measured in liters of ink, now the cartridge heads in the Gxxx series have practically ceased to differ in their resource, for example, from 440\441 cartridges. The only difference is that classic disposable cartridges cost almost 2 times cheaper.
The information is relevant for those who print a lot (liters of ink per year). For ordinary users, we think the resource of printers and MFPs of the Gxxx series will be enough for two or three years.
In light of this, for those who type a little and are not afraid to pick up a syringe for refilling, it becomes more profitable to buy a model without CISS, for example,
Preface:
Canon with a built-in CISS system is already in Russia. The youngest printer model with the index G1400 can be purchased in retail chains at a price slightly higher 8000 rubles.More precisely, it was sold, now the excitement is such that retail chains, out of modesty, have raised prices to almost 10,000 rubles for the youngest model.
Well, finally, what should have happened three years ago happened. Epson management has been underestimated for a long time, but they hit the nail on the head with their print factories. It is enough to look at the statistics of requests on the Internet to clearly understand which inkjet printers are now popular in Russia.
So, Canon announces the entry into the market of its cartridge-free solutions. The step is belated, although certainly logical. The consumer mentality in Russia will not allow dealing with expensive cartridges for a long time. The main selection criterion so far is the price; it is this that pushes tens of tons of alternative inks into users’ printers.
So why not offer your own alternative? That’s exactly what Epson did, and that’s exactly what Canon is doing now. Alternative inks, even under the banner of a well-known brand, will always find their buyer.
What does Canon offer us? Three models have been announced so far: PIXMA-G3400, PIXMA-G2400, PIXMA-G1400- models with the same type of printing mechanism and different external body kits. From a simple printer to an MFP.
Of course, Canon, by releasing a model for inexpensive photo printing, tried to divide the markets. Separating “high-quality” photo printing (models with photo-black color) and the new series of G1400..G3400 devices, which, by their position, are at the bottom of the model range (in terms of photo printing quality). Because black when printing G1400..G3400 they get mixing three primary colors. But with this approach you cannot get a deep black color.
But on the other hand, models from Canon with built-in CISS immediately print photos 10*15cm without borders and do not torment users, as Epson did for 4 years, with their 4-color models that could not print full-fledged photographs in the 10*15cm format.
Well, the big question is whether the mass consumer needs photographs L range<20 . Whether they see it on their monitors or on the screens of inexpensive laptops.
Be that as it may, we will try to answer all possible questions from future users regarding print quality and performance characteristics of new models of printers and MFPs from Canon.
We have been testing the model for the Asian market for more than a month now; the main bottlenecks are already clear, what to check and where to look. But we were waiting for the release of models specifically for the Russian market. As materials are completed, they will be posted. Stay tuned for updates and additions.
1 Delivery set:
Well, here it is “in hardware”, or rather in plastic. Finally, the Russian language, and not a bunch of hieroglyphs on the “Asian” model.The excitement around new models of printers and MFPs from Canon is already such that it is beginning to resemble the “Apple theme”; sellers are taking advantage of the moment and inflating the price tags for these printers.
But the market is already occupied by Epson print factories, and it is with them that we will compare new devices from Canon. In what areas will it be possible to push Epson aside, and in what areas will Canon only be catching up? Read our constantly updated review.
Printers are supplied in standard boxes for this class of devices. Everything is usual: advertising, titles, the promise of a huge number of copies without refilling.
There are no surprises in the box, except for the calculator. Probably to calculate the amount of money saved on printing. Otherwise, thick cardboard, foam, etc. Everything for the safety of valuable contents.
The supply, of course, is not very rich; everything fits on the printer lid. Manufacturers save on everything, and the Canon G1400 is no exception, which doesn’t even come with a USB cable.
Well, that’s all, and for starters, a close-up of what will be the main intrigue: ink and print heads, what is their quality, what is the price? As for the price, of course, we are only guessing, but we will certainly tell you about everything else.
2. Disassembling the printer:
Actually, why wait, everyone is interested: how Canon’s proprietary CISS is implemented. There is not much text in this section, mostly photographs. But if you notice the text, we advise you to read it.But before the “ninth wave” of photographs of the printer outside and inside comes, I would like to recall our assumptions that Canon will take into account the problems of its predecessor, and in order to avoid unnecessary problems, the print heads will be pre-filled with ink, which naturally will ultimately immediately increase their price. Well, that's all in the photographs.
First, a pool of photos that can be taken without disassembling the printer. By the way, with the CISS installed, the manufacturer is no longer cramped in narrow cases, there is plenty of space, you can install another CISS.
In the heat of filming the printer's parts and components, we almost forgot about the printer as such. Actually, from the outside the printer looks like a printer, if not for the windows of the CISS containers.
Let's move on to the dessert of this section. The body has been dropped, let's try to appreciate the engineering genius from Canon.
And immediately there are interesting differences in the approach to the implementation of ink tanks. If Epson did it the simple way (we tilt the tanks, thereby creating an air column), then Canon did not make cans hanging on two corners on the side. And I built a whole system of clamps to block the air column when refilling ink. And all this for the sake of the monolithic design of the printer, so that the printer does not look like a craft with a CISS hastily attached. How reliably will this work? It's hard to say. But we can definitely give one piece of advice: don’t open and close the covers of the ink compartments unless necessary.
We’ll immediately tell you about the changes in the operation of waste drainage mechanisms. It just so happens that printers with CISS systems installed require more frequent cleaning. This statement is not spared by the new G series printers and MFPs from Canon.
The engineers had to significantly increase the volume of the “diaper”, and since there was no longer enough space for it in its usual place, part of it (for the pigment channel) was moved to the back side of the printer. This required laying a drain to it. But every cloud has a silver lining, now it has become much easier for Canon owners to remove part of the waste (pigment) into an external container, thereby leaving the printer clean. Unfortunately, the water channel continues to be emptied for the parking lot.
What are the possible problems here? The problem is precisely the long hose for testing. The fact is that the waste material is passed from the pigment channel through a hose of limited cross-section; during long periods of downtime, thickening is possible.
By the way, the waste can thicken not only in the hose, but also in the “pump”. Therefore, periodic switching on (at least once every 3 months) for this printer is a recommendation that extends its life.
With prolonged downtime, fatal “thickening” of the waste is possible, which will render the printer inoperable.
All components are presented in as much detail as possible in the photographs, and an option for organizing waste disposal into an external container is also presented. Unfortunately, it is not possible to remove the back side of the pump with the second hose; we only show how it fits there. Getting close to it to bring out the dropsy channel is also a problem.
As promised, there is an option to organize the drainage of the pigment channel into an external container. With this option, we, of course, did not spare the body and drilled a hole instead of one of the screws. For those who want to maintain the product warranty, they need to come up with a more gentle method.
These are actually all the main differences from “cartridge” printers; to complete the picture, there are also a number of photographs of the disassembled printer.
Putting the printer into operation does not cause any problems: install the print heads and fill in ink.
This was probably the most boring section of our review, which is more interesting to printing professionals.
For those who are not particularly versed in the clutter of rollers and gears, let’s sum it up: brief summary of the disassembly:
Canon, despite the clearly budget positioning of the G series, took the design of the printer very seriously. The printer components, by today's standards, are well implemented. Of course, from the point of view of a printer who needs 5-10 thousand color prints per month, this is not the best choice. But for home users of the mechanics resource seem to be more than enough.
3.Photo print quality:
So, we’ve figured out the ins and outs of the new G series printers and MFPs from Canon, let’s move on to more understandable tests.Photo print quality. First, let's look at what instrumental measurements give us in the field of color gamuts.
We present graphs of the ink color gamut for the values L = 20, L = 50 and L = 80. G series printers are a white graphic. Four-color L series printers from Epson are the green graph.
As expected, the lack of photo black immediately affected the quality of dark shades. But the failure is not catastrophic, especially compared to competitors - Epson 4-color printing factories.
Of course, this printer is not suitable for artistic images in the Low Key style. But for most everyday photographs, the question is whether life exists on Mars, i.e. at L<20.
Now let’s look at “live examples” of printing from the new G series printers. For a “seed”, we present a scanned well-known multifaceted test image in print quality (2 on the left) and (max on the right). The images are clickable, but the size is large, about 3 megabytes.
We remind you that printing was done without using profiles, on Lomond Super Glossy Br270 photo paper. Well, as we predicted that Canon would show very decent results without the use of profiling, this series is designed for ordinary people, not printing professionals.
Now about the black color. Yes, of course, it’s not that deep. But even on test images it looks pretty good. For amateur needs this is more than enough.
Now about the raster. The raster on the new printers is significantly better than on 4-color models from Epson. But for many, quality is the visible absence of dots or stripes, and not high color rendering matters.
On cheaper photo papers when printing without a profile, not everything is so rosy. Matte lomond 230 g - photo on the left, glossy cactus 230 g - photo on the right.
Both types of papers, when printed without “profiling,” showed very average results. And most likely, cheap types of photo paper will be the target for this printer.
Therefore, unfortunately, without using profiles for these types of photo papers, high-quality photo printing is impossible.
So, we have sorted out the printing of photographs to a first approximation. But this is a home printer, what about text printing? Still, the printer claims to be a universal one.
We remind you that printing text for an inkjet printer is a failure, just like printing photographs for a laser printer. However, a special pigment channel is allocated for text in order to bring the print quality closer to “laser” systems.
We look at the “scans” of printing in fonts of various sizes on ordinary office paper.
The quality of “laser machines” is like the moon. This applies to both the clarity of the lines and durability. The standard wet finger lubrication test leaves very noticeable marks.
Nevertheless, a separate channel with pigment gives the quality of text printing on ordinary office paper significantly higher than dropsy printing in Epson printing factories.
And the durability of the pigment, if you don’t rub it, is not bad. On Epson, text on regular office paper blurs just with a drop of water. So, in this parameter, the new G series printers are ahead of their closest competitor.
Let's disappoint the “circulators”: in standard quality, the printer cannot print large runs in one gulp (hundreds of full-color sheets at a time), and nozzles will fly out. In high-quality printing modes, “streams” can be printed in any quantity. Text documents are printed in standard quality in any reasonable volume (checked in pools of 300-400 pages) without loss of quality.
Thus, this printer/MFP completely covers all household needs.
To evaluate the printing speed, we present videos that demonstrate the printing speed of text documents, as well as 10*15 cm photographs and A4 photographs.
Video of text printing As you can see, the speed is quite decent, you can print books, abstracts, etc. If you can't afford original ink, take a closer look at DCTec pigment- excellent quality at a price several times lower than the original. To date, about 300 ml have been printed with DCTec pigment, the heads are still alive.
Video printing photos 10*15cm The total printing time is one and a half minutes, which, of course, is not a speed record, but a completely normal result. Taking into account the more pleasant raster, in contrast to Epson's 4-color print factories, the speed characteristics of the new printers from Canon look quite good.
Video of A4 photo printing Total printing time is almost 4 minutes. But, unlike Epson, there is no drop in speed after printing a dozen copies, and you can accurately calculate the time to print a large number of photos.
Let's take a closer look at the operation of the raster machine on the Canon G1400.

Below are examples at an optical scanning resolution of 1200dpi. The enlarged fragments in the photograph have dimensions 2*2cm. So, even if you hold the photograph up to your nose, it is not possible to see the features of the raster.
The first thing that catches your eye is the active “noise” of monochromatic areas, thereby eliminating the visible banding caused by the junction between the passage of the PG along the movement of the paper.
The next interesting feature is the lack of black color. At the same time, there are no single black dots that 5-color models like to create. Here the printer is forced to generously and evenly pour ink of three colors to increase the density. At the same time, we get fairly smooth transitions (for amateur use).
In general, Canon showed very good results for a household printer, created, as they say, without pretensions. Many users will prefer the absence of a visible raster in photographs rather than the wide color gamut from Epson.
The average ink consumption was about 0.6 ml for a high-quality A4 print. Those. for a photo 10*15cm ink consumption will be about 0.15 ml
What's next?
We received a lot of feedback and questions on the article, one of the popular questions is where is the second hose and how to remove it?We answer, in order to get to the outlet of the second hose, you need to remove the parking assembly, then we hope everything is visible in the photo.
As you can see from the photo, the solution is not the best. Especially if you take into account the rather limited capacity of the “diaper”. How to remove the waste hose will be left to the discretion of future active users of this printer or MFP.
Everyone is interested ink lightfastness issue, but we do not use high-speed methods of influence. If you burn prints in a short period of time (several days), then sometimes the results begin to differ significantly from the fading of prints under normal conditions (indoors). Therefore, it takes about 3 weeks to get results.
We will compare with 4-color Epson, and the main intrigue is whether the ink will be close in durability to L800 or will fall to the level of an “alternative”. While ink in cans from Canon evokes only positive emotions, we are looking forward to the announcement of ruble prices for them.
Print head life. At the moment everything is very encouraging. Resources of 300 ml per color were passed on all 3 test devices. We would, of course, buy original ink and run one of the printers only with it, but we don’t have original ink yet. Therefore, having run all 3 sets of the original from the supplies through 1 printer, we transferred it to DCTec.
Let's see if the difference in mileage will be visible after the death of the PG. Still, 3 sets is a significant expense for household purposes. For 90% of users this is several years of operation!!!
A year has passed...
We are again glad to meet our readers in the section of printers with built-in CISS. A year has passed since this article was written and it’s time to sum up the results of our testing of these printers from Canon.First, the good news is that all three test units successfully passed the one-year mark (with daily mileage). The volume of print is so large that we will not voice it. No one will believe it anyway.
Yes, and we ourselves, in the third month of continuous tests, waited, well, this week, well, at most another month and a corpse. But they live, and now they are alive.
So home users can rest assured that the print heads are not the bottleneck of this printer. Well, or, at least, they are not yet (remember the story with the chronic depressurization of the Epson L800).
All 3 printers were converted to ink EverNew and actively “ate” 500-sheet reams of paper, imitating the printing of photographs and text documents.
By the way, we were asked, how do you reset the “diaper” of new models, since they have just appeared, and you are already running liters of ink through them?
The answer is that we are simply not shy and brainstorm printers by reading the EPROM dump of a new printer.
Here are photos of how this roughly happens. In fact, this is standard procedure for any printer that comes into our hands.
Many questions are asked about the PIXMA G1400, PIXMA G2400, PIXMA G3400, PIXMA G4400 series of printers and MFPs. We will consistently try to answer the most pressing of them. Unfortunately, this series of devices completely dropped out of the discussion of “prof. parties” on forums. Basic questions from ordinary users remain unanswered. So:
Ink:
Six months after the announcement of the start of sales of new models, branded ink finally became widely available.
Their cost at the beginning of 2017 was about 700 rubles per 70 grams. Which roughly corresponds to the price of Epson 664 series ink (for printing factories).
Of course, we were interested in the issue of light fastness of this ink. Here is a graph of the lightfastness of DCTec EverNew inks compared to original Canon inks.

For non-specialists: Canon branded ink fades 2 times faster than the new DCTec EverNew series. I don’t want to comment on this fact, but anyone who used the original ink noticed that indoors, if the prints are exposed to sunlight, the photographs fade quite quickly.
Most likely, when creating branded ink in jars, the reference point was the successful printing factories from Epson with 664 series inks. The volume of the bottles and their price were set in relation to them, and even the light resistance turned out to be approximately at the same level.
Those. large corporations remain true to themselves and do not go beyond cartel agreements. They have defined certain quality criteria and are not going to overcome them even under the guise of competition.
How to print bright photos?
Probably the most popular question. By default, photos come out gray and featureless. This is perhaps the main drawback of this series of devices from Canon.Unfortunately, the G1400..G2400…G3400…G4400 devices do not use black ink when printing photos. The supplied black pigment ink is of fairly low quality and is not designed for photo printing. Their destiny is to print documents.
However, there are a huge number of “cartridge” printers and MFPs on the market, which, even with this printing scheme, allow you to get more sane photographs than the Canon models in question without cartridges.
We believe that Canon has artificially “coarsened” the photo printing mode in order to position the printer in the lowest segment of the inkjet device market.
The solution is not “clean”, especially if you remember the well-known folk wisdom: don’t make it worse – it will turn out worse on its own.
We assume that the printer’s brain is significantly clamped on the “inclimit” (the amount of ink poured per unit area of paper) in order to show the outstanding efficiency of the models in terms of ink consumption.
And the price for such savings is gray, indistinct photographs. By the way, attentive readers noticed that in our test a year ago we circumvented this problem by choosing a different type of photo paper.
Unfortunately, both methods turn the model into an appendage of a personal computer. You won't be able to get bright photos using a smartphone or direct printing from cards.
Both printing methods are aimed primarily at budget photo papers, on which the gap in brightness and saturation of photographs when printed between those presented by Canon and Epson print factories reaches depressing values.
How to print bright photos. Method No. 1
Why are the photos pale? Well, why, there is no black color. Actually, here is the answer, you just need to turn on the black color when printing.In the print settings, select plain paper and high print quality. And, lo and behold, the printer immediately begins to use black pigment when printing images.
Unfortunately, the printer does not know that we are inserting not ordinary paper, but a photo, and is very greedy when applying ink to the paper. The photos will still be faded, you need to increase the amount of ink applied to the paper. To do this, we will correct the values in the driver.

Unfortunately, Canon is very creative in writing drivers, and the word “not in the settings” means no additional correction, and not disabling it altogether. Therefore, we definitely exhibit it.

Don't forget to remove automatic negotiation with ICC profiles. By the way, manual selection is for the current session; as soon as you switch the type of photo paper in the driver menu, the system will immediately try to slip one of the profiles here. We recommend deleting all ICC profiles with names (CNBC*****.icm) from the system. And in general, look at this menu item more often. Especially before printing targets for building ICC color profiles.

Using these settings, profiling was performed on inexpensive Imatec matte photo paper. The profile can be downloaded from link..
Here are graphs of the color gamut for this printing method. It can be seen that the coverage in the shadows has increased significantly. The graph shows coverage values on a 4-color print factory (Green graph) and a G1400 printer (White graph). The coverage graph is shown at L = 25.

Shadow coverage has increased significantly. And although Canon loses to Epson, without using this technique on matte photo papers the situation was extremely deplorable. The black point on matte photo papers was L>30. There was no need to talk about any black color with such parameters. The photo, printed with default settings, was something grayish and dim.
We present to your attention test photographs printed using the first method. We immediately apologize for the vertical stripes on the scanner, it is already reaching its end of life, we will replace it in the near future.
These are classic tests, A4 print format. The images are clickable; you can estimate the size of the raster using the black pigment channel. But in terms of color we managed to get quite nice saturated photographs, on photo paper costing less than 6 rubles. per A4 sheet.
One of the significant disadvantages of this method is the visibility of the pigment channel raster. After all, the pigment in these models was created for printing text; a drop is about 10 picalitres and is already clearly noticeable upon a detailed examination of the print. Although this may be a viable option for many.
Unfortunately, this method is only suitable for printing on matte photo papers. On glossy papers, in addition to a noticeable raster, you will also get “bronzing”. This, of course, can be reduced by filling in a photo series of pigment from DCTec, but we think this solution is not for the masses, especially if you take into account the price of the photo pigment.
Well, the third drawback of the method is a noticeable “banding” in the photographs if some of the nozzles are clogged. Because This mode uses single-pass printing.
In order to evaluate the saturation and contrast of an image, in addition to scanned photographs, we offer photographs of prints, where the amount of contrast can be assessed next to ordinary household objects. A pack of tea, a can of coffee - you can always find all this and see how rich it is.
We hope now you can get a comprehensive idea of how bright and saturated prints can be with the proper use of inexpensive materials.
How to print bright photos. Method No. 2
For those who are not satisfied with the raster pattern in the spinning method and the inability to print on glossy papers. Another solution can be proposed. When using high-quality EverNew inks and sane photo papers, you can continue to raise the “inlimits” to values at which the color mixture will be most similar to black.DCTec ink does not have time to spread, but is well absorbed in the receiving layers of photo papers. We warn you right away that not all ordinary glossy photo papers are capable of this.
For example, we took glossy photo paper Imatec G200 and a couple of microporous photo papers Lomond SG-260 And Imatec RC190-G. Print settings are certainly not for the faint of heart:


Even increased doses of ink on photo paper certainly cannot compensate for the lack of black color. But nevertheless, progress from using additional. Printing settings are very important. And he has the right to life. More precisely, these settings are the only way to get normal photos on PIXMA Gxxxx series devices.
Separately, I would like to talk about Imatec glossy paper; at a more than affordable price, it has a very decent photo layer, and with a decent gloss. In terms of tactile sensations, the paper occupies an intermediate place between ordinary gloss and microporous papers, while the price is less than 8 rubles. per A4 sheet.
The photographs on all three photo papers have sufficient contrast and brightness, and at least correspond to classmates with the same type of printing (without black). The raster is not noticeable in photographs. It is practically impossible to assess the difference in color gamut through a scanner, so we present sample “scans” of photographs to evaluate the raster and overall color contrast. We remind you not to pay attention to the vertical stripes, this is a scanner that is reaching its end.
The photographs are on glossy photo paper Imatec G200; upon “pixel-by-pixel” examination, you can already see the quite black color. In general, photos do not leave a “white” feeling like they do when printed with default settings. Although, of course, it is not possible to compensate for the lack of full black color. One of the nice bonuses is a soft raster without black dots as in the previous printing version.
Photograph on microporous glossy photo paper Lomond SG-260.
Photo on microporous glossy photo paper Imatec RC190-G.
Increasing the color gamut from the bottom made it possible to reproduce flesh tones without significant dips and holes in the gradients. In general, this is a definite success for the lower segment of printing. We hope our recommendations for printing photos on PIXMA G1400....G4400 printers will allow you not to be disappointed in this unit.
But in order to understand the place of this printer in the photo printing section, look at the graph, we added a 15-year-old Epson 2100 printer on Lomond 260 photo paper to the shadow coverage graph on three photo papers.