Adding a new widget block to WordPress templates. How to add widgets to the main panel? How to add a widget to a wordpress page
Widgets are one of the unique features of the Android operating system. After all, there are no widgets that could be added to the screen even on the iPhone. In this article, you will learn how to add a widget to your Android screen and how to remove it later.
Depending on the version of Android that is installed on your smartphone, the process of adding widgets to your desktop may vary greatly. In addition, there are differences in different shells. In the standard Android shell, widgets can be added completely differently than in the shell from some conventional Samsung. In general, it is simply impossible to describe all possible options in one article. Therefore, we will consider only a few of the most common methods.
If you have a smartphone with a standard Android shell, then in most cases, in order to add a widget to the screen, you need to click on any empty space on the desktop and hold your finger on the screen until the menu appears. This menu may look different depending on what version of Android is installed on the phone. For example, in older versions of Android it looks something like this:
If you have such a menu, then you need to select the “Widgets” option and then add the desired widget to the screen by selecting it in the list.

In more modern versions of Android, after a long press on an empty space on the desktop, this menu appears. In which you can select “Wallpaper”, “Widgets” or “Settings”.

Select “Widgets”, after which a list of available widgets opens. In order to add one of these widgets to the Android screen, you need to click on it and, while holding your finger on the screen, transfer the widget to the desktop.

In addition, in some versions of Android, the list of widgets can be opened through the application list. To do this, click on the button that opens the list of installed applications (the button with dots at the bottom of the screen).

And after the list of applications opens, you need to swipe to the left to go from the list of applications to the list of widgets.

To add a widget to the screen, do the same as described above. Click on the widget and without releasing your finger, transfer it to one of the desktops.
If you are tired of the widget or you have added the wrong widget, you can always remove it from your desktop. To do this, you need to click on the widget and, without releasing the panel, drag it to the “Delete” button. Typically this button is located at the top or bottom of the desktop.
Most users are already accustomed to the Yandex main page, but it can be easily changed. For example, make the main page like this:
The settings are valid only for the browser from which you configure!
Let's start with the design. To select a theme for the main page, you need to click the icon in the upper right corner and, in the menu that appears, select the line “set a theme”.
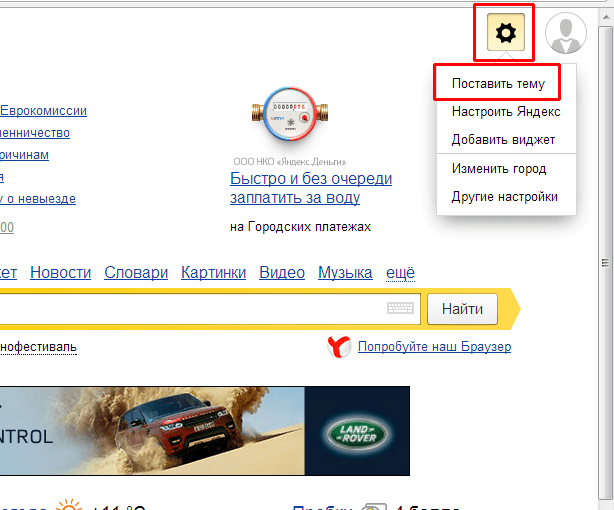
Animated themes appear at the bottom of the page; click on them to see what the page will look like.

For the convenience of selecting the required topic, you can choose from the proposed sections, for example, “summer”, “spring”, “fashion”, etc. Sections are indicated at the top of the topic menu that appears. Topics are also divided into “all” and “new”.

If you are not satisfied with the topics, you can scroll through the topics using the arrows left and right.

After selecting a theme, you need to click the “save theme” button located at the bottom. If you change your mind about installing the theme, you can close the window or click the “cancel” button.

The second item in the Yandex appearance settings menu is “configure Yandex”. Here you set the widgets that you will see on the main page of Yandex search.

When you click “configure Yandex”, we go into the mode of replacing and deleting unnecessary widgets. Widgets can simply be dragged with the mouse into place of another widget (point at the widget, hold down the left mouse button and drag), or they can be deleted by clicking the cross in the upper right corner. Some widgets have their own settings, depending on the information shown. For example, the “Yandex traffic jams” widget can be configured for any city, and you can also set a “work-home” route.

In addition to the widgets shown, you can select others. To do this, click the “add new widget” link in the upper left corner.

On the left you can select the theme of the widget you are interested in, and on the right you can see the widgets themselves with a short description. At the bottom of the page there is a numbering for moving to the next or previous pages.

To select a widget, hover the mouse cursor over it, the add button appears, and click with the left mouse button (it is not necessary to click on the button, just click on the gadget or name).

After this, the widget appears on the main page and can be dragged in place of other widgets. You must select an action - “keep” or “delete”.

There are buttons in the top menu - “return” to return deleted widgets (if you haven’t deleted them, then there will be no such button), “reset settings” - returns everything as it was originally, the entire page design is also reset, “cancel” to return the same appearance , which was before the changes and “save” - to save the changes.
In the field for entering the name of the city, we begin to enter the initial letters of the city and then select it from the drop-down list. You won’t be able to enter the city yourself, you can only select from the list. Here you can set the default city, that is, the city will be determined automatically. By checking the “do not specify my location” checkbox, you will not be shown pop-up windows with a question, for example, “are you in Moscow?” and two answer options - “yes” and “no”. After selecting the city, click the “return” button.

In this lesson I want tell you about widgets. So what is a widget?
Unusual word widget(from English widget– “thing”, “gimmick”) is used to refer to tools or content that can be added, organized, and removed from the sidebar of a WordPress blog or page. Widgets make it easy to customize your blog sidebar content.
This means that all the information you see on the sidebar of your site can be easily edited, deleted and any other changes.
The widgets page is located in the console menuAppearance - Widgets.
First, look in the menu Appearance and go to Widgets. On the left you see a list of all widgets available for adding.

List of available widgets
To activate widget, drag it to the side (right column, with a list of available places for widgets) column or click on it. To deactivate widget or delete widget, drag it back or click "Delete".

Adding a Calendar widget by dragging the mouse
After we have dragged the desired widget to the sidebar panel, enter its name and press the button "Save".

By analogy, we add all the necessary widgets that you want to see on the sidebar of your site. You can see a list of standard widgets and their capabilities below.
Standard Widgets in WordPress
- Widget "RRS" -Entries from any RSS or Atom feed.
- Widget "Calendar" - Calendar of your site's entries.
- Widget "Tag Cloud" -Cloud of frequently used tags.
- Widget "Latest Posts" -The most recent posts on your site.
- Widget "Pages"- List of pages of your site.
- Widget "Archives" - Archive of your website posts by month.
- Widget "Meta"- Links to login/logout, RSS feed and WordPress.org.
- Widget "Search"- Search form for your site.
- Widget "Categories" -List or drop-down menu of categories.
- Widget "Fresh Comments" -The latest comments on your site.
- Widget "Text" -Free text or HTML code.
Saving widgets when changing templates
Usually When installing or changing templates, widgets are lost. To avoid this, it is recommended that before changing the templates (themes) of your WordPress site, move all active widgets to a block "Inactive widgets".
The result of adding a widget that adds a calendar to the sidebar of the site in the template Contango:

Result of adding a widget (click on the image to enlarge)
As you can see, everything is very simple! In this tutorial we learned how to add, edit and delete widgets in WordPress. If you have any questions, ask them in the comments.
Hello friends! In previous lessons, we showed you how to embed a video on a website and learned how to change the theme in WordPress. In this lesson I want to tell you about widgets. So what is a widget? The unusual word widget is used to refer to tools or content that can be added, organized, and removed from the sidebar of a WordPress blog or page. Widgets make it easy to customize your blog sidebar content. This means that all the information you see on the sidebar of your site can be easily edited, deleted and any other changes. The widgets page is located in the console menu Appearance - Widgets. Adding and customizing widgets in WordPress First, look in the Appearance menu and go to Widgets.…
So, friends. Once upon a time, I promised to write to you on how to add new widget zones to your WordPress template or edit old ones. But unfortunately, I forgot about it.
I apologize for this. Thank you very much to Marina for reminding me of this. I really love receiving feedback from visitors to my site. And I'm always happy to help.
Let's get started.
First of all, I would like to talk about what a widget is in WordPress. Many people probably don't know.
Widgets are functional blocks that are used to layout your template. WordPress comes with over a dozen widgets by default. For example: categories, archives, text field, calendar, etc. They are located in the WordPress admin panel in the tabs "Appearance" ->"Widgets" .
In addition, many plugins can add their own widgets, which, after installing the plugin, we can also place on the site. But we cannot place them everywhere. But only in those places that were originally designated for widgets.
This is what we will talk about now.
1. Initializing widget zones in the functions.php file
Yes, yes. It is in this file that the widget zones are registered. This file is located in the folder with your theme. More specifically here:
/wp-content/themes/theme_name/functions.php
Open it with any text editor. It is most convenient to use Notepad++ (for more advanced users - Adobe Dreamweaver). And scroll it almost all the way down. Before function:
There may be several similar ones. As a matter of fact, the number of widget zones that will be in your template depends on how many of them are written.
Let's look at the syntax.
This line indicates that we will now describe widget zones, and not something else.
This line specifies the name for the widget zone, which will be displayed in the admin panel on the “Widgets” tab. “twentyten” is the name of the topic (yours may differ).

This is the description that will be displayed when you open the widget area in the "Widgets" tab.

Let's continue looking at the code:
This code will be added before the title, which we will enter into the text field when creating the widget itself.
| "after_title" => "" , |
Accordingly, this code will be added after the header. We close the tags in it that we opened before the title.
That's it! The widget zone initialization is complete. Let's move on.
2. Placing the widget zone in the template.
It all depends on where you want to place the widget area. If you want to place it in the header, then add the code to the header.php file.
If in the sidebar, then to the sidebar.php file
If in the basement - then in footer.php
Now let's look at the code that needs to be added:
This code checks if any widgets have been added to a specific zone. After all, you must agree - there is no point in displaying a zone if there is not a single widget in it.
“primary-widget-area” is exactly the same identifier that I talked about in the previous chapter. It points to a specific area.
So, the condition was checked. If the widget is not added to the zone, the zone is not displayed, but if it is added, then the following construct is inserted into the page code:
Inserts a specific widget zone at this location. Again, identified by “primary-widget-area” - the same identifier.
Well that's it! Now you know how to add a widget area to your WordPress template.
I wish you to understand this topic and create templates that you need, and not the one who created the template.
And don't forget to subscribe for updates. There are still a lot of interesting things waiting for you.
GetResponse widgets are customizable Main panel at your own discretion. You can add an unlimited number of widgets with the indicators that are most important to you and arrange them in the desired order. Widgets are possible move , tune or, if they are no longer needed, delete.
Using widgets you can customize quick action or track contact list statistics, mailings, autoresponders, surveys, processes, landing pages, webinars and forms.
Track subscriptions and list updates
- List Statistics
Sort your lists by name, size, and added and deleted contacts. This widget is useful for tracking changes in your contact lists.
- New contacts
Track the number of subscriptions to one or more lists over a specific period. The widget graph displays data on growth, decline, or constant number of subscriptions. You can view the total number of subscriptions or switch between lists to view statistics for each individually.
Tracking the effectiveness of mailings
- Mailing statistics
Track open and click rates for the latest email from your selected list.
- Autoresponders
View autoresponder lists, open rates, and the number of contacts who receive autoresponder emails.
Track visits and registrations
- Landing page statistics
Track the number of unique visitors, page visits, new contacts and registrations for a specific period.
- Form Statistics
Track the number of unique visitors, form views, new contacts and registrations for a specific period.
- Webinar statistics
Track number of participants, unique visitors, invitations sent, and participation rates.
- Poll statistics
Track how many people opened and completed your survey.
Track how many people have completed all stages of the process
Find out how many people completed and did not complete all stages of the processes. This widget displays information for published and unpublished processes. You can set the time range for displaying results.
Create up to 5 shortcut buttons for frequently used tools
- Quick access
This is your selection of links to mailing list builders, web forms, landing pages, webinars, processes, autoresponders or surveys. And also a quick link to the section Add contacts.
How to add more widgets and change widget options?
Each widget has two "sides". Front - with indicators, and back - with widget parameters. To go to setup settings, press Options(gear icon) in the upper right corner. To return to the data display click Cancel or Save(if the parameters have been changed).
To add more widgets, hover your mouse over the plus icon in the lower left corner. The plus icon will turn into a button Add a new widget. Click the button to go to the widget library. Find the widget you want and click the plus icon to add it to your home panel. Newly added widgets first display the options page (back side). Configure widget settings and click Save.
To change settings or remove a widget, click Actions. Change settings and click Save or click Delete widget.