Formatting the hard drive at a low level. The best program for low-level formatting of hard drive and USB devices - review
Low-level formatting of a hard disk drive (HDD) is applicable to transmission interfaces, including SATA, as well as IDE, which operate at a low access level.
However, it is necessary to immediately make a reservation: when they talk about formatting at a low access level, they mean the “new” technological process of “zeroing” the hard drive. In this case, data from the surface of the device is erased and replaced with zeros using special software. Previously, low-level formatting meant a completely different process.
Why do you need disk cleanup?
Most often, a complete wipe of a SATA or ATA (IDE) hard drive is performed for the following reasons:
In fact, the question arises: why resort to such reformatting methods, what are the reasons for processing the disk at a low access level?
- getting rid of malware and viruses that cannot be eradicated by other, less effective methods: anti-virus protection, scanning and destruction of damaged data.
- for a cleaner reinstallation of the system, high-quality installation of applications on a fresh Windows OS, Mac OS or Linux.
- low-level formatting can be used to securely erase private, personal data, which is easily restored using appropriate recovery applications
- one of the most justified reasons is “treatment”, prevention of bad sectors of the hard drive, bad cylinders, which significantly impair the performance of the HDD
- in case you are using a new storage device that does not work without first formatting
- if the boot sector has been damaged: that is, the disk does not function as a boot device, but is available for storing information
- when reading errors occur during low-level file operations performed on the HDD
- for prevention, diagnostics of the hard drive, bringing its structure and surface into proper condition, suitable for correct reading and writing of information
- when reviving a hard drive, this is the most effective way possible
The design of the hard drive allows you to use unused “reserve” sectors to replace bad blocks. However, in practice, the HDD may simply not use this backup feature and continues to write and read information to and from bad sectors.
Therefore, low-level formatting of a hard drive allows you to instruct it to discard bad cylinders, replacing them with spare ones. This, in general, significantly improves the performance of the disk, especially when it comes to SATA and IDE storage devices that have been in use for a long time, while standard formatting methods do not lead to the desired results at an acceptable level.
What program can I use to format a disk at a low level?
Note. If you decide on this procedure, I advise you to first make a backup - that is, both user data and programs - since after formatting the data will be destroyed irrevocably.
A small free program will help you HDD Low Level Format Tool, which supports a huge range of SATA and IDE hard drives (with rare exceptions).
Of course, there are also standard means. For example, some BIOSes have a low-level formatting option for the hard drive. However, the disadvantage of this method is the low quality and even inadequacy of such methods. Some HDD manufacturers provide their own tools that access the hard drive at a low level, but this is a very narrow niche... Therefore, it is relatively safer to use HDD Low Level Format by downloading the program through my catalog.


Using the SeaTools for DOS utility to format
I present to you an excellent low-level formatting utility - . You can download it for free from the HDD supplier's website. SeaTools functionality includes three methods for formatting HDDs, which are individually of interest to both home and professional users. The utility will be useful for eliminating numerous problems associated with bad sectors, bad blocks, sudden damage to the structure or systematic loss of important information on the disk.
One of the important features of the program is that it really functions at a low-level, runs under DOS, and is easy to work with in the command line interface. The program works quite quickly - try scanning the surface of the disk with it, this operation only takes a couple of minutes.
After scanning and diagnosing the problems, you can proceed to hard low-level formatting of the disk by selecting the required method for deleting information.
Formatting refers to the process of applying special marks to the drive. It can be used for both new and used drives. It is necessary to format a new HDD to create markup, without which it will not be perceived by the operating system. If there is already any information on the hard drive, it is erased.
For these reasons, formatting may be relevant in different cases: when connecting a new HDD to a computer, to completely clean the disk, when reinstalling the OS. How to do this correctly and what methods exist? This is what this article will discuss.
HDD formatting is required for several reasons:
- Creating basic markup for further work with the hard drive
This is performed after connecting the new HDD to the PC for the first time, otherwise it simply will not be visible among the local drives.
- Clearing all saved files
Over the years of operation of a computer or laptop, a huge amount of unnecessary data accumulates on the hard drive. These are not only user files, but also system files that are no longer needed, but are not deleted on their own.
As a result, the drive may become overfilled and operation may become unstable and slow. The easiest way to get rid of garbage is to save the necessary files to cloud storage or to a flash drive and format the hard drive. This, in some way, is a radical method of optimizing the operation of the HDD.
- Complete reinstallation of the operating system
For a better and cleaner OS installation, it is best to use a blank disk.
- Bug fixes
Fatal viruses and malware, bad blocks and sectors, and other problems with the hard drive are often corrected by creating a new partition.
Formatting steps
This procedure is divided into 3 stages:
- Low level
The term "low-level formatting" has been adapted for users. In the usual sense, this is the erasure of information, as a result of which all disk space is freed. If damaged sectors are found during the process, they are marked unused in order to eliminate future problems with writing and reading data.
On older computers, the Low Format feature was available directly in the BIOS. Now, due to the complex structure of modern HDDs, this feature is not available in the BIOS, and real low-level formatting is done only once - during manufacturing at the factory.
- Partitioning (optional step)
Many users split one physical disk into several logical partitions. After this, one installed HDD becomes available under different letters. Usually "Local disk (C:)" used for OS, "Local disk (D:)" and subsequent ones - for the distribution of user files.
- High level
This method is the most popular among users. During this process, the file system and file tables are formed. After this, the HDD becomes available for data storage. High-level formatting is performed after partitioning; data on the location of all files recorded on the hard drive is erased. After it, you can fully or partially restore data, unlike low-level recovery.
Formatting Types
There are two types that are used to format internal and external HDD:
- Fast
It doesn’t take very much time, since the whole process boils down to overwriting the file location data with zeros. At the same time, the files themselves do not disappear anywhere and will be overwritten with new information. The structure is not optimized, and if there are problems, they are overlooked and not corrected.
- Complete
All information is completely deleted from the hard drive, at the same time the file system is checked for various errors, and bad sectors are corrected.
HDD formatting methods
Formatting a hard drive can be done using different methods. To do this, either built-in Windows tools or third-party programs are used. If you want to carry out this procedure and clean the HDD, then use one of the suggested options.
Method 1: Using formatting programs
There are both small utilities and powerful programs that perform additional tasks besides the main one, for example, partitioning the hard drive and checking for errors. To format OS partitions, you will need to create a bootable USB flash drive with the program installed.
Acronis Disk Director
One of the most famous utilities that works with physical disks and their partitions. The program is paid, but very powerful, as it has many features and functions.
Allows you to format a hard drive by changing the file system, cluster size and volume label. The interface resembles a standard Windows program "Disk Management", and the operating principle is correspondingly similar.


Method 3: Via BIOS and command line
To format the HDD in this way, you will need a bootable USB flash drive with a recorded OS. All data, including Windows, will be deleted, so if you need to format a drive with an installed OS, this procedure will not be possible using the previous method.
Follow these steps:
- Connect the flash drive to your computer.
- Restart your PC and go into BIOS. To do this, after start, press the enter key - usually this is one of them: F2, DEL, F12, F8, Esc or Ctrl+F2(the specific key depends on your configuration).
- Using the keyboard, change the device from which the computer will boot. To do this, go to the section "Boot" and the list of boot devices in first place ( "1st Boot Priority") insert your flash drive.

If the BIOS interface is like in the screenshot below, then go "Advanced BIOS Features"/"BIOS Features Setup" and select "First Boot Device".

- Click F10 To save the settings and exit, to confirm your actions, press "Y". After this, the PC will boot from the selected device.
- In the running Windows 7 environment, at the very bottom, click on the button "System Restore".

In the options window, select "Command line".

On Windows 8/10, also select "System Restore".

Then press the buttons in sequence Diagnostics > Troubleshooting > Command Prompt.

- Determine the drive that will need to be formatted. The fact is that when you start a PC from a bootable flash drive, their letter designations may differ from those that you are used to seeing in Windows, so first you need to find out the real letter of that hard drive. To do this, write the following command on the command line:
wmic logicaldisk get deviceid, volumename, size, description
The easiest way to determine a HDD is by its size - it is indicated in bytes.
After the letter has been determined, write this on the command line:
format /FS:NTFS X: /q - with changing the file system to NTFS
format /FS:FAT32 X: /q - with changing the file system to FAT32
or just
format X: /q - quick formatting without changing the file system.Click Enter every time the command line requires it, until the process completes.
Clarifications: Instead of X use the letter of your HDD.
You can also assign a volume label (drive name in Windows Explorer) by replacing the command /q on /v:IMYA DISKA
Modern hard drives use NTFS. For older PCs, FAT32 is suitable.
Please note that due to differences in BIOS versions, menu item names may vary. If your BIOS does not have the specified parameter, then look for the most suitable name.
Method 4: Formatting before installing the OS
If you plan to format the disk before installing a new version of the operating system on it, then repeat steps 1-5 from the previous method.

Now you know what formatting is, what it is, and how it can be done. The method depends on which drive needs to be formatted and what conditions are available for this.
For simple and quick formatting, the built-in Windows utility, which can be launched through Explorer, is sufficient. If it is impossible to boot into Windows (for example, due to viruses), then the formatting method via BIOS and command line is suitable. And if you are going to reinstall the operating system, then formatting can be done through the Windows Installer.
Using third-party utilities, for example, Acronis Disk Director, makes sense only if you do not have an OS image, but you can create a bootable USB flash drive with the program. Otherwise, it is a matter of taste - to use a standard tool from Windows, or a program from another manufacturer.
Flash drives are a very popular accessory for storing important information or for transferring data between several computers when it is not possible to transfer it in other ways. Despite the high reliability and the possibility of repeated recording, under the influence of various factors, wear of microcircuits and memory sections occurs, as a result of which various failures and malfunctions can occur, and information can be read and written with errors. As a result, the system may require you to format the flash drive and not open it. You can try to check the disk for errors or restore the data and continue using it.
An extreme measure to restore the functionality of a flash drive is low-level formatting.
But when everything is so bad that neither recovery nor regular formatting helps, only low-level formatting will help. It will help to fully restore the functionality of the flash drive, as well as get rid of errors and failures. In this article, we will take a closer look at what low-level formatting of a flash drive is, as well as software that can help with this.
It’s worth starting with how the file system is organized. The entire file system is divided into tracks and sectors (so-called clusters) of a certain size, which, in turn, are combined into sections or directories. Depending on the file system used, their organization and location may vary. All service information is recorded in the memory of the controller, which manages requests for access to the desired location in memory. When you transfer data to storage media, the file is split into cluster-sized pieces and written to a specific sector of the disk. When reading, the controller accesses the desired sector, and you gain access to the data.
If for some reason the location of the sectors is lost, for example, when writing or reading a large amount of data, you pulled the flash drive out of the connector, the controller cannot correctly access the desired sector, since that section is damaged. Low-level formatting allows you to delete memory sectors located on the disk and clear the controller's control information. In other words, you do a complete reset of the firmware of a flash drive or memory card and erase the file system. To continue using the flash drive, you will need to format it in the usual way.
What else is low-level formatting used for?
- Complete cleaning of various malicious files found on a flash drive, especially if they cannot be removed in the usual way using an antivirus or recovery.
- The most reliable and complete removal of secret and important data to eliminate the possibility of restoring them using special software.
- Prevention of errors in the presence of bad sectors and junk files that interfere with normal functioning.
- To restore the boot sector, that is, if the flash drive is physically intact, but the system cannot access the files.
In order to perform this procedure, you will need special software. Let's look at some of the best utilities that can help you with this. Usually they all support all major drive models, but since some of them may have their own characteristics, in such cases you will have to limit yourself to a utility tailored for use with devices from a specific manufacturer.
Review of the best utilities
A very powerful and advanced utility for low-level formatting of flash drives and other storage media. The program is capable of resuscitating them from almost any, even the most hopeless, state (well, except perhaps for unrecoverable physical damage to microcircuits and controllers), as well as completely erasing absolutely any information without the possibility of recovery. The program erases the disk partition table without leaving a trace, and then re-partitions it.
Program features:
- Full support for almost any model of flash drive or disk from popular manufacturers.
- Compatible with all possible connection interfaces.
- Detailed report on the work done.
- Limited features of the free version and no restrictions in the paid version.
How to use the utility correctly?
- Download the installation file from the site and run it.
- When you launch it for the first time, click the Continue for free button.
- Find your flash drive in the list of displayed media and double-click on its name with the mouse.
- Select from the list of possible operations Low-Level Format - Format This Device - Yes.
- After the procedure is completed, open Windows Explorer, right-click on the flash drive and select “Format.”
- After this, you can use your flash drive.
An excellent utility for performing low-level formatting with a Russian-language interface and minimal requirements for computer resources. The program does not even need installation, as it works in portable mode. How to use it?
- Download and run the program installation file.
- In the main window, place the cursor on the disk that you want to format, click the “Recover media” button.
- Wait for the process to complete, click the “Finish” button.
- Format the media as usual using Windows Explorer.
The utility is designed for use with JetFlash, Transcend, A-Data media. Maybe you'll be lucky and be able to recover another flash drive. What are the features of the application?
- Complete portability.
- The minimum number of buttons is only two - “Start” and “Exit”.
- Work in the cloud, so the load on the computer is minimal.

You need to download the installation file, run it and click the “Start” button. Very simple and fast.
SP USB Flash Drive Recovery Software
A proprietary utility from the well-known manufacturer of portable storage devices, Silicon Power. However, even if your flash drive from another manufacturer uses standard device identifiers, you can safely use it. To do this you need:
- Download the installation file and run it.
- Select your flash drive from the list.
- Click the start recovery button.
In a couple of seconds everything will work as expected.
Since Kingston has a significant share of the portable media market, it also offers its customers a utility for restoring USB drives. It is also not overloaded with functions, has the most necessary functions and practically does not load the system. To format a flash drive using this utility, you need:
- Download it and save it in a folder on your hard drive.
- Open the archive, click the Unzip button in the automatic unpacker that opens and select the folder where you want to save the unzipped files.
- Go to the folder where you unpacked the utility and run the program file.
- Select your flash drive from the list of drives and folders and click Format.
- Wait until the program finishes its work to start using your flash drive.

A universal application for formatting flash drives from different manufacturers. It is completely free and is very effective in the fight against damaged partitions and sectors. In addition to formatting, the program is equipped with the following functions:
- Supports almost all existing manufacturers and models.
- Works on all the latest versions of the Windows operating system.
- Checking and correcting errors.
- Quick formatting.
- Deep and traceless deletion of all recorded data.
- A detailed log of work operations.

To use the program:
- Download the program and run it.
- Select the flash drive and file system format from the list.
- Come up with a name for the disc.
- Click Format disk.
- Wait until the procedure is completed.
Conclusion
Low-level formatting, despite the abundance of software, must be carried out with caution, as there is a risk of irreversible damage. Then you'll have to go and buy a new media. In the comments, please write what program you used to format your USB drive.
Good day, glad to see you on my website! Today, a rather interesting topic that is relevant and may be needed in the future when using your hard drive is low-level formatting. For a low-level hard drive format, we will use a special program.
Why do you need low-level formatting of a hard drive?
So, what is low-level formatting of a hard drive, and why is it needed:
- Deleting all information without the possibility of recovery. Please note that all previously deleted files from your hard drive can most likely be returned; even after regular formatting, you can recover photos and other personal documents. Therefore, if you want to sell a hard drive, we recommend doing low-level formatting. To completely remove confidential information without the possibility of recovery.
- Marking bad sectors to an unused section. If your hard drive is cracking, is not immediately detected, and is simply glitching, then a low-level format can help you. It will mark bad sectors and they will not be used in the system in the future.
- Prevention when purchasing a hard drive, if you recently bought a hard drive, then I recommend that you also make a low-level format.
So we figured out the advantages of this formatting method, but we’ll soon find out how to do it correctly, and what program will help us! It doesn’t matter what brand the hard drive is: Seagate, WD, Samsung or any other - low-level formatting is equally successful.
How to find out if it's worth doing
To check and diagnose bad sectors, use the Victoria program. Using it you can find out about the current state of the hard drive. You can download it.
Attention! If you have one HDD and a system on it, then this operation is dangerous! Up to the point of HDD failure. More details Here.
A program for correct low-level formatting of a hard drive
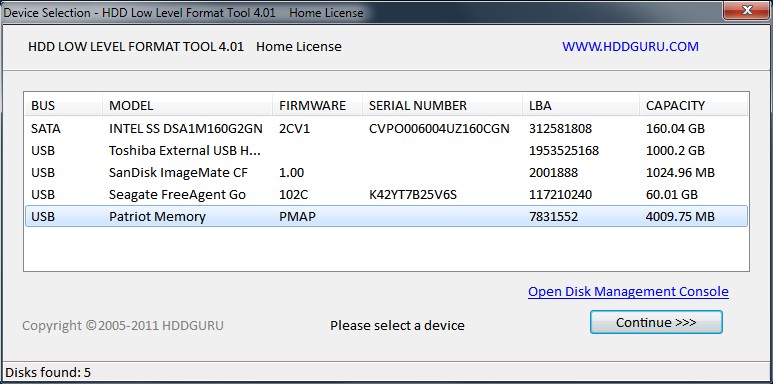
We will use the program HDD Low Level Format Tool, the name speaks for itself - this program was developed only for low-level formatting of a hard drive under Windows, you can download it below:
The program does not require installation, after launching it it is ready to work, the interface language is in English, but it is very easy to use. I have written detailed instructions with pictures, so you can definitely figure it out.
1. Launch the program and select the hard drive that needs to be formatted, click "Continue >>>"
 2. Go to the second tab "LOW - LEVEL FORMAT", don’t forget to check the box and click "FORMAT THIS DEVICE"
 3. A warning will appear stating that all information on the disk will be lost, we agree to the formation.
 Attention, do not touch the hard drive during formatting, wait until the end of the operation.
Greetings to everyone :) In this opus, I want to share my impression of the work of the HDD Low Level Format Tool program. I think many users, both experienced and newbies, have encountered problems with hard drives. And so let's get started, in this material we will step by step look at the work of the above-mentioned program and its removal of software budgets from the hard drive I use. The article will focus on the home license of this software and “editing” it with a WD smart hard drive, model velociraptor 600Gb.
Before starting to describe how the program works, I want to say the following banal and simple things: In any business, the arms should be straight and the convolutions crooked, and not vice versa. This phrase means that the author disclaims any responsibility for your incorrect actions. Incorrect use of the program, after reading this material, is your illiterate actions and the author of this opus, abdicates all responsibility. The decision to use this software is your choice.
Well, now let's get started :) First of all, I want to write what the HDD Low Level Format Tool program can do according to the manufacturer, and so let's look at the functionality of the program and so on.
Supported interfaces: sata, ide, sas, scsi, usb and firewire.
Supported hardware manufacturers: Maxtor, Hitachi, Seagate, Samsung, Western Digital, Toshiba, Fujitsu, IBM, Quantum and much more not listed here.
The program also supports working with memory cards: SD, MMC, MemoryStick and CompactFlash.
OS compatibility: MS Windows XP, Vista x32/x64, 7 x32/x64, 2003 Server, 2008, 2008R2
I am describing the version for personal/home use, the program was installed on a PC with OS win8 and all the actions that I will describe in the future were performed on it.
Also from the manufacturer’s words: The program will completely destroy your data, perform low-level formatting, and also allow you to change the size of the drive up to 281,474,976,710,655 bytes. Supports work with external devices via USB and Firewire interfaces. It is possible to use UltraDMA mode.
I would like to clarify right away that the program performs full formatting, but this is not low-level formatting as the manufacturer claims. Since low-level formatting is performed when the hard drive is partitioned by the manufacturer. I advise those who have doubts to read about disk formatting on wikipedia.
Also in the main program window in which we start formatting there is an item: Perform quick wipe(just remove partitions and MBR)- this means, loosely translated, that by checking the box you will delete partitions and MBR.
And so, during the next check of SMART parameters, problems were detected on one of the hard drives, but to my luck they were software. See screenshot.

I launch the program.

I select the desired drive and confirm.

The process has begun :) Here I want to stop a little and draw your attention to what you will see in the screenshots below. Several screenshots will show the beginning of the formatting process and its subsequent stages. And I would like to draw your attention to the speed of the formatting operation; when using the free version of this program, the speed will always be equal to: 50Mbps.

Formatting is nearing completion :)

Well, here's the finish :)

And so, after formatting was completed, I launched the crystaldiskinfo program and saw that not all the bad things were “removed,” but it didn’t matter, because I have used this software more than once, I knew that in order to see a reliable picture, I needed to initialize the disk in the OS and possibly reboot the PC.


I reboot the PC and see :)

Well, this opus has come to its logical conclusion :)
I express my gratitude to the Administration for the opportunity to post content and encouragement to write it.
PS I tried not to be rude with commas at the request of the readers, but what happened with the style is not for me to judge, but I sincerely apologize in advance, because I don’t particularly know how to write, and remembering my school years, everyone probably remembers - today we are writing an essay on the topic: how I spent the summer, so at the end of this essay, I was already writing like my grandfather in 1945 at full speed, on his locomotive to Berlin. ..
PSS Comments on the substance of the issue are welcome :) Comments like: a shkolota wrote, and other nonsense will be deleted.