Instructions for using the MSI Afterburner program. How to enable game monitoring in MSI Afterburner
Mining equipment is rarely used with default settings. Professional miners always resort to overclocking - manually increasing characteristics to improve performance. For this purpose the program is used MSI Afterburner in mining, although the functionality of the offer is quite extensive (diagnostics, downvolting).
The utility is downloaded for free from the official MSI website, but can work with any manufacturer. After downloading and unpacking the archive, you need to run installation file MSIAfterburnerSetup442.exe.
The Afterburner installation wizard is nothing special; just click “Next” everywhere. In the window for selecting program components, you must uncheck the RivaTuner statistical tool. After completing the installation of Afterburner, it is too early to start mining - first, settings.
Settings
Afterburner offers the following tools:
- GPU Clock. Display clock frequency selected video card.
- Core Voltage. It looks like a slider with which you can adjust the voltage level of the card.
- PowerLimit. Slider to adjust the device's power consumption level. When overclocking, the parameter must be increased, otherwise the video card will not cope with the frequencies and will constantly reset them to default.
- TempLimit. Allows you to set the temperature limit for heating the adapter. If the indicator is exceeded, mining will stop and the video card will reduce the frequency.
- CoreClock. Another important component MSI settings Afterburner for mining. Increases or decreases the frequency of the video processor, and, accordingly, the hashrate.
- MemoryClock. Affects hashrate, but by increasing frequency RAM cards.

- Fan Speed. Adjusts the rotation speed of fans on the video adapter (from 0 to 100%). If you have any doubts about how to set the indicator, you can simply set it to Auto. In this case, the value will almost always be close to 100%, since the card overheats from mining. It is not recommended to manually set 100% in Afterburner - this will speed up the wear of the coolers.
- Displays the current temperature of the adapter processor (GPU) and other data on the state of the video card. The rotation speed of the cooler and the temperature of the video card are strictly dependent. The maximum temperature is 105 °C, normal - up to 80–85.
MSI Advanced Settings
Open by clicking on the gear icon. With their help you can produce fine tuning MSI Afterburner for mining. For example, set synchronization between different settings profiles for cards of the same model or unlock voltage control.
Setting up Afterburner for mining requires certain knowledge and skills. Despite the apparent simplicity of the program, rash actions can lead to hardware breakdowns and disruption of the stability of the cards under load. Proper overclocking increases profitability by an average of 20%.

Instructions for overclocking via Afterburner using an example NVIDIA video cards GTX 1080 Ti:
- Go to Afterburner settings for mining and enable core voltage monitoring.
- Select the ideal voltage so that the frequency is also at an acceptable level. These two indicators are closely related to each other.
- If the energy efficiency of mining equipment is not too important, set overall memory and core overclocking. Good option for the DaggerHashimoto algorithm.
- Press Ctrl+F and study the core voltage curve at different frequencies. Adjust the parameters to create a horizontal plateau of the same frequencies to achieve the best settings.
- By gradually increasing the frequency, achieve maximum stability without driver crashes. The process takes several hours. The approximate optimal voltage for NVIDIA GTX 1080 Ti is 190 Watt, at which the hashrate will be 700 sol/s.
All manipulations in Afterburner are performed separately for each card: after adjusting one, you need to test the system, only then move on to the next one.
MSI developers have launched their brand new product on the market - the MSI Afterburner program, creating it based on the outdated Riva Tuner utility, the support of which has been discontinued. New software product will allow you to overclock GPU, increasing the frequency characteristics of the memory and boosting the operating voltage of the main graphics modules. At the same time, the new program is able to regulate the speed of the cooling cooler, preventing the possibility of overheating.
MSI Afterburner has a function for monitoring the temperature of the video processor and displays warnings when the heating level exceeds the permissible values, which the user can configure independently. In this article we will figure it out for you .
Important! While using MSI Afterburner, continuous monitoring of GPU temperature is required. This in turn will serve additional means protection against overheating and will maintain its functionality. In cases where high-performance video cards are used, which is not uncommon in gaming practice, a more efficient cooling scheme should be provided.
Installing MSI Afterburner

For correct installation and further work MSI Afterburner recommends rebooting your computer. This will help to more accurately determine the optimal operating modes of this software with graphics adapter.
When you start the program, the entire interface and current performance characteristics will be displayed on the monitor screen. All that remains is to tell you how to use it new program and consider its possibilities.
Selecting and setting display styles for MSI Afterburner interface
Most users consider the initial design style inconvenient for harmonious work, so if desired, you can adjust it and select the most comfortable style option for work using the “Settings” button, traditionally indicated by a gear.

In the panel that opens, click on the “Interface” tab, and then go to “Skin Properties”. Here you can select and set your favorite design style for this application, as well as preferred language, time scale, and temperature units - Celsius or Fahrenheit.
In order to select the desired GPU on which you need to change the configuration, click on the “Basic” tab. This may be required when video cards are paired or when a discrete one is also connected along with the built-in video card.
If video devices are connected to each other, then to synchronize them, enable the appropriate option by checking the box in the synchronization field of GPU settings.

Information panel
Once the required video device is selected, you can go to the information panel. On it, on the left and right, you can see 2 round scales, in the center of which the current voltage indicators, video processor frequencies, and its temperature are displayed. at the moment time.

In the center of the information panel there is a frame consisting of six sliders. They allow you to set the desired level:
- tension;
- permissible power;
- limit temperature;
- GPU core frequencies;
- video memory frequencies;
- number of cooler revolutions.
By setting the required characteristics here, you can overclock the video card to the required level.

So that, if necessary, you can return to the initial default configuration of the program, at the bottom of the frame with overclocking parameters, next to the settings button there is a reset button to factory settings. It is indicated by a ring-shaped arrow.

At the bottom of the information panel there is a window in which, using graphs, the performance characteristics of the selected video adapter are monitored.

The final element in the interface is the profiles panel, created to select one or another profile during the overclocking process. This panel is also used when switching from one profile to another. Finding the profile panel will not work a lot of work. It is built in on the right above the window for monitoring current parameters.

Changing Voltage Settings
Adjusting the voltage supplied to the video adapter is only one of the technical capabilities Afterburner programs. The units of measurement in which the increase in initial voltage on its key modules will be displayed depend on the architecture of the video device. Indicators will be indicated either in microvolts or as a percentage.
On video devices produced by the company MSI function voltage control is already connected. On third-party video adapters, this option is disabled by default. To activate it, you should again open the main settings tab in the application and, by checking the box, unlock the voltage control. Unlocking can be done in various modes. For standard and advanced MSI devices, reference hardware, and graphics cards from other manufacturers. Choose desired mode allows a button with a drop-down menu.

In cases where problems arise with activation, when the voltage regulation cannot be activated, the user will have to use the instructions for the device installed. graphics device. Since Afterburner does not support all types of video processors, including those that have a voltage control option.
The procedure for increasing the voltage should be done with caution and gradually, avoiding sudden jumps. Adding to entry level voltage is several percent, you need to pause and carefully monitor the degree of heating of the video processor.
If its temperature begins to rise sharply, this will affect the correct operation of the entire device and the image from it may be transmitted in a distorted form, or cause a failure in the operating system.
After changing the voltage and temperature values, they must be fixed by pressing the button with a checkmark located under the frame with sliders on the information panel. Then it is recommended to test the operation of the video card and conduct a special stress test using the Kombuster utility. The device must be tested for at least 2 hours. If no malfunctions are detected during this period of time, the voltage can be increased by adding a few percent.

One of the features of this method of overclocking video cards is that after the set voltage values are fixed, they can again change to standard values. In this case, you can try to return to the settings and select a different method of adjusting the voltage, but in most cases, in this state of affairs, it is not possible to fully overclock the video adapter using MSI Afterburner.
Adjusting Peak Power Consumption
Unfortunately, this feature is not available for all types of devices, but only those that provide energy management functions. Parameters can be changed using the corresponding slider or entered from the keyboard. When you click on the current numeric value, a field with a blinking cursor appears.

Video processor frequency correction
Changes frequency characteristics GPUs are produced by the Core Clock slider. The higher the clock frequency, the more data the video chip can process in 1 clock cycle. The ability to program the GPU frequency is provided using the Memory Clock slider. Indicators of such frequency can be expressed as a percentage or numerical values.
In one step you can increase the indicators by several percent or add 2-3 dozen units. After each step and saving set values It would be a good idea to conduct a stress test and make sure the device is working properly.
The same actions should be performed after turning on and running energy-intensive, resource-intensive games. This can be accomplished using RTSS. Installation of this application is offered after downloading Afterburner and makes it possible, using a convenient overlay, to see data on the number of frames that the video card produces during the game.

Setting up efficient cooling
Manual control of the cooling equipment is performed by the Fan Speed slider, which can be activated by clicking on the button located next to it, indicated by the gear symbol.

In order for the system to regulate the speed of the cooling fans, the function must be enabled. automatic adjustment cooler rotation speed by selecting the AUTO mode at the bottom of the slider.

To optimize cooling efficiency, the “Cooler” tab is intended, where you can determine at what frequency the fan performance indicators should be updated. Thus, you can set the cooler to the most efficient operating mode and reduce the noise level created by the fan.

Visual monitoring
You can select the parameters necessary for monitoring by opening the “Monitoring” tab in the settings window. Here you can enable or disable graphs displaying operating readings, as well as set their peak values. Immediately after a particular parameter reaches its peak, the application will notify the user with a corresponding warning.

Profile management
Afterburner can be used in a variety of situations, such as adjusting settings to enable graphics-intensive games, 2D graphics, or video processing. Therefore, the application developers have provided the ability to configure five different profiles, each of which can be customized for specific tasks. So one profile can be turned on in order to play modern games and configure it accordingly high performance. And another profile, with reduced power consumption, will be very useful when watching movies, or for working with text files.
The transition from one profile to another is done instantly, by pressing a key with a ready-made configuration, or by clicking on a button with a single icon.
You can add a preset with new values by setting the required overclocking parameters and then saving them.

After this, all you have to do is secure the finished configuration by clicking on one of the flashing cells with the profile number.
Each of the profiles can be called using hot keys. Combinations that are assigned in the “Profiles” tab. The main thing is that these combinations do not repeat those used in the system.

More early versions the programs had built-in options for capturing video and creating screenshots of games with 3D graphics elements, and also included a set of profiles for use with 2D and 3D graphics. Later, the creators of the application decided to abandon them, and in new versions such functions became unavailable.
In conclusion of this guide to working with MSI Afterburner, I would like to once again remind you that overclocking a video card has always been associated with a certain degree of risk of possible failure and can lead to premature wear of the components of the video device.
MSI Afterburner allows you to control graphic cards from red and green, namely adjusting the speed of coolers, monitoring, overclocking equipment, capturing video, and many others. The program works with graphics cards from any manufacturer. The user just needs to install MSI Afterburner on his computer, after which he can fully use the program’s capabilities.
This article will tell you how to enable monitoring in the game using the MSI Afterburner program. Let's consider not only how to use MSI Afterburner, but also what monitoring settings are best to set. And also pay attention to how to configure monitoring parameters in the game, for normal display in games, so as not to distract from the game.
Users are looking for how to download MSI Afterburner from the official website in Russian. There really is such a possibility, since you can change the localization of the interface right in the program. It is also recommended to choose a more convenient program skin, since the standard one is not suitable for every user.
It is worth noting before installation that you need to be careful when using MSI programs Afterburner. Because the hardware overclocking functionality and the ability to adjust fan speed can harm the computer, especially in the hands of beginners.
- Go to the official website of the MSI Afterburner program and in the section Downloads press the button Download Afterburner.
- Next, open the downloaded file and follow all the steps of the program installer.
The main thing is to make sure that at the step of selecting the components of the program to be installed, MSI Afterburner and RivaTuner are selected Statistics Server. Since RivaTuner Statistics Server expands the capabilities of MSI Afterburner by adding the ability to enable FPS monitoring.
After installation, we immediately launch and change the program interface language. Just open MSI Afterburner and go to settings by clicking the gear at the bottom of the program. Next go to section Interface and at point Regional settings choose Russian language.

In the monitoring tab, you can also enable other parameters that the user considers necessary to display on the monitor during the game. Please note that different boot options graphics core or temperatures are available in MSI Afterburner without additional component RivaTuner Statistics Server. If you do not have frame rate monitoring settings, then make sure that RivaTuner Statistics Server was installed along with MSI Afterburner.

The last step is to customize the appearance of the on-screen display overlay. You can choose one of the available styles or simply customize the fonts and colors to suit your needs.
Style settings are available in MSI Afterburner properties. Just go to the bookmark Monitoring and highlight the desired monitoring schedule and press the button Selecting an Overlay Screen Display Style in the form of three dots near the point Show in OED.
In the window that opens, just select the active display style you like or configure the current style by changing its properties.
And also additional settings Overlay Screen Display displays can be found in the RivaTuner Statistics Server utility. It is enough to directly open the RivaTuner Statistics Server utility or go to the tab in the properties of MSI Afterburner OED and press the button Additionally. Here, in another interface, you can adjust the color, font, size and select the position of the text. There are also many other parameters available and the ability to immediately view the configured text parameters.
Conclusion
MSI Afterburner is a powerful tool for managing and monitoring settings graphics adapter. The user just needs to download and install the MSI Afterburner program from the official website. The ability to select the Russian interface language is available immediately after installing the program.
MSI Afterburner allows you to enable game monitoring, namely enable the display of frames per second (FPS). We previously looked at, although the MSI Afterburner program was not included in the list, it can also display a counter for the number of frames per second and more. Also take a look, as it is more suitable for beginners and also controls the speed of coolers connected to the motherboard.
- a multifunctional program for managing a video card. It works with graphics cards from AMD and NVIDIA, allows you to overclock, enable data monitoring functions in games and more. In this publication, we will consider the question “how to configure MSI Afterburner” for proper operation video cards.
Setting up the program
Important! For full-fledged work programs, do not uncheck the boxes from RivaTuner Statistics Server. Install with MSI Afterburner.
The main settings of MSI Afterburner are opened by clicking on the gear. When you first start, there are 7 tabs available in the menu:
- Basic and Monitoring.

- Capture Screenshots and Videos.

- Profiles and Interface.

To begin with, in the “Basic” tab, set:
- “Synchronize settings of identical GPUs” if your PC has two graphics cards.

- “Unlock Voltage Monitoring” to access the use of the Core Voltage slider.

- “Run with Windows”, to integrate some functions and the ability to run with the operating system.

Click OK and restart the program.
Working with a cooler
In the program you can change the rotation speed of the coolers, which depends on the heating temperature of the video card. Unfortunately, this function Available only for desktop PCs. Open the “Cooler” tab in the properties. You can change parameters by dragging points on the graph. 
Setting FPS in the game
To set up the monitoring mode, in the “Monitoring” tab, click to select the “frame rate” values and click “Show in Overlay Screen Display”.  In addition, you can output other parameters in a similar way. In the game, the necessary monitoring data will be displayed on the screen.
Working with OED
In this tab you can set hotkeys and set additional settings for displaying text on the screen in computer games. 
When you click the “Advanced” button, a new window with settings is displayed. 
Saving game screenshots
In the “screenshot capture” tab, you can configure the key that will be used to save. In the “Capture screenshots” line, click the mouse pointer and press a key or key combination. In the future, pressing the indicated keys will save a fingerprint of the image from the screen. You can also select the folder in which the screenshots will be saved.
Posted on January 11, 2016
Want to monitor your system's performance while gaming? What's the best way to see what your equipment can do? Does it reveal itself completely or is something preventing it?
You've probably seen game reviews with system performance information right on your computer screen while you're playing and wondered: How did they do it?
This information presented in the left top corner screen is called OSD or OSD menu and is one of the most frequently used functions in the MSI Afterburner application. It allows you to monitor the performance of your video card and other hardware during the game, and thus gives you important information about what can be improved to increase productivity. Want to know how to get this information on your screen? Just follow our directions below!
First, you need to get the latest version of MSI Afterburner and Rivatuner Statistics Server. Both programs are included in MSI installer Afterburner. ()
1. Launch MSI Afterburner
2. Click “ Settings"(Settings) 
3. Click “ Monitoring”(Monitoring) and go to “ Active hardware monitoring graphs”(Active Hardware Monitoring) and select the information you are interested in to display in the OSD menu (for example, we use “GPU usage”)

b. To display the information you are interested in on the screen, select the “ Show in On-Screen Display”(Show in OSD menu). 
c. In the column “ Properties"" (Properties) you will see the inscription " in OSD”(in the menu). Select other information to display on the screen in the same way. You can change the order of information displayed on the screen by dragging the desired menu items up or down the list.
d. Text shown in “ Override group name”(Group Name Change) to be displayed in the OSD menu can be changed as you wish. (Here we changed the name “GPU usage” to “GPU load”)
e. Don't forget to click OK to save your changes and exit to MSI Afterburner. 
Now when you launch the game you will see an OSD menu!
But that's not all! You can also customize appearance menu. You can easily customize the OSD menu using the RivaTuner Statistics Server utility, which is automatically installed with Afterburner.
1. Click on the “ icon Riva Tuner Statistics Server”

2. In the menu that opens, you will see settings that you can change. Here are some of the most interesting options to change:
a. On-Screen Display shadow (OSD Shadow Setting): When this option is enabled, the text will have a dark outline to improve its visibility.
b. On-Screen Display palette (Change OSD Color): Here you can change the OSD text color. You can also change the color of the shadow.
c. On-Screen Display zoom (OSD Enlargement): Here you can change the OSD text size.
d. Position of OSD(Changing OSD Position): Drag the OSD text to any position on the screen. 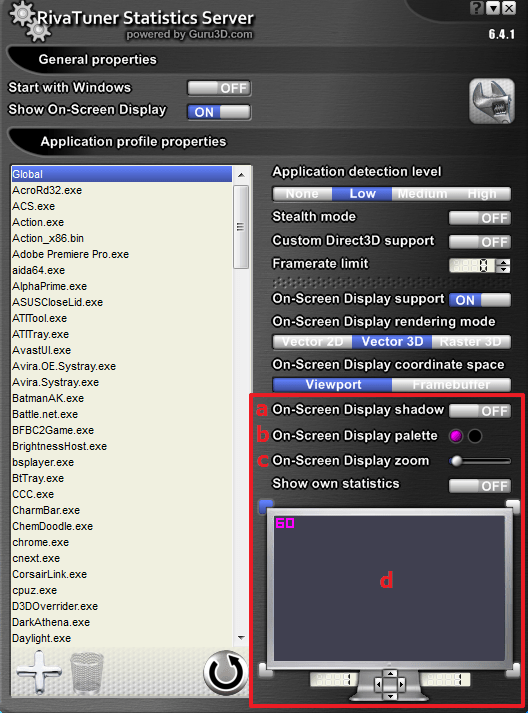
3. After you are done with the OSD settings, launch the game and observe the result. The MSI Afterburner app is very convenient tool any gamer, and not just overclockers. You can use MSI Afterburner for optimal gaming performance! The application is constantly updated and guarantees excellent stability and compatibility with your equipment. Since new versions are released regularly, make sure you use latest version application, which is available for download at the following link: