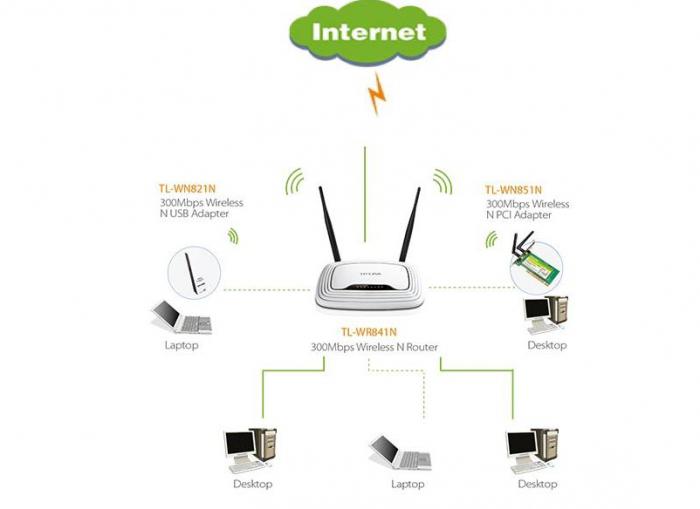
How to set up a tp link wireless router. Typical configuration of Tp-link routers. Block Internet access by MAC address
This instruction is suitable for setting up all Tp-link routers
Preparing a computer or laptop for setup
Before setting up the router, you need to prepare your computer. Open this page so that it is at your fingertips, because until you configure the router you will not have Internet.
In our example, the operating system is Windows 8.1. Windows 7 and Windows 10 are configured in the same way.
There are two ways to set up your internet connection, they are slightly different at first. Let's see:
First way
1. Go to the Start menu. It's located at the bottom left of your computer.
2. Go to

3. Select "Network and Internet"

4. Go to “Network and Sharing Center”

Second way
1. Find the computer icon next to your clock, like in the picture 
2. Left-click on the icon and select “Network and Sharing Center” 
Next, the setup of the two methods is identical

2. Right-click on the “Local Area Connection” icon

3. In the context menu that appears, at the very bottom, find “Properties” and click on them

4. The “Local Area Connection - Properties” window will open in front of you. In this window, in the components, find “Internet Protocol Version 4” and open it by double clicking the mouse

5. In the “Properties - Internet Protocol Version 4” window that opens, you need to put the dots in the top position “Obtain an IP address automatically” and “Obtain a DNS server address automatically” and then click “OK”. If the dots are already in the top position, do nothing.

We have prepared the computer to configure the router. Now let's move on to setting up the router.
Setting up a router via a computer or laptop
After you have finished preparing your computer, you need to connect the router to the computer.
Connect the network cable to any yellow port, connect the other end of the cable to your computer or laptop. The connection cable is included in the box with the router. Look in the box: it is gray, 1-1.5 meters long with plugs at both ends. Plug in the power supply.
For now, we don’t need to connect the Internet cable that comes to your apartment to the blue port of the router. We'll do this later.

We will configure the TP-link wr841n router via the web interface.
1. Launch your browser. A browser is a program through which you open websites. The most common browsers are shown in the figure below. Look for a similar icon on your desktop, there may be several of them. Choose any.

Turn the router over and see what address you need to enter to enter the router settings:


Now enter into the address bar of the browser: http://192.168.0.1/ or http://tplinklogin.net/, depending on the information at the bottom of the router, and press “ENTER” on the keyboard.
Now enter “Username” and “Password”. They are also at the bottom of the router, see the picture above: “Username” is username, and “Password” is password. Default “Username”: admin; “Password”: admin.

2.You are inside the router. Let's start setting up. From the menu on the left, select "Network" and then "WAN". Here are the main Internet settings. Click on the arrow to the right of “Dynamic IP Address” and select “Static IP Address”.

3. Fill in 5 fields of network details: IP address, Subnet mask, Default gateway and two DNS servers. Network details are in your contract on the first page in Appendix A to the contract, see the table. You can also call technical support and find out the network details from our employees. After making the settings, click “Save”.

4.Now let's set up a wireless connection so you can use the Internet via your phone, tablet or laptop.
In the menu on the left, go to “Wireless Mode” → “Wireless Mode Settings”
In the “Network name” field, write the name of your WIFI. It can be anything: Anton_wifi, TP-link12414, fawgwagag. The main thing is that you know the name of your network.
In the “Channel” field, set the mode to auto. This is usually the optimal mode. In some situations, your devices will disconnect from WIFI in auto mode, in which case you will have to force set the WIFI channel. Try setting any channel from 8 to 11, they are usually the least loaded.

5. To ensure that no one but you can connect to the router, WIFI needs to be protected. To do this, in the “Wireless Mode” menu, find “Wireless Protection”
By default, the router has the “WPA/WPA2” mode selected, so we’ll focus on that. Leave “Version” and “Encryption” unchanged.
In the “Wireless Network Password” field, enter the password. Use lowercase and uppercase letters, numbers and symbols in your password, it’s safer. For example: FahqyAR245. If you forget your password, you can always look it up in the router settings. Next, scroll down the page and click “Save.”

6. Almost everything. Now go to “DHCP” → “DHCP Settings” and register two DNS servers: 10.10.0.100 and 10.10.0.20. This will slightly speed up the devices when working via WIFI. Click "Save"

7. Now that’s it for sure. In System Tools, select Restart. Click on the “Reboot” button and wait for the process to complete.

To check, log into the router again. In your browser's address bar, enter: http://192.168.0.1/ or http://tplinklogin.net/, depending on the information at the bottom of the router, and click " ENTER".
Then enter the “Username” and “Password” that you entered at the beginning of the setup.
Check the settings with your contract. The settings in the picture have been removed so as not to confuse you.

TPLink routers are designed for creating local networks in offices, cafes, clubs, and at home. With their help, you can easily provide access to both files stored on network-connected devices and the Internet. The company produces many models that support modern wireless communication standards. In offices, they will ensure stable work with documents and excellent video communication, and at home they will provide the opportunity to play online games and watch streaming videos without interruption.
Features of TPLink Wi-Fi routers
The advantages of TP Link Wi-Fi routers are:
- simple setup using step-by-step instructions - even those who are trying to set up a router for the first time can handle it;
- powerful, stable signal and high-speed data transfer;
- reliable protection of transmitted data.
The catalog of the M.Video online store also presents other products from this manufacturer:
- Wi-FiTPLink receivers;
- TPLink Wi-Fi signal repeaters;
- Powerline adapters TP Link.
- TP-Link routers are presented in a wide range of 24 models in the M.Video online store;
- Prices range from 625.0 to 14390.0 rubles;
- Compare prices for TP-Link Routers, read specifications and customer reviews;
- Buy TP-Link routers with a guarantee on favorable terms of purchase (including on credit or in installments);
- Order TP-Link routers in the cities: Moscow, St. Petersburg, Yekaterinburg, Novosibirsk, Chelyabinsk, Kazan online on the website or by calling 8 800 200 777 5, arrange delivery to the specified address or pickup from the store.
Over the past few years, many decent devices have appeared on the computer market at very low prices. Most of them are positioned as honest, high quality Chinese brands with markets all over the world. This article is about one of such devices. Wireless router TP-Link TL-WR841N with huge functionality and high performance. The device description is accompanied by a review, quick setup instructions and includes reviews from owners and system administrators.
Greeted by clothes
A very attractive bright green box will easily attract the attention of the buyer. An image of the assembled device and a brief image will quickly help you make the right choice. The TP-Link TL package includes everything you need to fully configure and operate the device. In addition to the access point, there is a power supply, a patch cord, two amplifying antennas, a disk with documentation and instructions.
The first acquaintance with the access point will bring only pleasant impressions to any owner. The affordable price of about 1000 rubles for the TP-Link TL-WR841N router provides the buyer with a powerful Wi-Fi device made of very high quality plastic, with an excellent design and a sophisticated cooling system. As it turned out, the entire building is dotted with ventilation windows on all sides. Apparently, the Chinese took into account the experience of their old devices, which froze during operation due to overheating.

Performance characteristics
The TP-Link TL-WR841N wireless router operates at a frequency of 2.4 GHz in 802.11b/g/n class networks. The control system operates on the Atheros AP81 core with 400 MHz and has a built-in memory of 32 MB. The device has a built-in switch with four ports, operating in 100-megabit networks, and one WAN port for connecting an incoming Internet channel. In addition, the wireless router understands WPS technology, which allows you to connect devices via Wi-Fi without prior settings and authorization. And if we consider the wireless capabilities, the manufacturer stated according to the 802.11n standard - 300 megabits per second with support for two spatial streams (MIMO 2x2). Types of connection to the provider are fully present for all technologies in the post-Soviet space: static and dynamic IP, PPPoE and PPTP/L2TP with Dual Access support, manual entry of the MAC address, including cloning. IPTV, which is gaining momentum in Russia, is also supported.
Preliminary router settings
The instructions supplied with the TP-Link TL-WR841N describe in great detail the procedure for setting up and connecting a Wi-Fi access point. But still, many owners, judging by their reviews, claim that before activating the device, it is necessary to perform a forced reset to factory settings. To do this, you need to press and hold the RESET button located on the back panel of the router with a sharp object like an awl for ten seconds. Naturally, at the time of reset, the access point must be connected to power and at least one indicator must be lit. An effective reset will result in a change in the light indication on the device's control panel.

Preliminary settings for a computer or laptop
Setting up a TP-Link router is possible only if the computer is ready to automatically receive the required IP address provided by the wireless device. Therefore, if your Windows system is configured via DHCP, then you should skip this item. The rest will have to make minor adjustments. To do this, find “Network Management” and select “Change adapter settings”. Click the alternative mouse button on the active adapter and select “Properties”. In the window that appears, find the line “TCT/IPv4”, place the cursor on it and select “Properties”. If the lines of the window that opens contain numbers, you need to copy them all in order onto a sheet of paper, including the names of the lines. Then select the option opposite the “... automatically” fields. Save and exit settings.
Communication between two devices
According to the instructions supplied with the TP-Link TL-WR841N router, setup is carried out in the following steps:
- The router must be turned on and the computer must be in working condition.
- The provider cable must be connected to the “Internet” socket located on the back panel of the device. If the provider does not require additional settings, the second indicator on the right will light up on the control panel, indicating the availability of the Internet.
- The patch cord is inserted at one end into the computer's network adapter, and at the other end into any LAN port of the router. A green light will appear on the device's control panel indicating connection, and a network connection message will appear on the computer. If the provider does not limit Internet access with settings, then it will immediately become available on the user’s computer.

First step in setup
Having opened any browser on your computer, you need to enter the IP of the router without quotes “192.168.0.1” in the address bar. If the browser gives an error, you need to enter another address without quotes “192.168.1.1”. There is confusion in the addresses due to different firmware. Setting up a TP-Link router begins with the appearance of the authorization menu, in which you must enter a password and login. Oddly enough, they are identical - “admin”. The result of correct data entry will be the opening of the wireless access point management menu. Not only system administrators, but also many users recommend going to the “Utilities / System Tools” - “Password” menu, located on the left panel of the control window, and changing the authorization data. Entering “admin” in the first two lines, enter a new login in the third, and a new password in the fourth and fifth. It is recommended to use English letters for input. Digital input is not prohibited.
Specifying provider settings
If the Internet appeared on your computer when you connected the router, then you can skip this point, otherwise the provider provides services using its own protocol, which means fine-tuning the TP-Link router is required. To do this, you need to go to the “Quick Setup” section and, following the data requests, enter the information previously recorded on the sheet. In addition to this data, you need to specify the type of connection, which only the administrator of the company providing Internet services can tell you. Very often, when drawing up an agreement with a provider, the document is supplied with information on connecting to the service. Also, all users should visit the official website of their provider and look at the “Equipment Setup” section. Many suppliers offer ready-made firmware for download with specified settings for different routers. Perhaps the provider will have firmware for the TP-Link TL-WR841N. In any case, if there are any difficulties with the setup, it is better to contact a specialist. Nobody forbids you to play with the settings yourself, because you can always reset the router to factory settings.
Alternative router management
Many users will like the ability to manage a wireless access point using a special Easy Setup Assistant shell, which can be downloaded from the manufacturer’s official website. To configure the TP-Link TL-WR841N router, you will need a driver for Windows, which is also offered for download. It wouldn’t hurt to check out the availability of latest firmware for the device that you can install. And for the firmware you need step-by-step instructions, which are also available on the official website.
Reading customer reviews about the TP-Link TL-WR841N, you can find a lot of negativity towards the developer for alternative control of the router using an assistant. Compared to the web interface, which allows quick access to any setting, the shell has limited capabilities in the form of an assistant and does not allow the user to enter their own data. And the assistant only works under Windows, which limits its capabilities.
Wi-Fi setup
Setting up a wireless network in the TP-Link TL-WR841N router is a pleasure. The menu is so convenient and informative that the user should not have any problems:
- The SSID field prompts you to enter the name of the network in Latin letters, which will be detected when searching for Wi-Fi.
- In the “Channel” field you should leave “auto”, the mode should be “11 bgn mixed”, and the maximum transmission speed can be set to maximum.
- It is better to set the authorization method to universal - “WPA-PSK/WPA2-PSK”, and set the encryption to “AES”. This choice will allow you to set a password consisting of numbers and letters of unfixed length (from 8 to 64 characters).

In addition to the standard wireless network settings and LAN ports, the TP-Link TL-WR841N router boasts a lot of useful functions that will be of interest to advanced users.
- The demilitarized zone “DMZ” makes it possible not only to prohibit access from the Internet to servers located on the user’s local network, but also to restrict the child’s computer, which is what many parents constantly use.
- A very simple IPTV setup will allow you to create a connection in a few minutes and enjoy watching high-quality movies transmitted through the provider’s network.
- There is a menu for setting up WPS. You can set a simple password, not the same as for Wi-Fi, and give it to friends who want to use the Internet service while visiting. Naturally, to connect you need to press the “WPS” button.
- When setting up Wi-Fi, you can determine the priority of streaming video “WMM”, which will allow you to allocate channel resources to watch a movie if it is busy with a torrent, for example.

In conclusion
For the most part, customer reviews about the TP-Link TL-WR841N are positive. They note a large set of functions, which very often remains untapped. Users did not ignore the reliable and well-ventilated design, the presence of a signal amplifier in the form of antennas, ease of control and ease of configuration. Disadvantages include failures when downloading torrents. disappears for a few seconds, and then smoothly rises. Many users recommend setting the software download speed limit to half, and the problem will be solved forever. In general, it’s simply impossible to ask for more from the TP-Link TL-WR841N router for 1000 rubles.
In this instruction we will show in detail how to configure a TP-Link router. The TP-Link Wi-Fi router is available in several modifications, and to write this article we used the TP-Link WR841 N router as an example. However, these instructions are quite suitable for the following models: TP-Link TL-WR740N and TP-Link TL -WR741N. You should not close the page, even if you have a TP-Link WiFi router of a different modification. In any case, there will be no significant differences, so read the article and repeat all the steps according to the instructions.
As for connecting a TP-Link router, the scheme is standard: We connect the router to the power supply, insert a cable from the Internet provider into the WAN port, and connect a network cable from the computer into the LAN socket.

You can read more about the general rules for installing and connecting a router of any model. So, there should be no questions regarding connection, so we can immediately begin setting up the TP-Link router.
Setting up a TP-Link router
Before setting up your TP-Link router, it is advisable to reset the existing settings. This is done quite simply. Each router has a special button for resetting the router settings “Reset”. We press this button and hold it for about 30 seconds, after which the router should reboot and the settings will be reset.
Now you can start setting up your router. To do this, you need to go to the router's web interface. To do this, open any browser and enter 192.168.0.1 in the address bar. If you can’t log in, try entering 192.168.1.1.
Note: the login address to the router interface may differ depending on the firmware installed on the device. Typically, the login is initially carried out through 192.168.0.1, and after updating the firmware through 192.168.1.1.
After going to the above address, a window will appear in front of you in which you need to enter your login and password. For TP-Link routers, the default login is “admin” and a similar password. If the default password and login are not suitable, then look at the router documentation; it will certainly contain all the necessary information. Also, information for entering the settings web interface is available on a sticker on the bottom side of the Wi-Fi router.

So, after entering your login and password, click “send” and get into the web interface of the Wi-Fi router, here we will perform all the necessary settings. First of all, we need to update the TP-Link firmware to the latest version. Before downloading the firmware, you need to determine the hardware version of our router. It will be indicated on the back of the router.

In our case, the version “Ver: 7.2” is used, therefore, we need to download it. You may have a different hardware version, but the essence does not change. We go to the website http:// www.tp-linkru.com and enter the model of our Wi-Fi router into the search bar on the site. As mentioned earlier, our instructions are based on the example of the TP-Link WR841 N router. You enter your model and click find. Select the appropriate model from the list. Next, look for the “Downloads” tab and click on it. Now we need the “Software” section, where we need to select “Firmware”. Here we look for the hardware version of your device and download the first firmware in the list. Unzip the firmware file to your computer and return to the wifi router setup menu.
Now we need to install the latest firmware that we just downloaded. To do this, go to the “System Tools” section and select the “Firmware Upgrade” item. Now click “Browse” and specify the path to the firmware file, then click “Upgrade”. Next, the router will automatically update the firmware and you will find yourself on the main page of the web interface.

Now you can proceed with the basic settings of the TP-Link router. Let's start by changing the login and password to enter the router settings. To do this, open the “System Tools” section, select “Password” and enter the desired data, then click on the “Save” button for all the settings to take effect.

How to set up Internet on a TP-Link router
Half the job is done. Now you need to configure the network settings. To do this, look for the “Network” section in the main menu of the interface, and then select the “WAN” item, where we need to select the network type. The type of connection depends on which Internet provider you use. You can find out the necessary information in the contract with the provider or on the official website of the service provider.

After selecting the network type, go to the “MAC Clone” tab, where you need to select “Clone MAC Address” and click the “Save” button.

How to set up a Wi-Fi network on TP - Link
In principle, the Internet should appear after completing the above steps, however, we recommend that you also configure the Wi-Fi network. To do this, look for the “Wireless” section and in the “Wireless Network Name” field indicate the desired name of your Wi-Fi network.

Save the settings and go to the “Wireless Security” section. Here we need to configure the security settings of our Wi-Fi network, that is, come up with a password. In principle, you don’t have to change anything, but then anyone can connect to your Wi-Fi network, so it’s better to still set a password. To do this, enter the desired password in the PSK Password field.


If everything was done correctly, then no problems with Internet access should arise. Now you know how to set up a TP-Link router, if you still have any questions, ask them in the comments or in the “ask a specialist a question” section.
Hello! The topic today will be a little strange, but what can you do? As they ask, I answer. You can't please everyone, but you have to think about something.
Guys, this is a general article about setting up all router modelsTP- Link. I highly recommend that you search on our website for settings for your specific model - you will save both time and nerves. It’s better to download the manual from the official website - there is much more information there.
Another request - if you haven’t found any point, you still have questions, there are corrections - leave comments. I have had many routers TP-Link, let's come up with something together.
Customization goals
The main task of an ordinary home router (and TP-Link is one of the leaders in this market, so their models can be seen in half of their neighbors) is to please the owner. What does the owner need:
- 24/7 internet via Wi-Fi.
- A working local network (less often, but some people drop files, use a printer, and watch movies on TV).
- Other rare functions - everyone has their own thoughts, an individual approach is needed here, with this it is better to immediately comment.
In total, we need to connect the Internet during this manul, and the local network will configure itself. In fact, there will be nothing complicated, and the generality of the topic will not greatly affect - all routers are configured almost identically for basic functionality. TP-Link is no exception - I tried a lot of them. So watch, do, think about it, but if you have any difficulties, look for instructions for your model from us.
Setup video
TP-Link TL-WR841
This is the most popular router today of all the “tiplinks”. And of course we have separate instructions for it. All owners go to the page below:
Before setting up
We will need:
- Router
- Cable connecting the router to the power supply
- Network cable connecting from router to computer/laptop
- Internet provider cable in the apartment (Ethernet or ADSL)
- A computer or laptop with the ability to connect via wire (you can, of course, use a smartphone or tablet, but some models don’t like that, which is what I asked you to look for for your model)
- Login and password for connecting to the Internet
- Login and password for connecting to the router
A few clarifications. If everything is clear with the device itself, then you need to find your login and password for the Internet. Usually it goes straight into the contract. If not, contact your provider by phone or in person. Sometimes they will understand.
Another problem is the data for connecting to the router for further configuration. Here you need to get:
- Connection address
- Login
- Password
Usually this is all located on a sticker under the router itself. Something like this:
If suddenly there is no sticker, try these values:
- Address: 168.0.1 or 192.168.1.1 or http://tplinklogin.net
- Login: admin
- Password: admin
If during the setup process the values do not match, then there is a possibility that someone else used the router (even if it is new). Just reset the settings and everything will be as it should (more about resetting below). Sometimes it is even better to reset the settings to default than to reconfigure.
Installation and activation
So, let's start assembling the structure. Make sure the router is turned on:
- We place the router in a convenient position - it’s enough to reach both the Internet cable and the computer/laptop. How to install the model depends on the device itself - you can put it, you can hang it. Routers are generally unpretentious things.
- If there are removable antennas, we install them.
- We connect it to power. Many TP links have an “Enable” button on the back - don’t forget to click on it. We look to see if the indicator lights are on (if any). If they are on fire, we continue.
- We connect our Internet channel - be it an Ethernet cable, a telephone cable, or even a USB 3G/4G modem - it depends on your needs and capabilities. As a rule, another light comes on when the cable or USB device is successfully connected. The most important thing is that the cable is connected to a separate WAN connector - it usually differs from other ports in color. Don't get confused.
- We wait about a minute - the procedure for identifying connections can sometimes take a long time, so there’s no shame in it. In the meantime, it’s thinking, read on.
Indication

More for your reference. Main indicators on the panel. May vary from model to model, but everything is approximately the same everywhere. Very useful to watch when you need to quickly analyze a problem.
- Nutrition. There is a separate light bulb. Even if nothing is connected, Wi-Fi is not working, it will still light up when the power is on.
- Internet. Active internet connection. Initially disabled. When connected it lights up, but during active use it usually flickers very quickly.
- WAN(this includes an Ethernet connection, a telephone ADSL connection, and a USB modem) – shows the presence of the connection itself (without the Internet). We connected the provider's wire - it caught fire. Sometimes combined with the previous lamp. For example, in ADSL it initially blinked when the line was established, and after connecting it simply glowed. But if it doesn’t light up, then you need to look at the wire.
- Wi-Fi– usually enabled initially, but can be disabled in the settings. If there is a wireless network, it will light/flicker/blink.
- WPS. Establishing a quick connection using a key. Usually starts blinking when you press a special button on a device with WPS. Available almost everywhere, but may be absent.
- Network ports. Also common lamps - on the back there are LAN ports for connecting wired devices to the router. So, when connected, the corresponding indicator immediately lights up. Usually there are about 4 ports, and the same number of lamps.
- USB. Likewise, if connected, it lights up. There may be other lamps, just look at the model. And something may be missing.
Connecting a TP-Link router

You can try to do the setup from a PC, a laptop, a tablet or a phone. Another question is that the Wi-Fi network will not always be available, so the classic option is to set up via wire. But the whole point here is in the connection. All other actions are the same. So I propose to consider further connecting via a laptop - there you can use both Wi-Fi and a wire.
- Wire. Everything is simple with the wire. We connect it and see that the indicator light comes on. Fired up? Then everything is ok. I won’t describe all the problems; sometimes you may need to reset the operating system’s network settings. Or maybe something more interesting. So feel free to write your questions and experiences in the comments. From my notes, it is important to connect the wire to the LAN connector. Don’t confuse it with the WAN - the provider’s cable goes there; if you confuse it, you won’t be able to connect.

- Wi-Fi. There is nothing complicated either. We search the networks for a network with a name something like TP-Link with the best signal and connect to it over the air. The default password is usually empty, or is specified in the settings on the same sticker. There were times when it was impossible to connect at all. But the whole point was that the neighbors also had a TipiLink, and even a more powerful connection) In general, you won’t miss it.
Authorization in the web interface panel
It's time to try going to the settings panel. To do this, go to the address recognized above, enter your username and password.

If suddenly the password does not work, reset the device to factory settings. On the back of the panel there is usually a Reset recess with a button inside. We hold it in the on state with a needle for 10 seconds and try to connect again - everything should work out.

There is usually nothing special about your personal account on the main page. Just general information:

Unlike the screenshot above, when turned on for the first time, the IP address values will be zero: 0.0.0.0. The figure already shows a successful connection establishment.
ADSL, Ethernet, USB
Once again, I repeat that all routers are built approximately the same. There is only a slight difference in the connection technology: via an ADSL telephone cable, via Ethernet, via a USB modem.
Everywhere you will be required to enter a login and password from the provider. If you have any doubts, still find a review for your model. Here, for complete coverage, I will take an ADSL modem - there are a little more settings for the connection. So, if you use a modern cable, you will have fewer possible problems.
It doesn't matter what operating system you use -WindowsLinuxMacOSiOSAndroid or something else. The setup will still take place through the browser on the web interface.
Internet setup is easy
Any modern modem is now equipped with a convenient setup wizard, and also in Russian. Now in my model it’s written like this – “Quick setup”. Everything is really shown and explained there in great detail, just for dummies. Therefore, I will not dwell on this extensively here, I will simply give step-by-step instructions on what he usually does:
- Greetings to you.
- It asks you to find out how you want to use the modem - set something like “Connect to the Internet”.
- It will ask how you want to do this - usually select PPPoE mode.
- Enter the login and password from your Internet provider.
- Usually here he asks about activating the Wi-Fi network. Asks you to create a password for her.

Sometimes a special disk is supplied with the router. Usually there are no drivers on it, but a software setup wizard. The differences from the web interface are minimal.
Setting up the Internet is difficult
Everything is the same here - initially we are looking for either a quick setup, or Quick Setup, or Settings, or Configurations. It can be called differently. Here's an example:

What is important to do here:
- WAN Link Type – PPPoE – a common type for our networks, connection type.
- VPI/VCI – 0/33. At Rostelecom I had 0/35. We are only talking about old telephone connections. This parameter was always included in the contract next to the login and password. The same difference and complexity compared to new networks.
- PPP Username and PPP Password – login and password.
Everything else isn't that important here. The names may vary slightly on your model. Especially if they are in Russian) But you get the gist. Do this, and the Internet will appear on the router. The indicator will signal this.
Wi-Fi setup
Usually the whole point of setting up WiFi comes down to turning it on and setting security parameters. Sometimes it all comes together on one page. The setup occurs either automatically from the wizard, or through the menu items Wi-Fi, Wireless, Wireless mode or something like that.
Basic settings: WirelessBasic:

What's important here:
- EnableWireless– enable the wireless mode itself.
- HideSSSIDBroadcast– hide the network from the list of networks. On the one hand, it’s cool that no one can find your network without third-party applications. On the other hand, when connecting all your devices, you will have to manually enter the name of the network - and this is not always convenient. And modern Wi-Fi security allows you to leave this option unused. I assure you, if someone wants to hack your network, this option will definitely not save you.
- Wireless Network Name– network name. So it will be visible in the list of networks. Write something different from your neighbors)
Attention! Changing the network name will reset your current Wi-Fi connection. You just need to reconnect manually.
Now let's move on to Wi-Fi security: WirelessSecurity:

Again on the safety points:
- EnableWPS– set it to Disable if you do not use WPS. This is the ability to connect to a device without a password using the WPS function. Yes, there is a password there. But this password is searched faster than the password from WiFi itself. Modern models have all the necessary protection against brute force, but careful... If not necessary, turn it off.
- NetworkAuthentication network authentication type. Determines the security level by specifying encryption. You need to choose - WPA2. And that's the only way.
Do not useWEP – this system is very easy to hack!!!
- WirelessNetworkKey– password for your network. Use at least 10 characters, do not use simple constructions, use letters and numbers. The more complex the better. This is your first line of defense.
All. After saving, you can re-login to your network with a new password. This completes the basic settings. There is Internet, the network is active. You can use it. And this is how the setup works on any device.
Nothing worked out? There are comments where you can ask your question. Just don't forget the name of your model and a detailed description of the problem!
Panel access password
Remember also that you connected to the panel using a standard password? Any person on the network can do the same and do something bad to you. The best method of protection is to change the password for our Wi-Fi router (not to be confused with the wireless network password):

Advanced router settings
Below I will give only a description of the possible functionality of routers. Options that are not used very often. Use it or not - only according to your needs. Experienced specialists usually figure things out on their own, but it would also be interesting to see such people in our discussion thread.
It is better to clarify the settings below for a specific model.
- Channel – can be set from 1 to 11. Usually there is an Auto mode. That's what we need. But if there is some kind of network load from neighbors or devices, you can try switching the channel, and suddenly the connection will improve. Use at your own risk.
- Mode – protocol for working with Wi-Fi. Now there are b/g/n and b/g/n+ac. You can't go wrong with choosing more. All current standards are compatible.
- Network bridge. Many routers allow operation in repeater (or repeater) mode. The essence comes down to intercepting a visible signal and repeating it with amplification. To reach the farthest room. Usually this setting is not visible, but it is present in many places. For me, it’s easier to purchase a separate repeater, but it’s more convenient for everyone.
- Filtration – wide range to reject different devices. Typically, access is filtered by MAC address. But you can also filter access to the Internet by issued IP.

Firmware
Use in special cases. Usually everything works great out of the box. Only for those who know exactly what they are doing. Update plan:
- Download the firmware for your model from the official TP-Link website or a third-party forum with full confidence in compatibility.
- In the panel, go to “Software Update”. Select the downloaded file. Click “Update”.
- Installing new firmware takes up to 5 minutes - do not reboot the router during this operation - the device may be damaged.
- The device will most likely be rebooted.
