How to set up a Wi-Fi router: the fastest way. How to connect a router to a home computer
In the realities of the modern world, every Internet user should know how to connect a router. Routers are fairly simple network equipment. Anyone can set them up, but only if they follow certain instructions. We will tell you everything from “A” to “Z” about connecting, activating and setting up a home modem.
Selecting a location
Once you've purchased your new router and unpacked it, don't rush to connect it. The router needs to choose the right location, because the quality of the signal and its distribution throughout the apartment depend on this. The choice of location is based on several parameters:
- available network cable length;
- availability of a nearby outlet;
- dimensions of the house or apartment.
Most even budget models have powerful transmitters to ensure signal distribution in three-room apartments. It is recommended to place the device on a hill (on the highest shelf, on top of a table, or attach it to the wall) for better signal propagation. Make sure that the LAN cable and power cord are loose and not under tension.
Do not install the modem near electrical appliances (TVs, microwave ovens or on the system unit). Remember that metal barriers weaken Wi-Fi the most. If you have metal cabinets or cabinets, of course, we recommend moving them to the outer walls. If in a private house the coverage area does not cover all rooms, then it is worth strengthening the signal or purchasing a repeater.
Connecting the router to a laptop or PC
Having chosen a place, it is worth inspecting the purchase package to begin connecting. As a rule, the kit also includes a LAN cable, instructions and a disk with electronic documentation or support software. At a minimum, you need to connect the router to an Internet cable, and you can configure it either from a PC or laptop via Wi-Fi.
Via cable
If you are using an ADSL or Ethernet connection, then you need to connect a wire with the Internet to the router (usually a classic “twisted pair”). Take the end of the cable and then plug it into a port called WAN. It is usually highlighted in color separately from others. Next, connect the output of the network card to the LAN port of the router. There are usually 4 of them in the device. They are marked in yellow/orange.

Next, take the power supply and plug it into a power outlet, and insert the end of the wire into the connector on the modem (it can be designated as 5V-2.5A or Power). Use only factory power supplies, as products from third-party manufacturers may produce a different voltage, which in extreme cases will lead to burnout of the microcircuits.

Connecting the router is very simple, and then you can configure the device via the web interface directly from your computer.
Via Wi-Fi
A Wi-Fi router has one important advantage - it can be configured remotely, without resorting to a physical connection through a wire between the device and the computer. As a rule, most models immediately distribute Wi-fi after switching on. A password is not set, but if there is an icon with a lock on the network, then you should look at the factory code for the network on the label of the router.
- Find the wireless networks icon in the tray and click on it;
- Select your wireless access point from the list and click “Connect”.

We recommend sitting as close to the device as possible, since the data transfer speed directly depends on the distance. If Wi-Fi does not activate automatically, you will have to do it manually. Then you can connect to the router only in one way - wired.
Setting up the router
Some providers do not require the user to set up a modem, since after the steps described above the Internet is already available on the computer, however, these are rare situations. More often than not, you have to manually establish the connection. Setting up Wi-Fi is mandatory if you want to put your password on the network.
Login to the web interface
First, you need to learn how to enter the main menu of the router. Please note that the device does not need to be connected to the Internet at all to do this. You will need any browser (Google Chrome, Opera, Firefox or similar). Next you need to know:
- IP address where you can access the modem menu;
- username and access code (password).
This information is located on a special label attached to the case. The login is usually the English word admin, the password is either similar or presented as a combination of numbers (1234 or 0000). It depends on the manufacturer.

Once all the information received has been found, follow these simple steps:
You will be taken to the main menu when you provide the correct information. Now you can change the device settings. You can log in not only from a personal computer, but even from a phone by repeating this procedure in a mobile browser.
Reset all settings
Before performing any actions, you need to figure out how to return everything to its place if incorrect parameters are set. Modems have a special feature called Factory Reset. It will override any changes made by the user. You can reset the device in several ways:
- Separate RESET button. Hold it for more than 10 seconds until all indicator lights come on and go off.
- Combined WPS/RESET button. It is also necessary to hold it for more than ten seconds.
- Soft reset via the corresponding item in the system menu.

After the reset, the login information and Wi-Fi password (if there was one) will be reset to the factory settings. This is the only way to regain “control” over the device if it has been hacked by attackers.
Internet setup, connection types
Let's move on to the most interesting part - setting up an Internet connection. Typically, the procedure comes down to determining the type of connection and setting the specified parameters, which are provided by the provider. Let's look at connection types using the example of the common Wi-Fi router TP-LINK TL-WR840N. Menu options may vary slightly on other devices.
The connection is configured in the “Network” section, WAN subsection. The following types are available for you to choose from:


This router model has a “Detect” button. Once it has been pressed, the system will automatically select the connection type to be used.
Wi-Fi setup
If you are using a Wi-Fi modem, then the menu will have a special item for setting up the device as an access point. More advanced models can work as a client or repeater. To start setting up, you need:

At the end, all you have to do is click the “Save” button. Some models will also require a reboot for the changes to take effect. Do not use simple passwords such as combinations of numbers from 1 to 8 or the famous “qwerty”. They are easily selected not only by specialized software, but also by ordinary users. These are all the steps needed to activate Wi-fi.
Other settings
Depending on the manufacturer, of course, routers have a number of additional settings. We recommend reading in detail about each of them in the technical manual. The most common and useful ones will be presented here:
- MAC address filtering. The function allows you to restrict access to Wi-Fi for individual devices. For example, you can prevent your neighbor’s phone from connecting, but you will first have to find out the MAC address of his device.
- Creating an additional guest network. The device creates a separate network with its own password. You can limit the number of users, connection speed, and more. Useful when using the modem in public places.
- Virtual servers. Allows you to redirect incoming packets to the required address.
- Parental controls. Restricts access to specific resources (either completely or at certain times). A useful feature if there are children in the family.
- Backup. With its help, you can create a file with settings, and if there are problems with the device, restore them in just a couple of clicks.
Do not set parameters on the router that you have no idea about. They may disrupt or block Internet access.
Changing the password to log into the web interface
As you noticed, the standard passwords in the web interface are identical on almost all models. To prevent attackers from playing around with your router, we recommend changing your password. This is done through one of the sections of the standard menu:

This simple step will significantly improve the security of your network. The knowledge gained will be useful many times in life. You shouldn’t pay an adjuster for basic steps that you can do yourself in 5-10 minutes. If difficulties arise, do not be lazy to open the instructions.
Report content
Copyright infringement Spam Incorrect content Broken links
Many people are faced with the problem of a short wireless network range, which greatly complicates the use of tablets, smartphones and other devices connected to the network. Such situations arise in apartments, offices and other premises. Buying a second one will not change the situation, because it requires a free Internet cable. Therefore, you need to know how to connect a router through a router and whether it is possible at all. It is advisable to choose a second router to connect from the same company as the main one. This way you will not be affected by connection incompatibility issues.
Connection methods
Of course, connecting one device through another will increase the scale of network access. You can connect the router via the router in two ways:
- via cable;
- via a wireless network.
Both methods are quite easy. Choose the one that is more practical for you.
How to connect a router to a router via cable?
This method is the easiest. The only caveat is that the routers must be nearby. Let's find out how to connect router to router via cable. To do this you must:
- Purchase a UTP cable of the required length. On both sides there are special plugs for connectors in routers.
- We insert one end of the cable into the router, on which the wireless network is already connected to the “Internet” connector.
- We insert the second end of the cable into the LAN connector on the second router marked Lan2.
- We go to the “Network and Sharing Center” through the control panel.
- Click “Local Area Connections”, then call up properties.
- Select the connection type “Dynamic”.
- Then set up your WiFi connection network as usual.
- Save the settings and reboot the main router.
This connection option may not work due to a conflict in device addresses. Therefore, let's consider another option for how to connect two routers via cable:
- We connect the device ports with a cable.
- In the connection properties, disable the DHCP server.
- In the “Local Network” section, change the IP address of the main router to the second one.
- Save the settings and restart the routers.
How to connect router to router via WiFi?
This method of network expansion is more correct. To do this, WDS technology was installed in the routers, which allows you to connect the router through a second router. Each router is a station of this technology and must be properly configured to connect with other devices. If you do everything correctly, then the question of how to connect a router to a router via WiFi will be resolved fairly quickly.
First, make sure that your router model is capable of connecting via WDS. You can find out about this on the model manufacturer’s website. The router that connects becomes a repeating device. Set it up using these steps:

A notification about network distribution and connection will appear on the screen. Check for a wireless network at other scales and connect. If there were no problems, then you were successfully able to connect the router through a second router and can use the Internet. If you were unable to do this, then turn off the routers completely, reset the settings and reconnect. Contact the manufacturer's website for help, because new router models have some deviations from the usual schemes and their own nuances.
Good day.
In order to organize a wireless Wi-Fi network at home and provide Internet access to all mobile devices (laptops, tablets, phones, etc.), you need a router (even many novice users are already aware of this). True, not everyone dares to connect it and configure it themselves...
In fact, most people can do this (I don’t take into account exceptional cases when an Internet provider creates such a “wild” with its own parameters for accessing the Internet...). In this article I will try to answer all the most common questions that I heard (and hear) when connecting and setting up a Wi-Fi router. So let's get started...
1) What router do I need, how to choose it?
Perhaps this is the first question that users who want to organize a wireless Wi-Fi network at home ask themselves. I would start this question with a simple and important point: what services does your Internet provider provide (IP telephony or Internet television), what Internet speed do you expect (5-10-50 Mbit/s?), and at what protocol you are connected to the Internet (for example, now popular: PPTP, PPPoE, L2PT).
Those. The functions of the router will begin to appear by themselves... In general, this topic is quite extensive, therefore, I recommend that you read one of my articles:

searching and choosing a router for your home -
2) How to connect the router to the computer?
As a rule, the router itself comes with a power supply and a network cable for connecting to a PC (see Fig. 1).
By the way, please note that on the back wall of the router there are several sockets for connecting a network cable: one WAN port and 4 LAN ( the number of ports depends on the router model. In the most common home routers, the configuration is as in Fig. 2).
Rice. 2. Typical rear view of the router (TP Link).
The Internet cable from the provider (which was most likely previously connected to the PC’s network card) must be connected to the blue port of the router (WAN).
Using the cable that comes with the router, you need to connect the computer’s network card (where the provider’s Internet cable was previously connected) to one of the router’s LAN ports (see Fig. 2 - yellow ports). By the way, you can connect several more computers this way.
At an important moment! If you don’t have a computer, you can connect the LAN port of the router to a laptop (netbook) with a network cable. The fact is that the initial setup of the router is better (and in some cases, it is impossible to do otherwise) via a wired connection. After you specify all the basic parameters (set up a wireless Wi-Fi connection), you can disconnect the network cable from the laptop and continue working via Wi-Fi.
As a rule, there are no issues with connecting cables and power supplies. Let's assume that your device is connected, and the LEDs on it started blinking :).
3) How to enter the router settings?
This is probably the key question of the article. In most cases, this is done quite simply, but sometimes... Let's consider the whole process in order.
By default, each router model has its own address for entering the settings (as well as login and password). In most cases it is the same: http://192.168.1.1/, however, there are exceptions. Here are a few models:
- Asus - http://192.168.1.1 (Login: admin, Password: admin (or empty field));
- ZyXEL Keenetic - http://192.168.1.1 (Login: admin, Password: 1234);
- D-LINK - http://192.168.0.1 (Login: admin, Password: admin);
- TRENDnet - http://192.168.10.1 (Login: admin, Password: admin).
At an important moment! It is impossible to say with 100% accuracy what address, password and login your device will have (even despite the brands I listed above). But this information must be indicated in the documentation for your router (most likely, on the first or last page of the user manual).
Rice. 3. Enter your login and password to access the router settings.
For those who were unable to enter the router settings, there is a good article with reasons (why this could happen). I recommend using the tips, link to the article below.

How to log in to 192.168.1.1? Why it doesn’t log in, the main reasons are:
How to enter the Wi-Fi router settings (step by step) -
4) How to set up an Internet connection in a Wi-Fi router
Before describing these or those settings, a small footnote should be made here:
- First, even routers from the same model range can have different firmware (different versions). The settings menu depends on the firmware, i.e. what you will see when you go to the settings address (192.168.1.1). The settings language also depends on the firmware. In my example below, I will show the settings of a popular router model - TP-Link TL-WR740N (the settings are in English, but understanding them is not so difficult. Of course, setting up in Russian is even easier).
- The router settings will depend on the network organization of your Internet provider. To configure the router, you need connection information (login, password, IP addresses, connection type, etc.), usually everything you need is contained in the Internet connection agreement.
- For the above reasons, it is impossible to give universal instructions that are suitable for all occasions...
Different Internet providers have different types of connections, for example, Megaline, ID-Net, TTK, MTS, etc. use a PPPoE connection (I would call it the most popular). In addition, it provides higher speed.
When connecting PPPoE to access the Internet, you need to know the password and login. Sometimes (as for example, MTS) uses PPPoE+Static Local: access to the Internet will be provided, after entering the password and login for access, the local network is configured separately - you will need: IP address, mask, gateway.
Necessary settings (for example PPPoE, see Fig. 4):
- You need to open the “Network / WAN” section;
- WAN Connection Type - indicate the connection type, in this case PPPoE;
- PPPoE Connection: Username - specify the login for accessing the Internet (specified in your agreement with the Internet provider);
- PPPoE Connection: Password - password (similar);
- Secondary Connection - here we either do not indicate anything (Disabled), or, for example, as in MTS - we indicate Static IP (depending on the organization of your network). Typically, this settings item affects access to the local network of your Internet provider. If you don’t need it, you don’t have to worry too much;
- Connect on Demand - establish an Internet connection as needed, for example, if the user accesses an Internet browser and requests a page on the Internet. By the way, please note that there is a column below Max idle Time - this is the time after which the router (if it is idle) will disconnect from the Internet.
- Connect Automatically - connect to the Internet automatically. In my opinion, the optimal parameter is what you need to choose...
- Connect Manually - connect to the Internet manually (inconvenient...). Although for some users, for example, if they have limited traffic, it is quite possible that this type will be the most optimal, allowing them to control the traffic limit and not go into the red.

Rice. 4. Setting up a PPPoE connection (MTS, TTK, etc.)
It is also worth paying attention to the Advanced tab - in it you can set DNS (they are sometimes necessary).

Rice. 5. Advanced tab in the TP Link router
Another important point - many Internet providers bind your network card MAC address and do not allow you to access the Internet if the MAC address has changed ( approx. Each network card has its own unique MAC address).
Modern routers can easily emulate the desired MAC address. To do this you need to open the tab Network/MAC Clone and press the button Clone MAC Address.
Alternatively, you can tell your new MAC address to your Internet provider and they will unblock it.
Note. The MAC address is something like this: 94-0C-6D-4B-99-2F (see Fig. 6).

Rice. 6. MAC address
By the way, for example in “ Billine» connection type is not PPPoE, A L2TP. The setup itself is done in a similar way, but with some caveats:
- Wan Connection Type - the connection type must be selected L2TP;
- Username, Password - enter the data provided to you by your Internet provider;
- Server IP-address - tp.internet.beeline.ru;
- save the settings (the router should reboot).

Rice. 7. Setting up L2TP for Billine...
Note: Actually, after entering the settings and rebooting the router (if you did everything correctly and entered exactly the data that is needed), the Internet should appear in your laptop (computer) that you connected via a network cable! If this is the case, all that remains is to set up a wireless Wi-Fi network. In the next step, we will do this...
5) How to set up a wireless Wi-Fi network in a router
Setting up a wireless Wi-Fi network, in most cases, comes down to specifying the network name and password to access it. As an example, I’ll show the same router (although I’ll take Russian firmware to show both Russian and English options).
First you need to open the Wireless section (wireless network), see fig. 8. Next, set the following settings:
- Network name - the name that you will see when searching for and connecting to a Wi-Fi network (specify any);
- Region - you can specify “Russia”. By the way, many routers don’t even have such a parameter;
- Channel Width, Channel- you can leave Auto and not change anything;
- Save your settings.

Rice. 8. Setting up a Wi-Fi wireless network in the TP Link router.
Next, you need to open the “ Wireless Security". Many people underestimate this point, but if you do not protect the network with a password, then all your neighbors will be able to use it, thereby reducing your network speed.
- Version: you don’t have to change it and leave it automatic;
- Encryption: also automatic;
- PSK password is the password to access your Wi-Fi network. I recommend that you indicate something that is difficult to find by regular search, or by random guessing (no 12345678!).

Rice. 9. Setting the encryption type (security).
After saving the settings and rebooting the router, your wireless Wi-Fi network should start working. Now you can set up a connection on your laptop, phone and other devices.
6) How to connect a laptop to a wireless Wi-Fi network
As a rule, if the router is configured correctly, there should be no problems with setting up and accessing the network in Windows. And such a connection is made in a couple of minutes, no more...
First, click on the Wi-Fi icon in the tray next to the clock. In the window with a list of found Wi-Fi networks, select yours and enter the password to connect (see Fig. 10).
Rice. 10. Selecting a Wi-Fi network to connect your laptop.
If you entered the network password correctly, the laptop will establish a connection and you can start using the Internet. Actually, this completes the setup. For those who did not succeed, below I will provide several links to typical problems.

The laptop does not connect to Wi-Fi (does not find wireless networks, there are no connections available) -

Problems with Wi-Fi in Windows 10: network without Internet access -
In our daily activities, we often use devices with Internet access via wireless channels, for example, mobile phones, tablets, laptops, even modern TVs have the ability to connect to the Internet. Therefore, using a WiFi router in our home is very convenient; it allows you to connect all the necessary devices to the Internet without any problems. Before I start talking about how to connect a WiFi router to a computer or laptop, you must make sure that your router has WiFi (look at the labels and antennas on the router or check out the characteristics of this model on the Internet.)
So, we have an Internet provider cable (telephone or any other), a router and a desktop computer. Typically, modern computers have network devices built into the motherboard for connecting to local networks. Make sure your computer is also equipped with this module. Find such a connector on the back of the computer. It's called RJ-45.
If it is, then you can connect a cable to connect to the router. If you do not find such a connector, then the network card will need to be purchased separately at any computer store and installed.
By the way, if you buy a cable and connector separately, you will have to crimp it. So it’s better to buy a ready-made cable! Just in case, here is an article for you: “”, from which you will understand how cables are crimped.
Turning on the router and a few nuances
Now let's move directly to the connection. We power the router from the included power supply into the socket WAN Let's connect the cable from the Internet provider, and connect the network cable to the computer and to one of the LAN sockets of the router (usually they are indicated by numbers) (purchased separately, calculate in advance how long you will need).
You should end up with something like this:

Turn on the router by pressing the power button on it. Most often, network cards in computers and laptops are equipped with connection indicators in the form of yellow or green LEDs. If everything is connected correctly, the LED should light up (it may blink - there’s nothing wrong with that).
Attention! If the router has been configured, the “Internet” indicator will light or blink. This is a sign that the router has Internet and then all that remains is to configure the computer.
If someone has already used your router before you, then do not forget to reset the settings installed on it. Usually there is a “Reset” button for this, which is specially difficult to reach so as not to accidentally press it. It is usually located at the bottom of the router; to reset the settings to factory settings, you need to press it with a needle or pin and hold it for 5-10 seconds. You may not need these items since this button may be in an accessible location.

On the computer connected to the router, click “Start” - “Control Panel” - “Network and Sharing Center”. Find the Local Area Network Connection icon and right-click on it. Select Status.
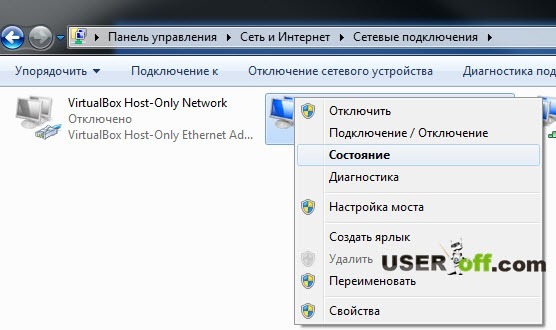
In the window that opens, click the “Details...” button. Find the line “Default gateway IP...”. Opposite it will be written the IP address of the router itself. Write it down. Perhaps there will be no data here, then read the article further.

Pay attention to the line “DHCP enabled”. If “Yes” is written on the right, then an IP address is assigned to your computer automatically and you do not need to configure it.
If DHCP is disabled, you will have to enter the IP address yourself. Decide in advance how you would like your router to distribute addresses: automatically or manually.
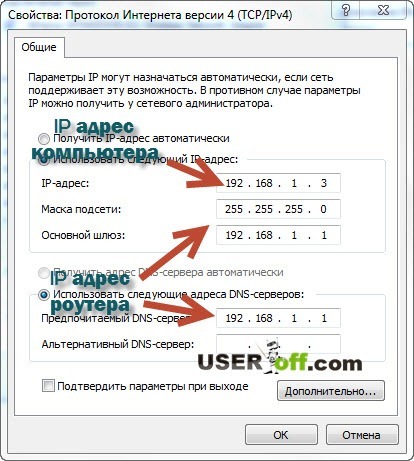
Close the “Network connection information” window and in the already open “Status - Local Area Connection” window, click the “Properties” button. Next, in the “Network” tab, find “Internet Protocol Version 4 (TCP/IPv4), left-click once, and then click the “Properties” button. If you decide that your router will distribute addresses automatically, then check the “Obtain an IP address automatically” checkbox; if you do not need the DHCP function, then check the “Use the following IP address” checkbox. And on the right, enter the IP address from the desired range, for example, 192.168.1.2.
However, you can choose any last three digits from the range from 0 to 254, the main thing is that it is not the same as the router’s IP address (we wrote down its address a little earlier). Then click in the field opposite the “Subnet Mask” column. The numbers 255.255.255.0 will appear automatically. Opposite the “Default gateway” column, enter the IP address of the router in the field. Below, mark the line “Use the following DNS server addresses” with a marker. Next to the “Preferred DNS server” line, enter the router’s IP address again. For convenience, write down all the addresses, masks, etc. - they may be useful to you later.
For example:
Let's move on to setting up the router. In the address bar of your browser, enter the address of the router and go to it. By the way, you can also find it out from the instructions for the router, and it is also sometimes written directly on the router case. There is an example in this article: "".
Setting up the router
Above, using examples, we figured out how to connect a WiFi router to a computer or laptop; now all that remains is to configure it to receive the Internet on your device. An authorization window will appear in which you must enter your login and password. They are also written in the manual or on the router case. The router settings panel opens. Please check your provider's connection type and settings in advance. The type of connection may be specified in the contract for the provision of Internet access services.
Go to the WAN section. In this section we need to specify the connection type and provider settings. All of them are most often specified in the contract. These settings are the IP address or name of your provider's server (serverIP/Name), your account (account) and the password to access it (password). Save the changes.
We are looking for the Wireless section. The main thing we need to do in it is: turn on the wireless channel (Wireless – Enabled or check the box), come up with any name for your network (SSID), type of protection (Authentification Method) - choose WPA2, and Password - come up with a more complex password, if not want someone else to use your Internet. Let's save the changes again.
Reboot the router by turning it off and on. Ready! The computer has access to the Internet and a wireless access point has been created!
Now let's look at how to connect a laptop to the created access point.
Make sure your router is turned on and configured correctly. . The system will automatically search for possible connections. A signal strength icon will appear in the taskbar tray. Click on it and in the drop-down list, select the access point you want to connect to by name. Click “Connect” and, if necessary, enter the access point password. Ready! The laptop is connected to the Internet via a router. All other wireless devices are connected in the same way.
If you still have not received Internet access, then you should check how you configured the router, and also make sure that you entered the correct username and password. Of course, I talked about the main points of connecting the router to a computer or laptop, but you may encounter some difficulties that I did not describe in the article. In this case, ask a detailed question (it is advisable to tell what measures were taken) and perhaps I can help you in the comments after this article.
Note: I didn’t take screenshots to configure the router, since there are a lot of models, and this is not the main topic of the article.
I found a video for you that tells you about setting up and connecting the router to your computer:
Based on the name, a reasonable question arises: why do you need to connect the router through the router, what is the meaning of these actions. The fact is that users are often faced with a situation where the Wi-Fi signal is not able to cover the entire area of their homes. This is a common occurrence for large private houses, for example, with an area of 100 m3 or more. Regardless of the model, routers have a limited coverage area, and to increase it, repeaters are used that can “expand” the space significantly. For the same purpose, two routers are connected to each other using a connection to the same network. The second router performs the function of a repeater, thus achieving both its expansion and expansion.
Important to know! When setting up such a connection scheme, when you need to connect two routers in order to expand the existing Wi-Fi network, you will need to configure the router in repeater mode. But this method is not suitable for all devices; some models do not support this function.
To connect router to router, a LAN cable is most often used. This is easy to do: no specific skills are required, and it does not take much time. But not everyone knows how to connect a router to another router via cable. It is naive to believe that it is enough to connect one device to another and everything will work. No, of course, you will need to delve a little into the process and understand the intricacies, since there are two completely different connection schemes. Before taking any action, you should familiarize yourself with both, and then choose the most suitable option for yourself.
Network of routers cascaded LAN-WAN
 This scheme is preferable for the majority of users, in any case, it is used more often. First, you need to figure out how to properly connect two routers with a cable: from the LAN socket to the WAN input. This is done for a simplified way of setting up the Internet, which will be a feasible task even for beginners in this matter. A tree-like “Wi-Fi” bridge is built using this principle: in this way, you can connect countless routers using one access point.
But first, this chain needs to be established. It is noteworthy that the last device in this chain uses the settings of the previous one, and this simplifies the task. The process of how to connect and connect two routers actually comes down to the fact that you need to enable the dhcp function on the main router:

After the changes are saved, wait until the connection appears and work quietly.
Communication between routers using an equivalent LAN-LAN scheme
 With this option, you need to connect the routers with LAN ports, using a cable by sequentially inserting it into the LAN port of one device, and in the opposite direction. Such a connection creates one logical segment, and wireless networks must have different SSID names with the same addressing. To configure and connect, unlike the previous method, you need, on the contrary, to disable the DHCP server. To do this, first go to the web interface of the primary router, the DHCP server tab, and remember the pool of distributed addresses. By default, the range of values is from 2 to 100:
- Open the settings of the secondary device, go to “Network” - “Local network”.
- If they have the same IP address, it needs to be changed. The address is not selected from the DHCP server pool, that is, we set the value to 192.168.1.101 or something like that.
- Go to “DHCP Settings”, disable the server by checking the box next to “Disable”.
- Click on the “Save” button, then reboot. We managed to connect.
Wireless connection
 There is another recognized option for how to connect a router to another router via wifi. Connect them together by creating a wireless “Wi-Fi” bridge, as a result of which you can install routers at a great distance from each other, while increasing the coverage area. In this case, cables will not be needed, this is a positive thing: they will not interfere. But this option is not without its negative sides: it’s easy to connect, but the network loses stability, which is accompanied by a decrease in speed. If there are serious reasons not to use a cable for the connection, this would not be the worst option. When using the wireless method of connecting and connecting routers, you should keep in mind that not all devices support WDS mode; this mainly applies to outdated models.
Wireless bridge based on WDS
A wireless network bridge can be created simply by connecting two routers into one Wi-Fi network, but the process itself is complex and time-consuming. The detailed settings methods differ on different routers, but the principle of creating such a bridge with your own hands is unchanged: this requires WDS support.
To expand coverage, it is recommended to connect and connect one router to another via Wi-Fi, using devices of the same brand. In other words, if the main router is, for example, Asus, the operation and connection will be more stable when using an additional device of the same brand.
Configuring the main router for WDS mode
Different routers have their own settings, and many manuals have been published on this matter. But the process and sequence of actions described in them are so complex and confusing that a novice user is simply lost. And the principle of how to configure a router (main) in order to connect with an additional one comes down to one thing, regardless of the device model:

Setting up a second router for WDS mode
Everything is a little more complicated here, but figuring out how to set up a WDS wireless bridge for the second router before connecting is also not difficult. Setting up a router in bridge mode for an additional device looks like this: 
- First change the IP address of this device.
- Set an identical channel as the main one, the same value is indicated.
- Enable the “bridge” function (WDS) by checking the box.
- Designate the network name (SSID) used by the main device.
- Next you need to enter the mac address of the main router.
- Specify its password, key type and Wi-Fi network password.
- When you enable the WDS function, a Search button will appear. Click on it to scan available networks.
- Select the desired network - “Connect”.
- Specify the “Key Type” and “Password” of the main device network, then “Save”.
- Go to “DHCP Settings”, disable the DHCP server.
- Click on the “Save” button and reload. We managed to connect.
Connecting an access point (AP) to the router
Before connecting both routers to create and configure a wireless bridge, connecting them to each other, you will need to update the firmware and begin setting up the access point, which will help expand the coverage radius. The connection will help create a distributed network using multiple APs to obtain a connection through both devices.
Connecting APs to each other
 In order to connect two devices, the process begins by entering the router address on your computer or laptop in the browser search engine via: http://192.168.1.1. Then press Enter and enter the user details in the registration window: admin and admin. Next, go to the router’s web interface:
- In the settings, select “Wireless networks”.
- In the network name - SSID - indicate the name, for example, WL550gE, and in the WPA2-PSK column create a password for the wireless network. Remember it or write it down.
- In the IP Config folder, open WAN & LAN, where the IP address of the first access point is indicated. Remember it.
- In the “Wireless Networks” folder, select “Bridge”.
- In the new window, find AP Mode, where you select “Mixed Mode”, and as a bridge - the WDS Only option.
- Here select a fixed WDS channel, value 1, 6 or 11.
- Activate the “Connect to access points in the list of remote bridges” function.
- Enter the MAC address of the second access point with the value 00:0E:A6:A1:3F:6E – “Add”.
- Click on the “Finish” button, then “Save and Reload”.

Setting up a second AP
To connect the second router to the access point and connect to the first, a similar sequence of actions is used. Then go directly to the device settings:
- Open the menu and specify the network name (SSID), it must match the first AP.
- Open the DHCP server in the IP Config menu.
- In the “Enable DHCP server” line, select “No”, then “Apply”.
- In the “Bridge” menu, specify the same channel as the first AP.
- Enter the MAC address of the first access point with the value 00:0E:A6:A1:3F:87 – “Add”.
- In the “Password” field, you must enter the code word created by the user for “WPA2-PSK” in the first router.
- Click on the “Finish” button, and then “Save and Reload”.

Conclusion
The process of how to connect and connect one router through another can be difficult or easy depending on the option chosen. But first you need to ask yourself questions: is it worth it and why do we combine routers? If the answer is yes, and the goal is clear, all that remains is to choose the most preferable method to connect both devices into one.