How to transfer data to a Samsung memory card. How to transfer applications from phone to memory card
Modern mobile devices have a large amount of built-in memory. However, this is not always enough, since modern games and applications take up quite a lot of space. Memory problems can be partly solved by moving applications to the SD card.
It is worth noting that some applications are not transferred to the Android memory card if the developer does not include such an option in their product or there is no free space on the memory card. Also, in some budget phones this function is initially removed from the firmware.
How to move an application to an SD card using the standard method
The first thing you can try is the built-in move feature:
Important! The standard method does not move all the data; some information will remain in the device’s memory.
This is a convenient utility that eliminates the need for repeated stereotypical actions; it provides the ability to perform group control list of applications. 
First launch sorts applications, allowing movement and will display a list. The required ones are highlighted by pressing and holding. To transfer an application to a memory card, you need to click its icon and, when prompted by the utility, confirm the transfer. Separate tabs display programs that are already on the SD card and programs in the phone's memory that cannot be moved. In addition, a warning will be issued if moving the program will reduce its functionality.
Folder Mount
An advanced program that allows you to link any internal folder to any external one, thereby moving applications to the memory card. For FolderMount to work requiresroot rights:

After this, only the image remains in the internal memory, and the folder itself is located on the SD card. 
Folder Mount analyzes the list of applications, their size and finds those that should be transferred to external media first.
Application "Move to SDCard"
““Weighs” little, moves programs in both directions, sorts them by date, name, size. 
The procedure is simple:
- In the menu on the left side, select “ Move to memory card»;
- Mark the application with a bird, click " move»;
- appears process image with a slider from 0 to 100%.
The reverse process is available from the " Moving to internal memory». 
For work necessaryroot rights and an additional etx partition on the memory card (primary). 
On startup scans the device and displays a list of all programs that are allowed to be saved to the Android memory card. You can select one application, or use the " Multilink» Perform batch transfer. But first you need to create the necessary sections.
Creating a partition using Recovery TWRP
The system recovery menu is intended for installing alternative and factory firmware, updates, applications, synchronizing with a computer, full or partial backup, creating and formatting partitions on an SD card. Using TWRP is easy:

The program will ask for consent to install an officially distributed application. If you don't need it, click " Donotinstall».
After reboot, go to " Memory"("Storage") and check whether the storage size available for SD has changed. If everything is done correctly, it will shrink because the created ext-partition is now visible only to App2SD, Link2SD and other similar managers.
Create a partition with EaseUS Partition Master
In this case, we will work on a computer, connecting the card through a card reader.
The procedure for partitioning and creating a 2nd partition on an SD card in EaseUS Partition Master:

In the “Settings” of the device, go to “ Memory", choose " Disable card" The warning prompts you to confirm the action. 
After launch it will ask you to confirm superuser rights.
Open « Create", a new section will be displayed at the top, below it a line with information about the SD size and the file system used: 
Button " ADD» creates a new section. The size can be set using the slider or by clicking on the number. 
Choose file systemfat32, mark “Format” with a bird. 
Now the parameters of the second section are set.
Again you need to press " ADD" Move the slider all the way and leave a checkmark in the “ Format", click ext3, then " Apply"("Apply"). 
This displays warning. To start the card splitting process, you must agree. 
The process image will appear first, then the new sections. 
The SD card is connected. Through " Settings" V " In memory"You can see its changed size.
Moving with Link2SD
Now it is possible to transfer applications to an Android memory card using the manager. To do this you should:

When the process is complete, launch the transferred application. If it (no matter for what reason) does not start, it is best to return to the previous location using the “ RemoveLink».
Files To SD Card
A program for transferring applications to a memory card is available in the Play Market. It can be used to quickly change file location even in devices with small built-in memory. Allows you to copy data in both directions. Makes it as easy as possible to free up the internal storage of the device.
After installation, as well as after every restart device, the program needs confirmation of rights and configuration of access to the external storage.
All-In-One Toolbox
A package of tools that optimizes the OS. All-In-One Toolbox is useful for fixing registry errors, returning to factory settings, including after a device infection and incorrect installation of programs. Allows you to monitor and optimize the storage status, delete cache and history, and manage SD card partitions.
Using the card as internal memory
This function is not available on all gadgets, but only starting from Android 6.0.
Important! In this case, this SD card cannot be used otherwise. For example, to move it to another device, you will need formatting. When you remove a flash drive connected in this way from the device, all information will be deleted from it.
In Settings select " Storage" and press " SD card" Find the item at the top right " Tune", then go to " Internal memory" A warning about data deletion will appear. To agree to start the process, you need to click “ Clear" If the card class is lower than 4, a warning will appear indicating that the device will operate slowly. To complete the process you need to click " Transfer now", then " Ready" After the transfer is complete, reboot the device.
There is information on setting up this function on our website.
Many owners of modern gadgets are trying their best to expand the memory in their device. Unfortunately, 4-8 GB of internal memory is not enough for users to work comfortably. An SD card allows you to expand these boundaries. You can transfer music, videos or text documents to it. But what can you do with games? How to move applications to a memory card? Now there are many ways to help you do this.
Standard means
As we have already found out, built-in memory plays an important role in using the device. As a rule, about 1 gigabyte is allocated for the operating system, 2 GB for multimedia files. So what remains? Only 1 gigabyte is allocated for various applications. Of course, by modern standards this is very little. Nowadays there are Android applications that take up more than 2 GB. It doesn’t matter how powerful your mobile phone is, because without memory you won’t be able to install normal applications. It is because of this that many users are looking for a way out of this situation. Let's look at how, using standard tools, you can move applications to a memory card from Samsung, Asus and other well-known brands. Unfortunately, this method will not work for owners of Chinese phones.

The fact is that in Chinese models, developers separate internal memory for general use and memory for multimedia. When transferring, the files will simply move to the second half.
On more expensive models, the developers have provided the ability to transfer applications to an external drive. This method does not require any third-party utilities. If your phone supports this feature, then you can easily move the necessary programs. How to move applications to an Android memory card?
First, let's go to the settings of your device.
Go to the “Applications” item.
In the list, find the application that needs to be moved and click on it.
In the new window, click on the “Move to USB drive” button.

Unfortunately, not all programs can be moved. If the developers have provided such an opportunity, then you will move the application in a few minutes. You also need to remember that not all files are moved to the SD card. Only large files are transferred, while others that are responsible for launching the application remain on the internal memory.
Additional software
How to move an application to a Lenovo memory card? This can be done automatically using additional programs. The most common is App Mgr III. This utility is available to everyone. It's free and you can download it from Google Play. The program is quite simple, anyone can understand the functionality. When installing a new program, it will warn you that you can install the game on the SD card. Agree with it and wait for the game to install.
Using the App Mgr III program
How can I move applications to a memory card using additional software? If the game or program is already installed on the device, then you should follow the instructions to transfer the utility.

1. Open the required application and select “Moveable” from the top. This will show you all the games that can be moved to the SD card. You can also view games and programs that have already been moved by selecting “On SD card”, and utilities that cannot be transferred.
3. Confirm the selected actions and wait for the set goal to be achieved.
Using FolderMount
FolderMount is a special program that performs its functions perfectly. It will help you move the application. Using this program, the Android memory card will be used as the main memory, since it allows you to move almost all files to an external drive. Unfortunately, FolderMount has a significant drawback: it requires ROOT rights. If you get superuser rights, then this utility will help you a lot. It transfers not only game files, but also their cache. It's great for gaming. You can also transfer applications not only to an SD card, but also to any other external storage device.

FolderMount operation
Transferring files using this utility is quite simple, but some users may encounter certain problems. How to move applications to a memory card?
Download the program from Google Play and install it.
Click on the button in the form of a plus sign, which is located in the upper right corner.
In the new window, first select “Name” and write the name of the game you want to move.
After this, select “Destination” where you want to move the game.
Confirm the action by clicking on the checkmark in the upper right corner. We wait for the application to move to the memory card. Then you can move on to other games.
Conclusion
How to move applications to a memory card? As you may have noticed, there is nothing complicated about this. If using standard tools you were unable to move the game or program, then you should install additional software. Of course, these programs will not be able to transfer all applications to the SD card, but this way you will still free up memory. The most effective utility is FolderMount, but it requires ROOT rights. When you get superuser rights, you take a risk, but it greatly expands the functionality of the phone as a whole and gives you many new features.
The amount of built-in memory is something that many smartphone manufacturers save on. This is especially true for budget devices based on the Android operating system. Such budget models may have 8, 4 or 2 gigabytes of memory. You also need to take into account that part of this memory will be occupied by files of the operating system itself. As a result, users end up with a device with very little free space to install applications.
But, there is a solution to this problem. If you have an Android operating system version 2.2 or higher, then you can use the application transfer feature. This will free up some space and allow you to install new applications. If you are interested, then you have come to the right place. In this article we will talk about how to transfer applications to a memory card on Android.
Step #1: Open Settings and go to Applications.
First of all, you need to open the Android settings and go to the “Application Manager” section. In some firmware, this settings section may simply be called “Applications”.
Step #2: Open the desired application.
After going to the “Application Manager” section, you will see a list of all installed applications. Here you need to find the application that you want to transfer to the memory card and open it.

Step No. 3. Transfer the application to the memory card.
After selecting an application from the list, you should see a page with information about this application. Here you can see how much memory this application takes up, as well as get other information.
In order to transfer the application to a memory card, you need to click on the “To SD memory card” button. In other firmware, this button may be called “Move to SD card” or something else. But the meaning is the same - transfer of the application.
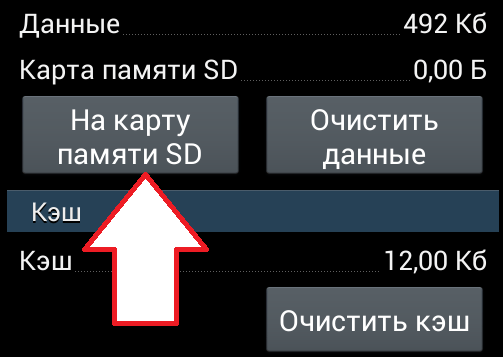
Pay attention! In some cases, the app transfer button is missing. This means that this application cannot be transferred. Select another application from the list.
Step #4: Wait until the application transfer is completed.
After clicking on the application transfer button, the operating system will begin to copy data from the device’s built-in memory to the memory card. During this time, the transfer button will be unavailable.

After a while, the “Move to device memory” message will appear on the transfer button. This means that the application transfer is complete and you can use it.
Mass transfer of applications on Android.
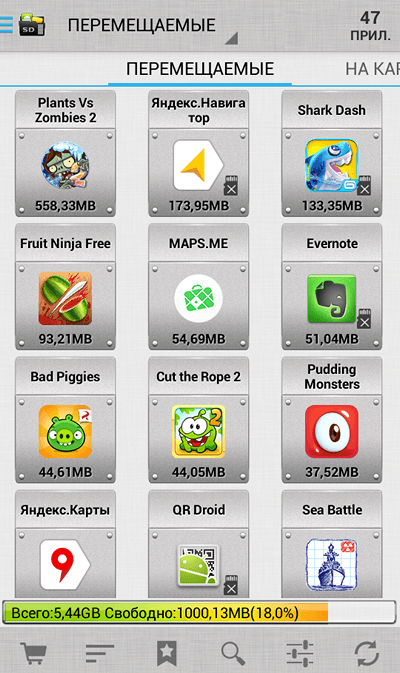
This application sorts all adopted applications into three categories:
- Movable (applications that can be moved to a memory card and back);
- On the SD card (applications that were previously transferred to the memory card);
- In the phone (applications that are located in the phone’s built-in memory);
This sorting of installed applications allows you to quickly figure out which applications can be transferred and which cannot. You can also quickly go from the program to the application page in the Application Manager and actually transfer the application, as described above.
We are faced with the task: to transfer all the information from one memory card to another, and at the same time maintain the functionality of the programs installed on the card. For example, this is often necessary after purchasing a new memory card with a larger capacity. It seems like a simple matter, but there are some nuances here, so let’s look at the whole process in detail.
Preparing memory cards
So, there is an 8GB microSD memory card, its place should be taken by the purchased 16GB card. 1. The first thing to do is format a new card using your phone. This will allow you to identify possible problems (for example, incompatibility) at an early stage. In phones running Symbian 9.2 (for example), this is done like this: Menu -> Tools -> Memory -> Functions -> Format. map.

After successful formatting, we assign a name to the memory card. It is advisable to assign the same name as the old one. Remove the card from the phone.
2. Next action - enable the display of hidden files and folders on your computer(if this has not already been done). This is necessary so that such objects are displayed in Conductor(and they are on the map, in particular, the folder System is hidden), because We have to copy everything.

In Windows XP this can be done like this: go to “ Control Panel", select applet " Folder properties"/View, mark " Show hidden files and folders" Confirm OK.
Data transfer
3. Now let's start transferring the files directly. Reinstall the old memory card into the phone. We connect the phone to the computer using a USB data cable, select the mode on the phone Data transfer(aka "Accumulator"). Open in Windows Explorer contents of the memory card. We will temporarily create a folder on the computer where we will copy everything from the old card. Select all objects on the memory card and copy them to the prepared folder.
I would like to note right away that, depending on the size of the memory card and how full it is, this may take a lot of time, because... Often the “drive” mode does not allow copying/writing operations to a memory card at maximum speed. A USB card reader will allow you to speed up the process, of course, if you have one.

In this case, information exchange operations between the computer and the card will be close to the maximum permissible speed, which will dramatically reduce the time of data copying.
4. After completing the operation, remove the old memory card, insert a new one and similarly copy all the contents from the folder on the computer to the new card. After formatting, a folder structure was already created on the card; we respond to the request to replace it affirmatively.
5. Install the memory card into the Nokia phone and reboot it (off/on).
Let's check. Everything should work as before.
Altanets Complete transfer of information from one memory card to anotherGood afternoon, our dear readers and at the same time users of modern devices. Today we will talk about a problem that is so familiar to many of us.
It happens that you install a new application, but the download does not turn on, and a window pops up asking you to delete old applications to free up memory on the device. When Android does not save to the memory card, what to do about it?
Danger of the problem
Tablets and smartphones today have different sizes of built-in memory. True, given the abundance of applications and the ability to connect different gadgets, the main memory may not be enough.
Of course, in our age, everyone understands that the elementary solution here is to connect an SD card, because today phones store not only contacts, but also a lot of useful and entertaining things.
So modern microSD can add up to 8 GB of memory, microSDHC - up to 32 GB, microSDXC - optimally offer 64 or 128 GB, but the most expensive of them can accommodate 2 TB of information.
For comparison, music downloaded to a phone usually weighs 3-10 MB, a photograph on a smartphone takes 1-5 MB, and a movie of the poorest quality starts from 700 MB. Not to mention games for smartphones. In general, when purchasing a card, you will, of course, be guided not only by the capabilities of your device, but also by your needs.
It just happens that the card is finally inserted, the problem should get better, but here it is again: you download the application from the Play Market, and it again goes to the smartphone’s memory.
Clearing the cache is only a temporary measure. So why doesn't Android want to save to the card? The issue of forcing files to be moved to an external card directly depends on the OS version.
Find out the Android version
How to find out the Android version? To do this you need:
- go to “Settings”;
- in the list of items, find “About phone”;
- Now click “Version Information” and here you will see the version of the operating system.
Solution for Android versions 4.0 - 6.0

The sequence for solving this issue is different for certain operating systems. So today, a large number of mid-segment smartphones run on Android from version 4, as well as Android 5.1 and 6.0.
Android 4.0, 4.1 and 4.2 allow you to configure saving files to an SD card without having a . You just need to go to “Settings”, enter the “Memory” submenu and specify there the installed memory card as the default resource for saving data.
From now on, the new application from the Play Market will be saved there. True, old applications will have to be moved manually, and if that doesn’t work, install them again.
To carry out the task, go to “Applications”, select the one you need and indicate the path each time - “Transfer to SD”. But not all applications, especially system ones, will “listen” to you, because to transfer data to Android from 4.4 and higher you will need to obtain Root rights.
Obtaining superuser rights occurs through special utilities.

The most famous of them are Framaroot and Kingo Android Root. But with full access to your files, you suffer some costs when obtaining Root rights: you lose your rights to warranty service for the device, updates do not come by themselves over the air, and unknowingly you can damage the system by accidentally deleting important files.
Using Third Party Applications
You can force your smartphone to transfer applications faster through AppMgr Pro III.
Download the application from the Google Market, clear the application cache automatically and perform other manipulations. The program divides applications into three characteristics: those stored on the SD card, those stored on the phone, and those that are moved. The latter can be broadcast to an external card. You can even click “transfer everything” right away - quickly and conveniently.

An alternative is the Link2SD program, which works with OS from 4.4. It creates separate libraries on the card, transferring applications partially. But be careful here too - do not touch system files.
Telephone does not see the memory card
There are several reasons why the phone does not recognize the card:
- Lost contacts is the first reason. Simply remove and reinsert the SD card.
- Sectors are damaged. What to do in this case? Format the memory card.
- The reason is a block in the phone's security system. The service center can help you remove it.
- The service center will tell you if something inside the phone is not going well, and will help you fix this element, returning the device to a responsive “dialogue” with the memory card.
- Incompatible card. All you have to do is replace the card, carefully reading the instructions about the compatibility of your device.
When the device detects the presence of the card, you can try to transfer programs to it according to the instructions above. And the unloaded system memory will serve you uninterruptedly, save applications, videos and photos to your smartphone and will not bother you with unpleasant notifications when downloading new applications from the Google Store.
I hope we have provided you with real help and are happy to continue to talk about the intricacies of modern devices. Also visit us with your friends in the VK group, on Facebook, on Twitter, as well as on YouTube channel.
There was a site with you
