How to understand that the computer's power supply has burned out. How to check a computer's power supply without a motherboard in various ways
The power supply in the computer is used to provide all components with the current necessary for their proper operation. If the computer shows no signs of life at all and does not turn on, the first thing you need to do is check it. Below we will tell you how to check the computer power supply (hereinafter referred to as PSU) at home.
Important! When checking any electronic devices, to avoid electric shock, you must unplug them from the outlet. Follow safety rules when working with electronic devices.
When checking under voltage, do not touch the housing and any ground electrode (primarily the battery) at the same time.
Before checking
A modern switching power supply rarely fails. Most often, the reason for a silent personal computer is a loose connection of the cord.
In the presence of Card-Reader, the procedure is greatly simplified. Even in sleep mode, during hibernation, in the presence of a mains voltage of 220 V, the switching power supply generates voltage via the USB bus for the operation of the mouse and some other devices that, when activated, can turn on the system unit to load the operating system. Therefore, various light signals will be observed here.

The listed steps are mandatory before verification.
Checking the voltage of a switching power supply
Please note that the test is performed without dismantling the source. This is done because the process of removing the power supply is accompanied by labor-intensive procedures. This check is only performed if there is no Card-Reader and no warning lights. Consequently, it is impossible to accurately determine the presence or absence of voltage. Otherwise, the power supply is removed and taken away for repairs.
The check is carried out according to:

Here the color coding is as follows:
- Black – circuit neutral (zero).
- Yellow – +12 V.
- Red – +5 V.
We are interested in the yellow and red line. Even in the off state, if there is a 220 V power supply at the input and a working power supply, voltages of the order of +0.45 V are observed in this area. MOLEX 88751 is somewhat more difficult to check because there is nowhere to insert the probe. But testing is still feasible. Hold the probes with your fingers. Secondly, we pay attention to the USB connectors of the motherboard. 5V comes here for the backlight. Secondly, because it is more difficult for an untrained user to check this connector.

The observed voltage should be about +4.98 V. In service centers, special couplings are used for testing instead of the usual tester probes. But by tilting the probe, you can achieve the desired result without this. Lean it against the outside so as not to short-circuit the power to the information lines of the connector. The leftmost terminal is not connected; you can lean the black probe against it. As a result, verification is simplified as much as possible.
Dismantling
If the above does not help to identify serviceability, then some kind of breakdown is assumed. We dismantle the switching power supply for further inspection. Unplug the power connectors of the motherboard, unscrew the screws and remove the module.

There are latches on the power supply connectors. The most problems are with ATX 20 pins. Press the latch and, rocking the plug from side to side, gently pull it towards you. This is not a quick process and requires a certain amount of patience.

The small ATX 12V plug also has a latch. It was not included in the photo because it is on the reverse side.

The literature says that you cannot turn on switching power supplies for a computer without a load. But we don’t do repairs, we just carry out inspections.


Result
If the check reveals that there is no voltage, then checking the fuse inside the switching power supply is not recommended.

And all because after turning off the power, a voltage of about 650 V still remains on the input filter capacitors, which can hurt the experimenter.
The switching power supply is being sent for repair.
For experimenters: how to turn on a seized power supply
We do not recommend doing this yourself, but there will always be those who want to do it themselves. In this case, at least do everything as it should. Among the plugs we have, we choose ATX, which has 20 or 24 contacts. Color differentiation of wires will prevent the wires from being mixed up when taking measurements. The first step is to connect any load to the power supply, because... Manufacturers do not recommend turning it on without load. The data when turned on without load may be slightly overestimated, or the power supply will not turn on at all.
- As a load, it is enough to use a fan or a DVD drive that is installed in your PC case. But at the same time, the power supply will not turn on so easily; to turn it on, you need to give a special signal. To reproduce it, you need to short-circuit the ground (GND, COM, common wire, ground) and the control wire, which is colored green. The mass is always black.
- You can short-circuit these two wires briefly with a simple paper clip. Hold for no longer than 3 seconds. Don’t be afraid because if you connect the green wire to any other, the power supply simply won’t turn on, the same result will happen if you connect the black wire to any other. After the paperclip is inserted, you can plug the power supply into the outlet; if the fans start working, then the output stages are working properly, and you can proceed to the next step of checking. If it does not turn on, there is a defect inside the power supply. You shouldn't go there without having the appropriate skills.
Computer power supply voltage ratings
Check the output voltage. For this step, you will need a device such as a multimeter (aka voltmeter or tester). The principle of checking the voltage at the terminals is as follows: touch the required terminal with the red probe, touch the ground with the black probe (always the black wire). First of all, let’s check the gray wire; its purpose is to let the motherboard “understand” whether voltage is supplied to it. It's called Power Good, which speaks for itself. The voltage, when checked, should be +5 volts (see above). Next, let's move on to the blue or blue wire.
When tested as described above, the voltage on it should be -12 volts, note that the voltage should be negative. If you are using an analog voltmeter, then you should swap the probes. The blue cable provides power for the RS232 interface (COM port), as well as some PCI boards. Next, let's move on to the white wire, the voltage on it should be -5 volts. This wire is currently not in use.
The next step is to check the purple terminal. The voltage should be +5 volts, this wire is called “5V Standby” or standby voltage (that is, even when the power supply is turned off, the voltage on it will be +5 volts). Used in some cases, for example, turning on a computer remotely via a network (if this option is supported). Next, you should check all orange cables; the voltage on them should be +3.3 volts. The yellow and red cables are used, in fact, to power the computer systems and should have +12 volts on any yellow and +5 volts on any red cable.
This is how a complete check of the computer's power supply is carried out; if the desktop still does not turn on (but all voltages are normal), then the cause of the breakdown may be swollen (or even leaked) electrolytic capacitors, or a malfunction of the motherboard itself. You can replace electrolytic capacitors yourself by purchasing new ones with the same parameters in a store and re-soldering them. But this already requires knowledge of electronics.
If computer malfunctions occur, system diagnostics are required. One of the first to be tested is the power supply. Therefore, it is important for an active user to know how to check the power supply.
Key characteristics of the power supply
The presence of a reliable and high-quality unit in a computer is extremely important for each component of the system. In this case, uninterrupted and error-free operation of the computer will be ensured. What is a power supply and why is checking the computer power supply so important?
A computer power supply (PSU) is a secondary source that supplies the computer with electricity. Its main purpose is that power is supplied to the computer nodes in the form of direct current, and the mains voltage is converted to the required values.
The functional feature of the power supply is based on stabilization and protection against minor disturbances in the main voltage. The power supply also takes part in cooling the machine system elements. Therefore, it is so important to diagnose this component, which is practically the most important part of a computer of any kind. Since a malfunction in the power supply negatively affects the entire device.
(banner_123_block-pitaniya)
There are special standards that a power supply installed on a computer must comply with. First of all, it should work normally at a voltage for a network of 220 v - 180-264 v, the frequency is suitable 47-63 hertz. The unit must withstand sudden interruptions from the power source. When choosing a power supply, you should also pay attention to the connectors, which are divided into the following:
- supply of HDD and SSD master devices;
- motherboard supply;
- GPU graphics adapter supply;
- CPU supply.

PSUs have a coefficient of performance (efficiency) - the amount of energy that powers the computer. A high efficiency rate has a number of advantages. Among them are minimal electricity consumption; slight noise as it operates at lower speeds; longer service life, because temperatures are low, overheating does not occur; less heating due to reduced heat that needs to be dissipated, etc. As a result, the remaining elements of the system receive “high-quality food”, which means the entire computer works smoothly and lasts.
The table shows approximate consumption options.
If the calculations correspond to 250 W, then it is better to take it with a reserve - 400-500 W.
What do you need to know before you start testing your computer power supply?
Testing a computer power supply involves working under voltage. You need to be very careful to avoid an accident. Before checking the computer power supply, it is necessary to inspect the integrity of the braid of each cable. Under no circumstances should parts be touched with wet, bare hands. If you do not have enough experience in carrying out such operations, it is better to contact a specialist.
During diagnostic activities, it is important to remember that replacement diodes must be rated at 300 volts or higher. They must also carry a current of at least 1 ampere. Remember, after changing the diode bridge, you do not need to turn on the device from the network, because you need to check all the components at once.
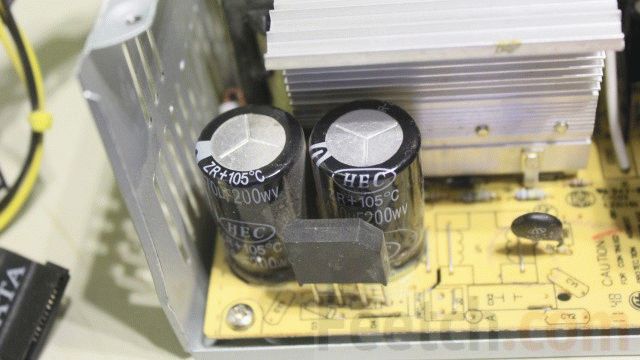
Checking the power supply occurs in several ways. The first and simplest is to visually assess the external state of the BP. If there are inflated electrolytic capacitors and varistors, then the power supply protection is broken. The parts urgently need to be replaced with new ones.

If such a visual test of the power supply does not give positive answers, then you can use one of the diagnostic options - a computer program, a multimeter, a volt-ohmmeter, a special computer power supply tester (such devices sometimes show inaccurate readings).
One of the most common methods of testing a power supply is using a multimeter.
Step-by-step procedure for diagnosing a power supply using a multimeter
So, if the computer is unstable, suddenly turns off, a blue screen appears, or problems arise when loading, it’s worth checking the power supply. This process occurs in several stages. First you should examine the cooling. To do this, you can touch the top of the system unit, where the power supply is located. If you feel obvious heat, then the power supply overheats. The reason for this is a breakdown of the cooling fan in the power supply. After a little testing with a screwdriver, which can easily spin the blades a few revolutions, if the fan is working properly, we decide on further actions. If everything is fine, clean the fan from dust and start the computer. If the fan malfunctions, it should be replaced. Now that we've put this part in order, let's figure out how to check the power supply without a computer.
To carry out diagnostics, it is not necessary to remove the power supply from the computer itself.
But for convenient work, you can still take it out.
Checking the voltage supply
- Turn off your computer- we finish the work, wait for the device to completely turn off, then on the back wall of the power supply you need to turn off the switch. Now we leave the network.
- Open the computer lid- disconnect the power supply from other components of the device. The cables must be removed one by one, and it is important to capture a picture of the correct position of the cables using a photo or video.

- We do the load- the computer turns off, but the test occurs under load. To do this, connect the cooler with a special connector. Don't forget about the 220V cable.
- Take a replacement wire- a paper clip in the shape of the letter U is inserted into the power supply after turning it off, you can also use a wire of a suitable diameter.
- Press the largest connector (20/24)- it is usually connected to the motherboard.
- Find contacts 15, 16 (green and black)- in order to touch these contacts with a paper clip.
- Insert a paper clip into contacts 15,16- after which be sure to release it and you can connect the power supply to the network and turn on the switch.

- Check the operation of the fan - if the cooler turns on, it means that the power supply is conducting current, it is working properly. If it doesn’t work, check the contact with the paper clip again and try again. If there is no result, the power supply does not work.
Testing the unit's operation
- We switch the multimeter to continuous current mode (voltage up to 20 W).

- Disconnect the power supply from the network.
- Using a handy device - a paper clip - we bring the power supply into working condition, connect the load through the optical drive. If the cooler does not spin, the power supply is faulty.
- We measure the voltage with a multimeter - we plug the black probe into the Molex connector, which is located opposite the black wire (middle connector). We insert the red probe one by one into the contacts on the wide cable and monitor the readings on the multimeter.

- In accordance with the pinout diagram of the power supply contacts, we determine the required voltage indicators in the operating state of the power supply. If the indicators do not match, this is a sign of a unit malfunction.
For ease of verification, we present a pinout diagram of the power supply contacts.
|
1 |
13 |
||
|
+3.3V |
|
|
+3.3V |
|
+3.3V |
|
|
-12V |
|
Ground |
|
|
Ground |
|
+5V |
|
|
Power On |
|
Ground |
|
|
Ground |
|
+5V |
|
|
Ground |
|
Ground |
|
|
Ground |
|
Power Good |
|
Reserved |
|
|
+5V Standby |
|
|
+5V |
|
+12V |
|
|
+5V |
|
+12V |
|
|
+5V |
|
+3.3V |
|
|
Ground |
|
12 |
24 |
As an example, the red wires have a voltage of - 5V, if your indicator is 4V - this is a clear sign that the power supply test showed a negative result and your power supply is faulty.
If you find a breakdown in the power supply, you can disassemble it and try to repair it. To do this, you need to have a basic knowledge of the operation of electrical devices. So, remove the cover, remove the dust and begin visual testing. What should you pay attention to? We are looking for elements that have blackening, swelling of capacitors, and looking for broken wires. It is necessary to inspect the inductor (inductor). A fuse or resistor may also blow.

Didn't find anything? We turn the board over and look at the solder tracks and connections. We are looking for sealed elements that could simply come off due to overheating or a manufacturing defect. The tracks that conduct current could burn out. In this situation, we simply replace the faulty components, and the device will be in working order. If you cannot fix the problem, contact a specialist. But don’t forget, if the power supply is under warranty, you should take it to a service center without opening the box.
Upon completion of testing, it is important to collect all contacts and connect according to the previously taken photograph. Remember, if your power supply is working properly, but problems with your computer continue, the reason for such operation of the device may be hidden in other components. Test the system further until you find the cause and eliminate it.
What will help extend the life of the power supply?
To prevent diagnostics of the computer power supply from becoming a frequent process, it is important to adhere to several rules for the safe operation of the power supply. First of all, check how securely and firmly the power supply is secured in the system unit. When installing components with higher power, the load on the power supply also increases. Therefore, you should make sure that the conductor and semiconductor components will not overheat. It’s better to immediately install a power supply with a power reserve, even when purchasing a computer. A good owner will monitor not only the power supply to his car, but will also promptly and regularly clean the insides of dust, which fills all the parts and makes their work difficult.
In order not to think about how to check the health of the computer power supply, it is important to ensure the constancy of the incoming alternating voltage and protect against sudden shutdown. To do this, just install an uninterruptible power supply and this problem will fade into the background.

In addition to the power supply itself, you also need to monitor the fan that cools the power supply. Periodically it is necessary to clean and change the lubricant.

So, the rules for choosing a device:
- do not buy very cheap power supplies because the quality will be appropriate;
- You shouldn't chase after Vata. For a computer with a more powerful gaming video card, it is worth choosing indicators - up to 550 W. For the rest, 350-400W will be enough;
- When purchasing a power supply, keep an eye on the price/Vata ratio. The larger the Wat, the more expensive the model;
- a quality block will weigh much more than a fake.
Well, in order for the test result to please you, try to carry out diagnostics whenever you suspect a unit malfunction. Then there will be more chances to fix it and continue using your favorite computer.
So, there are several ways to check the operation of a computer's power supply. Here we learned how you can do it yourself if you have basic knowledge of electronics. Follow the instructions and the diagnosis will be successful.
(banner_123_block-pitaniya)
Video instructions
Nowadays, many devices are powered by external power supplies - adapters. When the device has stopped showing signs of life, you first need to determine which part is defective, in the device itself, or the power supply is faulty.
First of all, an external examination. You should be interested in traces of a fall, a broken cord...
After an external inspection of the device being repaired, the first thing to do is check the power supply and what it outputs. It doesn't matter whether it's a built-in power supply or an adapter. It is not enough to simply measure the supply voltage at the power supply output. Needs a small load A. Without load it may show 5 volts, under light load it will be 2 volts.
An incandescent lamp at a suitable voltage does a good job of acting as a load.. The voltage is usually written on the adapters. For example, let's take the power adapter from the router. 5.2 volts 1 amp. We connect a 6.3 volt 0.3 ampere light bulb and measure the voltage. A light bulb is enough for a quick check. Lights up - the power supply is working. It is rare for the voltage to be very different from the norm.
A lamp with a higher current may prevent the power supply from starting, so a low-current load is sufficient. I have a set of different lamps hanging on the wall for testing.
1 and 2 for testing computer power supplies, with more power and less power, respectively.
3
. Small lamps 3.5 volts, 6.3 volts for checking power adapters.
4
. A 12-volt automotive lamp for testing relatively powerful 12-volt power supplies.
5
. 220 volt lamp for testing television power supplies.
6
. There are two garlands of lamps missing from the photo. Two of 6.3 volts, for testing 12 volt power supplies, and 3 of 6.3 for testing laptop power adapters with a voltage of 19 volts.
If you have a device, it is better to check the voltage under load.

If the light does not light, it is better to first check the device with a known-good power supply, if one is available. Because power adapters are usually made non-separable, and to repair it you will have to pick it apart. You can't call it dismantling.
An additional sign of a malfunctioning power supply can be a whistle from the power supply unit or the powered device itself, which usually indicates dry electrolytic capacitors. Tightly closed enclosures contribute to this.
The power supplies inside the devices are checked using the same method. In old TVs, a 220-volt lamp is soldered instead of a horizontal scan, and by the glow you can judge its performance. Partly, the load lamp is connected due to the fact that some power supplies (built-in) can produce significantly higher voltage without load than required.
A PC may not turn on for many reasons, and one of them is a faulty power supply. In this article we will show you how to diagnose its malfunctions and what solutions exist.
A computer power supply (sometimes we will use its abbreviated name, PSU) is designed to supply the device components with direct electric current. The principle of operation of the secondary power supply is to convert the mains voltage to the required value. The power supply also stabilizes and protects the computer from voltage interference.
The following follows from this: the power supply, an intermediate link between the mains voltage and the hardware and software of the computer, is very important in its operation, and therefore any malfunction can damage the PC.
Causes and symptoms of power supply failure
Power supplies can be faulty for two reasons:1st reason: Frequently repeated surges in voltage in the electrical network, or when it goes beyond the permissible values within which the power supply can operate.
2nd reason: The power supply components are made of low-quality materials (this is especially true for cheap Chinese devices).
The following four symptoms indicate faulty power supplies:
- If you press the system unit's power button, nothing will happen. You will not hear sound, see lights or rotate cooling fans.
- The computer periodically turns on, does not turn on, or reboots on its own from time to time.
- The OS loads, but after a while it turns off, although there is sound and light, and the fans are spinning.
- A special utility or BIOS settings show that the temperature in the system unit and power supply is increased. This can be determined without opening the case. In this case, the computer often reboots, the OS slows down, and the coolers spin too quickly. An excessive increase in temperature threatens failures of all PC components: video card, motherboard, hard drives, etc.
- Using this method, we will check the most basic thing - whether voltage is supplied to the power supply.
- Using this method, we will check the output voltage to ensure it is in the range required for stable operation.
- This method will allow us to visually inspect the power supply and see a malfunction, for example, swollen capacitors, accumulated dust or a failed fan.
Checking the power supply voltage
First step Be sure to turn off the power to the PC, since the power supply operates with a mains voltage of 220V. This first point is strictly recommended for implementation.
Before you complete this step and move on to the next, take pictures with your phone/tablet so that you can properly connect power to the motherboard, optical drive, hard drive, and other computer components. And only after that, disconnect everything from the power supply.

Third step To perform the next, fourth, step, you will need a regular paper clip or a similar piece of wire. Bend the found paperclip into the letter “U”: it will be needed to close the contacts of the power supply.
Fourth step Find the power connector in the system unit, which consists of 20 or 24 wires, coiled in the form of a bundle. These wires connect the motherboard and power supply of the computer.

Step Five Locate the connectors with black and green wires on the electrical connector. Insert the prepared paperclip into the connectors where these two wire colors are connected. Fix it firmly so that it is in contact with the black and green wires.

Step seven At this stage, the health of the power supply fan is diagnosed. If the power supply is operational, then the voltage will start the fan (you will see the rotation of the coolers).
If they do not rotate, the paperclip that contacts the two connectors (black and green wires) may have moved and is not in place.
This diagnostic, we repeat, is the most unreliable and is not a guarantee of the performance of the power supply. It only makes it possible to find out whether the device turns on. Let's move on...
Checking the correct operation of the power supply
First step Be sure to turn off the power to the PC, since the power supply operates with a mains voltage of 220V. This first point is strictly recommended for implementation.Second step Remove the side cover of the system unit.
Third step Find the power connector in the system unit, which consists of 20 or 24 wires, coiled in the form of a large bundle. These wires connect the motherboard and power supply of the computer.
Fourth step Find the black, pink, yellow, red connectors located on the contact, consisting of 20 or 24 wires.
Fifth step To obtain correct output voltage values, they should only be measured when the power supply is under load. The power supply powers hard drives, fans, drives, and the motherboard while operating under load. Otherwise, our diagnosis will be incorrect: it will show a high error in values.
Step six Apply power to the device, first turning on the button if it was turned off when performing the first step of the instructions.
Step Seven Here we measure the output voltage of the power supply on the wires found in the third step using a voltmeter. Pink and black wires have the lowest voltage value - 3.3 volts, red and black - 5V, and yellow and black - 12V.
All listed values may deviate slightly, by 5%, in one direction or another. These are the acceptable limits:
- 3.3 volts - 3.13 - 3.46;
- 5 volts - 4.74 - 5.24;
- 12 volts - 11.3 - 12.5.

Visual inspection of the power supply
First step Be sure to turn off the power to the device, since the power supply operates with a mains voltage of 220V. This first point is strictly recommended for implementation.Second step Remove the side cover of the system unit.
Before you complete this step and move on to the next, take pictures with your phone so that you can properly connect power to the motherboard, optical drive, hard drive, and other computer components. And only after that, disconnect everything from the power supply.
Third step Remove the power supply, which is screwed to the system unit with four screws (unscrew them with a screwdriver).

Fourth step Disassemble the power supply by separating the two covers that are secured together with four screws.

Step Five Inspect the disconnected and disassembled power supply. The device must be clean, the capacitors are not swollen, and there is nothing obstructing the fan.
If you find all this, do the following:
- Vacuum the power supply thoroughly and carefully.
- Lubricate or replace the fan.
- Resolder faulty capacitors.

If none of the four step-by-step algorithms help resolve the problem, you will need professional diagnostics or installation of a new power supply.
Users who assemble a computer themselves spend a huge amount of time choosing a processor, video card or motherboard. However, many people forget that one of the most important components of any PC is the power supply. This hardware module distributes the voltage it receives at the input among all PC components. If the “machine” does not want to start, then you should immediately check the power supply. But how? How can you check the computer's power supply for functionality? This is exactly what we will talk about in this article.
Absolutely all modern power supply models are protected against overloads, power surges and other network problems. It is for this reason that this hardware component rarely fails. Nevertheless, power supply failures still occur. Here are a few signs that indicate that the power supply is not functioning as it should:
- The power supply does not start. If you press the power button of the system unit, it does not react at all. Neither the sound nor the light indicator works. Coolers that are used for cooling will also not spin.
- The PC turns on every once in a while.
- The operating system either does not start or boots, but after a few seconds the PC turns off. At the same time, coolers, light and sound indicators work.
- The temperature in the system unit and power supply is high.
If you observe at least one of the above symptoms, then you need to check the power supply for functionality.
Checking the input voltage
The first method is a rough check of the power supply. We will simply determine whether voltage is supplied to a given hardware component or not. This is done as follows:

The testing performed does not guarantee that the hardware module functions as intended. The above test only allows you to find out whether the power supply turns on.
Checking the output voltage
We found out that the power supply receives voltage at the input. But how is it distributed among hardware components? Perhaps the power supply produces too much or, on the contrary, very little voltage at the output. This is what we will find out. To carry out diagnostics, we need a voltage measuring device called a multimeter. Carry out the preparation (points 1-3 in the previous section), then follow the following instructions:

Important! Remember that when measuring voltage, a deviation of 5% is allowed.
Checking power supply components
If the power supply distributes voltage normally, then you need to unwind the power supply and inspect it. To do this, carry out preliminary preparation (this process was described earlier). Then perform the following manipulations with the power supply:

Software check
If you don’t feel like disassembling your computer at all, then special equipment can help you. On the World Wide Web there is a lot of software for testing PC hardware components. One of the best programs in this direction is OSST. This is what we will use. This utility is distributed completely free of charge. Moreover, the program supports the Russian language. You can download this software on the official website of the developer. Download the archive with the program and run it. After this, to perform an OSCT test of the power supply, do the following:

After testing is completed, you will receive detailed information regarding why the power supply is not working as it should. To repair the power supply, you need to build on the data received. For example, if the analysis shows that the temperature of the power supply is too high, then the coolers need to be replaced. If a physical failure occurs during the test (reboot, shutdown, etc.), this indicates that your system unit has swollen capacitors that need to be replaced.