How to check the startup of Windows 10 programs. Where is the startup folder? Autorun settings for USB drives and drives
While using the Windows 10 operating system, unnecessary programs inevitably accumulate in startup. Such programs are downloaded along with Windows 10 and continue to run in the background, constantly consuming system resources on the computer.
In this material, you will learn how to disable autorun programs in Windows 10 and get rid of these useless computer resource drains.
Disable autorun programs using Task Manager
Starting with Windows 8, the Task Manager has a large number of new features. Among other things, it has a new tab called “Startup”, with which you can enable or disable startup programs.
So, first you need. This can be done in several ways. For example, you can right-click on the taskbar at the bottom of the screen and select “Task Manager” from the menu that appears.
You can also open the Task Manager using the keyboard shortcut CTRL+Shift+Esc or by searching in the Start menu.

Once you have opened the Task Manager, you need to go to the Startup tab. The programs added to Windows 10 startup will be displayed here.

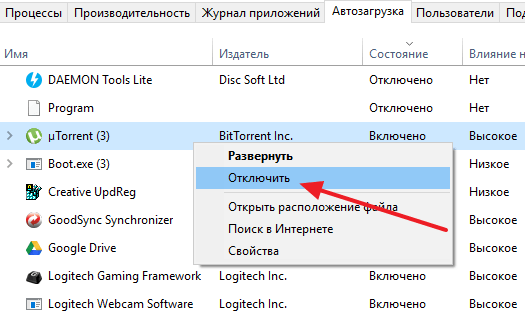
Here you need to pay attention to the “Status” column. If the state of the program is “Enabled,” this means that it starts when Windows 10 starts. If the state is “Disabled,” this means that the program does not start. For convenience, the list of programs in the “Startup” tab can be sorted by the “Status” column. Then programs with autorun enabled and disabled will not be confused.

In order to disable autorun of a program in Windows 10, you need to right-click on it and select “Disable” in the menu that opens.
Disable autorun programs through Services
It should be noted that some programs can be added to Windows 10 startup in a different way and then they will not appear in the Startup tab in the Task Manager. For example, a program can run as a service. To go to the “Services” tab in the Task Manager and click on the “Open services” link at the bottom of the screen.

After this, a list of Windows 10 services will open. To make it easier to work with this list, sort it by startup type so that automatically started services are at the top of the list.

After that, double-click on the service whose startup you would like to disable. As a result, a window with service settings will appear in front of you. Here you need to select the startup type “Disabled”, click on the “Stop” button and save the settings by clicking on the “Ok” button.

This way you will disable autoloading of the program through services. It should be noted that you need to disable services very carefully. If you mistakenly disable a system service, this may lead to unstable operation of the entire system.
Programs to disable autorun programs
You can also resort to specialized programs specifically designed to manage startup programs. One of the best programs of this kind is a free utility.

This program checks all possible ways to start programs and displays a list of all programs that are loaded with the Windows 10 operating system.
Files located in startup often take up space there completely unreasonably and simply waste the computer's system resources, making it slower. Unnecessary programs end up in startup for various reasons, most often due to the carelessness of the user, who confirms the automatic activation of the application every time the system is turned on.and how to remove an application from this list, let's talk about this in more detail.
The process is an automatic launch along with turning on the PC of some programs. They run in the background without the user noticing.
All programs that are marked in a special section for autorun constantly occupy RAM and create difficulties for the normal operation of the system. Here are the main signs by which you can determine that it is time to check and thin out the list of startup programs.
- System performance is significantly reduced.
- The loading speed of the operating system and desktop is very slow.
- The device displays “ ” even during everyday operation, without launching a large number of programs.
This problem most often affects owners of laptops and small computers. On more powerful machines, such a problem may not be noticed, but information aboutand how to remove unnecessary files from there will be useful to everyone.
Most manufacturers try to be sure to install their product in the startup list. You can skip this suggestion in a hurry or through inattention when installing the program on your PC. Therefore, it is imperative to monitor the content of this section and remove applications that are not needed there. This will keep your computer in good shape and prevent performance degradation.
In addition to the main question of where to find the required partition in the operating system, we will try to figure out how to remove or add the desired program to startup. It is worth noting that the latter is also sometimes necessary. Today, the user has several options available to him to add or delete a specific file. It is worth noting that some settings allow you to delay autostart and first let the operating system load completely, and then launch the application.
The required partition is located in a hidden folder on drive C, here is the path that indicates its immediate location:
C:\ProgramData\Microsoft\Windows\Main Menu\Programs\Startup. 
To exclude a program from startup, simply delete its shortcut from this folder, but this is not the only way. What other options are there?
Via task manager
Launch the task manager in any convenient way:

Select the “Startup” section and see the full list of programs contained in it. You can analyze information about the application, including its impact on processor load speed. If a program is added to autorun, its status will be “enabled”. After analyzing the list of programs, you can remove unnecessary ones.
It is worth noting that for autorun, mail agents are also sufficient. All other applications can be launched during operation. If one of the programs is in doubt, and the user is afraid to disable it, then you can search for it on the Internet based on the name and developer, and find out what it is needed for and whether it can be disabled.
If you are really sure that a number of programs are not needed in this list, then just right-click on them and click “Disable”. Activating the changes made often requires a PC restart.
Using CCleaner
A very convenient and useful CCleaner utility solves many user problems related to putting things in order on the computer. 
Open the application and in the “Service” tab select the “Startup” section. It also displays a list of all programs that run in conjunction with the operating system. With CCleaner, you can uninstall or simply disable the program so that you can return it back if necessary. To do this, also right-click and select the desired action.
Job Scheduler
This application will help not only remove unnecessary programs from startup, but also organize autostart of files that are not located in a special section in accordance with the schedule. 
You can find the scheduler by searching in the Start menu. After receiving the search results, launch the program and open the “Task Scheduler Library” section. In it you need to find the program that you want to exclude from startup and right-click. Select the desired action from the drop-down menu. You can either disable or completely remove an unnecessary application from startup.
Registry Editor
This approach is more designed for experienced users, but if you follow the instructions strictly, even a beginner can handle the task.
To carry out the task you need to open the registry:
- Win+R and in the window that opens, type regedit and click OK;
- through a search in the Start menu and specifying regedit in the line.
Open the required registry branch (for everyone or only for the current user), create a stock parameter, and give it a name. By right-clicking, open the context menu and select “edit”. In the window that opens, fill in the “value” field, specifying the path to the desired file, click OK, and the next time you start the operating system, the application will launch automatically.
To remove a program from autorun, you need to select the desired file in one of the registry branches and delete it.

Let us remind you once again that this method is suitable for more experienced users.
How to delay the launch
In order not to load the computer when the operating system loads and to speed up the PC startup, you can delay the startup of installed programs. To do this, the user needs to install the Autorun Organizer program; it is freely available and does not require much space for installation. 
The application allows you not only to delay the launch of some applications and wait for the OS to fully launch, but also to space out the launch of other files. Thus, autorun will not affect system loading and slow down startup.
Now and how to delete or add files to it is known to users and clearing the system of excess load will not be difficult. It is worth paying more attention to this and keeping your laptop or PC in shape.
Startup in Windows 10 and previous versions is responsible for automatically launching programs during login, allowing the user to get started right away. The user can independently remove and add programs to the startup list. However, some programs end up in startup during installation, for example, antiviruses and torrent clients. The startup speed of the entire system depends on the number of applications in startup, so it is important to correctly create a startup list.
The list can be managed in the following ways:
- using a custom startup folder;
- through the “Registry Editor”;
- in Windows settings (only after version 1803);
- in "Task Manager";
- using special utilities.
Note! After the Windows 10 Fall Update (Fall Creators Update 1709), applications that were running when the device was turned off or rebooted will be restored the next time you log in - this process is not related to startup.
To add a program to startup using this method, its shortcut is placed in a special folder. Removing a shortcut removes the program from the list.
Step 1. Path to the startup folder: “C:” - “ProgramData” - “Microsoft” - “Windows” - “Main Menu” - “Programs” - “Startup”.
Note! The "ProgramData" folder may be hidden. To solve the problem, just check the “Hidden elements” checkbox in the “View” tab.

Note! You can open the folder using the Run dialog box, which is opened by pressing the Win+R key combination. Enter the command “shell:startup” and click “OK”.

If you need to optimize the startup list for a specific user, the folder path will change: “C:” - “Users” - “User_name” - “AppData” - “Roaming” - “Microsoft” - “Windows” - “Main Menu” - “ Programs - Startup.
Note! The “AppData” folder will be hidden here. Setting up its display follows the same scheme as with “ProgramData”.
Moving a shortcut to the Startup folder is done in two steps:
Step 1. Right-click on the shortcut for the desired program. A menu of available actions will open - select “Copy” (or you can use the keyboard shortcut “Ctrl+C” by selecting the shortcut with the left mouse button).

Step 2. Go to the Startup folder and right-click on an empty space. In the menu that opens, select the “Paste” option and the shortcut will appear in the folder (you can also use the “Ctrl+V” keyboard shortcut directly in the folder).


Registry Editor
If user folders can only contain applications selected by the user, then programs that were included in autorun during installation will also be visible in the registry sections. The Registry Editor is launched through the Run dialog box.
Step 1. Press the key combination “Win+R”. In the dialog box that opens, enter the command “ regedit" and select "OK".

Step 2. The Registry Editor will open. As with folders, there are two paths to the desired registry key:

Step 3. Follow one of the paths, opening the folders on the left side of the window. On the right will be a list of applications that automatically launch when you log in. To remove an unnecessary program:

To add an application to the startup list:

Note! An executable file is a file that runs a program, but not a shortcut.
To find out the path to the executable file, follow the instructions:
Step 1. Right-click on the program shortcut. In the menu that opens, select “Properties”.

Step 2. In the window that appears, go to the “Shortcut” section. The path we need will be in the “Object” line.

Options
In the spring of 2018, a new update for Windows 10 was released - Spring Creators Update (1803). Among other things, users now have the opportunity to manage startups through system settings:

Task Manager
This is a program for monitoring current processes and the resources spent on them. Working with it is much easier than, for example, with the registry. However, here you can only enable or disable applications already in the startup list: adding or removing them from the list will not work.
Step 1. To start, right-click on the “Start” icon, open the menu in which we select “Task Manager”.


Step 3. By right-clicking any program, you can disable or enable its autorun. There is also an option to view information about the application on the Internet and the location of the executable file.

CCleaner
CCleaner is a free utility with the option to purchase a pro version. It is designed to optimize and clean different versions of operating systems. You can download CCleaner on the official website (www.ccleaner.com) by choosing the option that suits you: pro or free. For basic computer cleaning and startup management, the free version is sufficient.
The default language of the utility is English. To change this setting:

Like Task Manager, the list of applications is based on the registry and the user's Startup folder. The utility provides the ability to enable or disable application autorun. In addition, unlike the task manager, CCleaner allows you to remove unwanted programs from the list, but there is still no “Add” function.
What programs can be removed from startups?
Users are often afraid to remove or disable programs from startup. This results in the startup list being filled with useless applications that slow down the system upon login. In such cases, you should find out which applications start automatically. The most convenient way to do this is in the “Task Manager” or in special utilities (including CCleaner).

You can find out what a particular program is responsible for on the Internet (this option is provided in the “Task Manager”). After this, it will become clear whether you use this program immediately after logging in or you can remove it from the startup list. Remember that even if you disable all programs from startup, this will not harm the system as a whole.
In this article, we will look at the issue of autostart in Windows 10. We will find out where the programs that need to be added to autostart should be located, how to remove them from there, where the corresponding folder is located, and what third-party applications can help you work more conveniently with this function.
Applications in startup start with OS Windows 10. These can be, for example, antivirus, Skype, social networks, cloud services, etc. But along with useful applications, there may be unnecessary programs, sometimes even malicious ones. If we accumulate a lot of unnecessary software, this will result in the PC not only starting slower, but also performing poorly. Below we will look at how to add the necessary applications to startup and remove unnecessary ones from there.
The simplest tool for working with autorun is the task manager. Let's look at how it works.
- First, launch the task manager itself. To do this, right-click on the “Start” button and select the desired item.


You can also get to the task manager through the OS search tool. To do this, select the magnifying glass icon on the taskbar and write a query in the search field. Next, click on the result.


- If you launched the tool for the first time, expand it by clicking the "More details" button.

- We go to the “Startup” section, which contains a list of software that starts with the system.

- Here you can see the creator of the program (Publisher tab), see its status (enabled or disabled) and evaluate the degree of impact on Windows boot speed. Also, using the context menu, you can disable the application, enable it (if disabled), see where the file is located, see information about it on the Internet and go to the “Properties” menu.


Not all applications that start with the OS are displayed in the autorun task manager.
Add the program to startup through the system directory
Users are often interested in where the startup folder is located in “Ten”. You can find it in the following path: C:\Users\your name\AppData\Roaming\Microsoft\Windows\Start Menu\Programs\Startup.
But there is an easier way to open this directory. Launch the “Run” tool using the Win+R keys simultaneously, enter the following command into it: shell:startup and click “OK”.


If we place a shortcut to any application in startup, it will start launching along with the system.


Sometimes adding a program to startup in this way may not work. If this happens to you, use a more functional method - autorun through the registry.
How to add a file through the registry
Let's look at how to get to the OS startup menu using the regedit utility.
- Launch the Run tool by pressing the Win+R buttons simultaneously. In the window that opens, write regedit and click “OK.”


- We follow the path indicated in the picture. In the right half of the window we see a list of programs launched along with the OS.

- Using the context menu, you can delete an unnecessary entry. To do this, right-click on the name and select “Delete”.


- You can also create a new entry here. To do this, click on the empty space on the right half of the window and click on “Create” – “String parameter”.


- Next, rename the key as you wish. We will launch the calculator.


- Open the record by double-clicking the left mouse button and specify the path to the object that should start with the system. When finished, click “OK”.


After this, the calculator will start running along with the system. If we open startup in the task manager, we will see a new entry there that confirms the addition of the calculator to startup.


- We can edit the list of programs launched together with the system and for all users. To do this, right-click on the “Run” folder in the Registry Editor and select the item indicated in the screenshot.


You can work with this section in the same way as with HKEY_CURRENT_USER.
Editing using the task scheduler
Another option for working with Windows 10 autorun is the task scheduler. Let's figure out how to handle it.
- Initially we launch the application. To do this, click on the magnifying glass icon on the taskbar and enter the query in the search field. As soon as the result appears, we launch it.

- The Task Scheduler interface will open. Click on the “Library” section. On the right side of the program we can see all the tasks scheduled on the PC.


- Click on any entry and see a detailed description at the bottom of the window. In this case, it is the Google Chrome update service.

- We can right-click on an unnecessary entry and select “Delete” from the context menu.


- You can create a new action in the Task Scheduler. To do this, in the far right column of the window, select the “Create task” item.


- Fill in the name and description of the new task in the wizard that appears.

- Go to the “Actions” section and click “Create”.


- Click on the “Browse” button and select the program that will be launched upon completion of this task. Next, click “OK”.


- This completes the creation of a new task; you can click on the “OK” button.

As you can see, our task has been created and the calculator is included in the list of planned actions.

Note: Windows 10 Task Scheduler is a very flexible tool. We considered only the simplest algorithm for working with it. In fact, it is possible to create additional conditions and functions.
Autorun control using third-party software
Today, there are a huge number of free and at the same time functional utilities that can implement autostart of programs in Windows 10. Below we will look at the two best.
Autoruns from Microsoft
This is an official tool from Microsoft with very wide functionality. You can download the program using the button below.
There is no need to install the application; it is fully compatible with any version of Windows, including Ten. The main advantage of Autoruns is its ability to simultaneously display all tasks and programs that will independently launch along with the system.
In addition, there are a number of additional functions:
- scanning applications with VirusTotal antivirus;
- showing the location of the scheduled program;
- display autorun option;
- viewing process data online;
- removing an object from startup.

For an untrained user, the program may seem too confusing, especially at first glance. But not everything is as bad as it seems. With a little understanding, you will get an excellent tool for working with startup in Windows 10, which simply has no equal. You can add a folder, file, shortcut, gadgets, or even a bat file to autorun.
CCleaner
There is another option for working with autorun. It is simpler, more familiar, and also completely Russified. This is CCleaner. You can find startup in the “Service” tab.


Here you can delete unnecessary entries or disable them. In addition, CCleaner has a number of other useful features, which makes it an indispensable tool that should be on every computer.
If after reading the article you still have questions, write them to us in the comments, and we will give an intelligible answer as soon as possible.
Video about working with startup in Windows 10
As you know in the operating system, some programs are loaded along with the operating system. Sometimes it's good, and sometimes it's bad. Therefore, there are times when it is necessary to add some utility to startup, and sometimes to remove it. This procedure in Windows 10 is slightly different from previous versions, so let's take a closer look at the whole thing.
How to delete via Task Manager
Let's go to "Task Manager". To do this, right-click on the taskbar and select the item from the drop-down menu, find the utility we need and right-click on it. From the drop-down menu, select “Disable”.

How to add a utility to the list
Create a shortcut in a folder
We are done with the first point. Now let's find the folder. You can add shortcuts to the programs that you want to use as startup programs.
To do this, press the key combination Win+R and open the “Run” window. In the window we write: shell:startup

This same startup folder opens for us, into which we can insert shortcuts to the necessary utilities for startup.

Via the registry
Click on the search button near “Start” and write “ regedit” in the window. Click on the desired result.

We get to the registry editor. We follow the path:
Branch for autoloading programs for a specific user:
HKEY_CURRENT_USER/Software/Microsoft/Windows/CurrentVersion/Run
Branch for autoloading utilities for all users:
HKEY_LOCAL_MACHINE/SOFTWARE/Microsoft/Windows/CurrentVersion/Run
We see that parameters are displayed here, the values of which indicate the paths to the program boot files. These are the ones that we have added to startup. In order to remove any utility from there, simply delete the desired parameter.
If you want to add a utility, you must create a parameter with any name. To do this, right-click on an empty space and select “Create – String parameter”

In the “Value” section, you must enter the path to the file with which the utility is launched.

Using the Task Scheduler
And finally, I’ll show you how to add a program to startup in Windows 10 using the task scheduler. Of course, rarely anyone does this, but still...
Click the search button and write “scheduler” in the line, click on the result we need:

In the window that opens, on the right side, click on the button "Create task"

In the “General” tab, set the name of the task.

In the “Triggers” tab, click on the “Create” button to create a new trigger

In the window that opens, opposite the item “Start task...” select the item "When you log in" and click “OK” “Open”.

Now, every time you start your computer, this program will start along with the operating system.
That's all, we figured out how to autoload programs in Windows 10. You can read about it in another article.
We also watch the video