How to disassemble iPad 2 at home. How to disassemble an iPad. Disconnect the front camera and microphone cables and remove them
What is lighter than air? Air 2, of course. In today's step-by-step guide, we'll show you how to take apart the iPad Air 2 and find out whether Apple's thinnest device is still less repairable than other products the company has released before it.
Tools
In order to disassemble the iPad Air 2 or replace any element in it, you will need:
- iOpener set
- Set of 6 iFixit openers
- Tweezers
- Dielectric blade
- Plastic spatula
Step 1
Apple's thinnest tablet to date contains a variety of equipment:
- Fully laminated 9.7-inch LCD display with a maximum resolution of 2,048 by 1,536 pixels, 264 ppi resolution and anti-glare coating.
- 64-bit A8X processor (rumored to consist of three 1.5 GHz cores) with two gigabytes of RAM and an M8 motion coprocessor.
- 8MP rear iSight camera capable of recording video in 1080p at 30fps or 720p at 120fps + 1.2MP front camera at 720p.
- Touch ID fingerprint scanner + barometer + dual microphones + 3-axis gyroscope + accelerometer + ambient light sensor.
- Dual MIMO Wi-Fi antenna 802.11ac + Bluetooth 4.0.
- Built-in storage device with a capacity of 16, 64 or 128 GB.
The video below shows the disassembly process. The video is in English, but in the instructions below we will explain everything step by step in Russian.
Step 2
- The release of iPad Air 2 marks the introduction of a new model labeling template - A15XX. In our case, the iPad Air 2 Wi-Fi has the serial number A1566.
- In addition to the new number, iPad Air 2 is the first device in the iPad family to come equipped with Touch ID.
- For those who are unfamiliar with this technology, let us explain. Touch ID allows you to use your fingerprint to access your iPad. This authorization method can also be used to confirm purchases in the iTunes Store, App Store and iBooks Store.
The Touch ID scanner can recognize your fingerprint no matter which side you place your finger on the device. In any case, the system reads the data and recognizes you.
Step 3
- Devices whose thickness is comparable to a pencil are already a thing of the past. This tablet is now slightly thinner than a regular pencil.
- Well, speaking seriously, the thickness is 6.1 mm. - this is a pretty impressive indicator. The iPad Air 2 is not only thinner than the original iPad Air, it can't even be compared to the latest iPhone models, which also feature a controversial camera placement.
- A closer inspection revealed that the dual microphone is located much closer to the iSight camera, and the lock switch has simply disappeared from the device.
- iPad Air 2 is not only thinner, but also lighter. But exactly that much? About 12 pennies worth.
Step 4
- We were really hoping to find external screws on the Air 2. After all, the iPhone 6 Plus proved that Apple could make tablet-sized gadgets without glue.
- Alas, our hopes were not justified. We couldn't find any screws in the smooth case.
- Therefore, we are forced to resort to the iOpener kit.
- The new front panel is a little more rigid than previous iPad models, making it a little more difficult to remove. Be careful not to bend the glass, as this can damage the display even if you don't insert the tools too deeply.
- However, the glued display remains the only point of access to the iPad's internals. Therefore, even when performing the simplest repairs, you risk damaging the screen every time.

Step 6
- Having successfully opened the iPad Air 2, we immediately notice that the cables leading to the display are now located near the bottom edge of the device.
- This is a welcome change considering that in the previous iPad Air, the digitizer and LCD cables acted as a trap for the user, being located on both sides of the display.
- If you are wondering how deep you can push openers between the front panel and the body of the device, we have to disappoint you. Air 2 leaves no room for error.

Step 7
The cable that goes to the Touch ID scanner is very similar to the cable in the new generation iPhone models.
- Having removed the return button to the home screen, we find that there is only one chip under it:
- NXP Semiconductors 8416A1 Touch ID Sensor
Continuing to examine the front panel, we find several more chips:
- Driver LCD Parade Technologies DP675
- Texas Instruments TPS65143A Bias Voltage Controller for LCD Panels

Step 8
- Well, now let's direct our dielectric blades towards the new tiny speakers.
- Unfortunately, they refuse to talk to us, and the external markings leave no room for secrets...
- Ignoring the awkward silence hanging around us, we continue our work.

Step 9
- Next we need to remove the FaceTime HD camera, as well as the 8-megapixel iSight camera, next to which there is a microphone.
- If you compare it with the similar iSight camera from the iPhone 6 Plus, you can see that they are very similar. However, it is noticeable that the camera has become much better quality than its predecessor, which was equipped with the first generation iPad Air.

Step 10
- The position and design of the headphone jack remains largely unchanged. But something has changed...
- It looks like the FaceTime HD camera's ambient light sensor has been split into two separate sensors. One of them is now in the headphone jack.

Step 11
- Our Wi-Fi model's antennas are now located on the top of the iPad, whereas previously they were located near the bottom edge of the device.
- Now we're wondering where the Air 2 LTE models will hide their antennas.
- With one swing of the blades and antennas, they leave their comfortable foam “beds”.

Step 12
- We then remove the first two microphones, the second ambient light sensor, and the power switch from the iPad Air 2.
- After the next approach, we have a second microphone and two volume control switches hanging on the same cable.

Step 13
- The following markings were found on the microphones:
- M1300 5743 M1 334 (on the cable leading to the power button)
- M1300 5723 M1 334 (on the cable with which the volume control buttons are connected)
- It is worth noting that the volume and power buttons can be folded into a beautiful pyramid.

Step 14
- Unfortunately, the motherboard is secured with glue. Therefore, we once again turn to the help of the iOpener kit.
- After careful and tedious work, we have a motherboard in our hands!
- Having removed it, we regret to see that the Lightning connector cable is tightly soldered to the board.
- This is what makes removing the motherboard such a difficult task. This also means that to replace the Lightning connector you will have to replace the entire motherboard.

Step 15
Finally, it was time for the main course. A whole plate of chips! Bon appetit.
- Apple APL1012 A8X 64-bit processor
- Two 1 GB RAM modules. (1GB x 2 = 2GB total) Elpida/Micron Technology F8164A3MD
- NAND Flash memory SK Hynix H2JTDG8UD1BMR 128 Gb (16 GB)
- NFC controller NXP 65V10 (which can also be found in iPhone 6 and 6 Plus)
- Apple Audio Codec (Cirrus Logic) 338S1213
- NXP Semiconductors LPC18B1UK ARM Cortex-M3 microcontroller (Apple M8 motion coprocessor)
- Wi-Fi module Murata 339S02541

Step 16
A few more chips for those who want some extra:
- Amplifier Maxim Integrated MAX98721BEWV
- Broadcom BCM5976 Digitizer Controller
- Texas Instruments TI48WHXDP 343S0583
- Fairchild Semiconductor FDMC 6683 and FDMC 6676BZ (these chips date back to the iPad 2)
- Barometer BMP280 and accelerometer BMA280 from Bosch Sensortec

Step 17
- Now you can remove the battery, which we have freed from the embrace of the motherboard.
- Looks like we're going to need some help to get out of this sticky situation. Get out the iOpener.
- To unstick the battery from the back cover we need a lot of heat and effort.
- It's not that bad, but I would like to be able to change the battery without using plastic cards.
- The iPad Air 2 battery is slightly inferior to the previous version of the device in energy capacity (27.62 Wh versus 32.9 Wh).
- Apple claims the tablet can still last 10 hours on a single charge. Apparently the company was able to increase the battery efficiency. However, users claim that Air 2 still discharges a little faster than its predecessor.

Step 18
After we removed all the components from the device's body, only the Smart Cover magnets remained in its lifeless shell. Good news, friends! Last year's Smart Cover magnets are compatible with the iPad Air 2. Finally, one small exception to Apple's annual update cycle!
How to completely disassemble the iPad Air 2 and review the tablet
5 (100%) 1 voteOriginal article in English:
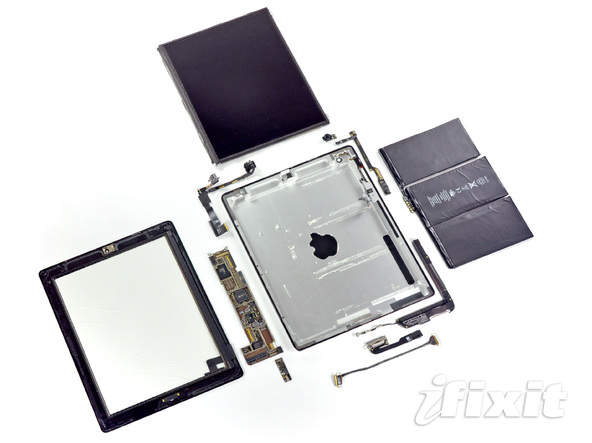
http://www.ifixit.com/Teardown/iPad-2-Wi-Fi-Teardown/5071/1.
Let's take a look at the latest Apple iPad 2 Wi-Fi tablet.
Here's what we need:
- hot air gun or hair dryer
- #00 Phillips screwdriver
- plastic tools for opening cases
- special plastic spatula (spudger)
Important! Everything you do is done at your own risk. Remember: after disassembling the device you will lose the manufacturer's warranty.
Finally!!! The iPad is flat again in the hands of the iFixit team! And this time there is a number “2” in its name, i.e. This is an iPad 2 model!
The long-awaited iPad 2 will make up for the shortcomings of the first generation iPad model.

Specifications:
- dual-core 1 GHz Apple A5 processor
- 512 MB LPDDR2 RAM
- built-in memory module with a capacity of 166/32/64 GB
- 9.7-inch glossy LED-backlit multi-touch IPS touchscreen display (1024 x 768 pixels)
- rear camera with the ability to shoot high-resolution video (720p) + front VGA camera

Let's compare Apple tablets by thickness. Compared to the previous version, it is impossible not to replace the beveled edges of the iPad 2 case.
We suspect that in the new version of the tablet the front panel is not held on by latches, but is glued a la the iPod Touch 4th Gen.
Because of the new body shape, the iPad will probably be called a “big iPod.”
Apple summed up the changes to the tablet in six short phrases: “Thinner. Easier. Faster. FaceTime video calls. Smart Cover. 10 hours of battery life."
The original iPad also had a 10-hour battery life, but when you consider that the device is thinner, lighter, and faster, that's impressive.

The iPad 2 has a new model number: A1395. Thanks Apple! This is much better than releasing different versions of the MacBook Pro 100,500 times under the same number A1286.
The iPad 2 number certainly cannot be confused with 1337, the number of the first version of the iPad.
On the back of the iPad 2 in the lower left corner is the speaker grille. We're not fans of mono sound, but stereo will have to wait until the iPad 3 comes out.

So, let's get started with the iPad 2 teardown without further delay!
It seems that, unlike the original iPad, here we cannot remove the front panel without the help of a heat gun.

Having warmed up the panel thoroughly to soften the adhesive base, we begin to pry off the panel with a plastic tool for opening the cases.

And then the panel came off! No latches, all glue.
As hard as it was for us to tinker with the latches on the original iPad, the adhesive was even more of a hassle. Don't be surprised if after opening the front panel you want to break it!

The LCD is held on by a few screws here and there. No problem - take out a screwdriver.

Under the display we find a battery with a voltage of 3.8 V and a capacity of 25 Wh. This is only slightly more than 24.8 Wh. original iPad, so the improved battery performance is due to software and updates to other device components.
The battery also indicates a capacity of 6930 mAh, which seems to contradict the mentioned 25 Wh at a voltage of 3.8 V ((25 W/3.8 V) * 1000 = 6579 mAh), but 3.8 V is the nominal voltage, not average. The average battery voltage during the discharge time is closer to 3.6V, which leads to a more accurate formula ((25W/3.6VV)*1000=6944mAh).
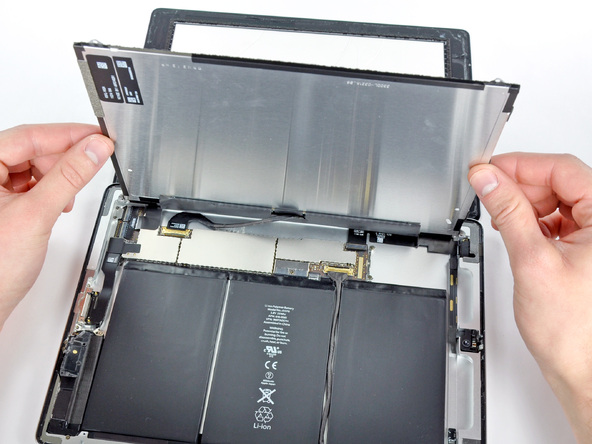
By disconnecting the cable, you can remove the iPad 2 display.
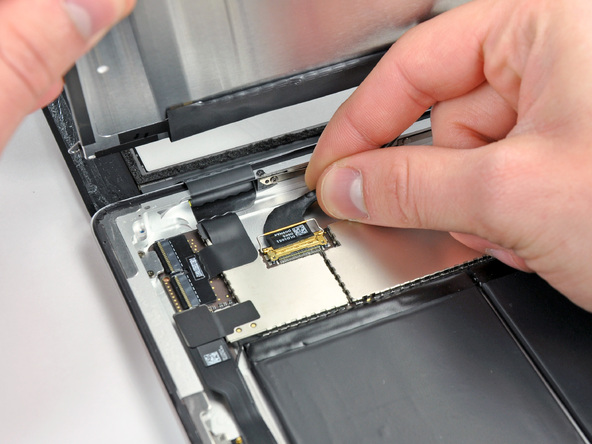
Disconnect the touch panel cable from the connector on the motherboard. Well, what Apple device can do without Multi-Touch technology? What could we do without it?

Disconnect the camera daughterboard/volume control cable from the connector on the motherboard.

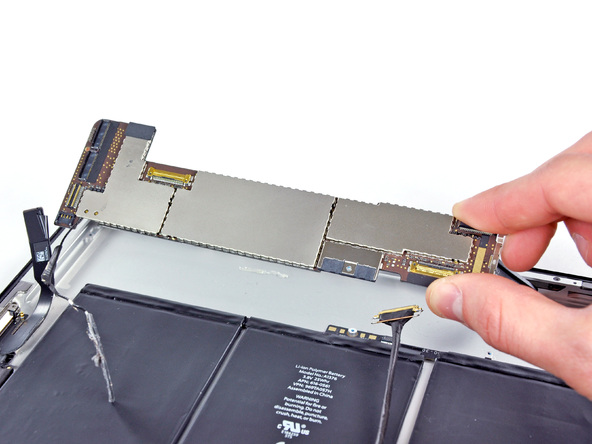
Then we disconnect the cable for connecting the docking station from the connector on the motherboard.
After this, unplug the speaker connector.

Unscrew the screws securing the motherboard to the case using a Phillips screwdriver.

After this, the motherboard can be easily removed.
We remove the electromagnetic shields and examine the integrated circuits on the motherboard:
- Broadcom BCM5973KFBGH touchpad microcontroller (circled in red)
- Broadcom BCM5974 CKFBGH Capacitive Touchpad Controller (outlined in orange)
Same as the original iPad - nothing new here!

Interestingly, under one of the electromagnetic shields, a Wi-Fi card is attached to the system board. It is easily removed from the connector.

Wi-Fi card; running another Broadcom chip, BCM43291HKUBC. This combo Wi-Fi/Bluetooth/FM tuner chip from Broadcom has become an integral part of smartphones - an extremely successful design solution.
It was this detail that Apple installed in both the first iPad and the iPhone 4.

Chips on the system board:
- Dual-core Apple A5 processor clocked at 1 GHz and 512 MB of Samsung RAM (circled in red).
- NAND flash memory Toshiba TH58NVG7D2FLA89 16 GB (circled in orange).
- Apple 343S0542 - Judging by the inductors and capacitors surrounding the chip, this looks similar to the Dialog Semiconductor power controller found in last year's iPad (circled in yellow).
- Texas Instruments CD3240B0 11AZ4JT G1 touchpad line driver working with the Broadcom BCM5973 and BCM5974 chips above (circled in blue).
- Power management integrated circuit S6T2MLC N33C50V (circled in turquoise).
The release of the A5 processor dates back to the end of January - mid-February 2011. There was clearly a rush to release it. The A5 processor appears to be the APL0498, replacing the A4/APL0398 found in the iPad 1 and iPhone.
Chip labeled Apple 338S0940 A0BZ1101 SGP. This looks similar to the Cirrus audio codec that our colleagues at Chipworks found in a Verizon iPhone, but they had to remove the chip from the motherboard to verify.

And this is what the motherboard looks like from the back.
That's right. Completely empty, so let's move on!

We remove the lithium-polymer battery from the back of the case.

To provide 10 hours of battery life, the iPad 2 uses three large lithium-ion batteries.

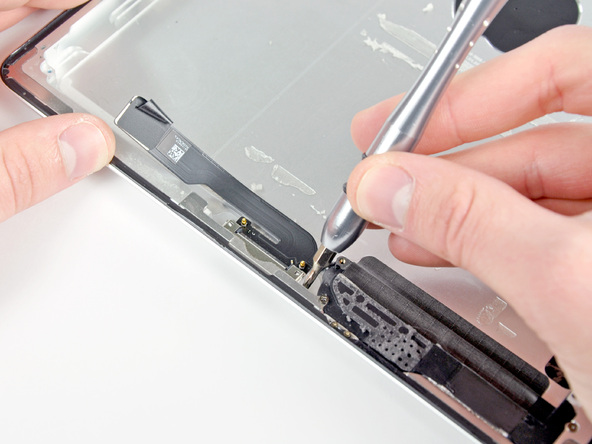
Unscrew the screw securing the volume button to the housing.

From the back we remove the camera from the socket.


Remove the board with the volume control and screen rotation button.

This small board houses an AGD8 2103 gyroscope and a LIS331DLH accelerometer, both from STMicroelectronics.

We unscrew the screw securing the front camera module to the body, pry the module to unstick it, and remove it.


The front camera module includes a camera, a headphone jack and a microphone.

Front VGA camera:

Microphone:

Unscrew the 2 screws securing the connector for connecting the docking station.
Unscrew a few more screws and remove the speaker module.


The speakers are so tiny, as if the idea of adding them came to the engineers too late.

Easy to repair iPad 2: 4 out of 10(10 points means maximum simplicity).
- The LCD display is quite easy to remove once the bezel is removed.
- Only standard Phillips head screws are used, no pentad or tri-blade tricks.
- The front panel is now glued to the body, which greatly increases the likelihood of glass cracking when trying to remove it.
- The LCD display is glued to the front panel with foam adhesive tape, which greatly increases the likelihood of breaking it during disassembly.
- The battery is very securely attached to the back of the case, and you have to remove the motherboard to remove it.
- The connectors on the front panel cannot be reached unless you remove the LCD display.
Keep in mind that this event may void the manufacturer's official warranties.
If you still dare to repair the iPad 2 yourself, follow a certain sequence described in the article and shown in the video instructions; here we will focus only on the fundamental differences. This means that everything that will not be mentioned separately is no different from the analysis of the first tablet. The iPad 2 is much thinner than its predecessor, so this needs to be taken into account during the teardown.
iPad 2 repair prices
[[!getPriceNTimeTableSingle? &resId=`126` &productId=`8` &tpl=`priceNTimeRow` &tplCaption=`priceCaption` &tplFields=`priceField` ]]Video instructions for disassembling iPad 2
Parsing the iPad 2 - the main nuances
The glass of the model is very tightly attached with glue to the base frame. Therefore, it is worth using an industrial hair dryer to heat the surface. Next, you need to use a special plastic spatula to effortlessly remove the glass from the body of iPad 2.


The device does not have fastenings that are used for the case. But too much glue is used, the excess of which complicates disassembly. And it doesn’t hurt to be careful when repairing the iPad 2, because its thickness is less than that of its predecessor model.


The battery, whose capacity is 6930 mAh, is located directly under the screen and is firmly glued to the back cover, connecting to the motherboard with a powerful cable.


By opening the latches on the left, we get access to the main internals of the tablet: a 1GHz processor, 512MB of RAM, 16GB of flash memory, a new chip for managing power, a touch screen controller, and a board for power management.


The rear camera is easily removed from the aluminum socket.


The front camera of the device is located on the board along with a mini-jack and microphone.


All parts are miniature in size, so attention and patience are required.


Analysis of iPad 2 is completed

While its older brother was reducing its “volumes”, the new version of the iPad mini, on the contrary, increased in size to accommodate the following:
- 7.9 inch LCD screen with a resolution of 2048 x 1536 at 326 pixels/inch
- Dual-core A7 CPU with 64-bit architecture and 1 GB RAM
- M7 motion tracking coprocessor
- 5 MP rear iSight camera with 1080p video recording and 1.2 MP front camera with 720p video recording
- 802.11n dual-channel Wi-Fi MIMO
- Supports memory cards of 16, 32, 64 or 128 GB
Step 2


We like to start looking at items with their ID number. Today's is A1489. A unique model number for a unique device. Apple's high-end handhelds are getting an unusual new color scheme: Space Gray. And we note that the iPad mini is still small enough to fit in one hand.
Step 3


We've never opened an iPad Mini with Retina Display before, but we think we can handle it. A little effort and we open the front panel of the iPad. As you can see here there is a ridiculously small amount of glue.
Step 4

We are starting to remove the nominal update to this Mini: the Retina Display. Compared to last year's, this one has added 0.3mm due to the introduction of additional pixels and, perhaps, this is a significant difference compared to, for example, the Kindle Fire HDX 8.9 inches, which is only 7.8 mm thick, but has an incredibly simple introductory procedure and a maintainability score of 7 out of 10.
Step 5


It looks like Apple saved money this time. The 16 screws in the previous iPad Mini's LCD screen plate must have been considered excessive; now we count only 7. Otherwise, it is very similar to the previous one, there are even places left for now outdated screws, pay attention to this when buying spare parts for Apple in bulk. We disconnect the bracket to release the LCD along with the cable channel.
Step 6


There have been rumors about a lot of problems associated with the introduction of updates to the "Mesh Display" and that it greatly reduces performance, slowing down the new Mini. This is quite interesting. Let's see.
Our little Retina has an LG display powered by the Parade DP675 LCD driver, which was also found in the iPad Air. There are also TI TPS65143A and a pair of TI TPS65195, most likely the power supply for LCD ICs.
While "Mini" is typically used to denote devices with reduced functionality, this version of the iPad offers a 2048 x 1536 resolution - exactly the same as the iPad Air. The same resolution on a smaller screen means improved pixel density - 326 ppi on the Mini compared to 264 ppi on the Air. Regarding the display resolution, it turns out that the Mini is not a stripped-down version at all, but quite the opposite.
Step 7


Let's move on. We're not surprised to find Broadcom BCM5976 dual touchscreen controllers here—they're used in several Apple products, including the iPad Air and iPhones 5 and 5s. Just great news for suppliers of spare parts for mobile and tablets!
Step 8


Finally we reach the iPad battery. And here's what it says: 3.75V, 24.3Whr, 6471mAh - a huge blow to the 16.3Whr batteries seen in the previous Mini. It seems that we have found the reason for the increase in the size of the Retina version. Despite these new specifications, Apple still lists battery life at 10 hours. And we suspect the new battery capabilities are aimed at supporting the performance of the updated display.
Step 9


The new battery design, now created in 2 cells, means more glue, more connecting links and requires more force on our part to rip that iPad battery out of the device. Well, as always, we managed to do it.
Step 10


Let's put the battery aside and continue digging into the remaining components of the tablet. Let's move on to the front camera first. It's still listed as 1.2 megapixel, 720p and labeled 821-1752-A.
On the back is a regular 5-megapixel camera. The camera's actual spec sheet states that it now has stabilization, which is great for us, but may be disappointing for the dozens of people who are used to enjoying the photos they take with their iPad.
Step 11


Now we can easily remove the headphone jack. The tiny ICs around the headphone jack appear to be an audio frequency amplifier. Exactly the same as was found in Air. But we have no idea who produced it. It's great when two different versions of the iPad use the same components, it saves a lot of money when purchasing spare parts from Apple in bulk.
Step 12


Building on Formicidaean's design for the iPad Air, the Mini has increased Wi-Fi efficiency by adding two antennas.
Step 13


So, we have only one component left. Last year's only Wi-Fi Mini had a blank space at the end of the logic board - just a flat space where the cellular chips were in the CDMA/GSM version. The Retina Mini board has a sleek outline instead. I'd like to hope this is just a cool weight-saving maneuver from Apple, because the other alternatives that come to mind are scary. We also notice the USI 339S0213 Wi-Fi module, which we saw in the iPad Air.
Step 14


- Apple A7 APL0698 SoC - This is the same part number as seen on the iPhone 5s, as opposed to the hotrod version of the 1.4GHz iPad Air. Great, we buy spare parts for cell phones wholesale and supply them to restored iPad Minis.
- A7 LPDDR3 DRAM Elpida 1 GB F8164A1PD
- NXP LPC18A1 (Apple M7 motion coprocessor)
- Toshiba THGBX2G7B2JLA01 16 GB NAND flash
- B334 STMicro MEMS accelerometer/gyroscope, same as seen in iPad Air. Note that there are a lot of similarities with this Air.
Step 15

More chips because we love chips. We open spare parts catalogs on Apple wholesale and check:
- Apple 338S1213 Cirrus audio codec
- Apple 338S1199 - likely a pair of audio amplifiers similar to the Apple 338S1077 found in the previous iPad mini
- Apple 343S0656-A1
- Fairchild semiconductor FDMC6676BZ and MOSFET FDCM6683
Step 16

Repairability of iPad Mini Retina Display: 2 out of 10 (where 10 is the easiest to repair).
- The LCD and glass are not glued together and can be replaced independently. This is convenient and big savings when purchasing spare parts for Apple in bulk.
- The battery is not soldered to the iPad's logic board or other components.
- Tiny screws can get lost or get mixed up and put back out of place.
- The glue binds too many components together - front glass, battery, front camera, rear camera, ribbon cables - making it extremely difficult to repair.
- The Lightning connector is soldered onto the logic board and therefore do not bend its pins.
- You will need to be extremely careful during disassembly when attempting to remove internal components as there are hidden screws.
Poor repairability, but an incredible benefit for iPad mini 2 parts suppliers. There will probably be 5-10 modules suitable for both iPhone and iPad of various versions. Buy wholesale spare parts for cell phones and tablets from our company on favorable terms.
iPad 2 much thinner its predecessor, therefore there are many changes in its design. The joke that the gadget resembles a large iPod Touch is no longer such after the release of the second tablet. It is assembled by analogy with the latest generation touch player.

Two guys from the box: iPad and iPad 2
The glass of the device is strong enough attached with glue to the main frame, so you can’t do without an industrial hair dryer. After warming up the surface, the craftsmen used a special plastic tool and, with some effort, opened the tablet.


As expected, the iPad 2 no longer has any fasteners that secure the glass to the body. Instead, there is a huge amount of glue, so when disassembling the gadget, the glass surface can be easily damaged. Especially 27% thinner glass than regular iPad.

Below the screen is 6930 mAh battery. Due to the design features, Apple was forced to slightly modify it. It is divided into 3 connected parts, firmly glued to the back cover and connected to the motherboard with a powerful cable.

Under special metal latches on the left side of the iPad 2 are the brains and heart of the tablet:

The same picture in high resolution - link
iPad 2 rear camera is located in a cozy aluminum nest and can be easily removed from it:


When iFixit removed the board containing the volume rocker and the volume/screen flip switch, they also discovered a dual chip for gamers. Gyroscope AGD8 2103 And accelerometer LIS331DLH- long-awaited functionality for fans.


Another new iPad 2 - front VGA camera, which is located on the same board with a 3.5 mini-jack and microphone.


As in previous devices, every detail, even the smallest, is a small work of art. Everything in the picture is assembled soundly and of high quality. Service centers are the only ones who can complain about the brand new iPad 2. It is very difficult to disassemble it; the reduced thickness of the glass can play a cruel joke on the craftsmen. In the next few years, Apple may seriously reconsider the entire process of servicing its equipment, abandoning spare parts. Instead, the company will issue new gadgets in exchange for damaged ones. It will be possible to collect Refurbished devices from old ones and sell them at a reduced price. Another small, unnoticed revolution by many.