How to create a virtual wifi adapter. Free virtual router for distributing wi-fi from any computer. Removing an access point
Hello admin, I have a laptop at home and local Internet is connected to it"Beeline" , the children also have another laptop, tablet and smartphone, the question is, can I use some program to distribute Wi-Fi Internet from the laptop, that is, use the laptop as a router, which, as you understand, I don’t have?
On the global network there is a description of working with the Virtual Router Plus program, I do everything as it is written there, but the laptop does not distribute Wi-Fi, either I did not understand something or something important was missed in the article.
How to distribute Wi-Fi Internet from a laptop or how to use Virtual Router Plus and Connectify Hotspot 2015 programs
Hello friends! Even in the absence of a router, it is possible to create a virtual Wi-Fi network using a regular laptop, because, after all, we live in the wireless era.
Creating a Wi-Fi network on a laptop is very simple using a special program. There are two very good free utilities that can help us in this matter: Virtual Router Plus And Connectify Hotspot 2015, but if don't know one thing, then you won’t succeed, I’ll definitely tell you about him.
First of all, let's connect our laptop to the Internet using a cable. I also don’t have a router and I connect my laptop to the Internet using the Beeline provider.
In network connections, both network adapters must be enabled: Ethernet adapter and adapter wireless network.

Now let's get down to our programs.
Virtual Router Plus
Cool program that works without installation, you can download it on my Yandex.Disk.


Extract the folder with the program from the archive and run the executable file VirtualRouterPlus.exe.

We set up the program and fill in all the fields.
Network Name (SSID)– come up with a name for your wireless network, for example I’ll call it renontcompa.ru.
Password– the password for the wireless network must be at least 8 characters and in English, but come up with a password so as not to forget.
Shared Connection– select from the list the name of the connection that supplies the Internet locally to the laptop, in my case Beeline Internet, since I do not have a router. In your case, if the laptop is connected using a LAN cable to the router, it may just be Ethernet (Local Area Connection).

That's all the settings, click on the button Start Virtual Router Plus.

Virtual Router Plus is up and running,

but there is one more setting left. Let's go to the folder Network and Sharing Center.

Changing adapter settings

The folder opens Network connections. ABOUT pay attention, it has appeared LAN connection 15(in your case it may be called differently) it is created by the program itself Virtual Router Plus.

Here, friends, the most important thing is don’t miss anything!
1. Please note that in my Network Connections folder there is an icon Beeline Internet, this means that I do not have a router and the Internet cable (WAN) of the Beeline provider from the corridor is directly connected to the laptop. In your case there may be an icon from another provider.
2. But if you have a router, then there will be no provider icon, but just an icon Local network connection or Ethernet.
In short, if you have a router, right-click on the icon"Local Area Connection" or "Ethernet" and select Properties.

If you don’t have a router, right-click on the icon of your provider (in my case) “Beeline Internet” and also select Properties

Let's go to the tab Access. Connecting a home network: click on the arrow and select LAN connection* 15(in your case the name may be different).

Check the boxAllow other network users to use this computer's Internet connection and press OK.


Now our laptop distributes the Internet and to connect to it (as to a router), you just need to left-click on the Network icon on another laptop

We select our wireless network (for example, I called renontcompa.ru) and click Connect

Connected.

Open the browser and we are on the Internet

So, we distributed Wi-Fi Internet from a laptop and connected another laptop to the resulting wireless network.
For example, let’s connect another tablet to our virtual network
Settings

Wireless WLANs

Choosing our network site

Enter the password and click Connect

Connected

Open the browser and go online

I want to say that with a router, of course, everything will be cooler and faster, but in some cases the ability to use this program can be useful.
Currently, wireless networks are becoming increasingly widespread: they work at train stations, airports, and enterprises, and for many users at home. In Windows 7, an option appeared called “virtual WiFi” - a software layer that creates several virtual adapters from the wireless network card installed in the computer. But first, a little theory.
Wireless networks can operate in two modes:
The devices are connected directly to each other. The result is a simple network (ad-hoc mode). This mode is called "point-to-point". This mode is used quite rarely and mainly for data exchange in cases where it is not possible to use an access point.
Devices are connected via an access point (Access Point-AP).
This mode is called Infrastructure Mode and is usually used in conjunction with a wireless router connected to the Internet.
It should be noted that the simultaneous use of two modes of wireless network operation on one physical wireless adapter is not provided for by the WiFi concept itself, and this is where the virtualization technology used in Windows 7, which expands the capabilities of adapters, comes to the rescue.
What is Virtual WiFi technology
Without going into technical details: in Windows 7, one physical wireless adapter can be turned into several virtual ones, and - attention! - Each of these virtual adapters can be configured to connect to different wireless networks.
What is this for?
Hmm... The question is, of course, interesting.
Example one: the radio signal from an existing access point does not cover the required distance between it and wireless devices. In this case, a computer or laptop with Virtual WiFi can act as a repeater (repeater), expanding the coverage area of the wireless network.
Example two: creating a personal network (Wireless Personal Area Network), to which you can very quickly connect a phone, camera, printer, laptop or any other device with a wireless adapter for simple information exchange.
Example three: an existing wireless network with static IP addresses of devices, but sometimes you need to quickly connect new devices, without any adjustments or adjustments (this can be done if the mode for allocating dynamic IP addresses was enabled. But alas) .
How Virtual WiFi is implemented in Windows 7
By the way: Virtual WiFi technology is included not only in Windows 7, but also in Windows 2008 R2.
Virtual WiFi is implemented in the operating system at the kernel level and allows for a very simple implementation of a software access point (SoftAP), while the only thing required from wireless adapter manufacturers is to implement SoftAP support in their drivers (many, by the way, have already done this).
So far - in the current implementation - Virtual WiFi has the following limitations: only one virtual adapter can be created, operating only in access point mode and only with WPA2-PSK/AES encryption.
By the way, Virtual WiFi technology allows you to connect up to 100 clients to an access point versus 8 clients in the My WiFi technology promoted by Intel.
Installing, enabling and configuring Virtual WiFi
Testing the operation of Virtual WiFi - installing, turning on and configuring a wireless network - was carried out on an ASUS eeePC 1000H netbook with a built-in Ralink WiFi adapter.
So, first you have to play around a little - call the command prompt with administrator rights and enter the following command:
netsh wlan set hostednetwork mode=allow ssid="MS Virtual WiFi" key="softodrom" keyUsage=persistent
“MS Virtual WiFi” here is the name (SSID) of the virtual network being created, and “softodrom” is the password for accessing the network. Of course, both of these parameters can be changed at your own discretion.
The last parameter - keyUsage=persistent - determines that the password will be saved and will not have to be specified every time you need to start a virtual network.
After running this command, the system will detect the new hardware and a new network adapter will appear in Device Manager called "Microsoft Virtual WiFi miniport adapter".
As a clarification: naturally, a virtual adapter will appear in the Device Manager only if the driver of the wireless adapter you have installed supports Virtual WiFi technology.
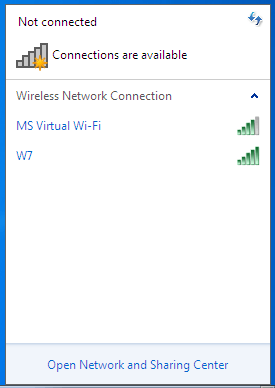
To be more reliable, let’s look at Control Panel –> Network and Sharing Center –> Change adapter settings:
As you can see, a new connection “Wireless network connection 2” has appeared here with the status “No connection” (it is already there in the picture. More on that below).
Let's move on to launching the network. In a command prompt running with administrator rights, run the following command:
netsh wlan start hostednetwork
After this, a) the network will start (Microsoft called it “Hosted Network”) and b) the software access point will work, which you can verify by going to Control Panel -> Network and Sharing Center.

As we can see, the computer is connected to several wireless networks simultaneously, and now other wireless devices can connect to our newly created software access point.
To provide Internet access to other wireless devices that will connect to our software access point, go to the Control Panel tab -> Network and Sharing Center -> Change adapter settings and in the properties of the adapter through which the computer - in our case eeePC netbook - gets access to the Internet (we have a WiFi connection, but it can be any of the available ones - Ethernet, WiMax, 3G, etc.) in the "access" tab, check the box "Allow other network users to use the Internet connection this computer."
In addition, in "Connecting a home network" you need to indicate which network adapter - in our case it is "Wireless Network Connection 2" - the Internet should be provided to.

Finally, about the client. From the client side, several wireless networks will be visible, and when connecting to an organized access point (previously we assigned it SSID = MS Virtual WiFi), the client will automatically receive an IP address from the internal DHCP server, gain access to the Internet and at the same time be separated from the external NAT (Network Address Translation) networks.
The clients used in the test were a laptop and a WiFi-enabled mobile phone; in both cases, accessing the Internet via a virtual WiFi network did not cause any difficulties.
Simplifying virtual WiFi network management
Despite the obvious advantages of Virtual WiFi, using the command line to configure and start a network for Windows users who are accustomed to pressing buttons is not convenient and familiar, especially since they will have to start the network every time after rebooting the computer, as well as waking it up from sleep or standby mode.
Unfortunately, there is no built-in graphical interface for Virtual WiFi in the operating system, but, as always in such cases, third-party developers came to the rescue and released graphical shells for Virtual WiFi - Connectify and Virtual Router Manager. We recommend using the first one (Connectify), since its developer is constantly working to improve it and regularly releases new versions, and the development of Virtual Router Manager is still in the beta stage, with the last beta version dating back to 2009.

The principle of using both utilities is very simple: in the appropriate fields you need to specify the network SSID and password for access and click on the Start button, after which the program will load along with the startup of the operating system, ensuring the launch of the virtual network. In addition, both utilities, Connectify and Virtual Router Manager, show current connections to the virtual network.
Commands for Managing a Hosted Network
Finally, for command line connoisseurs, there are new commands for managing a hosted network that appeared in Windows 7 and Windows 2008 R2:
netsh wlan set hostednetwork allowed/disallowed – allow or deny network use
netsh wlan set hostednetwork persistent/temporary - setting up network parameters, where SSID is the SSID of the network; key - security key (password) used by the network; keyUsage – indicates whether the security key is permanent or temporary
netsh wlan show settings – shows network properties and its status
netsh wlan show hostednetwork settings=security – displays the security settings of the hosted network, including the password specified in key when configuring netsh wlan set hostednetwork
netsh wlan start hostednetwork - start a hosted network
netsh wlan stop hostednetwork - stop the hosted network.
Over the course of their existence, wireless networks (Wireless Local Area Network-WLAN) have gone through many changes that affected security, range and speed, but the basic principles of operation have remained unchanged.
Wireless networks can operate in two modes: when two or more devices are connected directly to each other - point-to-point, or when they are connected through an access point (Access Point-AP). In the first case, they talk about a simple network (ad-hoc mode). The use of this operating mode is quite rare and is used mainly for data exchange when it is not possible to use an access point. The second mode, using an access point, is called infrastructure mode and in most cases is used in conjunction with a wireless router that is connected to the Internet. But using two operating modes simultaneously on one physical wireless adapter is not provided for by the Wi-Fi concept itself.
In search of new ways to use wireless networks, the concept of virtualization has been proposed, which removes certain restrictions on the use of such networks and thereby expands their capabilities. This approach to using wireless adapters has been implemented by several companies with corresponding technology names. At Intel, it's Intel My WiFi, and at Microsoft, it's Virtual WiFi.
Virtual Wi-Fi is a software layer that abstracts the wireless network card and creates multiple virtual adapters. Each virtual adapter can be separately configured to connect to different wireless networks, but they will all use the resources of only one physical wireless adapter.
What can this technology be useful for? For example, creating a personal network (Wireless Personal Area Network - WPAN) in which you can quickly connect a PDA, phone, printer, camera, laptop and other device with a wireless adapter for simple information exchange; use a laptop as a hotspot to provide Internet access to wireless devices using an Internet connection on the laptop, be it Ethernet, Wi-Fi, 3G or WiMax. Another example would be when the radio signal is not stable enough or does not cover the required distance between the access point and wireless devices. In this case, a computer or laptop with Virtual Wi-Fi technology can act as a repeater, thereby improving the radio coverage of the wireless network.
In Windows 7 and Windows 2008 R2, Virtual WiFi technology was included in the system and implemented at the kernel level, in addition, work was done on a simple implementation of a Software Access Point (SoftAP), while from wireless device manufacturers, Now you only need to implement SoftAP support in your drivers. In this regard, in the current implementation of Virtual WiFi in Windows 7 and Windows 2008 R2, it is possible to create only one virtual adapter that will only work in access point mode, while providing WPA2-PSK-AES encryption.
By the way, support for Virtual WiFi in drivers is a mandatory requirement for certification of wireless adapters for compatibility with Windows 7.
Virtual WiFi is designated as Wireless Hosted Network, in Russian designation as Hosted Network. In connection with the introduction of Virtual WiFi into new operating systems from Microsoft, new commands have been included in the network shell for managing a distributed network. Here are some of them:
- netsh wlan set hostednetwork allowed|disallowed - Allow or deny use of the network.
- netsh wlan set hostednetwork<идентификатор_SSID> <парольная_фраза>persistent|temporary - Configure network parameters, where SSID – network SSID; Key - User security key used by the network; keyUsage indicates the security key is permanent or temporary
- netsh wlan show settings – Shows the network property and its status.
- netsh wlan show hostednetwork settings=security – Displays the security settings of the hosted network. (Shows, including the password specified in key when setting up netsh wlan set hostednetwork)
- netsh wlan start hostednetwork - Start hosted network.
- netsh wlan stop hostednetwork - Stop network hosting.
What does setting up Virtual Wi-Fi look like in practice: we need a laptop or regular personal computer with wireless devices, Windows 7 and a driver that supports Virtual WiFi.
If the above described criteria are met, then call the command line with administrator rights and run the following command in it:
netsh wlan set hostednetwork mode=allow ssid="MS Virtual Wi-Fi" key="Pass for virtual wifi" keyUsage=persistent
In this example, “MS Virtual Wi-Fi” is the name of the wireless network, “Pass for virtual wifi” is the password to access this network. You can set these values at your discretion.

After executing this command, the system will find new equipment and a new network adapter will appear in the device manager, or rather a virtual one - Microsoft Virtual WiFi miniport adapter. But again, this virtual adapter will only appear if our wireless adapter driver has Virtual WiFi support.

By going to Control Panel - Network and Sharing Center - changing adapter settings, we will see a new connection, Wireless Network Connection 2, which will show the status - no connection. Therefore, the next step will be to launch the network. To do this, in a command prompt run with administrator rights, run the following command:
netsh wlan start hostednetwork.

After this, the network will start and the software access point (SoftAP) will work. You can verify this by going to Control Panel - Network and Sharing Center. Since we use a Wi-Fi Internet connection, we found that Windows 7 was connected to several wireless networks at the same time. Now other wireless devices can connect to our access point.

If we want to provide access to the Internet to other wireless devices that are connected to our software access point, that is, to organize a Hotspot, then we need to go to the Control Panel tab - Network and Sharing Center - changing adapter parameters and connection properties , which is connected to the Internet (in our case, this is a Wi-Fi connection, but it can be anything: ethernet, 3G, WiMax, etc.). On the access tab, check the box Allow other network users to use the Internet connection of this computer, and in Connecting a home network, specify which network adapter to provide (share) the Internet to, in our case, it will be Wireless Network Connection 2, which refers to the virtual wireless adapter.

On the client side, you can see several wireless networks, and when connecting to our organized access point, the client will automatically receive an IP address from the internal DHCP server and will be separated from the external network by NAT (Network address translation).
The convenience of using Virtual Wi-Fi is obvious, but using the command line to configure and start the network (and you need to start the hosted network every time after rebooting the computer with administrator rights) is not entirely convenient. And, unfortunately, there is no built-in graphical shell for setting up Virtual WiFi. Therefore, it is not surprising that third-party utilities appear that perform the function of this very shell. Now there are several such utilities - Connectify and Virtual Router Manager. Their configuration is kept to a minimum - you need to specify the SSID and password for access. They are loaded along with the system and immediately enable the distributed network and are able to display all connections to our distributed network.

Connectify
Now it is difficult to imagine how you can do without the use of wireless networks. The discovery of wireless networking technology made a significant contribution to the industry and changed the way we use the personal computer. Virtual Wi-Fi is a software layer that abstracts the wireless network card and creates multiple virtual adapters. What can this technology be useful for?
Over the course of their existence, wireless networks (Wireless Local Area Network-WLAN) have gone through many changes that affected security, range and speed, but the basic principles of operation have remained unchanged.
Wireless networks can operate in two modes: when two or more devices are connected directly to each other - point-to-point, or when they are connected through an access point (Access Point-AP). In the first case, they talk about a simple network (ad-hoc mode). The use of this operating mode is quite rare and is used mainly for data exchange when it is not possible to use an access point. The second mode, using an access point, is called infrastructure mode and in most cases is used in conjunction with a wireless router that is connected to the Internet. But using two operating modes simultaneously on one physical wireless adapter is not provided for by the Wi-Fi concept itself.
In search of new ways to use wireless networks, the concept of virtualization has been proposed, which removes certain restrictions on the use of such networks and thereby expands their capabilities. This approach to using wireless adapters has been implemented by several companies with corresponding technology names. At Intel, it's Intel My WiFi, and at Microsoft, it's Virtual WiFi.
Virtual Wi-Fi is a software layer that abstracts the wireless network card and creates multiple virtual adapters. Each virtual adapter can be separately configured to connect to different wireless networks, but they will all use the resources of only one physical wireless adapter.
What can this technology be useful for? For example, creating a personal network (Wireless Personal Area Network - WPAN) in which you can quickly connect a PDA, phone, printer, camera, laptop and other device with a wireless adapter for simple information exchange; use a laptop as a hotspot to provide Internet access to wireless devices using an Internet connection on the laptop, be it Ethernet, Wi-Fi, 3G or WiMax. Another example would be when the radio signal is not stable enough or does not cover the required distance between the access point and wireless devices. In this case, a computer or laptop with Virtual Wi-Fi technology can act as a repeater, thereby improving the radio coverage of the wireless network.
In Windows 7 and Windows 2008 R2, Virtual WiFi technology was included in the system and implemented at the kernel level, in addition, work was done on a simple implementation of a Software Access Point (SoftAP), while from wireless device manufacturers, Now you only need to implement SoftAP support in your drivers. In this regard, in the current implementation of Virtual WiFi in Windows 2008 R2, it is possible to create only one virtual adapter that will only work in access point mode, while providing WPA2-PSK-AES encryption.
By the way, support for Virtual WiFi in drivers is a mandatory requirement for certification of wireless adapters for compatibility with Windows 7.
Virtual WiFi is designated as Wireless Hosted Network, in Russian designation as Hosted Network. In connection with the introduction of Virtual WiFi into new operating systems from Microsoft, new commands have been included in the network shell for managing a distributed network. Here are some of them:
- netsh wlan set hostednetwork allowed/disallowed - Allow or deny use of the network.
- netsh wlan set hostednetwork<идентификатор_SSID> <парольная_фраза>persistent/temporary - Configure network parameters, where SSID is the network SSID; Key - User security key used by the network; keyUsage indicates the security key is permanent or temporary
- netsh wlan show settings - Shows the network property and its status.
- netsh wlan show hostednetwork settings=security - Displays the security settings of the hosted network. (Shows, including the password specified in key when setting up netsh wlan set hostednetwork)
- netsh wlan start hostednetwork - Start hosted network.
- netsh wlan stop hostednetwork - Stop network hosting.
What does setting up Virtual Wi-Fi look like in practice: we need a laptop or regular personal computer with wireless devices, and a driver that supports Virtual WiFi.
If the above described criteria are met, then call the command line with administrator rights and run the following command in it:
netsh wlan set hostednetwork mode=allow ssid="MS Virtual Wi-Fi" key="Pass for virtual wifi" keyUsage=persistent
In this example, “MS Virtual Wi-Fi” is the name of the wireless network, “Pass for virtual wifi” is the password to access this network. You can set these values at your discretion.

After executing this command, the system will find new equipment and a new network adapter will appear in the device manager, or rather a virtual one - Microsoft Virtual WiFi miniport adapter. But again, this virtual adapter will only appear if our wireless adapter driver has Virtual WiFi support.

By going to Control Panel - Network and Sharing Center - changing adapter settings, we will see a new connection, Wireless Network Connection 2, which will show the status - no connection. Therefore, the next step will be to launch the network. To do this, in a command prompt run with administrator rights, run the following command:
netsh wlan start hostednetwork.

After this, the network will start and the software access point (SoftAP) will work. You can verify this by going to Control Panel - Network and Sharing Center. Since we use a Wi-Fi Internet connection, we found that Windows 7 was connected to several wireless networks at the same time. Now other wireless devices can connect to our access point.

If we want to provide access to the Internet to other wireless devices that are connected to our software access point, that is, to organize a Hotspot, then we need to go to the Control Panel tab - Network and Sharing Center - changing adapter parameters and connection properties , which is connected to the Internet (in our case, this is a Wi-Fi connection, but it can be anything: ethernet, 3G, WiMax, etc.). On the access tab, check the box Allow other network users to use the Internet connection of this computer, and in Connecting a home network, specify which network adapter to provide (share) the Internet to, in our case, it will be Wireless Network Connection 2, which refers to the virtual wireless adapter.

On the client side, you can see several wireless networks, and when connecting to our organized access point, the client will automatically receive an IP address from the internal DHCP server and will be separated from the external network by NAT (Network address translation).

The convenience of using Virtual Wi-Fi is obvious, but using the command line to configure and start the network (and you need to start the hosted network every time after rebooting the computer with administrator rights) is not entirely convenient. And, unfortunately, there is no built-in graphical shell for setting up Virtual WiFi. Therefore, it is not surprising that third-party utilities appear that perform the function of this very shell. Now there are several such utilities - Connectify and Virtual Router Manager. Their configuration is kept to a minimum - you need to specify the SSID and password for access. They are loaded along with the system and immediately enable the distributed network and are able to display all connections to our distributed network.

Connectify

![]() Let's imagine this situation: at home you have a laptop or computer running Windows 10 with Internet access (via cable or USB modem), and in addition you have a tablet, smartphone, TV, etc., which would also be nice connecting to the Internet, of course, if you had a Wi-Fi router, this would not be difficult, but what to do when there are a lot of devices, there is no router, and everyone wants to connect to the Internet.
Let's imagine this situation: at home you have a laptop or computer running Windows 10 with Internet access (via cable or USB modem), and in addition you have a tablet, smartphone, TV, etc., which would also be nice connecting to the Internet, of course, if you had a Wi-Fi router, this would not be difficult, but what to do when there are a lot of devices, there is no router, and everyone wants to connect to the Internet.
There is a way out; you can set up Internet distribution via Wi-Fi directly from a laptop or from a desktop PC (provided it has a discrete or external Wi-Fi adapter) - i.e. create a virtual access point (Hot Spot), essentially turning your computer into a Wi-Fi router.
All this, of course, can be implemented using standard Windows tools (), but for most people it will not be so easy to understand all the intricacies of such a setup, so to distribute the Internet via Wi-Fi it would be much more convenient to use the free Switch Virtual Router program, which will help It is easy for every PC user to create and run a virtual access point.
Setting up the program
- Download the program via a direct link;
- No installation is required, just extract the files from the archive (for example, using an archiver or);
- Run VirtualRouterPlus.exe;
- Fill in the Network Name (SSID) field – you can come up with any name, in our example “alpinefile”;
- Password – set a password, a combination of letters (Latin) and numbers, but, of course, it’s better not to enter a password like ours “12345678”, come up with something more complicated;


- The program is up and running, but that's not all;


- On the left side of the window, click “Change adapter settings”;

- In the window that opens, select the main wireless connection, right-click on it, then “Properties”;
- Open the “Access” tab, check the box next to the item: “Allow other network users to use this computer’s connection”, then in “Home network connection” select “Local Area Connection* 3” (created by the Virtual Router Plus program, your name may differ ). The order of the above actions is presented in the screenshot;

- That's all, now we can distribute the Internet via Wi-Fi and without a router.
Possible problems during setup
If you did everything according to the instructions, the program works correctly, as evidenced by this icon in the notification area,
but there is no connection, then, with a high degree of probability, it can be argued that the connection is blocked by a firewall installed in the anti-virus program (Dr.Web, for example, does exactly this). Therefore, do not forget, if necessary, to add the created Internet connection to the exceptions of your antivirus software.