How to create a virtual disk (drive). How to create a virtual disk using Daemon Tools
Hello, dear users! A characteristic feature of the seventh version of Windows operating system is that it allows you to create virtual disk, and in the future you can perform various actions with the virtual disk (creating, changing and deleting a virtual disk partition, setting access rights for your data, as well as opening a virtual disk on other computers). In today's article we will find out how to create a virtual disk in the seventh version of Windows.
Let's say you have only one system partition on your computer (drive C), and you want to split the hard drive into additional partitions. In such a situation, the following options are possible: the first option is that the user can split the hard drive into additional partitions using special programs(you can read my article “” using one program).
The second option involves creating a virtual disk that you can connect or disconnect at any time, thereby protecting your data from other users.
So let's look at it step by step, how to create a virtual disk in the seventh version of Windows:
1. Right-click (RMB) on the “My Computer” shortcut and select “Manage” from the menu that opens.
2. In the “Computer Management” window that opens, go to the “Disk Management” section.

Now click on the “Actions” tab and select “Create” virtual hard disk". Then in the dialog box you need to specify the section hard drive, that is, the storage location of the created disk. In general, of course, it is recommended to specify the partition of the disk that has more free space.

In my example, I selected disk partition “D” and set the volume of the created virtual disk to 7 GB. By default, it is recommended to select a fixed virtual disk format and click OK.
As a result, the system will begin creating the virtual disk. As shown in the figure, the progress of the operation will be displayed at the bottom of the window.

After this, the created virtual disk will be displayed in the corresponding window.
Now we need to initialize the disk so that the manager local disks could access it. Right-click on the created partition and select “Initialize disk” in the menu that appears.

In the window that appears, leave everything as default and click “OK” (In my example disk being created has number 6, it may be different for you).

At the final stage of creating a virtual disk, you will need to create a volume. To do this, right-click on the created virtual disk and go to “Create Volume”.

This will launch the special Volume Creation Assistant. Click “Next”.

Then in the next window you need to set the size of the volume to be created (you can leave it as default).

In the next window, the assistant will notify you that the corresponding letter for the volume being created has been selected.

Finally, you will need to select file system and start the volume formatting process. I leave everything as default and click Next.

If desired, you can make the virtual disk bootable. At any time, you can disconnect or attach the created virtual disk, as well as open this disk on another computer. To do this, click on the “Actions” tab and in the drop-down list select the command that is shown in the figure below.

After that, in the window that opens, specify the path where you previously saved the virtual disk.
To summarize, we note that in the lesson we reviewed on how to create a virtual disk, users are encouraged to create an additional partition on the hard drive thanks to special features provided in Windows 7.
In general, it is believed that it is more expedient to create a virtual disk when it is necessary to create a partition on a hard drive, and the main criterion is the fact that the virtual disk should not be stored on the system partition of the disk. That is, if on the hard drive except system partition If there are two or more partitions, then in such cases you can also create a virtual disk on which you can perform various actions and experiment without fear of losing your information and system files.
If you have one installed on your computer hard drive size, which is, for example, 500 GB, and it is not divided into partitions (there is only a “Disk C” partition), then in this case to create additional section It is better to use a program special for this purpose.
Since all your data will be stored in a separate partition, the chances that the data will not be destroyed if the operating system crashes will be high. I also recommend that you read my article, in which you will learn:
Concluding this article, all I can say is that you now know how to create a virtual disk on your computer. As you can see, its creation does not take much time. I remind you that if you are not yet a subscriber to this blog, you can do so right now. To do this, just go to where you will learn how to properly subscribe to the blog.
That's all for today! All the best to you and in the next issue you will find out =>
Hello.
In this article I would like to touch on two things at once: a virtual disk and a disk drive. In fact, they are interconnected, just below we will immediately make a short footnote to make it clearer what will be discussed in the article...
Virtual disk(the name “disk image” is popular on the Internet) is a file whose size is usually equal to or slightly larger than the actual CD/DVD disk from which this image was obtained. Often images are made not only from CDs, but also from hard drives or flash drives.
Virtual disk drive(CD-Rom, disk drive emulator) - roughly speaking, this is a program that can open the image and present you with the information on it as if it were a real disk. There are quite a lot of programs of this kind.
The best programs for working with virtual disks and drives
1. Daemon Tools
 Link to the lite version: http://www.daemon-tools.cc/rus/products/dtLite#features
One of best programs for creating and emulating images. Supported formats for emulation: *.mdx, *.mds/*.mdf, *.iso, *.b5t, *.b6t, *.bwt, *.ccd, *.cdi, *.bin/*.cue, * .ape/*.cue, *.flac/*.cue, *.nrg, *.isz.
You can create only three image formats: *.mdx, *.iso, *.mds. You can use a lightweight version of the program for home (for non-commercial purposes) for free. The link is given above.
After installing the program, another CD-Rom (virtual) appears in your system, which can open any images(see above) which you can only find on the Internet.

To mount the image: run the program, then right-click on the CD-Rom, and select the “mount” command from the menu.
To create an image Just run the program and select the “create disk image” function.

After this, a window will pop up in which you need to select three things:
The disk whose image will be obtained;
Image format (iso, mdf or mds);
The location where the virtual disk (i.e. image) will be saved.

Conclusions:
One of the best programs for working with virtual disks and drives. Its capabilities are probably enough for the vast majority of users. The program works very quickly, does not load the system, supports all the most popular versions of Windows: XP, 7, 8.
2. Alcohol 120%/52%
 Link: http://trial.alcohol-soft.com/en/downloadtrial.php
(to download Alcohol 52%, when you click on the link above, look for the download link at the very bottom of the page)
A direct competitor to Daemon tools, and many rate Alcohol even higher. In general, Alcohol is not inferior in functionality Daemon Tools: The program can also create virtual disks, emulate them, and burn them.
Why 52% and 120%? It's a matter of the number of options. If at 120% you can create 31 virtual disks ods, then in 52% - only 6 (although for me - 1-2 is more than enough), plus 52% cannot write images to CD/DVD discs. Well, of course, 52% is free, and 120% is a paid version of the program. But, by the way, at the time of writing, the 120% version is given for 15 days for trial use.
Personally, I have version 52% installed on my computer. A screenshot of the window is shown below. The basic functions are all there, you can quickly create any image and use it. There is also an audio converter, but I have never used it...

3. Ashampoo Burning Studio Free
 Link: https://www.ashampoo.com/en/usd/pin/7110/burning-software/Ashampoo-Burning-Studio-FREE
This is one of the best programs for home use(also free). What can she do?
Work with audio discs, video, create and burn images, create images from files, burn to any (CD/DVD-R and RW) discs, etc.
For example, when working with an audio format, you can:
Create Audio CD;
Create an MP3 disk (https://site/kak-zapisat-mp3-disk/);
Copy music files to disk;
Transfer files from an audio disc to your hard drive in a compressed format.

Video discs are also more than decent: Video DVD, Video CD, Super Video CD.

Conclusions:
An excellent combine that can easily replace a whole range of utilities of this kind. As they say, install it once and always use it. Of the main disadvantages, there is only one: you cannot open images in a virtual disk drive (it simply does not exist).
4. Nero
 Website: http://www.nero.com/rus/products/nero-burning-rom/free-trial-download.php
I couldn’t ignore such a legendary package for burning discs, working with images, and in general, everything related to audio-video files.
With this package you can do everything: create, record, erase, edit, convert video-audio (almost any formats), even print covers for recordable discs.
Cons:
A huge package that contains everything you need and don’t need, many even 10 parts do not use the program’s capabilities;
Paid program ( free test possible for the first two weeks of use);
It puts a lot of stress on the computer.
Conclusions:
Personally, I haven’t used this package for a long time (which has already turned into a big “combine”). But in general, the program is very worthy, suitable for both beginners and experienced users.
5. ImgBurn
 Website: http://imgburn.com/index.php?act=download
The program pleases you from the very beginning: the site provides 5-6 links so that any user can easily download it (from whatever country he is from). Plus add to this ten three different languages, supported by the program, among which there is Russian.
Basically, without even knowing English language, this program will not be difficult to understand even for novice users. After launch, a window will appear in front of you with all the features and functions that the program has. See screenshot below.

Allows you to create images of three types: iso, bin, img.
Conclusions:
good free program. If you use it in combination, for example, with Daemon Tools, then the possibilities are enough for your eyes...
6. Clone CD/Virtual Clone Drive
 Website: http://www.slysoft.com/en/download.html
Hello Friends! Virtual disk or VHD is a file with an exact copy of the disk structure. It is intended mainly for virtualization. It's also very convenient to store in it. various information, and install programs on it. All this will be compactly placed in one file, which will eliminate any confusion. Virtual hard disks are very convenient for connecting to virtual machines, especially if you need to pass ( virtual machine) huge amount of data. To work with VHD in Windows 7, you do not need to install anything additional. Almost everything can be done from the Disk Management snap-in or using the DISKPART utility. In this article, we will learn how to manage virtual disks and install Windows on them.
Open the Disk Management window. Go to the Start menu and write “control” in the search field. In the results found, select Computer Management

In the window that opens on the left, select Disk Management

To create a virtual disk, open the Action menu and select Create virtual hard disk

In the window that opens, use the Browse... button to specify the name and location of the virtual disk file

- use the words "Windows" in the VHD file name
- place virtual disks in the Windows folder

The Creation Wizard will open. simple volume. Click Next >


Assigning a drive letter


Check the parameters for creating a simple volume and click Finish

We get a virtual hard disk.
To detach a VHD, you need to right-click on it and select Detach virtual hard disk

In the window that appears, click OK and the disk will turn off.

By checking the Delete virtual hard disk checkbox, the file containing this disk will be deleted along with all the information on it. (You can read about file recovery)
Once disabled, the ability to change information on the VHD will not be available. To do this you need to connect it again.
To do this, open the Action menu and select Attach virtual hard disk. In the window that opens, using the Browse button... select required disk(for example, an image created by the Windows Backup system) and click OK

The disk will connect and will be available for various manipulations.

Creation, connection and disconnection of virtual disks were considered.
Managing VHDs with DISKPART
The DISKPART disk utility allows you to do all of the above and a little more. This is necessary to install Windows 7 and/or Windows 8 on virtual disks.

Since we are studying the DISKPART utility, we will format from command line
Team list partition look through the sections. * — the selected section is indicated. Team format We format with default parameters. If you want to set your own parameters, see the help - help format

The virtual disk has been created and is ready for use.
To disconnect the disk, run the command detach vdisk

Also, using the DISKPART utility, we can expand the virtual disk we need. You can of course delete and create new disk larger volume, but then you will have to copy information to it again, install programs and/or operating system.
To increase the size of the virtual disk, select the desired VHD select vdisk file=C:\1.vhd
Set a new volume for the selected disk expand vdisk maximum=2000
Connecting an enlarged virtual disk attach vdisk

What we got in Disk Management utility

Now let's expand the partition to the entire size of the virtual disk.
Looking through the list of disks - list disk. If * it is not on the desired disk, select the required VHD select disk 1
Looking through the list of sections - list partition and select the one you need - select partition 1
We expand the volume with the command extend

Result in Disk Management

In this way, you can manage virtual and real disks using the DISKPART utility. If something is not clear, then refer to the help - help or help “command name”.
Here interesting video Managing VHDs in Windows 7 which will help us better understand this topicWindows 7 or Windows 8. Boot from the prepared flash drive or disk and go to settings and selecting a partition for installation

Click here Shift+F10- the command line will open
Launch the utility DISKPART by typing its name
Create a virtual disk for installation using the command create vdisk file="E:\Win7.vhd" type=fixed maximum=30000
We choose him as a team select vdisk file="E:\Win7.vhd"
Connect the selected virtual disk attach vdisk
Then close the command line window and click Update

A new unallocated partition will appear - our VHD. Select it and, ignoring the warning, click Next
Another interesting option is to install operating systems on a virtual disk. This feature makes it possible to try a new operating system (for example Windows 8) without breaking anything in the old one.
The video below shows how to install Windows 7 on VHD
Good day everyone!
Regular CD/DVD discs, no matter how sad it may be, are losing their popularity year after year (they used to be sold on every corner ☻). Still, development network technologies does its job...
Meanwhile, there is another side of the coin - the so-called virtual disks - separate file(s) made on the basis exact copy physical CD/DVD disk. They are also called images. The most popular image formats: ISO, BIN, MDS/MDF, NRG, CCD. By the way, now many files are transferred over the network in images (for example, even to create bootable USB flash drive with Windows - you must first download from the Microsoft website installation image with the system).
You can’t just open such an image, you need (you guessed it) a special one virtual disk drive (or drive. Also called CD/DVD emulators).
In general, I decided to construct this article in the form of questions and answers on working with images (of which there are always many). Along the way, I will present programs that best cope with the task. I think this will make it easier to present the basics to the inexperienced reader. So, let's get started...
The most popular questions about working with virtual disks
❶. How to create a virtual disk/ISO image, etc.
First of all, to get started, I recommend installing one program - Daemon Tools (Lite version, it is free and its capabilities for creating and emulating images are more than enough). And in general, in my opinion, it is one of the best (and most popular, by the way) programs for working with disk images. I definitely recommend installation and review.
Daemon Tools (Lite)
This program allows you to mount almost all types of images, and also emulates the simultaneous operation of up to 4 drives. In addition, the program allows you to record finished images on physical disks, convert from one format to another, create protected images and much more (by the way, some of the functions are paid, unfortunately). The program organizes image storage quite well: you can always find the desired disk from your collection.

And so, let’s say we have several CDs with music and games that are often used, and you are simply tired of inserting them into the drive (and over time, the discs deteriorate, get scratched, and make noise when inserted into the drive). Therefore, it is logical that once you make images of these disks, you can easily and quietly use them.
1) First you need to insert the CD into an actual physical drive.

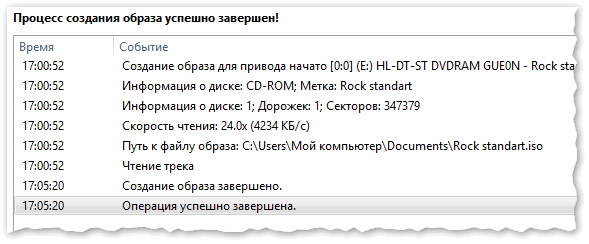
3) Then you need to specify the drive with the disk, specify the folder where the image will be saved, and the image format (in my example, I chose ISO). To start copying, click the "Start" button.


5) When the image is ready, you will see a message stating that the operation was completed successfully, as in the screenshot below.
In general, that's all. Now you can use this image (you just need to first create virtual drive, more on this below).
❷. How to create a virtual drive/CD/DVD-Rom emulator
Let's use the same Daemon Tools...
First you need to run the program and click "Add drive" (in the left menu of the program).


A new drive should appear at the bottom of the window: in my case, under the letter "F: (blank)".

DAEMON Tools Lite - a new drive has appeared (F:)!
❸. How to open images: ISO, MDF, NRG, etc. and run the application from them
After the virtual drive has been created in Daemon Tools, you can start opening and reading images in it. In general, Daemon Tools opens almost any image: ISO, BIN, MDF, NRG (even archives in 7z, rar, zip, etc.).
At the bottom of the window - left-click on the virtual drive (which we created in the previous step). See screenshot below.
DAEMON Tools Lite - first left click on the drive

If automatic start Your CD/DVD drives are disconnected (and nothing appears on the screen), go to “My Computer/This Computer”: among the drives there should be a virtual one, with the disk (i.e. image) that we opened.

If you are asked whether to allow this application to make changes, answer in the affirmative (at least for familiar drives...).

❹. How to burn an image to a physical CD/DVD
Daemon Tools, of course, can burn images to physical disks, but this feature is only available in paid version programs. Therefore, it is better to use analogues, especially since there are also free versions in this segment.
Why not Nero? Because the Nero package is paid, weighs several gigabytes, is very slow and clumsy. It’s unlikely that many will use even a tenth of its functions (not to mention the fact that most just need to burn a disc and that’s it...).
CDBurnerXP
![]()
CDBurnerXP is a free program for burning CDs and DVDs, including Blu-Ray and HD-DVD. The program also works great with ISO images, allowing you not only to create them, but to burn them to physical discs. The program supports dozens of languages (including Russian). Works on Windows XP/7/8/9/10.
Main features:
- record data (files, documents, pictures, etc.) on any type of disk;
- recording audio CDs;
- creating and burning ISO images;
- creating boot (installation) disks;
- BIN/NRG image converter → to ISO;
- possibility of printing covers.
After starting the program, click the button "Burn ISO image to disc" (see screenshot below).

Then specify the ISO image to burn, the physical drive, the writing speed (highlighted in yellow in the screenshot below - by the way, do not set the most high speed, errors are possible) and click "Burn disc". In general, that's all - in 10-15 minutes. your disc will be burned!

Burn Settings // CDBurnerXP
❺. What other programs can be used to work and read images?
Alcohol 120%

Alcohol 120% - excellent and very powerful program for working with images. Does everything: creates images, mounts them into virtual drives, writes them, creates a library on your PC (for them quick search and reading).
Although the program is paid, there is a free trial period of 15 days (and there is also free version, with reduced capabilities). In general, I recommend you check it out!
Main features:
- creation of up to 31 virtual drives;
- creating disk images (format support: MDF/MDS, CCD, BIN/CUE, ISO, CDI, etc.);
- recording from disk images: CD, DVD and Blu-ray;
- erasing discs: CD-RW, DVD-RW and BD-RE;
- search and create a library from image files on the PC hard drive;
- Availability of an audio converter for working with audio CDs.
Ultra ISO
Official website: https://www.ezbsystems.com/ultraiso/

A very powerful program for working with ISO images. Allows you to create them from real disks, record them, emulate them in a virtual drive, and, most importantly, edit them on the fly. Those. you can open the ISO image, delete from it unnecessary file(or add) and save the image. Actually, this is done very quickly!
In addition, the program will help you create a boot (installation) disk or flash drive. You can also try to compress current ISO images, etc. In general, I recommend everyone who works with ISO to have it on their PC...
Burn4Free

Very reliable and simple program for working with CD/DVD discs. Allows you to perform almost the entire range of tasks that the average PC user may need. With all this, it takes up very little space on your hard drive (several megabytes!).
Main advantages:
- burn CD/DVD discs in a few mouse clicks;
- the program is very easy and simple, the design is made in a minimalist style;
- you can copy audio CDs various formats(WAV, FLAC, WavPack, WMA, etc.);
- support SCSI - IDE/EIDE - SATA - USB;
- Russian language support;
- creation and recording ISO images;
- ability to record MP3 discs;
- support for everyone Windows versions: 10, 8, 7, Vista, 2008, 2003, XP, 2000, 98;
- support for most drive models (more than 4000!).
In general, I’ll add on my own behalf that this program worked even in cases where its analogs refused to either start or see the drive. I recommend it to anyone who often works with ISO or optical discs to have in their arsenal.
Virtual Clone Drive

This program is free and designed to create a virtual drive. The program is very simple and reliable. Supports up to 15 virtual drives, fully integrated into Windows Explorer, for easier and faster work.
In general, compared to many similar programs in this spectrum, it stands out noticeably. I recommend you check it out.
Main features:
- support for all popular image formats: ISO, BIN, IMG, UDF, DVD, CCD;
- emulation of up to 15 virtual drives (CD, DVD, and Blu-ray);
- there is a history of using images (for faster search and reading of the desired file);
- convenient integration into Explorer (now any image can be opened with a couple of mouse clicks!).
Instructions complete...
Good luck!
Users who lived through the early 2000s probably remember the times when films computer games, programs and music were delivered to our computers only using CD/DVD discs that were common at that time. No one knew about free downloading of data on the Internet, torrents and YouTube. The situation was saved by optical drives, with the help of which information was transferred to the computer’s hard drive.
The rapid development of Internet technologies has called into question the need to have such a component as a “disk drive”. In the current stationary systems You will rarely see a drive in laptops. All because of virtual disks, which replaced “blanks” and became commonplace. However, not everyone was able to make a comfortable transition to new technology. In this article we will try to fix this situation and explain in detail the essence of the creation process, the nuances of use and other questions that have repeatedly arisen for everyone who does not know how to use a virtual CD ROM.
When you might need it
Many may doubt the idea of using an innovation that has caught on with some people and simply continue to use the optical drive, using it to rewrite images and information on physical media. However, the archaic version loses in some cases, the most common of which are:
- Missing or faulty disk drive. Any part does not have an eternal service life. Sooner or later, a problem may arise, and it’s good if it does not happen at the most necessary moment (which, according to the “law of meanness,” happens often). In addition, the “system specialist” receiving the disk with information from you may simply not have an optical drive. But virtual CD-ROM available on any modern PC (if you devote some time to creating it).
- Multichannel. I have rarely come across computers that had multiple disk drives at once. Users who often work with recording and reading discs had to constantly rearrange CD/DVDs. There are no such problems with virtual disks, which means you can work with several at once.
- Convenient data transfer. To exchange information recorded on a disc, you need to personally hand over the media to the receiving party. In the case of virtually recorded images, the transfer is carried out online, over the Internet.
Creating a virtual CD-ROM
For reading virtual images (iso files; mdf, bwi, mds and others), you need to create a virtual CD-ROM, which, like an optical drive, reproduces (emulates) data from the drive. You can create a virtual disk using special software, such as Daemon Tools, Virtual Drive. Their operating principle is identical, and the functionality is largely similar. For example, we took the last one listed, since its capabilities and tools are very easy to cope with even for a user who is far from such processes.
- First, download the Alcohol 120% program installer using a link from the Yandex disk, or on the developer’s official website. Install it on your computer.
- Let's launch the program. First of all, we need to create a virtual CD drive. To do this, in the “Settings” section, select the option "Virtual disk".
- In the menu that opens, manually select the number of virtual disks to be created. Confirm the result by clicking on the OK button.
The drive has been successfully created, which we can see in the “Device” panel or in the “My Computer” folder.
- Now let's open finished image. To do this, select the “File” tab, and in the menu that opens, click on “Open…” (or simply use the combination Ctrl keys+O).
- We find the image file we need, select it with LMB and click on the “Open” button.
The image has been added to the library for processing.
- Now you need to read the previously added file. To do this, select the RMB image, and select the option in the drop-down menu "Mount to device".
The job is done. We can see the result in the “Computer” folder, where the installer located in the virtual drive will be listed among the reading devices.
After performing operations with the image, you need to remove it from the virtual drive. To do this, using the Alcohol 120% program, in the menu of available drives, select our BD-ROM with the right mouse button and select the function from the list "Dismantle image". The disk will be empty again.
If you want to remove the virtual drive altogether, you need to repeat similar steps as when creating it:
- IN available devices Right-click on the DVD/CD drive. In the list that appears, click “Properties”.
- Set the value back to “0” in the section for selecting the number of virtual disks and click “OK”.
Adding a virtual hard disk
The above opportunities have been available to many for a decade now. Popularity of use virtual device reading information caused the appearance of a similar phenomenon called a virtual hard disk. This technology allows you to create a file (with a VHD extension) that is displayed in Explorer as a standard partition on your hard drive. Everyone decides for themselves the rationality of using a virtual drive: some reorganize it this way free space on volumes, others even install the OS. Don’t forget about the opportunity to create a protected file container, thus limiting information from attacks by other users.
We will create a virtual hard disk using standard Windows tools(this feature is available in Windows systems 7, 8.1, 10). However, with the help of special software you can achieve a similar result. Daemon Tools Ultra, as well as Disk2vhd, cope with this task most effectively. These programs have separate sections dedicated to creating virtual disks (both drives and drives like HDDs).
- Open the “Run” service by simultaneously pressing the Win + R keys. Enter the command diskmgmt.msc into the empty line and click OK.
- The service will open "Disk Management". In the control menu, activate the "Action" tab, and in it select "Create a virtual hard disk".
- In the window that appears, you need to specify the location created file, select the format (VHD/VHDX), and also determine the possibility of file extension.
- The file has been created, but the disk has not yet been initialized. By right-clicking on the disk, select the option "Initialize disk".
- In the next window you need to specify the partition style (we recommend GUID if you intend to limit yourself to standard capabilities for working with the allocated space).
Connecting the drive after rebooting the PC
Unfortunately, working with virtual hard drive requires remounting the VHD/VHDX file after completing each session. Fortunately, we don’t have to create a new disk, initialize a partition, or create a volume. To return the virtual disk to work (emulate data), you must perform the following steps:

We hope that with the help of our article you learned how to create a virtual disk, and also determined the benefits of using it.
We also watch the video