How to install Russian language on a Samsung phone. A universal way to Russify different versions of Android. Instructions for old devices
Of course, there is a lot of risk associated with such a purchase, but that’s not what we’re talking about now. One of the most common problems when purchasing in another country is the lack of Russian localization. Many people do not consider this a significant problem and calmly use their smartphone in English. But it’s a completely different matter when the standard firmware is in Chinese or Hebrew (relevant for cheap devices), and then attempts begin by any means to install at least international English in order to understand at least something.
The first thing that is recommended to do is to log into your Google account, even in a foreign language this is not difficult, the main thing is that the keyboard supports the English layout. This is an important point, because through Google Play you can install an application to change the language with one click, so as not to click at random in the settings (this method will be discussed below). It is worth noting that in most devices the Russian language is present, it’s just sometimes hidden inside the system. Next we will talk about how to activate it safely.
The first method does not require installing additional applications
Initial conditions: the system is in English.
The following method is suitable for those who did not find Russian localization by following the instructions indicated above.
Activation of the Russian language using Morelocale 2
This option has some limitations: it is only relevant for devices that have an Android operating system no higher than version 4.1 JellyBean.
It should be noted that in this way Russian or any other language is added only to applications, but the system will remain with the localization that the manufacturers added to it.
The last option is suitable for owners of devices with the Android 4.2 operating system and higher. But it is recommended for advanced users because adb operations are required for implementation. It is worth mentioning that the user himself bears responsibility for any damage caused to the device, because interaction with the system always carries some risk.
Activating Russian localization using a computer
- The first step is to install the Morelocale 2 program on the device.
- The next step is to obtain developer rights in the system. This is done like this: the user needs to go to Settings - About and click on the Build number item several times. After this, the notification “You are now a developer!” should appear.


- In this case, a new line Developer options (For developers) will appear in the settings, you need to go here and activate the USB Debugging function (usb debugging).

- Then you need to download the ADB archive to your computer:
And also create a folder on drive C called adb and unzip the contents of the downloaded file here. - We connect the device using a wire to the computer. Make sure USB debugging is enabled (a notification will appear in the status bar). All you have to do is wait for the device to be recognized by the computer. If necessary, we provide access to the device.

- Through Start, open the command line, enter the following: cd c:\adb
The main thing is to ensure that the device is not locked during all operations with the computer.
- Then you need to enter several commands sequentially, waiting each time for the process to complete (just wait a few seconds)
Teams:
adb devices adb shell pm list packages morelocale pm grant jp.co.c_lis.ccl.morelocale android.permission.CHANGE_CONFIGURATION
- Disconnect the device from the computer and go to Morelocale 2.
- All that remains is to find the Russian localization in the list that appears.
After changing the language, do not forget to install a keyboard with Russian input, otherwise there will be no layout on the device.
Of course, the article does not describe all the ways in which you can translate a smartphone or tablet into Russian. The most radical of the existing ones is changing the firmware on the device. This way, they not only get rid of the problem of lack of localization, but also eliminate unnecessary applications, which Chinese devices are often famous for. However, not all custom firmware is stable and autonomous, so this issue must be approached carefully.
The Android operating system has become very widespread. Its virtual freeness gave the Chinese a free hand. Even the smallest companies from this country have started producing smartphones. They often focus on the low cost of their creations. Of course, these manufacturers try to sell their goods not only in their native China, but also outside the country, using one or another online store. And sometimes the buyer faces one problem - the device he received has an interface made in English or Chinese. In this article we will show that Russification of Chinese Android is not difficult.
It should be noted that by default Google implements support for several dozen languages into its operating system. There is also a Russian among them. A smartphone manufacturer can get rid of certain languages - for example, to reduce the amount of memory that the operating system will occupy. But practice shows that recently large and not very large companies have stopped touching language packs.
It is also impossible not to note the fact that when you first start the smartphone, it should prompt you to select a language. This applies to almost all versions of Android. If he doesn’t offer you to do this, then someone has already launched the device before you. But this is not scary, since you can install the Russian language on Android almost blindly. To do this, do the following:
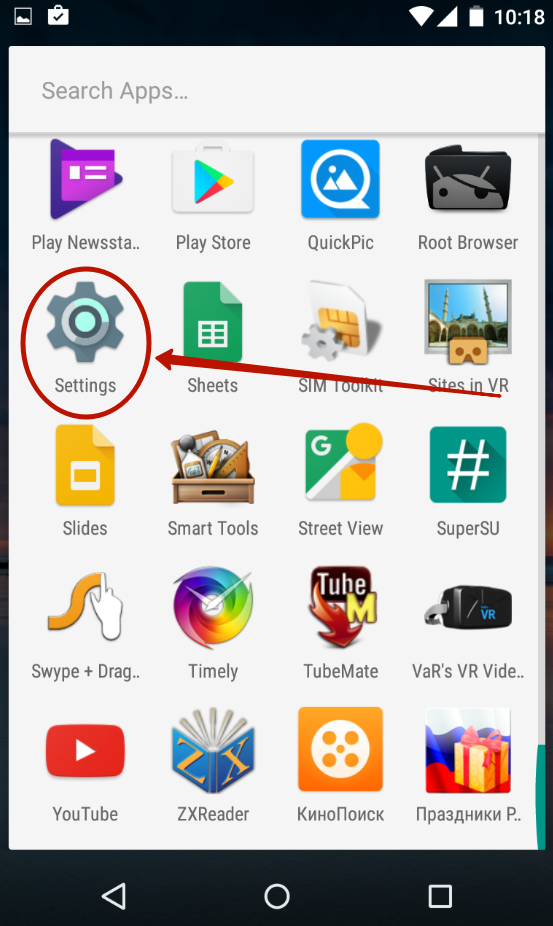
Step 1. Go to " Settings" If you use hieroglyphs instead of English, then focus on the appearance of the icon, which should look like a gear. In the latest versions of the operating system, it can be found not only in the menu, but also in the notification panel, if you pull it out completely.

Step 2. Proceed to the section " Language & Input" Usually next to its name there is a simple image of the globe.

Step 3. Click on the item " Language" It's at the very top.

Step 4. You will be offered a list of languages built into the operating system. Select from the options " Russian».
That's it! However, as we said above, the Russian language may not be on the list if the manufacturer decides to ignore it. Then you need a special program for Russification.
Using the MoreLocale 2 cracker
There are not as many localizers on Google Play as we would like. One of them is MoreLocale 2. The application is free and compatible with a huge number of devices. In fact, it contains all those language packs that are present in the Android operating system by default, before the influence of the Chinese manufacturer on it.
First you need to install this program. After this, do the following:
Step 1. Activate the section "For Developers" settings. Our recent article already wrote about how to do this. In the case of the English version of the operating system, you first need to go to “ Settings».
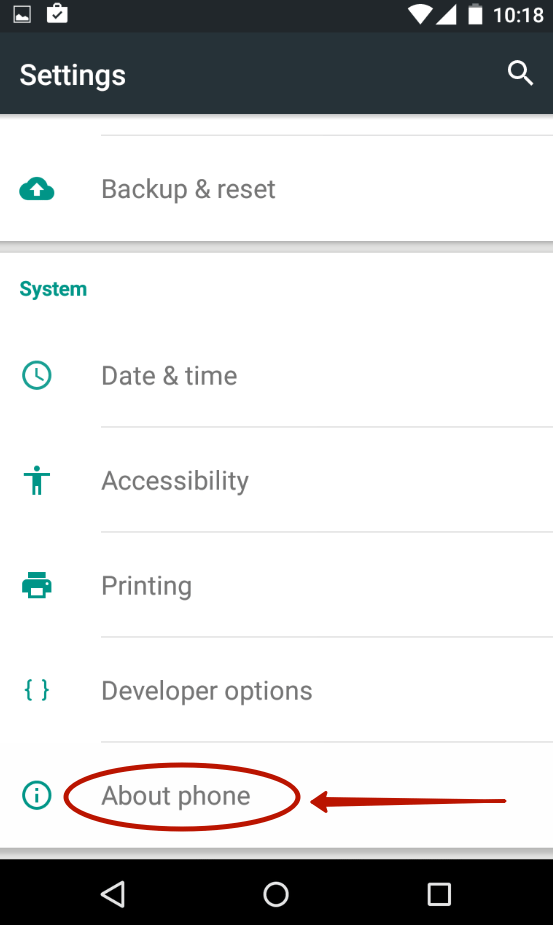
Step 3. Here tap about 7-10 times on the item “ Build Number" This will enable developer access rights, which will be indicated by a pop-up notification " You are now a developer».

Step 4. Press the " Back" Proceed to the newly appeared section “ Developer Options».

Step 5. Here you need to activate the checkbox next to the item “ USB Debugging", thereby enabling USB debugging mode..

Step 6. Now you will need the archive with the ADB executive file. Download and unzip it to the root of the C drive of your computer.
Please note that the versions for Windows XP and subsequent versions of this operating system are different!

Step 7 Connect your device to your computer using a USB cable. Next, launch the command prompt. To do this, open the menu “ Start" and enter in the search field " adb” (without quotes) by left-clicking on the displayed result.

Step 8 Type the following into the command line: cd c:ADB. Click Enter.
Step 9 Enter the command " adb devices", then press Enter. This will show you the code name of the device connected to your computer. If the system cannot detect the smartphone, then something has gone wrong - it is quite possible that you are using a low-quality cable.

Step 10 Enter the following commands in order:
- pm list packages morelocale
- pm grant jp.c.c_lis.ccl.morelocale android.permission.CHANGE_CONFIGURATION
Please note: The command line does not support the copy function. In this regard, you will have to enter all the text manually.
Step 11 Disconnect your smartphone from your computer and open the program MoreLocale 2.

Step 12 Find in the list of languages " Russian" Click on this item.
The system will be automatically localized. Your actions are now complete!
Russification of the keyboard
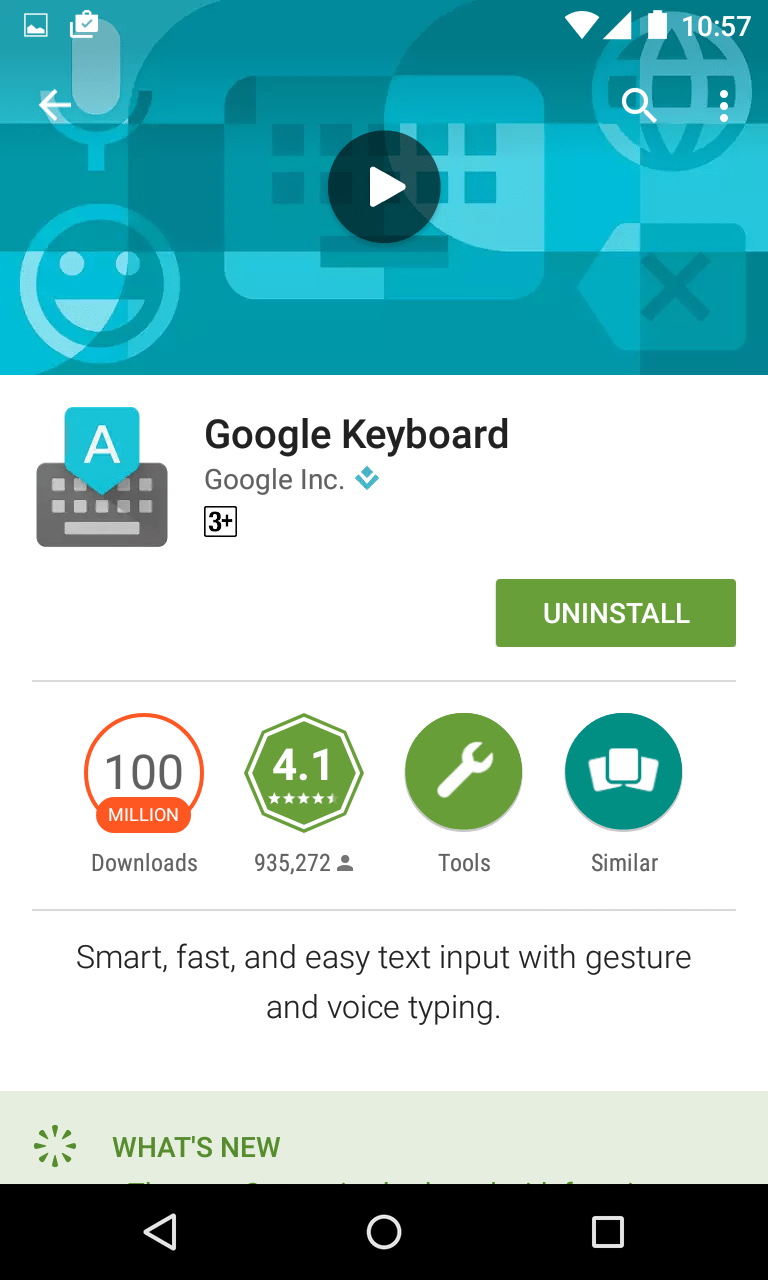
Interestingly, after changing the system language, absolutely nothing will change in the virtual keyboard. If English and Chinese were previously offered there, they will remain the same after Android localization. Fortunately, setting the Russian language for the keyboard is much easier than for the system itself. Especially after Google made its keyboard a separate application, allowing it to be downloaded from the online store.
Step 1. Download the program Google Keyboard .
Step 2. Now follow to " Settings" and visit the item " Language and input».

Step 3. Here click on the item " Google Keyboard».

Step 4. Click on the item " Languages».

Step 5. Check the languages you need. Or activate the item “ System language"if Android is already Russified.

That's it, the Russification of the keyboard is complete! Of course, in exactly the same way you can enable the Russian language on any other virtual keyboard, if it supports it (some of them only have a Latin layout).
Go to the following path “Menu – Settings – Language & keyboard”. Click on the topmost item “Language” and select Russian (Russia) from the list of languages that appears. If the Russian language is not on this list, then you need to Russify your Android phone or tablet. “But how to Russify Android?” – you ask. We'll talk more about this in the next step.

Step 2. Complete Russification of the Android device
By complete Russification we mean the following: Russian keyboard and Russian interface of the Android system itself. If you only need to Russify the keyboard, then proceed to step 3.
Instructions for those with Android version 4.1.X and lower
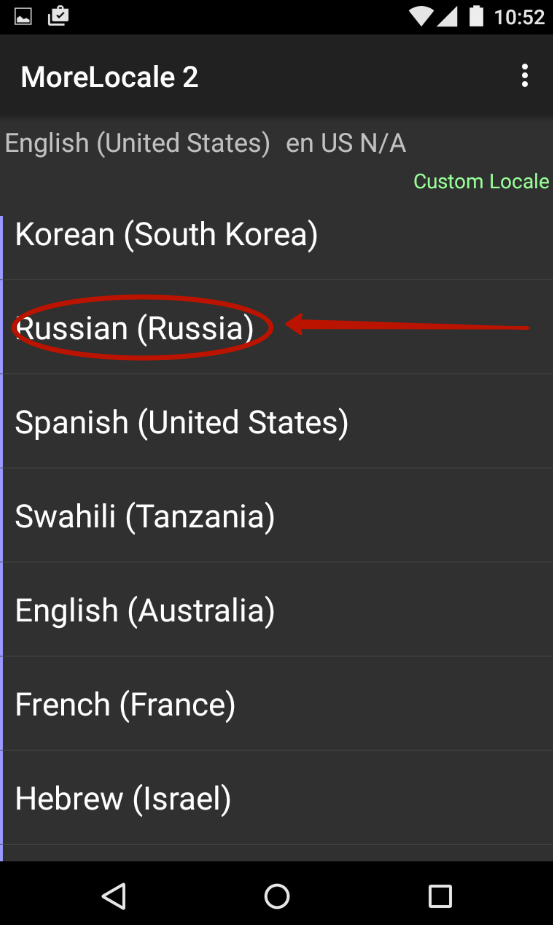
For this procedure, we will use the crack “MoreLocale 2” (Download from our server or from the Play Store - 255 KB). Download this application from the links given earlier and launch it. A window will appear on the communicator screen as in the first screenshot, click on the green inscription “Custom Lacale”, a window will appear as in the second screenshot - in this window, first click on the button with the inscription ISO opposite “Language” and select “Russian” there, then opposite “ Country" and select "Russian Federation" from the list. Confirm your choice by clicking on the “Set” button. All! Now your smartphone or tablet is completely in Russian.


Russification of Android version 4.2 and higher
Since the Android operating system version 4.2 Jelly Bean and later have protection for configuration changes, simply installing the program is not enough and you need to work a little with the ADB console application, which is installed on the computer and is used for debugging communicators and tablets.
First of all, install the MoreLocale 2 program on your device, links to which are above. Next, you need to install ADB on your computer (Download - 467 KB, updated 04/23/2014) and drivers for HTC phones (Download - 15 MB). Attention: if we have a different phone, then install the driver for your phone! Download ADB and unpack it to drive “C:” so that it looks like this: C:\adb\adb.exe (i.e. 4 files should be in the adb folder). We simply download and install the driver. Next, on the phone, go to “Menu - Settings - For Developers - Debugging via USB” (“Menu - Settings - Developer options - USB debugging”) and put a checkmark there. If there is no section “for developers” (this happens on Android version 4.2.2 and higher), then go to “Menu - Settings - About the device (or About the phone)” and click on Build number 10 times. A message should appear indicating that the "For Developers" section is open. Enable USB debugging. Now we connect the phone to the computer. We launch the command line (if you have Windows 7, then click start and enter “cmd” in the search field, then press the Enter button), write the following commands in the command line:
- cd c:\adb- go to the folder with ADB.
- adb devices- we are looking for connected devices, there should be 1 line below the line “List of devices attached” - this is your communicator.
- adb shell pm grant jp.co.c_lis.ccl.morelocale android.permission.CHANGE_CONFIGURATION- we give the MoreLocale2 program the right to change the configuration of the smartphone.

That's it, now we disconnect the smartphone from the computer and launch the Local program and do everything as for devices on Android version 4.1.x and lower.
Step 3. Russification of the keyboard
In order for the keyboard of your device to be in Russian, just install any Russian keyboard from the Play Store, go to “Menu - Settings - Language and Keyboard”, and there, in the “Keyboard and input methods” item, select the keyboard installed from the Market.
The Android operating system can work in many languages, including Russian. And each user can instantly select the desired language in the settings of their device - there is nothing complicated about it. Russification is present on the vast majority of tablets and smartphones, but sometimes people are faced with its absence. How to Russify Android and what is needed for this? Let's try to go from the easiest way to the most difficult.
Russification at the service center
The easiest way to make your gadget speak Russian is to take it to the nearest service center. Specialists will inspect your device, find the required language pack and apply it. If there is no Russian-language package, they will add it or flash your smartphone or tablet. When contacting the service center, you can only count on positive results..
- For novice users who do not understand the Android operating system;
- People who have not found the required language pack in their device and are afraid to take further steps;
- People who are extremely far from modern technology (although it is not clear why they need a smartphone or tablet).
By contacting the service center, you will receive a fully Russified gadget.
Quick Russification of Android through the settings menu
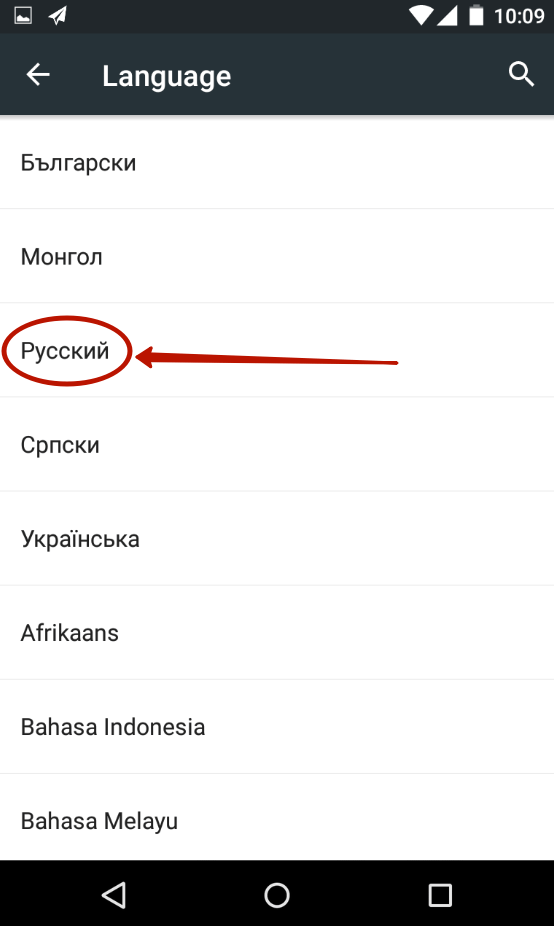
Another simple way to Russify Android firmware is to go into its settings. Let's assume that at the moment all the inscriptions are displayed in English, and not in Chinese, since it will be very difficult to understand the hieroglyphs. First, let's check whether the Russian language is available in the system at all, and whether it is available for selection. This is done very easily - go to “Settings – Language and input – Language”, look for the Russian language in the list that opens (all the inscriptions here are in your own language).
If the Russian language is still available, feel free to select it, wait a few seconds and enjoy complete Russification. Next, you just have to select a keyboard with the ability to enter Russian. If there is no suitable keyboard in the list, download it from the Play Market application store(after all, we don’t have an iPhone in our hands, so we can easily change applications with keyboards). We recommend choosing Russian Keyboard from the developer GameWarrior.
Does your Android device speak a language you don't know? Then you can find the “Settings” item by the characteristic label with an asterisk. In order to find the “Language and Input” item, try using some online dictionary - this is the easiest way to find the item you need.
Russification of Android 4.1 and older versions
How to Russify Android 4.1 and below without putting extra effort into it? To do this, you need to install the More Locale 2 application using the Play Market application store. It will help you force the Russian language to be selected, even if it is hidden in the main settings. We launch the application, click the “ISO639” button opposite the “Language” field, look for the Russian language there and add it to the general list. We go back and try to set Russian as the default language - if there are files with Russification in the firmware, everything will be successful.
Russification of Android 4.2 and later versions
The above method will not help if your smartphone/tablet is running Android 4.2 or higher operating system. We'll have to act in a different way. In order to translate Android into Russian, you need to download the ADB program and the ADB drivers corresponding to the device. First, install the drivers, then install the program (don’t forget the path, for example, D:ADB).
Next, pick up your smartphone/tablet, go to “Settings – Developer options” and turn on the “USB debugging” mode. In Russian, we went to “Settings – Developer Options” and enabled USB debugging. If you don’t have the “Developer options” item, go to “About device” and find the “Build Number” item there and tap on it about 10 times - an inscription will appear notifying you that the desired item is activated.
Now we connect the phone to the computer, open the Windows console, enter the command cd D:ADB in it, after which we enter the following command adb devices - the program will start and recognize the connected device. Finally, enter the long command adb shell pm grant jp.co.c_lis.ccl.morelocale android.permission.CHANGE_CONFIGURATION, reboot and try the method described for Android 4.1 and below.
When describing this technique, we assume that your device operates in English. If it works in some other language, try switching to English.
Other methods
All of the above methods of Russification will not help if the firmware on your device, in principle, does not have the Russian language (this is very rare). If you were unable to activate the Russian-language interface either in normal mode or in forced mode, try flashing your device - we have already written about this procedure in our reviews. If you do not have knowledge about flashing, contact the service center.
How to translate an Android application into Russian
In order to Russify this or that application, you will need knowledge of the structure of APK files and their internal structure. Using third-party applications for compiling and decompiling files, you can Russify the selected program. You should immediately warn that this will not always work out - some points may remain un-Russified. It is best to find a localized program or its Russian-language equivalent.
You can find Russified applications on specialized Internet resources. When installing them, do not forget to check the “Unknown sources” checkbox in the security settings of your device. And it’s best to learn English at least at the most minimal technical level - it will definitely come in handy.
Android is a popular system; it is used not only on smartphones, but also on tablets, netbooks, and e-readers; it is used in digital players and game consoles, there are even wristwatches and glasses on this system. In the near future, it will power TVs and cars.
Of course, all these gadgets are much more convenient to use if the interface is Russified.
Changing the language on Android is easy, you just need to select “Languages and keyboards” in the settings and click on the top “Languages” item. In the list that appears, select “Russian (Russia)”.
In the case when Russian is not in the list of available languages, Russification of the Android system is needed. This way you can get both a Russian keyboard layout and an operating system interface in Russian.
The procedure will depend on what version of Android is installed on your smartphone or tablet. The video at the end of the article shows how easy this can be done. Let's take a closer look, if 4.1.x (or lower), then Russification of Android proceeds as follows:
- Download the crack “MoreLocale 2” from Google Play https://play.google.com/store/apps/details?id=jp.co.c_lis.ccl.morelocale.
- A window will appear, click on “Custom Locale”.
- In the next window, select “ISO”.
- Select “Russian” from the list that opens.
- In the field opposite “Country” select “Russian Federation”
- Press “Set” to confirm.
This is enough for the system to be completely Russified.
For new versions (4.2 and higher) this is not enough; a ban on editing the configuration has been added. Just installing a special cracker will not be enough; you need to work with the console.
How to install Russian language on Android using the ADB application? It can be downloaded from the Internet and installed on your computer. Then you can connect a smartphone or tablet to it and get them working.
To Russify Android versions 4.2 and higher, you need:
- Install the same crack “MoreLocale 2” on your Android device.
- Download the “ADB” program, install it on your home PC as follows: you need to connect your phone as an SD card, copy the ADB.rar archive to your computer, unpack and run adb_install.bat or exe application that will install ADB on your computer (for Windows) . Then in ADB Master select the ADB Location path, for example, C:\adb\adb_win_v1.0.26
- There should be . If they are not there, you need to download and install them.
- On your Android device, go to “Settings”, “For Developers”, “USB Debugging”. Check the box.
- Connect the device to the computer. Turn on the command line and write:
- cd c:\adb – this command will open the folder with the “ADB” program
- adb devices – command to search for connected devices. When the gadget is found, one line should appear below the inscription “List of devices attached”. This is the Android device string.
- adb shell pm grant jp.co.c_lis.ccl.morelocale android.permission.CHANGE_CONFIGURATION – the command gives the MoreLocale2 cracker permission to edit the configuration of the Android device.
- Disconnect the device from the computer.
- Launch “MoreLocale 2” and do the same as you would do for an earlier version of Android.
To use the Russian keyboard, you can download any Russian-language keyboard from Google Play and install it.
If you have a Samsung smartphone and the steps above did not help, then try the Locale application https://play.google.com/store/apps/details?id=com.whenair.language