How can I set the BIOS to boot from a flash drive? detailed guide! Solving the problem when the BIOS does not “see” the USB flash drive
In order for the computer to start not from the hard drive, but from a USB drive, you need. Such a flash drive is used for system recovery, password reset and other “rescue” missions. But how to select a media if it is not displayed in the BIOS settings? You can solve the problem yourself. Provided that the drive is working properly and data is being read from it.
How to fix the problem: BIOS does not “see” the USB flash drive?
Check if USB device support is enabled. How to do this depends on the motherboard model. After turning on the computer, the message “Press [key] to enter Setup” will appear at the bottom of the screen. Click it to enter BIOS. And look for a menu that has “USB” in its name.
New BIOS versions
You can work with new BIOS versions using a keyboard and mouse. There is also support for the Russian language. You will quickly understand the parameters. But even if it is not there, you will be able to configure the boot order and launch via a USB flash drive.

Award-BIOS
After starting the BIOS, do you see two lists on a blue background? Then you have the Award version. You won't be able to navigate through the menu by clicking the mouse. It can only be configured using the keyboard. Below or on the side there will be instructions on which buttons to press for this.


Now let's take a look at boot priority.

When you are finished working with the drive, return to the previous BIOS settings.
AMI-BIOS
The BIOS AMI interface has a gray screen, blue font and a row of tabs at the top. The information block is on the right. Mouse control is also not available.

Now you can change the bootloader parameters:

Phoenix-Award BIOS
In BIOS Phoenix-Award there is also a gray screen. Information about which keys to press is located below and highlighted in green. If the computer does not boot through the drive:

UEFI
You enabled USB support, but for some reason the flash drive is not in the BIOS? The problem could arise due to UEFI - a mode that “protects” the bootloader from malware and foreign code. This module will start the operating system even if you have configured the BIOS correctly. What to do? Disable UEFI.
Settings depend on the motherboard manufacturer. First way:

Second way:

After working with the media, re-enable “boot protection”.
You need the “right” flash drive
Perhaps it's the flash drive itself. More precisely, in the way it is written. If you copy information onto it directly, nothing will work. But why is it necessary to create a “bootable” drive? To run it, you need some kind of “software script”. Without it, the system will not understand what to do with the media.
To create a bootable USB flash drive from the LiveUSB utility:
- Insert the drive into the slot.
- Run the installer.
- Select your Flash media from the list.
- Confirm installation.
- Now through this drive you can “reanimate” the system.
To install a third-party OS, you need a ready-made ISO image and a burning program. For example, UltraISO or Rufus. Let's look at the second one:
- Insert the drive into the USB port.
- Launch the program.
- Check the “Create a boot disk” checkbox.
- Click on the disk button.
- Specify the path to the image.
- Click on “Start”.

You can create a bootable USB drive using Windows.

If the BIOS does not “see” the bootable USB flash drive, perhaps the problem is not in it, but in the settings. There is no need to throw it away ahead of time. First try changing the BIOS configuration.
The world does not stand still. Once upon a time, the height of popularity was to store information on a disk or floppy disk. Now preference is given to more convenient and capacious flash drives.
To boot into BIOS via a flash drive, you need to take into account several features:
- It is recommended to connect the removable disk to the connector located on the back of the system unit. It is he who is located on the motherboard;
- Connect the storage device before turning on or restarting the computer.
Regardless of the BIOS manufacturer, to boot Windows from a flash drive, you must take the following steps:
- Open BIOS. To do this you need to click Delete or Esc. The service call keys may differ in different versions of the program. They are usually written at the bottom of the screen immediately before the operating system boots.
- Next you need to enable the USB controller.
- After this, the flash drive must be moved to the first place in the list of devices from which to boot.
- Save your changes.
Running from a flash drive in Award Bios
This version of the program is called by the button DEL or keyboard shortcut Ctrl+Alt+Esc(in older versions).
Go to the tab "Integrated Peripherals" to enable the USB controller. Near the inscription "USB Controller" And "USB Controller 2.0" set value "Enable". To do this, use the button Enter. Go back one step by clicking Esc.
Now we need to directly configure booting from a flash drive in bios. To do this, go to the tab "Advanced BIOS Features". Select section "Hard Disk Boot Priority". Here the first line should indicate the name of the memory card. By default, this position is occupied by the hard drive. Using the key «+» , move the required line to the first place. Return to the previous menu.
Pay attention to the line "First Boot Device". Next to this inscription there should be "USB-HDD", which means booting from a flash drive or external hard drive. Sometimes the installation process may not proceed. In this case, you should select the external floppy drive indicator - "USB FDD".
Hard Disk should be indicated next to Second Boot Device.
After making changes, you can exit the BIOS while saving the changes. Press Esc to exit to the main menu. Then click "Save & Exit Setup".
Installing boot from flash drive in AMI Bios
Exit to “AMI BIOS” is carried out by pressing keys DEL or F2.

USB controller settings are located in the tab "Advanced", in section "USB Configuration". Indicator "Enable" should be near "USB Function" And "USB 2.0 Controller".
Return to the previous menu (Esc) and go to the tab "Boot", chapter "Hard Disk Drives". The name of the flash drive should come first. Click "Enter" on the first line and in the new window, select the desired item.
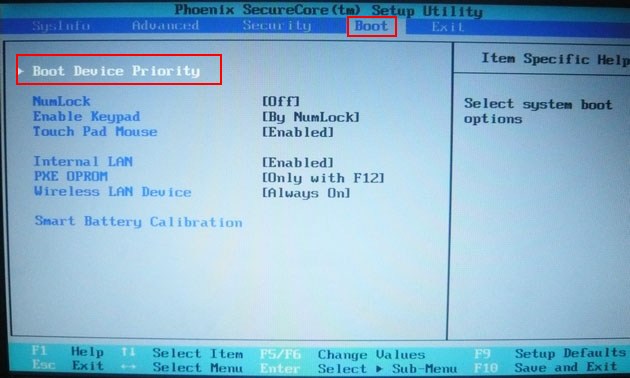
In the previous menu, go to "Boot Device Priority". There should be a flash card at the top.
After this, you can return to the main menu and exit the BIOS, saving the settings.
Set to boot from a flash drive in Phoenix-Award Bios
Clicking F1 or F2 you can open the BIOS version “Phoenix-Award” .

The USB controller section can be found in the tab "Peripherals". Indicator "USB-HDD" must be placed in line "First Boot Device", tab "Advanced". Don't forget to save your settings.
Configure booting from a flash drive in Bios UEFI
New laptops released no earlier than 2013 have a special BIOS version. One of its features is the presence of protection against installing operating systems from any media other than a licensed disk. To install booting from a flash drive in this version of bios, you must first disable this protection and set the compatibility mode with other operating systems.
After entering the BIOS, go to the tab "Security", chapter "Secure Boot" and set the value there "Disabled".

In the section "Boot", in line "Boot Mode" value should be set "Legacy Support". In line "Boot Priority" should stand "Legacy First".
You have a bootable DVD or flash drive, now you need to make sure that the computer can boot from it.
There are 2 ways to boot your computer from a DVD or flash drive:
- Selecting a device in the boot menu
- Changing boot priority in BIOS
Each method has pros and cons.
If you need, for example, to install Windows, then it is more convenient to choose the first method. And if you constantly work with boot disks, then the second method is more convenient.
Features of selecting a device in the boot menu
- On older computers (motherboards) this function is missing. In this case, you will have to change the priority in the BIOS.
- When you select a device in the menu, the computer boots from this device 1 time. This is convenient when installing Windows - there is no need to return booting from the HDD after the first reboot.
Features of changing priority in BIOS
- Works on both new and old computers.
- The priority change is permanent, i.e. lasts until the next change, and not one load as in the case of the menu. This is not very convenient when installing Windows from a flash drive; you have to return booting from the HDD after the first reboot.
How to enter the boot menu or BIOS?
There is no universal button for entering the boot menu or entering the BIOS. It all depends on the computer manufacturer (motherboard), they are all different - the keys are also different. The most correct way to find the right key is to read the instructions from the computer (motherboard). For some of the most common boards, the keys are listed below.
The only time when you need to press these keys is during self-test immediately after turning on the computer (English - Power-On Self-Test or POST). Without going into details, POST lasts from turning on the computer until the operating system starts loading (the logo or OS selection menu appears). The POST pass looks something like this:
A prompt appears on the screen: Press DEL to run Setup, which means - click DEL to login BIOS Setup. DEL is the most common key, but there are many others - more on that below.
During POST, a graphical splash screen may be displayed with the name of the computer or motherboard manufacturer.
Keys to enter the boot menu and brief instructions
As noted above, each manufacturer has its own key to enter the boot menu. Here is a short list of the most common ones:
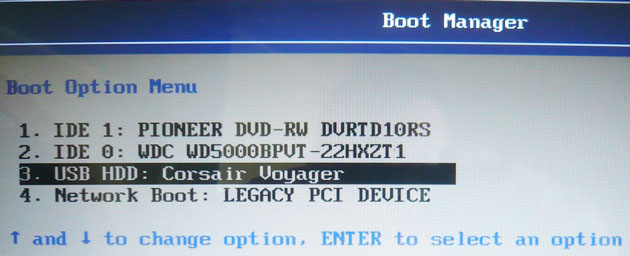
The boot menu looks something like this:

All you have to do is select the desired device from the list. If everything is done correctly, the disk or flash drive is written correctly, the download/installation should begin.
Keys to enter BIOS and brief instructions for changing boot priority
To enter BIOS Setup, use the key corresponding to the manufacturer of the computer or motherboard, here is a small list of them:
Acer (Aspire, Altos, Extensa, Ferrari, Power, Veriton, TravelMate): | F2 or Del |
Acer (older models): | F1 or Ctrl+Alt+Esc |
F2 or Del |
|
Compaq (Deskpro, Portable, Presario, Prolinea, Systempro): | |
Compaq (older models): | F1, F2, F10, or Del |
Dell (Dimension, Inspiron, Latitude, OptiPlex, Precision, Vostro, XPS): | |
Dell (old and rare models): | Ctrl+Alt+Enter or Fn+Esc or Fn+F1 or Del or Reset twice |
ECS (Elitegroup) | Del or F1 |
eMachines (eMonster, eTower, eOne, S-Series, T-Series): | Tab or Del |
eMachines (some older models): | |
Fujitsu (Amilo, DeskPower, Esprimo, LifeBook, Tablet): | |
Hewlett-Parkard (HP Alternative, Tablet PC): | F2 or Esc or F10 or F12 |
Hewlett-Parkard (OmniBook, Pavilion, Tablet, TouchSmart, Vectra): | |
Lenovo (3000 Series, IdeaPad, ThinkCentre, ThinkPad, ThinkStation): | F1 or F2 |
Lenovo (older models): | Ctrl+Alt+F3, Ctrl+Alt+Ins or Fn+F1 |
MSI (Micro-Star) | |
F2, F10 or Del |
|
Sony (VAIO, PCG-Series, VGN-Series): | F1, F2 or F3 |
Toshiba (Portege, Satellite, Tecra): | F1 or Esc |
You can find less common hotkeys for entering the BIOS.
In addition to the fact that there are several main BIOS manufacturers (AMI, Phoenix - Award), computer (motherboard) manufacturers also modify the BIOS for a specific model. As a result, it is impossible to create universal instructions even for changing one function (boot priority); there will be differences on each computer. You can only roughly show how this is done, but look for exact instructions in the documentation for your computer (motherboard).
To navigate through the BIOS and change settings, use the arrow keys on your keyboard. Enter And + \- .
AMI
Use the arrows to move to the tab Boot, let's go to Boot Device Priority:
In the following figure we see that the boot is performed sequentially: from the floppy drive (Floppy Drive), hard drive (Hard Drive), and the third device is not used (Disabled).
If we want to boot from a DVD, we need to change the priorities so that the first device is the DVD drive. Use arrows to switch to the first device ( 1st Boot Device), press Enter and select from the menu that appears CDROM. Everything is the same with a flash drive.
Click F10 and confirm the exit with saving (Save and Exit) by selecting .
Phoenix Award
We enter Advanced BIOS Features:
If we want to boot from a DVD, we need to change the priorities so that the first device is the DVD drive.
Use arrows to switch to the first device ( First Boot Device), change to CDROM. Everything is the same with a flash drive.
Click F10 and confirm exit with saving (Save and Exit).
Do you know other keys or want to find out more? Comments are open!
Enjoy using it!
Friends, in this article we will find this very boot menu for laptops Acer, Sony, Samsung, MSI, Toshiba, HP, ASUS, Packard Bell and load the above devices from my Corsair Voyager flash drive, which contains the Windows 7 operating system. Don’t forget, if you want to install Windows 7 or Windows XP on a new laptop, then connect the flash drive to the USB 2.0 port (black), if you connect the flash drive to USB 3.0 port (blue), the system installation will fail, since there are no USB 3.0 drivers in the Windows 7 installer.

We will also analyze the BIOS of these devices in detail. Let's look at how to change the boot priority on these laptops, in case you and I are unable to enter the boot menu. There is no need to be afraid of the BIOS; if you configure something in it incorrectly, you can always reset the settings to default.
Very important note: This note will be useful to you if you have a new laptop from any manufacturer (2013, 2014 with UEFI BIOS). If you have such a laptop and you are reading these lines, then you want. To do this, of course, the laptop needs to be booted from .
Almost all laptops currently sold have a UEFI BIOS; such a laptop cannot simply be loaded from a flash drive, since the UEFI BIOS has special protection - the Secure Boot protocol based on special certified keys (available only in Windows 8). The Secure Boot protocol will not allow you to boot your laptop from any boot disk or flash drive other than the Windows 8 installation disk. In order to boot your laptop from a flash drive, the Secure Boot protocol must be disabled in the BIOS of your laptop, this is done very simply, read our article or .
Let's return to this article. I think the information will be useful to many owners of laptops and netbooks. This article will also help if you want to boot from a disk and don't know how to do it.
Let's start with an Acer laptop, first of all we connect our Corsair Voyager flash drive to the laptop, then press F12 when loading,

Then you need to select our flash drive in the boot menu that appears and click
If you are unable to enter the boot menu of your Acer laptop using the F12 key during boot, then the Boot Menu option is disabled in the BIOS and needs to be enabled.
When loading, press F2, the initial Information tab, go to the Main tab, see the F12 Boot Menu parameter, set it to Enabled,

Next, press F10 to save the settings, reboot, press F12 when loading and our boot menu appears, select our flash drive in it and press Enter, it boots from the flash drive.
If the boot menu of the Acer laptop still does not appear, then go to the BIOS again (when loading F2), Boot tab. We select our flash drive and put it in the first position using the F6 key, then press F10 to save the settings, reboot and boot from the flash drive.


When loading the laptop, press F12 and get into the boot menu, select our flash drive here, if you connected a flash drive to the laptop, its name will be here. Press Enter and if your flash drive is bootable, it will boot from the flash drive.

If for some reason you cannot boot your laptop from a flash drive using the boot menu, then you can enter the BIOS and change the boot device priority there. We often press F2 when booting a Toshiba laptop and get into the BIOS of this laptop. The initial Main tab, go to the Boot tab (responsible for loading the laptop) and see our Corsair Voyager flash drive in sixth position. We select it using the keyboard and press F6, thus moving our flash drive to the first position, then press F10 to save the settings we changed, the reboot occurs and the laptop boots from the flash drive.
Friends, if you have a new Samsung laptop, for example 2012-2013, then read this article “”, for all others this instruction is also suitable.
When loading, press Esc or F10, get into the boot menu and select our flash drive. If the boot menu does not appear, then go to the BIOS, press F2 or DEL when loading. In the BIOS Boot tab, select the first parameter Boot Device Priority
And we enter it, here we select our flash drive and using the F6 key we put it in the first position. Next, press F10 to save the settings and reboot, reboot, then boot from our flash drive.


and we get to the boot menu. The first device is now the disk drive, if your flash drive is connected to the laptop, then its name will also be present here, select our flash drive here and press Enter or F10, a reboot occurs and further loading from the flash drive.

If you cannot enter the boot menu of an HP laptop, then go to the BIOS, press ESC when loading, then F-10, get into the BIOS,

Go to the System Configuration tab, then Boot Options, press Enter


As you can see, the first device is the Notebook Hard Drive. If your flash drive is connected to a laptop, then its name will be here, select our flash drive and use the F6 key to move it to the first position. Next, we save the settings we changed, press F10 to save the settings, the reboot occurs and the laptop boots from the flash drive.


If the boot menu is not available, press the DEL key during boot and enter the BIOS, then go to the Boot tab, select our flash drive and, without releasing Shift, press +, thereby moving our flash drive to the first position. Press F10 to save the settings, the settings are saved and the laptop boots from the flash drive.


Then go to the Boot tab, and set the Fast Boot option to Disabled,


Once again we enter the BIOS and go to the Boot tab, set the Launch CSM (advanced boot) option to Enabled,
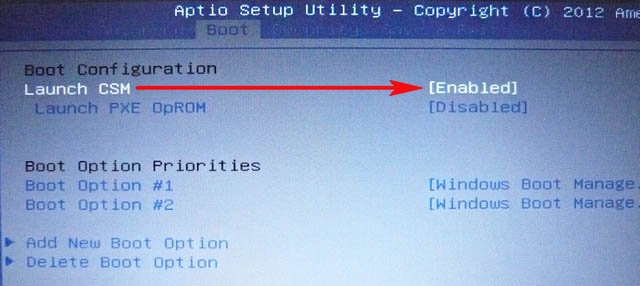
We go down to the Boot Option Priorities and Boot Option #1 option and enter it by pressing Enter, in the menu that appears, using the arrows on the keyboard, select the name of our flash drive and press Enter. Here we also put our Corsair Voyager flash drive in first place.


We press F10 to save the settings, reboot and our Asus laptop boots from the flash drive.
Also you can use boot menu Asus laptop, to do this, in the initial phase of booting the laptop, frequently press the key Esc, you will be taken to the boot menu, use the arrows on the keyboard to select your bootable USB flash drive and press Enter.

How to boot a Packard Bell laptop from a flash drive

Press the button when loading F12 and we get into the boot menu of the laptop, there we simply select our flash drive and boot the laptop from the flash drive.
If F12 does not work when loading, then click F2, less often F6 and get into the UEFI BIOS of the laptop,

here we go to the tab Boot.
If before turning on the laptop you connected a flash drive to it, then it may not decide immediately in this menu.
Set the Boot Mode option to Legacy BIOS.
And the option Secure Boot set to position Disabled.
Now the flash drive should determine. Place the flash drive in the first position, save the settings and reboot. If the bootable flash drive is made according to our articles, then the download will be successful.