How to enable and configure wifi on a laptop. Enable and configure Wi-Fi on laptops with different versions of Windows
To connect to the Internet on a laptop via a wireless network, you need not only a WiFi module, but also a working access point. To do this, you will need to buy a router at home, and to access the Internet while sitting somewhere in a cafe, it will be enough to turn on Wi-Fi on your laptop and enter the password for the desired network: installing an access point is the task of the owners of the establishment.
A WiFi module is installed in almost all modern laptops, and it’s easy to check whether your device has such a function. To do this you will need:
- Open “Control Panel”;
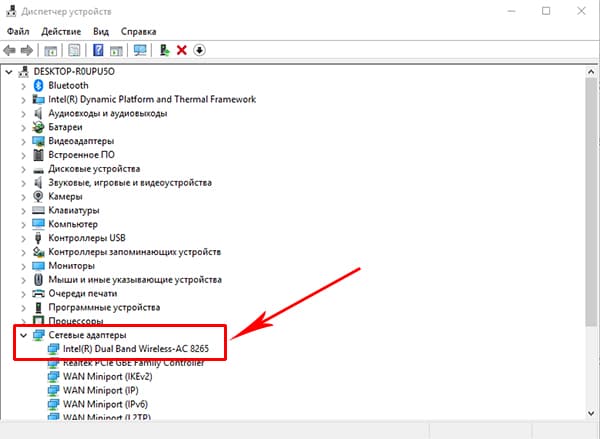
- Launch “Device Manager” (you can use the search bar);
- Expand the “Network adapters” block.
An existing device with the word “Wireless” in the name means that your laptop supports wireless Internet.
Turning on Wi-Fi on a laptop using the keyboard
Most often, Wi-Fi can be turned on using hot keys, usually two, pressed simultaneously. Their combination may vary among different laptop manufacturers, but the main Fn key, as a rule, is always there. The second key required to turn it on has a special WiFi icon and is located on the keyboard in the function row F1-F12.
You can learn more about how to enable Wi-Fi on a laptop of a specific brand from the following table.
In previous generation devices, Wi-Fi is turned on using a special slider on the laptop body, but the network icon remains the same.
How to turn on Wi-Fi on Windows 10
On laptops with “ten”, “Wi-Fi” can be enabled either in the system parameters or using the notification area, and the second method is more convenient and faster:
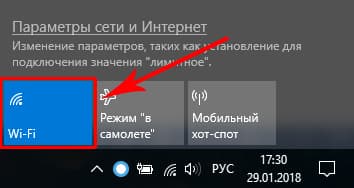
1. From the taskbar, open system notifications.
2. Open the Network tab.

3. Turn on WiFi by clicking on the corresponding thumbnail.
To enable Wi-Fi on Windows 10 using the options menu, you must:
1. Open “Settings” and select the “Network and Internet” block.
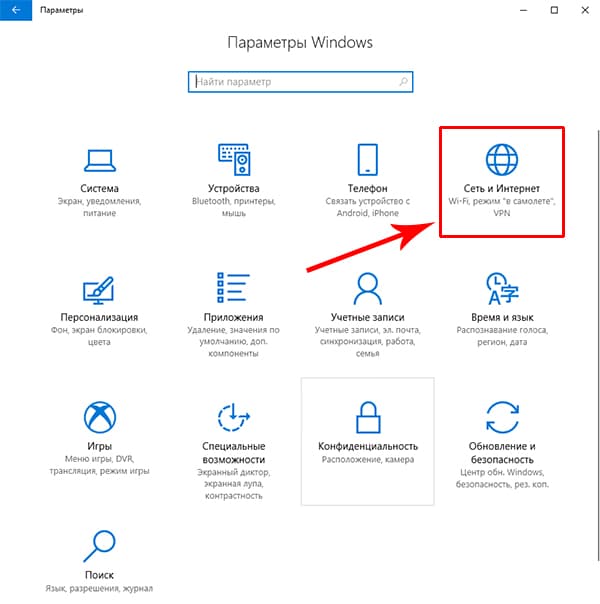
2. Click on the WiFi menu and turn on the wireless network status slider.

After these steps, the laptop will begin searching for all available wireless networks. If it is already in memory, the connection will occur automatically; if the access point for your device is new and protected (you will see a lock icon), you need to select it and enter a password to connect to the Internet.
Connecting WiFi on Windows 7 and 8
For laptops with previous versions of Windows, the algorithm for software enablement of Wi-Fi is different.
1. Go to “Control Panel” – “Network and Internet”, or right-click on the computer icon in the notification panel next to the clock.
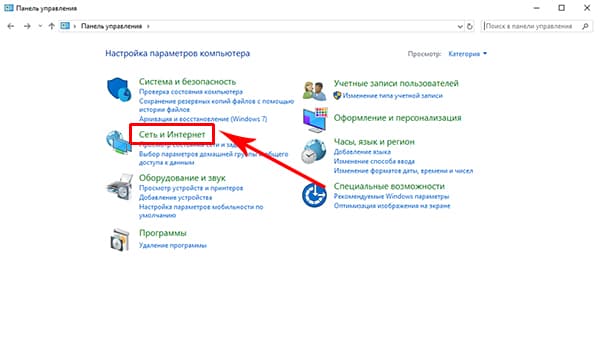
2. Select Network and Sharing Center.
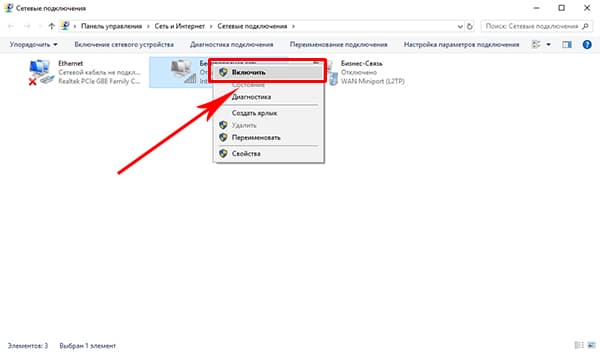
3. Click on the “Change adapter settings” menu.

4. Using the right mouse button, turn on the wireless network.
When the Wi-Fi module is working, you need to select an access point (the list will open by clicking on the WiFi icon in the notification area) and, entering the password if necessary, connect to it.
If the Internet via Wi-Fi does not turn on
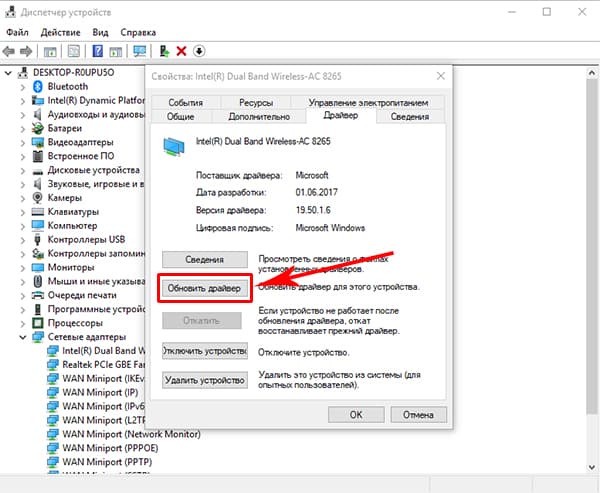
If Internet access on your laptop still does not appear after all of the above, connect the network cable to the computer directly, open Device Manager through the Control Panel, select the Network Adapters tab, find your Wifi module in the list and try updating the drivers. After that, disconnect the Internet cable and restart the laptop.
If you still cannot turn on the Internet after this, there may be either problems on the provider’s side, or incorrect router settings, or the Wi-Fi module is faulty. The cost of repairs at a service center ranges from 1000 to 2000 rubles, but you can get by with an external WiFi module - on Aliexpress such devices cost about 150 rubles.
Today you can use wireless Internet from completely different devices. This can be not only a laptop and computer, but also a phone, tablet and even a TV. But these devices must support WI-FI technology. Almost all modern laptops have Wi-Fi. This also applies to smartphones and tablets. And on computers, a wireless connection can be created by purchasing a special adapter.
I will tell you about this and much more right now.
So, after we have turned on WI-FI, we can already try to connect to it. Let's start with the laptop.
1. Connect to WI-FI on a laptop
Any modern laptop has WI-FI. All you have to do is turn it on, then find our wireless network and connect to it. Let's get on with it.
Opening:
Start – Control Panel – Network and Internet – Network and Sharing Center – Change adapter settings.
Here we see the icon Wireless network connection. By right-clicking on it, select the item Turn on.

A window will appear at the bottom of the screen (where the clock is) with the wireless networks found. We find our WI-FI and connect to it.

Confirm by entering your password.

Now we can open any other browser and try to load sites.
2. Connect to WI-FI on your computer
With desktop computers it's a little more complicated. They most often lack wireless technology. But this problem is easily solved by purchasing a special board or a small adapter.
This is what I had on my old computer:

By inserting it into a standard USB port, WI-FI appears on the computer.
On my new PC Network adapter as a fee:

The price is almost the same ($10), and it has a better signal, which has a positive effect on Internet speed.
After installing any of these adapters and installing drivers for it (the disk is included), exactly the same will appear on the computer connection to WI-FI, as in the laptop example. We proceed by analogy with a laptop.
3. Connect to Wi-Fi on your phone and tablet
On your phone, just go to settings, turn on WI-FI and find your network. Here's an example from an iPhone:

On other phones everything is similar, including Android smartphones. It’s the same on tablets too :)))
4. Connection on other devices
On other devices, for example, TVs that support WI-FI or even printers, everything is done the same way: it turns on, the network is found and the connection is made.
I hope you were able to connect to WI-FI.
Hi all! After reading the article below, you will learn how to connect a laptop to the Internet via wifi. A laptop is considered a mobile computing device. By purchasing it, the user gets the opportunity to use it absolutely anywhere. It is not very favorable to connect a laptop to the global network via a cable. Having thus connected to the Internet, the laptop turns into a simple home PC. That is why I decided to take on this topic, since it is currently very relevant.
The first thing you need to do is find the “wifi” icon. This sign may look different for everyone, it will depend on whether the laptop is connected to Wi-Fi or not connected.

This icon serves as an assistant for various operations.
So, after this, a window will appear in which all available network points will be displayed. Select the required network and click "Connect".

Then there are 2 options. If the network is not password protected, the connection will occur immediately. If the network is password protected, a window will appear where you will need to fill out a line.

After entering the password data, the Internet should work.
If you have any problems, then read on.
I can't find the icon I need
If you have a problem such as the absence of the “wifi” icon on the taskbar, then your Wi-Fi module is disabled. To enable it you must do the following:
- Log in to the “Control Panel”;
- Go to “Network and Internet”;
- Then visit the Network and Sharing Center;
- Select "Change adapter settings";
- Find “Wireless network connection” and connect it through the context menu.

Sometimes a similar issue arises due to the lack of drivers. In this case, they will simply need to be installed.
The icon is marked with a red cross
This is another common problem. In this case, the user will not be able to connect.

Usually, this means that such a module is disabled through the “Mobility Center” or through certain buttons on the body of the laptop itself.
To solve the problem you need:
- select the battery icon with the right mouse button;
- select “Windows Mobility Center”;

- Specify “Enable wireless communication.

If such a network is already turned on at this point, it means that the module is turned off through buttons or key combinations.
Conclusion
Thus, now you know how to connect a laptop to the Internet via wifi. I hope that my information will be useful to you. Thank you for your attention, good luck everyone!
How to connect a laptop to the Internet via wifi?
Almost every laptop has the ability to connect to wireless.
Using this technology, computers exchange data between themselves and network devices (printers, access points, etc.), and also access the World Wide Web.
There are many laptop models, but they all work according to the same communication standards. Can you imagine what their owners would have to do if each laptop did it differently?
Many laptops - one Wi-Fi
The procedure for setting up a wireless network depends only on the operating system.
Some manufacturers equip their laptops with network utilities, but this does not provide anything new, except that it makes the setup process more convenient.
Of course, you can use them, but it is more useful to know how to work with OS tools.
If you figure out how to set up WIFI on Windows 7, 8 and XP using the system, you can do this on any laptop, regardless of the model.
Three conditions for turning on Wi-Fi for the first time
Before you connect your laptop to the Wi-Fi network for the first time, you need to do three things:
- turn on the wireless adapter (also called a WLAN or wireless network card);
- start the WLAN autoconfiguration service.
Step 1. Enabling the Wi-Fi adapter
To turn on the Wi-Fi adapter on the laptop, there may be a button or key combination: Fn +[one of the keys F1 -F12, where the Wi-Fi icon is shown].
You can tell that the adapter is turned on by the glow of the indicator on the laptop case:
Step 2. Driver installation
Important! Networks marked with a shield icon with an exclamation point do not require a password. They are not protected in any way, and data is transmitted through them in clear text.
Step 4. Connect to a hidden network and change the communication profile
To connect to an invisible network whose name is hidden, as well as to create a new wireless access profile, right-click on the “Network” icon in the tray and enter “Network Center...”.

In the “Change network settings” list in Windows 7, click “Set up a new connection or network”, and in Windows 8 (8.1) click “Create and set up a new connection or network”.

Select "Connect to a wireless network manually." This window, like the following ones, looks the same in Windows 8 and 7, so let’s look at the setting using Windows 8 as an example.

Enter the access point name (SSID), security type, encryption and password. If you intend to use this network constantly, check the “Start connection automatically” checkbox.
The “Connect if the network is not broadcasting” option should be checked when the access point is not visible in the list.

In the next window, you can change the connection parameters by clicking the button of the same name.

Basic parameters - name (SSID), grid type and availability cannot be changed. Security settings can be changed, but they must be the same as those assigned to the access point.

Step 5. Connecting and setting up Wi-Fi on Windows XP
To connect your laptop to existing Wi-Fi networks, right-click on the “Network” icon in the tray and open “View available wireless networks.”

Select the desired access point from the list and click “Connect”.

Enter the password (security key) and its confirmation. After clicking on the “Connect” button, the connection will be established.

In this article we will take a detailed look at the process of connecting a laptop or Windows 7 computer to the Internet via Wi-Fi. I think the article will be useful to many, since many questions always arise when connecting to Wi-Fi for the first time. As a rule, they are associated with installing the necessary drivers, enabling the wireless adapter on the laptop, etc. More on this a little later.
The laptop is generally a great thing. I don’t really understand people who are buying desktop computers now. Only for serious games. Well, you must admit, it’s much more convenient with a laptop. If you want a big screen, you can connect it to a monitor or TV. It makes no noise and you can take it with you if necessary. And also, all modern (and not so modern) laptops have a built-in Wi-Fi module. A receiver that allows you to connect your laptop to the Internet via a wireless Wi-Fi network. In the case of a desktop computer, you will need to buy .
All you need is to buy and install (if you don't already have it), it will distribute Wi-Fi to which you connect your laptop. You can connect your computer to a free Wi-Fi network in cafes, shops, etc. Or, to your neighbor’s unsecured network :) This is much more convenient than laying a network cable. While this is still normal for a regular desktop computer, it is no longer the same for a laptop. And it’s not convenient to move around the house with this wire all the time.
Connecting a laptop to the Internet is not difficult, provided that the Wi-Fi driver is installed. Many people have a lot of problems because of the driver. If you simply did not install the driver for your Wi-Fi receiver, or you installed Windows yourself and did not install it, then you will not be able to connect to Wi-Fi. But you may already have everything installed and configured, so let’s first look at the process of connecting to a wireless network normally. If you fail to learn, there is no wireless connection, etc., then read the article to the end, we will look at possible problems.
Connecting the laptop to Wi-Fi
Let's first look at the connection process without any settings or checks. Why complicate everything, perhaps you already have everything set up. If everything is fine, your laptop sees the wireless network and is ready to connect, then the Internet connection icon in the notification panel will look like this:
Connection status, which looks like network level with an asterisk (like the picture above) indicates that the laptop sees available networks and is ready to connect to them. Click on this icon, then select the Wi-Fi network to which we need to connect and click the button Connection. In Windows 10, the process of connecting to Wi-Fi is slightly different. If necessary, detailed instructions.

If the network is password protected, a window will appear in which you need to enter a password and confirm the connection by pressing the button Ok.

That's all, your laptop should connect to the Wi-Fi network. The connection status will be like this:
![]()
You can use the Internet.
If you see the connection status, it looks like this:
![]() This means that most likely everything is configured on your laptop, but the laptop simply does not see the networks available for connection. Perhaps there is simply no coverage in this place. If you are connecting to your network, check that the router is turned on. If enabled, then .
This means that most likely everything is configured on your laptop, but the laptop simply does not see the networks available for connection. Perhaps there is simply no coverage in this place. If you are connecting to your network, check that the router is turned on. If enabled, then .
This is how the connection will proceed when you have the driver installed for the Wi-Fi adapter and the adapter itself is turned on. But very often the adapter on the laptop is turned off, or no one installed the driver for it at all. In such cases, many questions arise. Now we will examine in detail both cases, due to which you may have problems connecting your laptop to a wireless network.
Enable "Wireless network connection" on the laptop
If your wireless connection is disabled, or the Wi-Fi driver is not installed, the connection status will look like this:
![]()
This means that there is no way to connect to the Internet via Wi-Fi, and there is no connection via a network cable. As I wrote above, this happens due to the adapter being turned off, or due to the lack of a driver. Let's first check if your "Wireless Network Connection" is disabled. This is of course unlikely, unless you turned it off yourself, but you need to check.
Click on the internet connection icon and select Network and Sharing Center.

Then select Changing adapter settings.

Looking at the adapter "Wireless network connection", if it is disabled, then right-click on it and select Turn on.

After this, the connection status "There are available connections" should appear. (if there is a Wi-Fi network within the radius).
We enable wireless connections using the buttons on the laptop
It seems to me that now manufacturers no longer install separate buttons to turn on the Wi-Fi adapter. But, if you have problems connecting to Wi-Fi, then be sure to check if there is a special button to disable/enable wireless connections on your laptop. I know for sure that Toshiba loved making such switches.
Nowadays, on laptops, a keyboard shortcut is used to disable/enable the wireless network. As a rule, different manufacturers have different keys. But usually it's Fn+F2. So on Asus laptops. You can look at yourself, there should be a network icon on the key that is pressed in conjunction with Fn. Something like this:

True, for me the combination of these buttons is responsible for turning off Bluetooth. It doesn't seem to respond to Wi-Fi at all. But yours may be different. It's definitely worth checking out.
If in the adapter management window there is no “Wireless network connection” adapter at all, but there is definitely Wi-Fi on your computer/laptop, then this means that The driver for the Wi-Fi adapter is not installed.
Now we will check everything and try to solve this problem.
Check and install the driver for Wi-Fi
I have not yet seen a case where after installing Windows 7, the system itself installed the driver for the Wi-Fi adapter. This is much better in Windows 8. Windows 10 often installs the necessary drivers itself. So, after installing Windows, in order to use Wi-Fi, you need to install a driver specifically for your laptop or adapter (very often, adapters from different manufacturers are installed in one laptop model. It is because of this that you can see several drivers for Wi-Fi on the manufacturer’s website).
We go to the device manager.

In Device Manager, open the tab Network adapters, and looking for a driver for Wi-Fi. I have it called Atheros AR9485WB-EG Wireless Network Adapter, it is installed. You should also have something like a Wireless Network Adapter.

If you don’t have a wireless connection, then most likely you won’t find an adapter either. You need to install the driver, then Wi-Fi will work. And also, if the driver for the Wireless Network Adapter is not installed, then in the device manager there will be at least one unknown device with a yellow exclamation mark. It looks something like this:

This is most likely the same Wireless adapter that the laptop does not know how to work with.
Driver installation
All you need to do is download the required driver and install it. It is best to download the driver from the official website of the manufacturer of your laptop/adapter, and for your laptop (or adapter) model. It’s best to find the official website of your laptop, for example Asus, through Google, then use the site search on the site, indicating the model of your laptop. Most likely your computer's page will be found, open it and look for downloads of utilities and drivers there. Find the Wireless driver and download it for the operating system you need.
Most likely, the driver will be in the archive. To install, run the .exe file from the archive. For example, an archive with a driver for my laptop:

After installing the driver, restart your laptop and try connecting to the wireless network according to the instructions. I wrote in more detail about installing the driver in the article about .
If some points from the article remain unclear to you, or you were unable to connect your computer to Wi-Fi, then write about it in the comments, we will try to solve your problem.