How to enable installation from a flash drive in the BIOS. How to set boot from a flash drive in different BIOS versions
Previous articles described in detail how you can get into the BIOS on different models of laptops and computers. But for what purpose is this needed? In most situations, entering the BIOS is required to change the default boot disk.
This text discusses the method of booting from a disk or flash drive on several types of computers. The same principle applies to different devices. Moreover, its observance requires only a minimum of logic and care.
Two methods to boot from a disk or flash drive
In the first option it is proposed to put in SETUP(aka BIOS) the desired default boot device. In practice, it will look like this: whenever you turn on the computer, it will start with the specified equipment. If the device is inaccessible or not suitable for booting, the system will try to do so from the next one on the list, which can also be designated. If that doesn't work, the computer will move on to the third device, and so on.
The following method is supported by almost all modern laptops or desktop solutions. It is enough to turn on the menu to select the boot when the computer starts. In this way, the device is determined from which the system will start only once. This is a more convenient method in a situation where you need to boot the system from a flash drive one time.
When using the first method to select a boot device in the BIOS, you should go into it and see the available interface. If you are greeted by blue windows, then in front of you is Award, different in gray AMI, and the graphic design indicates UEFI. There are others. To decide, just study the screenshots and compare with your interface.
If you have an Award
Enter SETUP, go to " Advanced BIOS Features" As a standard, this item is placed second or third, starting from the top.


In another situation, the required partitions can be seen immediately.

Now let's decide on the necessary items on the menu.

First Boot Device means the hardware from which the computer will first start.
Second Boot Device used by the system if the first device is not suitable for booting.
TO Third Boot Device the computer will switch if problems also arise with the second equipment on the list.
Any item like “X Boot Device” corresponds to a hard drive, flash drive, CD/DVD or other boot device.
If none of the options are suitable and Boot Other Device is set to Enabled, then the operating system will be searched for on other drives.
When you select next to any “X Boot Device” Hard Drive, i.e. hard drive, the Hard Disk Boot Priority item allows you to specify in more detail which specific drive to use. This point also applies to flash drives, since this type of boot device is defined by the computer as an external hard drive.
Therefore, to start from a DVD or CD, you need to assign “ATAPI CD” or “CDROM” in the “First Boot Device” item and select nothing else. However, to boot from a flash drive you need to not only click on “Hard Drive”, but also go to the “Hard Disk Boot Priority” section. There, using the “PageUp” and “PageDown” or “+” and “-” buttons, move the flash drive up to the very beginning of the list.

Please note! The flash drive is connected to the computer until it is rebooted or turned on. Otherwise, it is far from certain that the BIOS will see it.
The name of the flash drive may look different. Usually it starts with “USB...”, “Generic USB...”, and sometimes “External Device”. The result of all actions performed must be saved. Just press the " F10"(to clarify, look down the screen at the prompts: there should be the words "Save" and "Exit") or even return to the main menu and select " Save and Exit Setup" In the red window that appears, use the “Y” button to agree to “Yes” and press “Enter.”


The literal translation of the phrase: “Press any key to load a CD or DVD...”. This means that you can press any button and the computer starts from the disks. If you do nothing, it will boot from the next equipment in the list.
Boot selection process in AMI BIOS
Such BIOSes have a completely different look compared to the Award version. First, go to SETUP and look for the section “ Boot» button to the right. There are two necessary points here, they can be clearly seen in the screenshot.

To boot from a hard drive or flash drive you need a tab Hard Disk Drives. Let's select it and put our flash drive (USB device) in the line “First Drive” (sometimes called “1st Drive”). After this, you should return to the previous section. Press the “ESC” button.

Then we go to Boot Device Priority. Select 1st Boot Device and again from the list - a flash drive.

Be careful, the selected devices must match! If in the first step you assign a hard drive, then you need to put it in the list not the flash drive, but it.
When you need to boot from a CD/DVD, you should select “CDROM” (sometimes “ATAPI CD-ROM”) in the same menu. Moreover, in this case, the “Hard Disk Drives” section is no longer needed. Save the settings with the " F10"or you can simply go to the "Exit" item and click " Exit Saving Changes».

A request appears, answer “OK”.
On different models of laptops and computers everything is quite similar. For example, on a standard Lenovo laptop, the “Boot” section includes all the equipment at once, which is very convenient for users. No confusion with additional subsections and priority. To set the loading order of the equipment, you just need to use the “ F5/F6" Therefore, to start from a flash drive, simply move it to the very top.

Some users will find a detailed transcript useful.
- USB HDD means an external hard drive or flash drive.
- How ATAPI CD is defined is a CD or DVD-ROM.
- HDD (sometimes ATA HDD) – hard drive.
- USB FDD – external device for floppy disks.
- USB CD – drive for external disks.
- PCI LAN stands for Local Area Network Boot.
On Lenovo models belonging to the G500 line, you should press the OneKey Recovery button when the laptop is turned off.
Below you can clearly see the EFI BIOS (UEFI), which differs not only in its graphical interface, but also in its working mouse. If you have a computer with EFI, then when you enter the BIOS you will be greeted by this image.

There is a menu at the bottom of the screen Boot Priority. Here you can directly drag and drop the mouse to create the required loading order. In addition, by clicking the “Exit/Advanced mode” button located in the top right, you can go to the advanced version. To do this, select Advanced mode in the window that appears. Then find the “Boot” section and in the Boot Option Priorities tab, in the “Boot Option #1” field, put the required boot device: DVD-ROM, flash drive, hard drive or other available equipment.

But the computer owners Hewlett-Packard Usually the following picture awaits you when you go to the BIOS.

In the “Storage –> Boot order” menu section, find the required device and press “Enter”. Move it up and when it is at the beginning, also press “Enter”. To save the settings, select “File -> Save and Exit”.
Methods for booting from a disk or flash drive without entering the BIOS
It was already mentioned above that almost any modern laptops and computers are designed for a one-time boot from the required device and for this there is no need to access the BIOS. You only need to press a certain button when you start your computer. For example, in this BIOS Award it is suggested to select “ F12"and call up the boot menu.

Usually something like “Press F12 Boot Menu” is written. This means: press "F12" to select boot hardware. We do this and see the image as in the screenshot below.

The list shows the found devices. Select a CD/DVD disk, flash drive or something else and press “Enter”. However, other options are possible in the AMI BIOS.

The inscription “Press F8 for BBS POPUP” requires pressing “F8” to display a menu with a choice. On laptops, you sometimes need the “F12” button to call it. The boot menu looks like the screenshot.

Just select what you need and wait for it to load from the CD or flash drive.
Possible difficulties when booting from USB devices
Problems sometimes arise and the computer does not boot. Let's look at common difficulties. First, make sure that the USB controller is not disabled in the BIOS. In Award, this information is checked in the “Integrated Peripherals” or “Advanced Chipset Features” item. You need to see the “USB Controller” and “USB Controller 2” functions; their status should be “Enabled”.

In the case of AMI, you need to find “USB 2.0 Controller” in the “Advanced” menu. The position should be “Enabled”. The "USB 2.0 Controller Mode" option requires the "HiSpeed" status.

In addition, the reason may lie in the sockets located on the front of the system unit panel. It's worth trying to connect a USB flash drive to the rear inputs of the computer.
If your SETUP resembles this photo, then in the “Startup” section, change the “UEFI/Legacy Boot” parameter to the “Legacy Only” position.

In addition, the problem may be with the disk or flash drive. Bootloaders are required! You can check this on another working computer.
For fairly old computers in general. If there is no newer BIOS version, then the PLOP solution may help. Download the latest version of Plop Boot Manager, unpack the archive. You will see the files, of which plpbt.iso is the image for the CD, and plpbt.img is for the floppy disk.
It is clear that if there is a floppy disk, then the corresponding image is written to it, and the image for the disk is placed on the CD-R/RW disk. You won't be able to simply write the file to the media: there is special software for the image. This topic was described in the OS installation instructions. Then you start from a CD or floppy disk and select the device in the window. The method helps to boot from flash drives on the most ancient computers.
Let's sum it up
You have studied a detailed guide on booting from a disk or flash drive in a variety of cases. If you need this just for once, then it is better to use a menu that does not require going to the BIOS. For constant downloads or if there is simply no such selection menu, then just fine-tune the BIOS. Don't forget to return everything later.
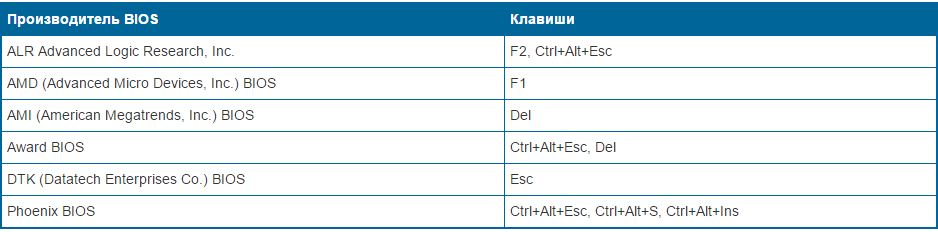
There are many types of BIOS: Ami, Award, Phoenix Award, UEFI. Let's figure out which buttons to press when booting a computer or laptop so that go to BIOS and boot from a flash drive to install windows. I would like to note that the traditional key delete, F2 to enter the BIOS. Below are button combinations on how to enter the BIOS to boot from a flash drive.
Buttons for entering bios from laptop and computer manufacturers.
Buttons from BIOS manufacturers
How to set the BIOS to boot from a flash drive to install Windows
Let me start with the fact that you don’t always need to go into the BIOS to swap the bootloader to install windows. For this there is a so-called start menu. To go there, you need to turn on the computer, sometimes a key is written. In this case F12. Press the key that is written in the word Boot Menu.

How will we start the computer: USB flash drive or other devices. Next will be the installation of the Windows system.

How to install boot from a flash drive in Ami Bios
- Click Device Priority.

In line 1st Devise set priority from the flash drive. That’s usually all, but many have encountered why I did everything correctly, but the computer does not start from the flash drive. Sometimes you just need to specify, in addition to the priority, forced loading in the line Hard Disk Drives.

- IN Hard Disk Drives set a forced launch from a flash drive.
- IN 1st drive select the media.
- Press F10 to save.
It turned out that in the settings of 1st Devise and Hard Disk Drives there is a bootloader with USB Flash i.e. We set the priority option, tried it and it didn’t work. Then we set a forced launch and everything worked out. And so on in all BIOS versions, if priority loading fails.

How to set Award Bios to boot from a flash drive
- Let's go to Advanced Features.

- Click First Device, in the context menu we set which bootloader we will start the computer with. We have chosen the primary device to launch.

- Hard Disk Priority put the flash drive in 1st place. (If in First Device If you choose to start from a drive, then you need to install a flash drive in Hard Disk Priority).
- Award is ready, press F10 to save.

How to boot from a flash drive in Phoenix Award Bios
- Settings Advanced, in line First Boot Device install a flash drive or other device.
- Click F10 to save.

New UEFI BIOS in which you can control the mouse.
- Line Boot Priority, change places by dragging with the mouse. Can be done through advanced settings > Exit/Advanced mode and choose Advanced mode.

- Presses Boot and select in Boot Option #1 loader.

Going into the BIOS and booting from a flash drive to install Windows turned out to be quite simple, you just need to change the boot type. And remember about the priority and forced bootloader.
If you download an ISO image with a Windows distribution and even burn it correctly to a DVD or create a bootable USB flash drive using the same UltraISO, almost no one has any difficulty. Many people have difficulties with the second stage, directly installing the operating system from a disk or flash drive on a PC.
I know of three ways to start installing Windows.
1) the simplest and most unreliable is to open the image through a virtual drive with Windows already running and start the installation, but there are many factors that can interfere and give an error at some stage of such an installation.
2) Insert the flash drive we created into a USB connector or a DVD with Windows into your drive, no matter what version, whether Windows 7, Windows 10, even win95. This works for everyone. Then, when you turn on the PC, call the BOOT menu, this is a list with the media from which you need to boot, select the media you need and press ENTER. You can read more about how to install Windows via the BOOT menu here.
3) It differs from method 2 only in that we indicate what we want to boot from not through the boot menu, but in the BIOS of our device.
In this article we will talk in detail about how to install Windows from a flash drive via BIOS or boot Windows 7 from a BIOS flash drive.
Booting Windows 7 from a BIOS flash drive
Installing Windows from a flash drive via BIOS begins by calling the BIOS menu or also called Setup, this is most often done with the Delete button immediately after turning on the laptop or computer, press continuously until you see a blue screen with some text, but it happens that you need to press another button, this is F2 or F10 or Esc. You can try all the options until you see the desired result, or you can read a text like “Press DEL to run Setup” in the welcome window of the mother firmware, it tells us that to get into the BIOS you need to press DEL.
And so, after we got into the BIOS SETUP UTILITY, we look for the Boot tab and use the arrows to go there. We need the Boot device Priority line

The logic here is simple: the higher the device is in the list, the higher the priority in the download queue. That is, the top one in the list is loaded first, and so on in turn until the system boots.

And so, using the arrows, select the first drive in the list and press ENTER, we see a list of all possible devices from which the computer can boot.

If we want to choose to load the BIOS via a flash drive, then select the USB interface, this is Removable Dev or something with the text “USB” included, or if the flash drive is already inserted, then the name of the flash drive manufacturer will be written. If you need to select a DVD drive, then as a rule this line begins with the words CDROM: or DVDROM: or it can also be written by the manufacturer of the DVD drive.
If you have made your choice, then press ENTER and in the same way select the second device in turn, the second on the list should be your hard drive on which Windows will be installed. If the BIOS does not see the flash drive, then try inserting the flash drive into another USB connector and do everything all over again.
In order for all changes to be saved in the BIOS Setup, before leaving, you need to go to the Exit tab and select the Exit & Save Changes line and press ENTER.

After this, we can install Windows BIOS via a USB flash drive or DVD drive. Not everyone has a bios with a blue screen anymore. In 2017, you can increasingly see a new generation BIOS, it is more graphically thought out, there are pictures of icons for a clear association, if you are not good at English, so as not to make a mistake. But essentially all the settings are the same.
Attention!- after our changes to the BIOS, now the computer will always boot first from the flash drive, then from the hard drive, so it is important when installing Windows after the first installation stage, when the laptop or PC reboots, YOU NEED TO HAVE TIME TO PULL THE FLASH DRIVE FROM the USB connector, or pull out the disk from DVD-rom. Otherwise, the first installation stage will be repeated endlessly.
Now we know how to configure the BIOS to install windows from a flash drive. And having with us a bootable USB flash drive with an image of WINDOWS 7 or 10, we can easily install or reinstall the OS on any device.
All the best to everyone!
One of the most common questions from users when installing Windows: "why doesn't the computer (BIOS) see my flash drive?". Naturally, I answered it several times, and more than once presented my recommendations on the blog. Now I decided to put them all together in this one article.
I’ll tell you right away so that the computer (laptop) “sees” your bootable USB flash drive (about how to create it correctly) - you need to configure the BIOS (UEFI) accordingly. If you don’t do this, then no matter how much you fight, nothing will work...
In this article I will show, using the example of several BIOS (UEFI) versions, how to do this correctly. I think this note will be very useful for those who do not reinstall the system very often.
Perhaps the article should start not with setting up the BIOS, but with how to enter it 👀... This is also far from so obvious and simple for an inexperienced user.
In general, it all comes down (usually) to immediately after turning on the computer/laptop, while only the first logo appears when loading, press special. key (preferably several times). If you pressed the correct key, you will see the treasured BIOS settings window.
The most Common buttons to enter BIOS: F2, Esc, Del. If you have a laptop, then it is possible that you need to press them together with the Fn button (i.e., for example, Fn + F2). It depends on the keyboard settings in the same BIOS...
The main difficulty is that there is no single key to enter the BIOS! Each manufacturer may have its own specials. keys (sometimes these are entire combinations of 3-4 buttons!).
Below I will give several options for how to enter the BIOS and provide links to articles where you can find out these treasured keys.
Option #1
If you have Windows 8/10 installed on your computer, you can stop guessing with buttons at all, but enter the BIOS from the OS interface. This is done quite simply, see the instructions, the link to which is given below.
Help!
How to enter UEFI (BIOS) from the Windows 8, 10 interface (without using special keys F2, Del, etc.) -
Option No. 2
To find out the key to enter the BIOS, you can use the documentation (which came with your device upon purchase), or special. tables and specifications (there are plenty of them on the Internet).
I also have several tables and instructions posted on my blog, perhaps you can learn something there.
Instructions!
1) how to enter BIOS or UEFI (instructions) -
2) tables with buttons to enter the BIOS / Boot Menu for different PC manufacturers -
Option No. 3
Notice the first screen that appears immediately after you restart your computer (to see the first screen, restart the computer, not turn it on...).
If you do not have time to see the “first” screen (or read the information on it) - press the key Pause (Break).
If you manage to do this, the screen will “freeze” and wait for your next click (that is, you will be able to read and inspect everything).
The screenshot below shows the AMI BIOS welcome screen: F2 or Del- these are buttons to enter BIOS settings (in English: to run Setup).

AMI BIOS: F2 key - enter BIOS settings.
Option 4
Some laptops have special buttons to enter the BIOS (they are usually small in size and located either next to the power button or next to the power socket).

You need to press them with a pen (or pencil) when the laptop is turned off. After clicking on it, the device will turn on and you will be presented with the boot menu (from which you can go to the BIOS).

Boot Menu / Lenovo (as an example)
Basics
Note: for those who are already more or less familiar with BIOS controls, this section of the article can be skipped.
Control keys, changing settings
In the BIOS you will have to manage and set settings without using the mouse (This scares many novice users. By the way, UEFI supports the Russian language and mouse).
In fact, even on Windows (where the mouse works) - many actions are much faster to do using the keyboard!
The control buttons are, for the most part, the same everywhere. (although there is a difference, it is usually not significant). One more detail: there is a hint on the right or bottom in the BIOS: it indicates all the main control keys (see photo below).

Control keys (AMI BIOS)
Main keys:
- F1 - call for help (help);
- Arrows ← and → - select a settings section (for example, Boot, Advanced, etc.);
- Arrows ↓ and - select a specific parameter in the desired section;
- + and - - change settings (increase/decrease);
- F10 - Save BIOS settings and exit (can be pressed while in any BIOS section);
- ESC - exit;
- Enter - set (confirm) the selected parameter/or open a parameter or section for further configuration (in general, one of the most basic keys).
In general, knowing these dozen buttons, you can easily change all BIOS settings.
Saving settings
You can change any settings in the BIOS, but they will take effect only after you save and reboot the device (by the way, the computer/laptop reboots automatically after exiting the BIOS).
- Press key F10- in most BIOS versions it means saving the settings and rebooting the device;
- Go to section Exit and click on Save Changes and Exit(save the settings and exit, an example is shown in the screenshot below - arrows 1 and 2).

By the way, you can exit the BIOS without saving the settings - to do this, select in the section Exit option Discard Changes and Exit (discard settings and exit / do not save settings, exit).
You can also exit the BIOS by simply restarting the computer (although it is not recommended to do this again...).
Reset settings to optimal
If you changed any settings in the BIOS and the computer stopped booting (or, for example, the sound disappeared) - or you just decided to return everything back to the way it was - then know that the BIOS has a special function for resetting settings. Those. this function will return all settings to default (i.e. it will do everything by default, as it was when purchased).
You can reset the settings in two ways:
- press the button F9(however, it does not work in all BIOS versions);
- go to the section Exit, then click on Load BIOS Defaults(see screenshot below).

Reset settings to default - AMI BIOS
By the way, after loading the default settings, you need to save them by pressing F10 (about this - see just above in the article).
In different BIOS versions, the name of the reset item may differ slightly. For example, the screenshot below shows the section Exit on a Dell laptop - here you need to click on Restore Defaults, and then save the tinctures - Save Changes and Reset. After rebooting the device, it will work with default settings.

Reset settings to default // Dell laptop // Restore Defaults
Setting up BIOS to boot from a flash drive/disk
Let's move on to the most important thing. I will look at the BIOS settings using the example of some of the most popular BIOS versions - AMI BIOS And Award BIOS(in principle, the main thing is to understand the meaning - everything is done the same way everywhere, there is a slight difference in the menu designation).
AMI BIOS
First you need to go to the section Advanced(extended, see arrow 1 on the screen below), then you need to open the section USB Configuration. Then check that all USB ports are turned on (that is, that the inscription next to them is lit Enabled)!

Checking USB ports - are they enabled?
- 1st Boot Device - CD/DVD... (means that the first boot device from which the PC will try to boot is the CD/DVD drive. If it does not have a boot/installation disk, the computer will try to boot from the 2nd Boot Device);
- 2nd Boot Device - SATA: 5M-WDC WD5000(computer hard drive. Windows is installed on it, therefore, it will boot if there is no disc in the CD/DVD drive).
Naturally, with such a download queue, the computer will not boot from the flash drive!

How it was and how it should be for booting from a flash drive // AMI BIOS
In order for the BIOS to see your flash drive, you need to change the boot queue to the following:
- USB: Generic USB SD;
- CD/DVD: 6M-TSST;
- SATA: 5M-WDC WD5000.
In this case, the BIOS will first check the flash drive inserted into the USB port, then the CD/DVD drive, and then boot from the hard drive. In most cases, the best option.
Award BIOS
In principle, it is configured in the same way, with a slight difference in the menu designation. And so, after entering the BIOS, I recommend immediately opening the section Standard CMOS Features.

In this section, check whether the USB ports (devices) are enabled. Just check that opposite the lines where “USB” is mentioned, it is everywhere (example in the screenshot below).

USB ports: do they work? They are working!
- First Boot Device (first boot device) - USB-HDD (the best choice for booting from a flash drive is a USB-HDD. In exceptional cases, if the BIOS suddenly does not recognize your flash drive, try USB-FDD) ;
- Second Boot Device (second boot device) - Hard Disk (hard drive).

Setting up the laptop BIOS
This is done in the same way as for a computer. True, there may be some “serious” differences in individual models, but overall everything is identical.
In laptops, there is a separate BOOT section for boot settings. Once you open it, all boot options are available to you.
I will give a universal version of the parameters that is most often used (using the example of a Dell Inspiron 3000 series laptop):
- Secure Boot - (secure boot mode is disabled. Only new versions of Windows 8, 10 support it, and many have several OSes, or use 7...);
- - (fast loading - in most cases, it doesn’t speed things up much...)
- 1st Boot Priority - the first boot device (USB drive);
- 2nd Boot Priority - second boot device (hard drive).

In many other laptop models, the BIOS settings are done in a similar way, the menus and settings are similar or the same.
A few words about UEFI
On modern computers and laptops, UEFI is used instead of BIOS. It is a more expanded and advanced version of the BIOS: for example, you can use the mouse in it, there is often Russification of the menu, etc. For the purposes of this article, I will say that in terms of editing the Boot section, everything is the same here...
For example, the photo below shows the main UEFI window on an Asus laptop, which is displayed immediately after logging into it. In order to open the extended menu and find the Boot section, pay attention to the bottom of the window: you need to press the key F7 (or press F8- and immediately start loading from the flash drive).

In the advanced settings in the Boot section, everything is done in the same way as in a “regular” BIOS: you need a flash drive (in my case "jetFlashTranscend 16 GB") just move to the first place and then save the settings (key F10) .

Booting from a flash drive/disk using Boot Menu
Why configure and change the boot queue in the BIOS when you can boot from a flash drive by pressing one button?
We are talking about the Boot Menu - the boot menu, translated into Russian. If you call up this menu, you can choose where to boot your computer/laptop from: from a hard drive, from a CD/DVD drive, from a flash drive, from an SD card, etc.
The button for calling the Boot Menu is usually indicated on the first screen that you see after turning on. Example in the photo below:
- F2 or Del - enter BIOS settings;
- F11 - call Boot Menu.

By calling the Boot Menu, you will see all the devices from which you can boot. An example in the photo below: you can boot from a hard drive, flash drive and CD/DVD drive.

Why doesn't the BIOS boot from a flash drive/disk?
1) USB controller disabled in BIOS
Almost all BIOS versions have an option to disable USB ports. Of course, if they are turned off, then you will not be able to boot from a USB drive. Check whether they are enabled (or reset the settings to default) - just above in the article, I showed how this is done.
2) The bootable flash drive was written incorrectly
Often it can be recorded incorrectly due to incorrect program settings (in which you recorded it), or a “broken” ISO image with the system. I recommend reading this article:
3) After rebooting the computer, installation starts all over again
Quite often the following situation occurs. You inserted the USB flash drive, the computer booted from it and the installation began, then it rebooted and the installation began again. And so in a circle...
In this case, simply remove the flash drive and restart your computer. It will boot from the hard drive (where the installation files from the flash drive have already been copied)- and the installation will continue (rather than start again).
4) USB 3.0 and USB 2.0
Nowadays, modern PCs/laptops have several types of USB ports: USB 3.0 (USB 3.1) and USB 2.0 (USB 3.0 - marked in blue). “Old” Windows operating systems do not support USB 3.0, so in cases where the flash drive is “invisible,” I recommend trying to install the OS from a USB 2.0 port.

Case in point: USB 2.0 and USB3.0
5) USB-HDD, USB-FDD, etc.
In the BIOS, when setting the boot order, you usually need to select USB-HDD, but in some cases the BIOS does not see the flash drive. In this case, try changing the USB-HDD to USB-FDD.
6) Error “Reboot and Select proper Boot device or Insert Boot Media in selected Boot device and press a key”
It often occurs if you have, for example, a disk (floppy disk) connected to a computer that does not have boot records. Simply remove and disconnect all media except the one you intend to install from (for example, USB flash drives).
Instructions! Solution to the "reboot and select proper..." error -
7) Disconnect all extras from the computer. equipment
It is also recommended to disconnect the second monitor, printers, scanners, etc. from the computer. The fact is that when installing Windows, this can create additional problems. For example, I had a case where Windows incorrectly determined the default monitor and was "sending" the image to another monitor that was turned off (and I saw a “black” screen...).
8) Turn on Legacy mode
In the Boot section, you need to change the boot mode from EFI (UEFI) to Legacy (if available). I made a recommendation regarding this above. The fact is that not all Windows operating systems support the “new” feature (in addition, you need to correctly write the USB flash drive for this installation mode).
9) Turn off Secure Boot
In the BIOS, in the Boot section (usually) there is a Secure Boot option - also disable it, set it to Disable (if it exists).
10) Enable Launch CSM (if available (usually the Boot section))
In the BIOS, in the Boot section, change the Launch CSM mode to Enable (if it has one).
In the last article we talked about that. And now I’ll tell you how to configure your computer’s BIOS to install Windows from a disk or flash drive.
1. What is BIOS and UEFI
Each motherboard has a special program for booting the computer and configuring the parameters of various devices. This program is flashed (programmed) into a special chip on the motherboard and is therefore called firmware.
Previously, all motherboards had firmware called BIOS, which had a simple graphical interface with white letters on a blue background and was limited in functionality. For example, in the BIOS it was impossible to use the mouse, select a language, and there were no graphic elements (pictures) due to the limited capacity of the BIOS memory chip. Also, motherboards with BIOS did not support drives larger than 2 TB due to limitations of the old disk partitioning system (MBR).
Nowadays, many motherboards have a new type of firmware called UEFI, which features an improved graphical interface using a beautiful background, hand-drawn buttons, the ability to select a language (including Russian) and some improvements. For example, support for a new type of disk partition (GPT), which allows the use of hard drives with a capacity of more than 2 TB.
What type of firmware your motherboard has can be found in its manual, on the website of the motherboard or laptop manufacturer, and also visually when entering the Setup configuration program. The Setup program is also flashed into the motherboard and is used to change BIOS or UEFI settings.
2. How to enter BIOS Setup
To enter the Setup program, immediately after turning on the computer, press the “Delete” button on the keyboard. On some motherboards and laptops, the “F2”, “F10” or “Esc” keys are used for this. You can read which button to press in the messages that appear immediately after turning on the computer.
In text form

Graphically

If you don’t have time to read, then press the “Pause” button on your keyboard to pause the download. You can continue loading by pressing any key. If you press the key designated to enter Setup, you will immediately be taken to the motherboard setup program.
Classic BIOS

UEFI interface

3. Basics of working in Setup
3.1. Control keys
The Setup program is a set of various parameters grouped on separate tabs, depending on their purpose. On the right or below there will be a description of the keys with which all actions are performed.

To navigate between tabs, you usually use the “right” and “left” arrows on the keyboard. To move between lines within one tab, use the down and up arrows.

To change values, use the arrows to navigate to the required field, press the Enter key, and then use the arrows to select a new value from the drop-down menu. The “+”, “-” or “Page Up”, “Page Down” keys can also be used for this.
To return up a level or to the previous page, press the Esc key. The “Esc” key on one of the main tabs will mean exiting the BIOS without saving the settings, which you will need to confirm or refuse to exit.
In the Setup program with the UEFI interface, you can perform all actions using the mouse.
3.2. Saving settings
This is a very important point. After making all the necessary settings, go to the “Exit” tab, select the “Exit and Save Changes” item using the arrows (“Exit and Save Changes”, the word order may be different), press “Enter” and confirm saving the settings by selecting the “OK” arrows or “Yes” and “Enter” again.
You can save the settings much easier and faster by pressing the “F10” key on the keyboard and confirming your decision. This key works in many versions of BIOS, UEFI and is often indicated in tooltips (bottom or right).
3.3. Cancel Settings
If you accidentally changed something or are not sure about the correct settings, then go to the “Exit” tab and select “Exit and Discard Changes” or press the “Esc” key until the message about exit without change settings and confirm the action (“OK” or “Yes”).
3.4. Restoring settings
To restore all settings to optimal defaults, go to the “Exit” tab and select “Load Setup Default”. After this, you can immediately change other settings or simply exit the BIOS and save the settings (“Exit and Save Changes” or “F10”).
4. Download options
Insert a bootable disk or flash drive into the computer on which you plan to install Windows. Now, in order to start installing Windows, you need to configure the BIOS (or UEFI) using the Setup program to boot from a disk or flash drive. You can also use the special boot menu of the motherboard (Boot Menu) for this. The last option is simpler and more convenient, but we will consider both methods.
5. BIOS setup
5.1. Changing boot priority
Go to the "Boot" or "Download" tab.

Install your DVD drive or flash drive first in boot device order.

If you install Windows from a disk, then the first item is to select a device like “ATAPI CD-ROM”, a name indicating the manufacturer or model of the drive. For example, “CDROM:PM-HL-DT-STDVD-RAM GH22NP” (this is an LG DVD drive).
If you plan to install Windows from a flash drive, then first choose something like “Removable Dev.” or the name of the flash drive indicating the manufacturer. For example, “USB: Patriot Memory” (this is a “PATRIOT” flash drive).
Transcend JetFlash 790 8Gb
The second should be a hard drive, which is designated as “Hard Drive”, “HDD” or the interface to which it is connected, the manufacturer and model of the disk. For example, “SATA:3M-SAMSUNG HD502HJ” (this is a 500 GB Samsung hard drive with a SATA interface).
Please note that in the “Boot” section there may be other items responsible for boot priority, such as “Hard Disk Drives” or “Removable Device Priority”.

They also need to check that the DVD drive or flash drive comes first.

If you have two hard drives, then the one on which you are installing the system should be higher. But in this case, I recommend disconnecting one of the disks to avoid confusion and possible errors in installing the system. It can be connected after installation.
In the Setup program with the UEFI interface, everything is done similarly. Look for the “Boot” or “Download” section, find your DVD drive or flash drive there and move it to the very top of boot priority. Plus, you can use a mouse for this, which is easier and more convenient.

5.2. SATA controller operating mode
In principle, this is not so important, but many people are interested in this issue, so I decided to clarify it a little. SATA drives can operate in compatibility mode with older IDE drives and in the more modern AHCI mode. AHCI gives a small increase in hard disk performance when multiple simultaneous accesses are made to it. This mode of disk operation occurs mainly on servers and is practically useless for an ordinary home computer.
When setting up the BIOS, it is possible to select the operating mode of the SATA controller.

These settings may be located in different places and have slightly different names, but the principle is the same everywhere. You are offered IDE compatibility mode or the new AHCI mode.

In general, IDE compatibility mode is recommended for Windows XP, since it does not natively have SATA drivers and simply will not see the hard drive, which will not allow Windows to be installed. Drivers can be built into the Windows installation distribution, but this makes no sense, since it will not affect the speed of operation and may add problems.
There is an easier and more convenient way to boot from a DVD or flash drive for both BIOS and UEFI - boot using the “Boot Menu”.
To call the boot menu, the “F8”, “F10”, “F11”, “F12” or “Esc” keys can be used. They can often be seen in prompts on the initial boot screen of your computer. You can also find out this information from the instructions, on the website of the motherboard or laptop manufacturer, by searching on the Internet, or at random.

Immediately after turning on the computer, press and hold the “Boot Menu” key until the boot device selection menu appears.

Use the down and up arrows to navigate to the DVD drive or flash drive and press Enter.
Sandisk Cruzer
The advantages of this method are obvious - you don’t need to delve into the BIOS, you don’t need to return the BIOS settings back later (although this is not always necessary), and it’s enough to call this menu just once, since after you start installing Windows, this will no longer be needed. Additionally, using the "Boot Menu" does not change the BIOS or UEFI settings.
7. Download problems
Friends, due to the fact that many people had problems loading when installing Windows and some wrote about it in the comments, I decided to make a separate section where I collected methods known to me to solve these problems.
- If the computer stops booting at the very beginning and asks you to press F1, after which it enters the BIOS, then you most likely either have a low battery on the motherboard (the timing may be off), problems with the processor cooler (failure, not connected there) or hard drive (errors in SMART).
- If, when you turn on your PC, the message “Reboot and Select proper Boot device or Insert Boot Media in selected Boot device and press a key” appears, this means that the boot area on the disk or flash drive is not found or is damaged. Try booting from the installation disk or flash drive using the Boot Menu (Section 6 of the article), if that doesn’t help, make the bootable media again using the Windows USB/DVD Download Tool utility.
- If, after restarting the computer, the Windows installation starts from the beginning, then remove the boot disk or flash drive and restart the computer, the installation should continue from the hard drive.
- Disconnect all unnecessary USB devices (flash drive, 3G modem, smartphone, printer) from the computer. You only need to leave the mouse, keyboard, DVD or flash drive from which you are installing Windows.
- If you have several hard drives, then disconnect all drives from the motherboard except the one on which Windows will be installed.
- Reset BIOS settings to default (described in this article).
- If the installer does not see the disk or error 0x0000007B appears at the end, change the SATA controller mode in the BIOS from AHCI to IDE or vice versa.
- If every time you boot your computer or laptop itself enters the BIOS or opens the boot menu, then set the Boot Pop Menu option in the BIOS to Disable (if any).
- Disable Fast Boot in the Advanced section of the BIOS, and in the Boot section set the Launch CSM option to Enable (if available).
- In the Boot section of the BIOS, change the boot mode from EFI (UEFI) to Legacy (if available).
- Set the Secure Boot option in the BIOS to Disable (if available).
- Select the version of Windows you are installing in the BIOS (if any).
- If you have a laptop, one version of Windows is installed, but another is not, and the advice on setting up the BIOS did not help you, then contact support or the manufacturer’s forum. Updating the BIOS can also help, after which additional options may appear in it (sections 8-12).
- If possible, from a DVD, since there are many different problems with flash drives.
- Make from .
- Insert the flash drive into the USB 2.0 connector on the back of the computer (motherboard) or the USB 2.0 connector of the laptop. Booting from USB 3.0 does not always work.
- Try using the Boot Menu, as described in paragraph 6 of this article. This method is simpler and more reliable than setting boot priority in the BIOS and you can determine whether the computer sees your flash drive.
- An underscore on a black screen indicates that the computer freezes while accessing a flash drive or hard drive. If the download continues without a flash drive, then that’s definitely the problem.
- If the computer does not see the flash drive or does not want to boot from it, use a DVD or other flash drive for installation.
- If this is not possible, then change the type of flash drive from “removable media” to “hard disk” using the “BootIt Next Generation” utility, format it with the “HP USB Disk Storage Format Tool” utility and make it bootable again using “Windows USB/DVD Download Tool". You can download all these utilities below in the “Links” section.
- If the problem occurs after selecting the Windows installation partition, then use the tips for setting up the BIOS (sections 7-12). During installation, remove old partitions from the disk or do this using the Acronis Disk Director boot disk.
- If the installer reports that it cannot install Windows on the disk, then try running it or back.
Let me remind you that to exit the BIOS and save the settings, use the F10 key.
8. Links
In the following articles we will look at how to install, and.
Sandisk Cruzer
Transcend JetFlash 790 8Gb
Sandisk Cruzer