How to restore the serial number. Windows System Restore. Recovering the OS using the recovery environment
This option will help return the system to the state recorded at a certain point in time - the restore point. If saving such points is configured and enabled, then the system state will be recorded to the hard drive before installing updates, drivers and applications.
Returning Windows to a restore point will save all personal files, but drivers and applications that appeared after the point was created will need to be reinstalled.
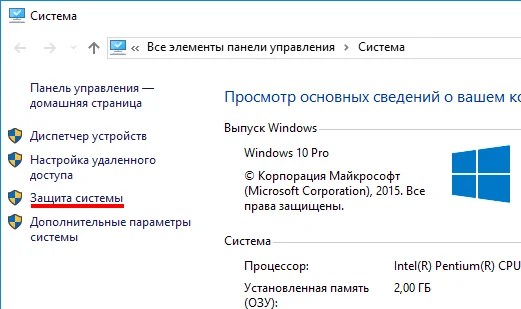
To start Windows Recovery, right-click on Start (Win + X) and go to Control Panel → System and Security → System → System Protection. Click "Restore" → "Next" and select the desired restore point.
Another path option: “Control Panel” → “All Control Panel Items” → “Recovery” → “Run System Restore”.
If the restore point is not found, it means that system protection is disabled, and you will have to use other methods.
To avoid troubles in the future, enable the creation of restore points. To do this, in the same “System Protection” menu, select the system drive, click “Configure” and enable system drive protection.
2. Return the computer to its original state
If there are no restore points or going to them does not help, try returning the system to its original state. You can roll back while saving the files or completely delete everything and . Also, some computers - often laptops - have an option to restore factory settings.

In Windows 8 and 10, you can start restoring to its original state by going to Settings → Update and Security → Reset your PC → Get Started.
In Windows 7, to do this, go to “Control Panel” → “System and Security” → “Backup and Restore” → “Restore system settings or computer” → “Advanced recovery methods” → “Return the computer to the factory-set state.”
3. Restore Windows using a disk
A recovery disk is useful, for example, for rolling back to a saved point or returning to its original state if Windows fails. An ordinary flash drive, external hard drive or DVD can serve as such a disk.

The recovery disc should be written in advance and stored in case of system failure. Under Control Panel → All Control Panel Items → Recovery, click Create a recovery disk. In the menu that appears, check the “Back up system files to a recovery drive” option, and you can use the USB drive not only to fix errors and rollback, but also to reinstall Windows.
You can create a recovery DVD in Windows under “Control Panel” → “System and Security” → “Backup and Restore” → “Create a system recovery disc.” The same method works in newer versions of the system, only the name is different: “Backup and Restore (Windows 7)” instead of “Backup and Restore”.

To correct errors, boot the system from disk. In the recovery environment that opens, click Troubleshoot. Start returning to a system restore point in the “Advanced options” → “System Restore” menu.
4. Restore Windows using a full system image
Another option for restoring Windows is to roll back to a previously created system image. The image is written to a hard drive, DVD, or network share.
Unlike a rollback or point-to-point restore, using a full image preserves all files, applications, settings, and drivers installed at the time it was created.

The most appropriate moment to create such an image may be when all the necessary applications are installed on the system, but there is nothing superfluous. This way you can continue working immediately after recovery.
To create a full system image, in the Control Panel, select Backup and Restore (Windows 7) → Create a system image. (In Windows 7: Control Panel → System and Security → Backup and Restore → Create a system image.)
In the menu that appears, you can choose which of the existing partitions and files to include in the system image and on what media to burn it.

With a complete system image at your disposal, you can quickly return Windows to the state you want. You can start image-based recovery when you restart the computer: “Diagnostics” → “Advanced options” → “System image recovery.”
This document describes how to restore your computer to factory settings. It consists of sections that present various methods of system recovery.
Before performing a system restore, back up all personal files and read the warning information.
Full recovery may take 4 to 6 hours. Make sure your computer is connected to the Internet. This may require you to restart your computer several times. Do not turn off the computer's power or interrupt the recovery process until the Windows login window appears.
Types of system recovery
There may be three types of system recovery available for your computer, or only two. Use the type that solves the problem without making unnecessary changes.
Restoring factory settings: A factory reset removes all partitions, reformats the entire hard drive, reinstalls the original operating system, and all original device drivers and software. This option also restores the required recovery partition (usually D:), the UEFI partition (usually E:) and reinstalls the necessary software.
Selecting the "Restore Factory Settings" option will return the configuration of all laptop software to the state at the time of purchase. All user changes or additions will be deleted.
Restoring a minimal image: Minimal image recovery (available on many HP laptops) removes all partitions, reformats the entire hard drive, reinstalls the original operating system, all original device drivers, and HP software (such as HP Support Assistant and HP Recovery Manager). Restoring the minimal image does not reinstall trial versions of applications and games.
System Restore: Reformatting the system drive (usually the C: drive), reinstalling the original operating system, all original device drivers and software. System Restore does not affect user-created partitions. If you have two hard drives, System Restore only changes one drive containing the operating system.
Attention!If the operating system partition (usually the C: drive) is smaller than the minimum required size, other partitions created by the user will be deleted and the recorded data will be destroyed.
This video shows you how to perform an HP System Restore on Windows 7
Recover from Windows 7 desktop screen
If Windows 7 starts without errors, follow these steps to run System Restore from the Windows 7 Start menu.
Note.If Windows 7 does not start correctly, go to the section in this document.
Turn off your computer.
Turn on your computer.
Click the Start button, select All Programs, and then select again.
When the system prompts you to provide an administrator password and confirm it, provide the password and re-enter it to confirm. If the User Account Control window appears asking if you allow the program to make changes to your computer, click Yes.

In the section, click System Restore.
Recovery Manager will prompt you to restore the computer to its original factory state. Click Yes and then Next.

The PC will restart. If the recovery partition on your hard drive is healthy, the Recovery Manager welcome window opens.
Note.If the recovery partition on your hard drive is damaged, you need a set of recovery discs to run system recovery. Follow the instructions in the section.

Click the button System Restore.
Recovering from the Start screen (during system boot) OR if the login screen fails to load
If Windows 7 won't start, follow these steps to repair your computer:
Note.If the recovery partition on your hard drive is faulty, this method will not work and an error message will be displayed. If the error message indicates that System Restore cannot be started from the Start screen, you need a set of system recovery discs. Follow the instructions in the Recovering from recovery discs section.
Turn off your computer.
Disconnect all peripherals except your monitor, keyboard, mouse, and power cord. Remove media from drives and remove any newly installed internal hardware.
Turn on your computer and press F11 at one second intervals until Recovery Manager opens.

In the section I need immediate help on a topic click System Restore.
When System Restore prompts you to back up your files, select a backup option:
In the warning window that opens, click OK.
When the system restore procedure is complete, click Finish to restart your computer. Enter the required information in the installation windows and wait until the computer completes it.
After installation is complete, turn off your computer, connect all necessary devices and cables, and then turn on your computer again.
Before using your computer, update and secure your computer. Reinstall any antivirus and security software that was installed on your computer before the system restore.
Reinstall any programs that were installed after you purchased your computer, as well as any files that were backed up.
Recovering from recovery discs
Follow these steps to restore your computer from recovery discs (CDs or DVDs). This may be a kit obtained from HP technical support or discs created by the user.
Note.HP does not include discs with your PC because... The recovery software is located on your hard drive. You can obtain recovery discs from HP technical support or create them yourself using Recovery Manager software. HP recommends that you create a set of recovery discs as soon as you receive your computer and store them in a safe place. When using support-provided disks, system recovery may take 4 to 6 hours, but when using self-created recovery disks, the process typically takes less time. For more information on creating a set of recovery discs, see Creating recovery discs or saving a recovery image to a USB flash drive in Windows 7.
If the Select Boot Device menu is displayed, use the Up or Down arrow keys to select the desired CD/DVD drive, then press Enter to continue.
When opening the Startup Options menu, press F9 to open the "Boot Menu" or "Boot Device Options". Use the up and down arrow keys to select your CD/DVD drive. Then press the Enter key.
Note.
You may be able to select more than one CD/DVD drive from the boot device list. In this case, select one CD/DVD drive from the list to see if HP Recovery opens. If the recovery process does not start, or a non-system drive error is displayed, restart the computer by pressing the Power key, then repeat these steps to select a different CD/DVD drive. Once the recovery process has started, continue to follow the instructions to complete the recovery process.
A window may appear asking you to choose to launch Recovery Manager from your hard drive or the disc inserted into the drive. If this window appears, select Run the program from disk and click Next.
Select the option you want based on the type of recovery discs you have:
When System Restore prompts you to back up your files, select a backup option:
In the warning window that opens, click OK.
Read and respond to system prompts on screens as they appear. If the system prompts for a disc, insert the next disc. In some cases, you may need to insert the same disc several times to continue the operation.
After system recovery is complete, remove the disk. If you cannot eject the disc, press the eject button on your computer.
When the Recovery Complete window appears, click Finish.
When the File Copying Complete window appears, click Next.
Depending on the model, the computer will shut down or restart. If your computer turns off, wait 5 seconds and then turn it back on.
Note.
If you use recovery discs sent from HP, the recovery process may take more than an hour. Do not interrupt the recovery process. The recovery is complete when the Windows setup screens are displayed.
Complete the Windows installation.
Disconnect all peripherals except your monitor, keyboard, mouse, and power cord. Remove media from drives and remove any newly installed internal hardware.
Immediately press the Esc key several times in a row every second until the Startup Options menu or Boot Device Selection menu appears.
The items you select may vary slightly depending on the type of menu displayed on the screen:
If the Select Boot Device menu appears, use the Up or Down arrow keys to select the desired USB storage device, then press Enter to continue.
When opening the Startup Options menu, press F9 to open the "Boot Menu" or "Boot Device Options". Use the up or down arrow keys to select the name of the USB storage device (adjust device volume). Press Enter
Before using your computer, update and secure your computer. Reinstall any antivirus and security software that was installed on your computer before the system restore.
Reinstall any programs that were installed after you purchased your computer, as well as any files that were backed up.
Turn on your computer and insert the first recovery disc into the drive.
To turn off your personal computer, press and hold the power button.
Disconnect all peripherals except your monitor, keyboard, mouse, and power cord. Remove media from the drives, then remove any newly installed internal hardware.
Turn on your computer.
Due to the presence of viruses, driver or software mismatches, the OS may malfunction. If your Windows crashes, don’t rush to panic. The situation can be corrected by returning the state of files and programs to the moment when the PC was working properly.
While running OS Windows 7, 10 or 8, certain errors and problems may occur. As a result of such failures, starting the operating system again in operating mode becomes impossible. In this case, it is not at all necessary to do a time-consuming reinstallation of the OS. All you need to do is perform a system restore.
Recovering the OS using the recovery environment
When working we use the following scheme of actions:
- Reboot the computer, press the F8 key while loading;
- Troubleshooting;
- System restore, selecting an OS restore point;
- Click "Next" and again "Next";
- Press the button "Ready", we reboot the system (in the Menu, select boot with the last successful configuration).
Windows 7 System Restore
There are several methods you can use to get your OS running again. Some of them rely on rolling back to saved settings. Others simply clear the data.
You can “reanimate” the OS in one of the following ways:
- by selecting restore points;
- using the command line;
- through safe mode;
- using a recovery environment;
- using an image/boot disk.
Restoring the operating system using system “resuscitation” checkpoints is one of the most affordable, effective and popular options. To apply it, you need to make a series of clicks:
- Panel "Start";
- "System Restore";
- "Next";
- "Select a restore point";
- "Ready".
With such an operation, problems with the computer will be corrected, changes will be canceled and the system will be returned to the operating state that allowed the PC to boot normally. There is no loss of data, files and documents with this type of recovery. All data is saved. The operation is reversible. You can roll back the system to a previous computer state and use a different restore point.
Many people wonder how to make a recovery point on their own (manually) in order to choose it in the future? To do this in the same menu "Start" - "System Restore" You can create such a point yourself at any time convenient and suitable for you. It will be saved indicating the current date, which you just have to remember.
From restore point
In computer engineering there is such a thing as a recovery point. These are saved PC settings. As a rule, saving occurs automatically with each successful OS boot. The easiest way to restore Windows 7 is to use this data.
Press F8 when your computer boots. This command will bring up a menu of system startup options. Next, you need to select the Last Known Good Configuration option.
Another method can be used. Go to the properties of the My Computer folder. Find the line System Protection, clicking on which will open the dialog box of the same name. Click Recovery – Next. We set a target date, indicate the disks that need to be fixed, and confirm the actions. After rebooting, the PC should work normally.
No restore points
You can fix problems with the OS even without restore points. To do this you will need to resort to the LiveCD program. You need to download it and burn it to a flash drive with the .iso extension.
Further all actions will take place in the BIOS. You need to configure booting from a flash drive. To do this, in the Boot section, select USB-HDD in the First boot device line.
Before proceeding directly with the recovery, copy all the necessary files to a removable disk. The LiveCD program provides a special menu for these purposes.
We will fix the system error using an archived copy. Connect the USB flash drive, open the Windows\System32\config\ folder. Files with the names default, sam, security, software, system must be moved to any other folder. In their place, transfer similar files from the RegBack folder and restart the computer.

The described method will only help if the problem is related to the registry.
Command line
You can resort to “reanimating” Windows 7 from the command line if the PC begins to freeze or works slowly, however, the system still boots. Enter the menu "Start" and using the right mouse button, launch the command prompt as administrator. Run the rstrui.exe command, which will open the system restore program. Click "Next". In the next window, select the desired rollback point and click again "Next". Once the process is complete, the PC should work normally.
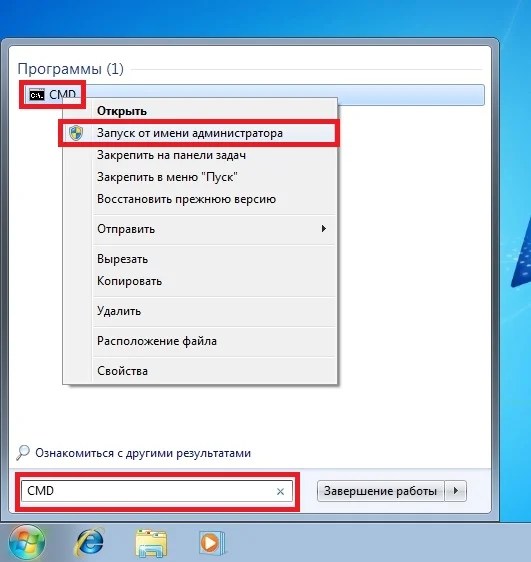
There is another way to access the utility. Let's go to "Start". To open the command line, click "Run" and enter the CMD command. We click on the found CMD.exe file and wait for it to launch. Next, enter rstrui.exe in the command line and confirm the action with the Enter key on the keyboard.
It is not always possible to play it safe and create OS restore points in advance. Problems may arise that block the option of such “reanimation” of the PC. Then you can use another, no less effective and easy option - restoring the Windows system using the system itself.
We rely on the diagram:
- Icon "My computer"- right mouse button "Properties";
- "System protection";
- In the new window click "System protection", recovery button;
- "Next";
- Select a restore point according to the date;
- Specify the system disks to be restored;
- We confirm the operations and reboot the system.
Restoring Windows 7 using Safe Mode
This method is preferred if the usual system boot is impossible. Then after pressing the PC power button on the system unit, hold down the F8 key to call "Start Menu". One of the "Menu" options is "Safe Mode". Select it and press Enter on the keyboard. As soon as Windows boots, we carry out the algorithm of actions that we described earlier.
System recovery Windows 8/8.1
If you managed to start the OS, you can resume Windows 8 via "Options". Hover over the top right corner and enter them. Click on "Change computer settings" – . Chapter "Recovery" will offer several options:
- "Regular recovery with information preservation".
- “Deleting data and reinstalling the OS”.
- "Special option".
Decide what exactly needs to be done. Next, follow the menu prompts.
If you choose the latter method, in the window that opens, click on the diagnostics item. You will be offered the following options:
- "Restore";
- "Return to original state";
- "Advanced options". This item includes the ability to roll back to the desired resume point.

To resume Windows 8.1, press Win+R and call sysdm.cpl. In the system properties window in the tab "Protection" specify the required system drive. Click "Restore". Clicking "Next", you will be able to see a list of rollback points. Select the one you want and click "Search for affected programs". Changes that have been made to the PC since the selected moment will be deleted. Complete the process by clicking "Ready".
If you work with Windows 8, problems may occur, the Internet may not work correctly, etc. To fix this, you can use the classic recovery method through restore points.
Another option is a system rollback. To do this, open the menu "Start" - "Control Panel" - "Windows Update". Select an item "Removing updates". The same can be done using the command line.
So, in the list of updates that opens, we delete those from the moment of installation of which (we look by date) problems and malfunctions began. We delete unnecessary files and reboot.
You can perform a factory reset on Windows 8.1. Important files will not be affected during this operation. The method is effective, but to implement it, the OS needs to boot without problems. We use the algorithm:
- Right side of the monitor - "Options";
- "Changing settings";
- "Update and Recovery" - "Recovery";
- "Recovery without deleting files".
If you cannot log into the system in the usual way, you must use the disk with the system. Load the installation disk, select "System Restore". Press the button "Diagnostics", And "Restore".
Windows 10 System Restore
If you have problems with Windows 10, press Windows + Pause. Go to "System protection" and press "Restore" – "Next". Select the desired indicator and click again "Next". When finished, click "Ready". The computer will automatically restart and the changes will take effect.
One of the advantages of the “ten” is the ability to return the settings to factory settings. This helps avoid having to install the system all over again. To reset your data go to "Computer Settings" – "Update and Security" – "Recovery" – "Return the computer to its original state". Click "Begin".
You can take care of the possibility of a rollback in case of failure in advance. You can create resume points yourself or configure their automatic creation at the desired frequency. To do this, in the settings, in the Update and security item, select Backup service. Specify where to save copies, click Add disk. After selecting the device, the function will be activated.
You can restore your Windows 10 system again by using restore points. In this case, the system will be rolled back to the moment when it loaded smoothly and worked without failures. This recovery method is described at the beginning of the article.
If the OS does not boot, a warning table with a key appears on the screen "Additional recovery options". Click it and select "Diagnostics" - "System Restore". We select a Windows restore point, wait for the system to roll back and reboot.
If such operations do not help and the computer continues to work incorrectly, you can roll back to the basic settings. Some programs and utilities, personal PC settings will be reset, and personal data will be deleted.
This technique is used extremely rarely if the other options described above do not help. The algorithm of actions is as follows:
- "Start" - "Selecting parameters"- tab "Updates and Security";
- Paragraph "Recovery"- button "Begin";
- We choose to delete all files or keep some of them.
Recovering the system after this will take 40-90 minutes.
Resuming using the installation disc
One of the radical methods of fixing the error involves using an installation disk. After launching it in BIOS, click System Restore. In the Troubleshooting section, specify the desired action. Next, follow the system prompts to complete the process.
But the user did not bother to write it down on paper and put it in another place in time.
Happens? Happens! And although, to be honest, most often you want to tell such a user that who is to blame for not making a backup copy, at the same time you need to remember that there is a whole class of software for restoring such serial numbers.
CD key (aka product key, activation key, key code, key installation, serial number) is used to determine that a copy of a program or game is original. In simple terms, a product key is a long string of numbers and letters used by many programs during the installation process.
2. ProduKey
This tool allows you to recover ProductID and CD-Key for Microsoft Office (Microsoft Office 2003, Microsoft Office 2007), Windows (including Windows 7 and Windows Vista), Exchange Server and SQL Server. For more details visit http://www.nirsoft.net/.
Download 32-bit versionhttp://www.nirsoft.net/utils/producey.zip
Download 64-bit versionhttp://www.nirsoft.net/utils/producey-x64.zip
3. WinGuggle
This is a powerful tool that allows you to quickly recover Windows 7/Vista/XP and Office keys. In addition, you can install, change, uninstall, or back up Original Equipment Manufacturer’s (OEM) Logo Information Settings.
Download http://download.cnet.com/WinGuggle/3000-2094_4-10795752.html
4. WinKeyFinder
WinkeyFinder 1.75 allows you to recover license keys for Windows 7, Windows XP, Windows Vista, MS Office 2007, Windows Me, 98, 2003, etc. NET from the registry
Download http://forums.winkeyfinder.com/new-releases/attachment.php?attachmentid=48&d=1324367008
5. Product Key Finder
Product Key Finder allows you to recover license keys (CD Keys) from the Windows registry and supports recovery of more than 200 applications including Microsoft Windows, Microsoft Office and Adobe Acrobat.
Download – http://davehope.co.uk/Projects/CPP-ProductKeyFinder.exe
6. Keyfinder-Thing
The tool retrieves the serial numbers of the software installed on your computer. This is a free key recovery product. The tool scans the system registry for 90 supported software products. Keyfinder-Thing allows you to copy or export all keys to a text or HTML file.
Download – http://download.cnet.com/Keyfinder-Thing/3000-2094_4-10491989.html
7. Product Key Finder PRO
Using this product you can recover your keys (CD Product key) for Windows or Office to reinstall (restore) your Windows or Office OS. Download – http://dl.filekicker.com/send/file/230955-HSCE/ProductKeyFinder.exe
8. Windows Product Key Finder Professional
One of the best products of this class
11. Product Key Finder (OTT Solution)
Allows you not only to find out product license keys, but also to change them without reinstalling applications
Download – http://www.ottsolutions.com/products/ProductKeyFinder/ProductKeyFinderV1.0.zip
12. SyberCorp' Windows Product Key Viewer
Download –
If you've lost the license key for your copy of Windows 7 or Windows 8, you can still recover it from the computer on which the operating system is installed. There are a ton of programs available for Windows 7 that allow you to recover your product key, but not all of them work on Windows 8. That's why I decided to check out a number of programs to see which ones work on Windows 8 as well.
Some of the programs in this review also promise to recover the license key for other products (for example, Microsoft Office). I have a licensed version of Microsoft Office 2013 installed, but no program has been able to read the key. They all seem to only support Microsoft Office 2010 and earlier versions of the office suite, so they need to be updated.
is a program that is distributed completely free of charge. It will show you not only the license key of your copy of Windows, but also detailed information about the installed software, hardware components, etc., so when you launch the program, it conducts a thorough analysis of the entire system.

When the analysis is complete, your default browser will open a page with all sorts of information in which you can literally get lost.

If you move your gaze to the left, you will see a Software Licenses link, which will take you to the section of the same name. There you will find several license keys, including one for installing Windows.
This program works well but spends a lot of time loading data as it searches for much more data than other programs. If you only need to know the product key, it is better to choose something from among the other programs.
The program has a very strange name, but it is free, and most importantly, it works. Be careful when installing, as it tries to install another program that you may not need at all.

Magical Jelly Bean Keyfinder 2.0 provides the information you need in a very simple interface.

This program works quickly and quite well. In addition, Magical Jelly Bean Keyfinder 2.0 easily finds the product key for Microsoft Office up to version 2010.
The small utility can display ProductID and CD-Key from Microsoft Office (up to 2007 version only), Windows, Exchange Server and SQL Server.
All you have to do is download the archive, unpack it and run ProduKey.exe. The program will start and instantly display the relevant information.

This program is very small, free, fast, does not require installation and is easy to use. I highly recommend it!
Which program is better?
All programs presented in this review find the Windows license key without any problems. Some of them even recover the product key for various programs installed on the computer. But if you need to quickly find a product license key for your copy of Windows 7 or Windows 8, I recommend trying ProduKey v1.56 or Magical Jelly Bean Keyfinder 2.0.
Have a great day!