How to set boot from a flash drive in old and modern BIOS versions. How to reset BIOS settings to default settings Setting up BIOS on an msi motherboard
If you were looking for BIOS settings in pictures, then you came to the right address.
The changes made will be protected by a lithium battery built into the motherboard and maintaining the required parameters in the event of a loss of voltage.
Thanks to the program, it is possible to establish stable interaction between the operating system (OS) and PC devices.
Attention! The present Boot network configuration section allows you to adjust parameters related to system boot speed and keyboard and mouse settings.
After finishing work or familiarizing yourself with the Bios Setup Utility menu, you need to press the hot Exit key, which automatically saves the changes made.
Section Main - Main Menu
Let's start working with the MAIN section, which is used to modify settings and adjust timing indicators.
Here you can independently configure the time and date of your computer, as well as configure connected hard drives and other storage devices.

To reformat the operating mode of the hard drive, you need to select the hard drive (for example: “SATA 1”, as shown in the figure).
- Type - This item indicates the type of connected hard drive;
- LBA Large Mode- is responsible for supporting drives with a capacity of more than 504 MB. So the recommended value here is AUTO.
- Block (Multi-Sector Transfer) - For faster operation here, we recommend selecting the AUTO mode;
- PIO Mode - Enables the hard drive to operate in legacy data exchange mode. It would also be best to select AUTO here;
- DMA Mode - gives direct memory access. To get faster read or write speed, select AUTO;
- Smart monitoring - this technology, based on an analysis of the drive’s operation, can warn of a possible disk failure in the near future;
- 32 bit Data Transfer - The option determines whether the 32-bit data exchange mode will be used by the standard IDE/SATA controller of the chipset.

Everywhere, using the “ENTER” key and arrows, the Auto mode is set. The exception is subsection 32 Bit Transfer, which requires the Enabled setting to be fixed.
Important! It is required to refrain from changing the “Storage Configuration” option, which is located in the “System information” section and not to allow correction “SATADetectTimeout."

Advanced section - Additional settings
Now let's start setting up the basic PC components in the ADVANCED section, which consists of several sub-items.
Initially, you will need to set the necessary processor and memory parameters in the system configuration menu Jumper Free Configuration.

By selecting Jumper Free Configuration, you will be taken to the Configure System Frequency/Voltage subsection, where you can perform the following operations:
- automatic or manual overclocking of the hard drive - AI Overclocking;
- changing the clock frequency of memory modules - ;
- Memory Voltage;
- manual mode for setting chipset voltage - NB Voltage
- changing port addresses (COM,LPT) - Serial and Parallel Port;
- setting controller settings - Onboard Devices configuration.

Power Section - PC Power
The POWER item is responsible for powering the PC and contains several subsections that require the following settings:
- Suspended Mode- set automatic mode;
- ACPI APIC- set Enabled;
- ACPI 2.0- fix the Disabled mode.

BOOT section - boot management
Here you can determine the priority drive, choosing between a flash card, disk drive or hard drive.

If there are several hard drives, then in the Hard Disk sub-item the priority hard drive is selected.
The PC boot configuration is set in the Boot Setting subsection, which contains a menu consisting of several items:

Selecting a hard drive
The PC boot configuration is set in the Boot Setting subsection,

- Quick Boot– acceleration of OS loading;
- Logo Full Screen– disable the screen saver and activate the information window containing information about the download process;
- Add On ROM- setting the order on the information screen of modules connected to the motherboard (MT) via slots;
- Wait For 'F1' If Error- activation of the function of forced pressing “F1” at the moment the system identifies an error.
The main task of the Boot section is to determine boot devices and set the required priorities.
- ASUS EZ Flash– using this option, you have the opportunity to update the BIOS from such drives as: floppy disk, Flash disk or CD.
- AINET– using this option, you can obtain information about the cable connected to the network controller.

Exit section - Exit and save
Particular attention should be paid to the EXIT item, which has 4 operating modes:
- Save Changes– save the changes made;
- Discard Changes + EXIT– leave the factory settings in effect;
- Setup Defaults– enter default parameters;
- Discard Changes– we cancel all our actions.

The following step-by-step instructions explain in detail the purpose of the main BIOS sections and the rules for making changes to improve PC performance.
Bios setup
Bios Settings - Detailed instructions in pictures
Let's look at ways to enter the BIOS of an MSI laptop motherboard using the B85-G41 model as an example to set WINDOWS 7 boot settings from a flash drive or CD/DVD drive.
We will be dealing with the new BIOS; the interface may seem unusual to those accustomed to the “old” BIOS options.
First of all, turn on the computer. When the screen saver appears, you must press the “Del” key on the laptop keyboard. It is located at the bottom of the digital section of the keyboard. Like everywhere else, it is on the right.
After pressing the “Del” key, the inscription “Entering the settings menu” will appear at the bottom left of the screen, then the MSI logo will appear and a little later we will find ourselves in the laptop’s BIOS.
The appearance of the new BIOS looks like this.

The advantages of this BIOS are that it already has a functioning mouse and has expanded functions.

To go to the BIOS settings, click on the “SETTINGS” tab. It is located at the top left.

In the Russian version, the “Download” tab is third in the list of five.
A new window will appear where you need to find the “Boot mode select” tab. Click on it, and in the window that pops up, select the “LEGACY + UEFI” item, if this item was not selected on your laptop earlier.
From the list of available devices for loading the operating system that pops up, select our flash drive by name USB + the name of your flash drive (the flash drive must be connected to one of the USB connectors of the laptop); if you need to boot the operating system from a disk, then select the CD/DVD item.
After these steps, press the F10 key. The laptop will ask if you want to save the configuration changes. Confirm by clicking “Yes”.
The second download option is a little faster.
The beginning is the same - entering the BIOS? SETTINGS? "Loading" ? "LEGACY+UEFI".
Reboot the laptop. When loading, press the F11 key. A prompt will appear. In this window, select a possible connected device from which we want to boot the operating system.
Click BIOS 4 is the latest generation of UEFI BIOS, specially optimized for modern operating systems. It matches the unique look and functionality of each motherboard, while at the same time it makes it easy to find any function no matter what board you are using, classic, GAMING or overclocking model. In addition, it responds faster to changes, runs more smoothly, and also supports mouse control. On this page, you can learn about some of the advanced and cool features of Click BIOS 4.
Hardware Monitor II
Hardware monitoring allows you to control system fans using Total Fan Control, as well as monitor the main system parameters using a convenient graphical interface. You can set the temperature threshold for the processor using four points, thereby setting the fan operation algorithm.Board Explorer
This function graphically displays all board connectors, connected devices and their current status. With BOARD EXPLORER you can easily determine which device is not connected or is connected incorrectly.OC profile preview II
Tired of manually adjusting settings every time? Thanks to saved OC profiles, you can easily switch between 8 settings profiles saved on HDD or USB. In the blink of an eye, you will see the difference between the current system settings and the settings loaded from the profile.Memory presets
Save time. Load stable memory settings for overclocking. With our new saved memory settings configurations, you can always quickly select the desired memory settings profile with maximum performance for your board.Memory-Z allows you to easily monitor your memory settings by displaying information about the timings stored in the SPD module. Helps optimize memory settings for greater stability during overclocking.
M-Flash allows you to update the BIOS, as well as save a copy of it on your hard drive or USB drive. With M-FLASH, you can test a new BIOS version without actually flashing it to the board. Explore new BIOS features and changes with M-FLASH as a portable BIOS chip.
Clickable OC Genie
Few people would want to open the case every time to turn the OC Genie on or off. With just one click, you can overclock your system in one second and take full advantage of OC Genie technology through the BIOS.MyOC Genie
The new version of OC Genie also supports MyOC Genie. With MyOC Genie, you can customize your own OC Genie profile and, with the click of a button, overclock your system even more.Memory Try It
Tired of selecting memory settings? Our engineers, with the assistance of the world's best overclockers, have created the largest database of overclocker memory profiles for the most popular chips. Just set the CAS latency and memory frequency, and we will do the rest. Memory overclocking has never been easier.Dragable boot order
Want to boot from another device? Thanks to Click BIOS 4, you can see not only the established boot order from devices, but also change it with the mouse by dragging the names of boot devices in the list. Conveniently controlled by icons at the top of the BIOS screen.GO2BIOS button
Didn't have time to press DEL to enter the BIOS settings? Just press the GO2BIOS button before you turn on or reboot the system and the next time you start you will automatically enter the BIOS settings.Multi-BIOS II
Did something go wrong when updating the BIOS? Don't worry! With Multi BIOS II technology, you have a second BIOS chip that you can use to restore the contents of the main BIOS chip.Ceasefire Lite
Don't waste time opening the case and removing unused graphics cards. Use Ceasefire Lite through Click BIOS 4. Thanks to this menu, you can disable unused PCIe slots.Slow Mode
Solve the cold start problem with Slow Mode. Slow Mode lowers the CPU multiplier to 8x. When using the CPU vCore Adaptive Mode, the Slow Mode function will significantly reduce the vCore voltage to 0.8~0.9V. This feature will help avoid the problem of “cold start” at extreme subzero temperatures during overclocking.My Favorites
Want quick access to the most important settings? The My favorite section will allow you to organize easy access to your favorite, most frequently used settings. You can divide the required settings into five groups.
Advanced memory settings
Configure memory parameters such as CAS latency and TRAS. In this section you can change the second and even third level memory settings.View complete processor information such as stepping, current frequency, voltage, and number of threads. CPU-INFO is a convenient tool for checking processor parameters and settings during overclocking. Make sure your processor is running at the correct settings before you run a benchmark or game.
Last known best setting
Couldn't boot after overclocking? Don't worry! Thanks to the Last Known Best Setting feature, the system will return to its previous BIOS settings before you have time to change them. This will save a lot of time.Change Settings Info
When exiting the BIOS, check what settings you changed. Click BIOS 4 has a Change Settings Info feature that shows you which settings were changed before you exited the BIOS. This way, you can always check what changes to the settings were actually made before you reboot the system.Quick XMP Button
Don't want to configure memory timings yourself? With easy one-button access to XMP in Click BIOS 4, you can be confident that the correct memory timings are set for optimal performance and stability.Quick nav
Quickly switch between different sections of BIOS settings using the Up/Down/Left/Right keys on your keyboard. A simple navigation bar will always help you determine which BIOS section you are in.Simple/advanced mode
Want to see only the important Click BIOS 4 settings? Use simple settings display mode to view the most important settings without unnecessary details. Use advanced mode and get access to all overclocking settings.Quick preview system status
Using the tab on the right side of the BIOS settings, you can monitor in real time the most important voltage values, for example, CPU Core voltage.Concluding our series of articles on updating the BIOS, we will tell you how to update the MSI BIOS, because motherboards from them have their own characteristics!
Updating the BIOS in a device equipped with an MSI motherboard is generally done as follows:
- the specific model of your motherboard is installed;
- checks for updated versions of the system you are interested in;
- install them directly.
If you know exactly the model of your equipment and the version of the system to reinstall, then all that remains is to find out whether your motherboard is from the MSI brand. The firmware you need can be downloaded either to the computer itself or to a portable device.
How to update BIOS from the MSI brand using a flash drive?
You can run the version of the I/O software update you are interested in directly from your desktop.
To make this operation easier, you can use the special Click BIOS II interface, suitable for working with devices from the Taiwanese manufacturer we are considering. In the “Utilities” section you will find the M-Flash program, suitable for installation from a flash drive, which will help you update your I/O software.
This specialized utility will prompt you to use the “Update Bios” option. With its help, the required update file is selected from a flash drive, previously downloaded from the manufacturer’s official website, and then it is installed automatically. Before continuing to use your computer, it is recommended that you restart it.
MSI live update 6 is also located in the same section. This is a special utility with which you can find out the version of your motherboard using the “System Information” section. 
This program will also help you check for the latest updates for your device in real time, either manually or automatically. If you select the first option, you will need to check the second “MB Bios” box before starting the scan. 
We understand motherboard models and utilities from the Taiwanese manufacturer
It is worth remembering that under the abbreviation denoting the equipment for which we are trying to install a BIOS update, there is hidden the name of a company specializing in the production of motherboards.
It sounds like Micro-Star International. Thus, we are not talking about any specific version of the motherboard, but rather about their whole family. For example, you may have MSI z270 a pro or MSI h110m pro vd on your computer.
You can find out your motherboard model in order to subsequently update the I/O system in a variety of ways, including:

Have a great day!
You've probably noticed that now in many articles on fixing various errors in Windows or restoring it, they almost always recommend using a bootable flash drive with operating system installation files or a LiveCD. And only then do they remember to use the installation CD.
In principle, this is not surprising, since today DVD drives have already faded into the background, and they were naturally followed by CD/DVD discs. For example, when assembling a new computer, few people additionally buy and install a DVD drive; by the way, many PCs that are sold already assembled do not have a drive installed either. Well, I’m generally silent about modern laptops or netbooks; in most models the drive has been missing for a long time.
Just in this instruction we will look at several examples of how to set boot from a flash drive in different BIOS versions. In this article you can find examples both for the earliest versions of BIOS and for some modern UEFI versions from various manufacturers.
Procedure for installing boot from a flash drive in BIOS
Setting up booting from a flash drive in different BIOS versions may differ slightly, but in principle the algorithm itself is the same for everyone.
- We write or with ;
- We connect the prepared USB drive to the computer. If you are planning to install Windows, I recommend connecting the drive to USB 2.0, that is, to ports that are painted black (blue is USB3.0). So, sometimes the system may refuse to start installation due to the lack of drivers for USB3.0 to which the device was connected;
- Turn on or restart the computer and enter the BIOS using the " Del" or " F2" If none of these keys work, you can find options that can help you here;
- In the BIOS, open the “Boot” section, where in the list of boot devices we move the flash drive to the first place;
- By pressing the “F10” key and saving the changed parameters, we try to boot from the device we connected;
In general terms it looks something like this. Well, now let's specifically go through each BIOS version.
Booting from a USB flash drive into Pheonix AwardBIOS
AwardBIOS is a rather old version of the BIOS, and today it is very rare to come across it, but it still happens sometimes.
So, having entered the BIOS, we need to go to the “” tab.


Initially, the hard drive will be in the first positions, or if you have several of them, then all hard drives will be displayed first and only then the connected USB device. Here you need to use the " + » Move the flash drive to the very first line.

Then we return to the previous menu using the “ Esc" and in the parameter " First Boot Device" select the value " USB-HDD" (By the way, some versions of this BIOS may not have such a line, so you can try selecting either USB-FDD or USB-CDROM).

Well, in the parameter “ SecondBootDevice » set « HardDisk».
By pressing F10, save the settings and restart the computer.
Booting from a flash drive in another version of Pheonix AwardBIOS
Also, there are several more versions of Pheonix AwardBIOS, in which the principle of installing boot from a flash drive is similar, but the menu itself is slightly different.
We'll start by checking whether the USB controller is directly enabled:

Installing boot from USB flash drive:

By the way, I would like to draw your attention to the fact that this BIOS version may have several more options for installing boot from a flash drive, for example:
- In some cases, it is enough to simply select “USB-HDD” in the “Boot” section as the first device from which the computer will boot.
- Sometimes a flash drive can be found not in the hard drive settings, but in the “Removable Drives” subsection;
How to set boot from a USB drive in AMI BIOS
AMIBIOS is another version of BIOS, which is often found on not the latest motherboards. boards. In general, if once in the BIOS its appearance is the same as in the screenshot below, then to install the flash drive as a boot device you need to follow the following steps:

In this BIOS version, also, the flash drive can be found not only in “ Removable Drives", but also in "", so be careful.
We set boot from a flash drive in UEFI BIOS Gigabyte
Now, let's move on to more modern types of BIOS, which can be found on later models of motherboards from various manufacturers.
Well, right now we will start with the UEFI BIOS on the Gigabyte motherboard.
So, having entered the BIOS using the same “Delete”, “F2” or “Esc” keys, go to the “ tab BIOS Features" Here you can see that initially booting from a flash drive will only be available in UEFI mode.
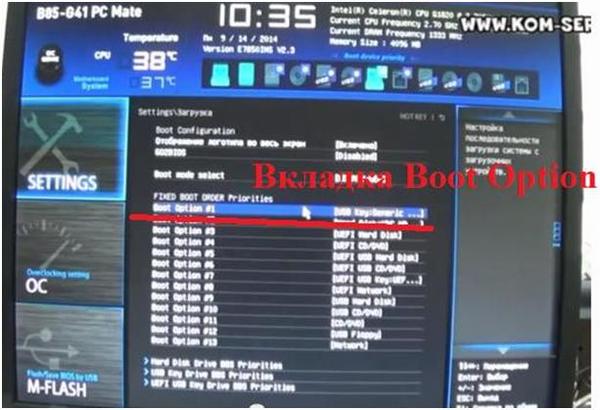
Well, since this option won’t suit most people, because the regular Legacy mode has a higher priority, we need to change it. To do this, go to the line “ Hard Drive BBS Priorities".

IN " Boot Option #1"We set a bootable USB flash drive instead of a hard drive, respectively, in " Boot Option #2", HDD must be installed.

After this, in the previous menu you will be able to select a flash drive as a boot device, but without the UEFI prefix.
There is another boot option, which, it seems to me, is much easier to use, but its trick is that it serves for a one-time boot from a USB drive, that is, the next time you reboot you will have to choose to boot from it in the same way again.
In order to use it, you need to move to the “ Save & Exit" and in " Boot Override» select the required device to boot the computer.

The beauty of this option is that it does not require any additional changes to the BIOS settings, and later you simply do not have to bother with returning the boot settings to their original position. By the way, this option is very similar to the same Boot menu, although in this case we will have to go directly to the BIOS.
Booting from a flash drive on ASUS motherboards
The BIOS on ASUS motherboards also has several options for starting a computer from a bootable USB flash drive with Windows.

On more modern motherboards the principle is the same. Below I will show an example using the same ASUS.
After entering the BIOS, on the initial screen we again need to use the mouse to move the priority device to the very top. Up because this menu has moved to the right side and become vertical.

You can also use the boot menu, as I showed in the previous example.
By going to " AdvancedMode ( F7)" and going to the tab " Boot", you can change the download priority manually in the " Boot Option Priorityties ».

Or simply select the desired device and start downloading from it in the “ Boot Override", which is located in the same "Boot" tab.

Booting from a flash drive in BIOS on an MSI motherboard
Regarding the motherboard in MSI, here we can set the boot from a flash drive in two ways.

In general, I hope that you will find an option that suits you, and that you will be able to set boot from a flash drive in your BIOS without any problems.
How to set boot from a flash drive in old and modern BIOS versions