Which program only reads a file from a flash drive. How to remove write protection from a flash drive - step-by-step instructions. Removing protection using the Local Group Policy Editor
The era of floppy disks is long gone, but sometimes when trying to write to a flash drive, the user may encounter a situation known since the days of using floppy media - it is blocked and cannot be used.
We will look at how to solve this problem in detail in our article today.
So, you need to write some information to a flash drive, you insert it and receive a message like “The disk is write-protected, remove the protection or use another one.”
This problem can be solved quite quickly, and we will talk about this a little later, but now we should say a few words about the purpose of installing protection from downloading on .
Pay attention! This operation is performed for only one purpose - which can spontaneously be copied to removable media without the user’s knowledge.
Methods for removing write protection from a flash drive
There are 2 key ways to remove protection from a flash drive: hardware and software.
The hardware solution is to install a lock switch, which is present in some drive models, as well as SD cards.
Most often, the toggle switch is located on the side edge of the drive.
Carefully inspect your existing drive and look for an open/closed lock icon or the word Lock on it.
Pay attention! Removing the lock is very simple - just move the lock lever in the opposite direction. That's it. Insert the media into the appropriate slot and repeat the file writing operation again.
The software solution involves the interaction of a flash drive controller, which is responsible for the ability to record information.
You can remove write protection using this method using the command line of the Registry Editor or Local Group Policy.
Learn more about all the methods listed below.
Removing protection using regedit
1. Click “Start” and enter - in the search field. Right-click (RMB) on the program and in the context menu go to the “Run as administrator” item.

2. Go to the StorageDevicePolicies section:
HKEY_LOCAL_MACHINE\SYSTEM\CurrentControlSet\Control\StorageDevicePolicies
Important! Important! If there is no such thing, you will have to create it. To do this, click on the section Control - New - Section. We call it “StorageDevicePolicies” without quotes. If there is no such section, you need to create it.

Create (RMB in the right column of the registry) a DWORD parameter (32 bits) in the created branch. For convenience, let's call the element WriteProtect.

3. Make sure that the WriteProtect value is 0. Right-click on WriteProtect and select “Change”. If the value is “1” you need to change it to “0” and click “Ok”.

4. Close the registry editor, remove the media and restart the computer. Insert the flash drive. Now the flash drive works as usual, allowing you to write files.
Removing protection using Diskpart
If we were unable to unlock using regedit, let's try to do it using the Diskpart command interpreter, which allows you to manage the commands that the user enters into the command line when working with partitions and disks.
1. “Start”, enter the name - cmd - in the search field. Right-click in the program and select “Run as administrator” in the context menu.

2. Now you should enter the commands: diskpart and list disk, and after entering each of them, press the Enter key.
3. In the list above, determine which serial number in the name the flash drive has.
This can be done based on the specified size, in our case an 8 GB flash drive, presented in the table as “Disk 1” with a capacity of 7441 MB.
4. Select the disk with the “select” command, clear the attributes that allow read-only “attributes disk clear readonly”.
If, you should enter the following commands: “clean”, create a partition “create partition primary”, format it in NTFS “format fs = ntfs” or FAT “format fs = fat”.

Removing protection using the Local Group Policy Editor
1. Open it by pressing the Win + R key combination, after which you should enter the command gpedit.msc and press “OK” or Enter.

When trying to write data to a flash drive, users are faced with disk write protection, so they are faced with the question of how to remove write protection from a flash drive. A message appears on the computer screen: “The disc is write-protected. Remove protection or use another disk."
It is necessary to remove write protection from a USB flash drive, because it is impossible to copy or add files on the device, or, conversely, delete files from the disk in the Windows operating system. In this case, you will not be able to use a flash drive to perform your tasks.
Such an unexpected situation occurs, which, as usual, arose at the most inopportune moment. The user expects to use a USB flash drive or flash memory card of various types (SD, xD, MS, CF, etc.), but here is this error.
The reasons for the error may be different: due to a hardware malfunction, or the problem is caused by software actions. It happens that the flash memory device simply malfunctions, for example, the electronic filling burned out, so there is nothing you can do to help here.
Sometimes you cannot use a flash drive due to viruses. Checking the flash drive using an antivirus program and removing malicious software from the disk will help you get out of the situation.
The main reasons for blocking writes to flash memory devices:
- drive hardware failure
- write protection using physical locking
- virus infection
- changing the disk attribute to read-only mode
If the flash drive is write-protected, what should I do, how to remove the protection? In this guide, we will look at 5 methods that help remove write protection on a flash drive. In most cases, this problem is solved successfully.
How to remove write protection from a flash drive physically
On SD cards and some USB flash drives there is a switch that serves to disable/enable the drive's recording mode. In this case, the flash drive or micro flash drive (memory card) is write-protected mechanically.

On the body of a flash drive or memory card there is a special switch marked with the word “Lock” with a picture of a lock. Move the switch to a different position, and then check the operation of the flash drive on your computer.
How to remove write protection from a flash drive on the command line
If the flash drive says: remove write protection, you can use the command line to remove the read-only attribute from the disk.
Follow these steps:
- Run Command Prompt as an administrator (read how to run Command Prompt in Windows 10).
- In the command line interpreter window, enter (after entering the appropriate command, press the Enter key):
- Next, enter the command to display all drives on your computer:
- The Command Prompt window will display all drives connected to the computer. We need to choose a flash drive number, which can be easily determined by the size of the disk.
- On this computer, the flash drive has a size of 8 GB (7712 MB), so I should select the number “1”; on your computer, the flash drive may have a different disk serial number.

- Enter the command to select a volume (disk):
- Next, run a command that clears the attributes of the selected drive:

Close the command line interpreter. Check the operation of the flash drive on your computer.
How to disable write protection of a flash drive in Registry Editor
By changing the Windows registry, you can disable write protection for flash drives.
To do this, do the following:
- Press the “Win” + “R” keys on your keyboard at the same time, and in the “Run” window, enter the command “regedit” (without quotes).
- In the Registry Editor window, follow the path:
- In the “StorageDevicePolicies” section, right-click on the “WriteProtect” parameter, and in the context menu click “Edit...”.
- In the "Edit DWORD (32-bit) Value" window, in the "Value" field, enter the value "0" (without quotes), and then click on the "OK" button.

- Restart your computer.
If the "StorageDevicePolicies" key is not in the registry, create it. To do this, right-click on the “Control” section, select “New” => “Section”.
In the "StorageDevicePolicies" section, create a DWORD value (32 bits) named "WriteProtect", set the value to "0". Reboot your system.
How to remove the write ban on a flash drive in the Local Group Policy Editor
A write ban on a removable drive can be set in the Windows Local Group Policy Editor. In this case, you need to disable the ban in the following way:
- Press the “Win” + “R” keyboard keys, in the “Run” window that opens, enter the command “gpedit.msc”, and then click on the “OK” button.
- In the Local Group Policy Editor window, go to: “Computer Configuration” => “Administrative Templates” => “System” => “Access to Removable Storage Devices”.
- Right-click on the "Removable drives: Deny writing" policy, in the "Removable drives: Deny writing" window, set the option to "Disabled", and then click on the "OK" button.

Check for a problem with the removable drive.
Troubleshooting by formatting a flash drive
If the flash drive has the FAT32 file system (FAT16, FAT, exFAT), then you will not be able to move files larger than 4 GB to the USB drive. To support the use of large files on a flash drive, you need to format the drive to the NTFS file system.
In other cases, formatting to the default file system sometimes helps to restore functionality to a problematic flash drive.
Using utilities to recover flash drives
Specialized utilities from device manufacturers will help you cope with many problems that arise in the operation of USB flash drives. Well-known manufacturers: Transcend, Silicon Power, ADATA, Kingston, etc., have created software to restore the functionality of their devices.
Using the programs: JetFlash Online Recovery, USB Flash Drive Recovery, USB Flash Drive Online Recovery, Kingston Format Utility, solve problems that arise when working with flash drives.
If these utilities do not help, use more advanced programs: HP USB Disk Storage Format Tool, AlcorMP, D-Soft Flash Doctor.
Conclusion
If a problem occurs with the write protection of the disk, the user cannot use the flash drive. Using various tools, you can try to solve the problem that has arisen: remove write protection from the flash drive.
If a user finds that they cannot add or delete documents on the media, it is likely that the media has write protection enabled. Sometimes the media is protected by the manufacturer, or a similar situation occurs due to a malfunction of the disk itself. And then you need to know how to remove protection from a flash drive.
If the user is not prompted for a password to make changes, you can remove the lock by using the Windows DiskPart utility. And before removing protection from the flash drive, it is better to reformat the disk as a precaution. This process is available on any version of Windows.
First you need to connect the external drive to the PC and log into the OS with an administrator account. In Explorer, open “Properties”. Select the disk file system - either NTFS or FAT32, and its capacity. Now you need to copy all the files from the media to your computer. After this, experts strongly recommend reformatting it. The operation will delete all data on the flash drive. Even if the user does not plan to reformat the media, Windows DiskPart may itself delete some files, so it is very important to first prepare backup copies of documents.
The sequence of operations to remove write protection on a flash drive is as follows:
- By launching the command line, typing cmd in the search, enter diskpart and Enter. DiskPart will open.
- Specify a list of disks in the DiskPart window and then enter. The drives will appear and you can identify the flash drive by its size in the File Properties window.
- Select USB, then a space and the drive number, for example, type select disk 1 and then Enter.
- Type attributes disk clear readonly and then Enter.
The protection should now be removed.
If it is still active, you need to go through another procedure:
- Before removing protection from the microflash drive, simultaneously press and [R] to open “Run”.
- Enter diskpart and click OK. The command line opens.
- Wait a few seconds, then enter the command “lis dis” and confirm with Enter, after which all volumes will be listed.
- Enter sel dis X.
- Replace "X" with the displayed disk number.
- Use the functions create partition primary, select partition 1, format fs = FAT32 quick and “active” one after another.
The flash drive is now formatted and has open access.

If the lock is not removed, there is a possibility that the user has not gained access to the disk. You need to check the write permission:
- Before you remove the write protection of a USB flash drive, you need to access its properties through the command line. After this, a pop-up window will appear - Removable Disk Property.
- Click "Security" in the "Scroll All" section to check if the write function has been checked. There are times when the problem is related to a single file. They are usually marked as read-only and do not accept any changes.
- Before you remove protection from a flash drive, you just need to go to the properties of that particular file and check if “Read Only” is disabled. If not, you need to uncheck the box and then gain access.
Pre-format the disk

To format external media, type clean in the search and press Enter. This function deletes all volumes and partitions from the disk, as well as folders and files.
The order of operations in order to remove write protection on a flash drive:
- Enter the initial section and then Enter.
- Format the flash drive in NTFS or FAT32 format, as it was specified earlier in the properties window. To do this, enter one of the following commands and then press Enter: fs format: fat32 or fs format: ntfs. Progress is displayed in a window, and DiskPart will notify the user when the partition is complete. It takes about a minute to format a 1GB drive.
- Type exit when the volume is formatted to close the DiskPart window.
- Now you can copy or move data that was previously located on the disk or add new files to it.

Some drives have switches between active and inactive protection. Before you remove protection from a micro-SD flash drive, you need to look at the device's case and make sure that any existing switch is set to “unlock”. If the switch cannot be found, the software is failing. In the Windows menu, depending on the type of mobile equipment, you can install software write protection on the external memory or remove it.
List of stages:
- Open Windows Explorer and click Computer.
- Open the folder section, select "Properties" and find the "read-only" dialog box.
- Check that the checkbox is missing, otherwise delete it. The subtlety of this process is that you can remove the lock only on the PC on which it was installed.

If the user accidentally removes the drive while reading and without the "safely remove hardware" feature, many folders automatically switch to data write protection. In this case, you need to remove the lock:
- Before removing protection from the flash drive, format it, and to save the data, it is recommended to use the Smart Data Recovery tool.
- In the dialog box, you can try to restore the folder by clicking on “Format”. If the system reports an error, you will have to remove protection through the registry.
- Enter regedit in Windows search and then select “Registry Editor”.
- Select HKEY_Local Machine from the navigation bar and open subfolders by clicking on the small arrow next to the name.
- Select System, Current Control Set and finally Control.
- Scroll down the page until you go to Storage Device Policies. If this directory does not already exist, right-click to create a new folder and give it this name. Pay special attention to upper and lower case.
- Open the folder, two files will appear on the right side.
- Select the Write Protect entry. If the file does not exist, continue reading until point 8. In the dialog box that opens, select “Hexadecimal” on the right. In the field on the left, enter “0” - this will mean that all external storage devices are automatically unprotected.
- Confirm the entry with OK and close the editor. If the file does not already exist, create it in the folder indicated above and name it Write Protect. Make sure that a 32- or 64-bit file is generated, depending on what system the PC is working with.
- Restart your computer by pressing Windows and "E".
Removing write protection from an exFAT card
Sometimes hard drives and flash drives formatted with exFAT become read-only after a computer crash. As for the exFAT system, you will most likely need to remove the dirty bit from it, since this system has automatic protection.
There are several common fixes for removing a lock. Before you remove protection from a USB flash drive, you first need to check whether there is a lock slider on its adapter. If so, turn it off to remove the protection. Next, you need to fix the existing error on the card and reset it or completely format it, and if necessary, change it to a new file system.
Using CMD before removing protection from a USB flash drive:
- Open Run. Type CMD and then Enter. Run as administrator.
- Type chkdsk /ff: and Enter. f: This is the drive letter from the exFAT partition on the SD card. The program will find and correct the error on the map.
- If you receive the following error message: "The operation could not be completed." You need to run this command: chkdskf: / f / r / x and then Enter, after which the dirty bit and the protection attribute will be removed.
Unblocking a card via phone

SD is typically used as expandable storage and is formatted as exFAT for Android, 3DS or PS4 smartphones. If it is read-only and prevents its use, such protection may be removed. Before removing the write protection from a flash drive via phone, it is better to use a special program that can be downloaded from the Internet. Experts recommend AOMEI Partition Assistant Standard. This is a free SD card protection removal program that can solve problems caused by corrupted files and faulty systems. You can not only completely erase all information, but also reformat it to any bit depth.
Removing exFAT SD Card protection:
- Before you remove the protection from the flash drive to format it, connect the card via an adapter and make sure that it is recognized.
- Install and run AOMEI Partition Assistant.
- On the main interface, right-click on SD and select “Format”.
- In a small pop-up window, specify the partition information, that is, edit the volume name, set the file system and select the cluster size.
- Confirm the result, click “Run” and “Continue” to complete the procedure.

If the user still cannot access the drive, you can use Ease US Partition Master Free before removing the protection from the flash drive.
Formatting sequence:
- Connect the card or drive to the PC.
- Launch Ease US Partition Master.
- Right-click on the device and select “Format Partition”.
- Specify a new label/file system and size for the formatted card. Click “OK” and “Apply” to save all changes. You can specify disk attributes using commands.
- To remove read-only, specify the disk disk readonly attributes, or to set the read-only attribute, use readonly.
- Then type exit to exit the program.
Boot in Safe Mode
The user will not be able to format the device if they try to do so after a normal boot into Windows and receive a message that the device is write-protected. To counter this:
- Restart Windows, once the computer turns on again, press F8. A menu with BootInto Safe Mode will appear.
- Select this option using the arrow keys and press Enter.
- When Windows boots and the desktop appears, press WinKey + R and enter CMD in the Run dialog box to get DOS.
- In the black window, enter the format followed by the drive letter of the removable storage. For example, if the desired drive is F, enter the format f, keeping in mind that the input format will delete the contents of the storage device. In addition, you must specify the drive letter accurately, since entering an incorrect letter will completely delete the data in the corresponding storage.
- After formation, save the files to disk.
If the saving process is completed, the problem is fixed. If not, you need to move on to the next troubleshooting step.
Removing a destructive entry
Destructive write tests often solve the problem when external storage device table files are corrupted. Almost all of them completely destroy the file allocation table and create a new one. However, you may need to format the drive before you can store any data on it - after testing. There are some good third party programs that can help you achieve this, such as HD Tune. The free version is enough to fix the disk, however, without restoring old data.
HD Tune Pro is an excellent tool for diagnosing HDD and SSD. This utility allows you to compare your storage device with minimum, maximum, and average transfer speeds, as well as other useful tools. Other HD Tune features include detailed driver information, disk error scanning. Pro versions allow you to monitor the health status of multiple drives, offer information about folder usage, secure erase, file checks, cache checks, and additional tests.
Changing security permissions
If using diskpart as described above does not work to clear the read-only attribute of the USB, you may need to change the security permissions.
Before you remove the write protection from the sd flash drive, you need to do the following:
- Find the flash drive in the "My Computer" list.
- Click on the flash drive icon and select “Properties”.
- Go to the “Security” tab.
- Next - “Edit” in “Group”.
- Under Permissions, click the Everyone entry if it's not already selected.
- Under Permissions for Everyone, make sure the Allow checkbox is checked for the Edit entry. If it is not installed, then install it.
- Click OK to save your security permission changes. If you want the flash drive to be accessible only to all users, uncheck all the boxes in the Allow column except the Read entry.

You can always change the write protection of individual files and folders on a removable drive. If the steps below do not work for the flash drive, it may be preventing permission changes due to some security software blocking it. In these cases, the user will not be able to make the flash drive writable until he closes the program.
Unfortunately, write protection on flash drives still causes many problems. Changes are not accepted, functions are not available, USB is damaged. If none of the above instructions helped, which, unfortunately, is not an isolated case, especially in Windows 10, you can try additional tools: free LockHunter and Unlocker.
Question from a user
Hello. I'm trying to write one Word document from my hard drive to a flash drive, but an error appears that the disk is write-protected. This has never happened before, I didn’t hit the flash drive, didn’t drop it, didn’t do anything with it...
Interestingly, I tried to delete some file from the flash drive - the exact same error appeared, no access. Those. in fact, I can only copy previously recorded data from a flash drive. Tell me how to remove this error?
PS Windows 7, 8 GB Kingston USB flash drive (the most common)
Hello.
Such an error can be caused by several reasons: a hardware malfunction of the flash drive (for example, if you accidentally dropped it before), a virus infection, “manual” installation of write protection, etc.
In this article I will look sequentially at all the popular causes (causing this error) and ways to eliminate them. I think that by presenting the article in a similar format, it will be simpler and easier for you and other users with the same error to solve the problem.

Typical error when deleting a folder from an SD card // example
Reasons blocking writing to a flash drive
Let's eliminate it consistently!
1) Check if there is a hardware write lock
Experienced users probably remember that floppy disks used to have a small lever, thanks to which it was possible to protect the information on it from unwanted deletion (or modification). And in my opinion, the thing was extremely useful!
Now most USB flash drives do not have such protection; some manufacturers (mostly Chinese) produce such flash drives. Therefore, some users do not attach much importance to some “locks” on the flash drive body. Meanwhile, if the protection is turned on, then you will not write anything to such a flash drive (see photo below).
Well, SD cards (used in cameras, for example) have a small switch on the side. If you move it to the Lock position, the flash drive becomes read-only.
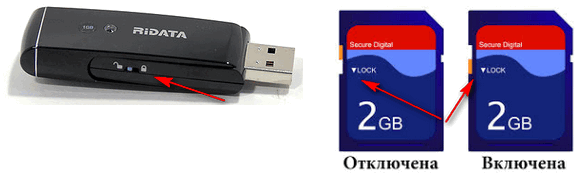
The moral of the last sentences: first of all, check whether there is mechanical write protection, whether the lever is positioned correctly (and in general, whether your device has one).
2) Is the flash drive (computer) infected with a virus?
I remember my student days... When it was necessary quite often to bring and connect a flash drive to computers “infected” with viruses (and knowingly and knowing about it in advance) - otherwise it would be problematic (if not impossible) to print materials. After such a connection, I had to check the flash drive for viruses and clean the “infection”.

If you do not have an antivirus on your computer, I recommend choosing one from the list:
3) Is there room on the flash drive?
I understand that this question is somewhat banal, but still. If the size of the recorded file is larger than the remaining free space on the flash drive, you may receive a recording error.
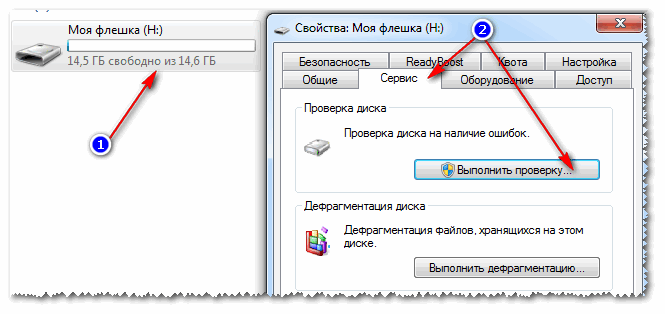
To find out how much free space is left on the flash drive: open "My Computer", then right-click on the flash drive and open it properties. In the tab general- it will be indicated how much space is occupied and how much is free.

4) Isn't it worth writing protection in the registry?
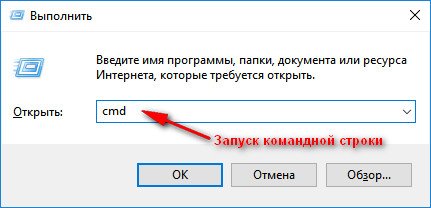
First you need to open the Registry Editor as an administrator. This can be done, for example, through the task manager: to launch it, press the keyboard shortcut Ctrl+Shift+Esc(or Ctrl+Alt+Del ).
Next click file/new task and to the line open enter the command regedit(note that the task will be performed as an administrator).

By the way, you might find the article on how to open the Registry Editor useful.-
(for Windows XP branch: HKEY_LOCAL_MACHINE\System\CurrentControlSet\Services\USBSTOR )
Important! If the branches StorageDevicePolicies will not be in the registry - it means you do not have a blocking entry in the registry. Just in case, you can create a branch (a branch in the registry is analogous to a folder in Explorer) and then the Write Protect string parameter with the value "0". Creating branches and parameters is reminiscent of working in a regular Explorer, the same as creating a simple folder.


5) Check the file system of the flash drive for errors
A similar error can also appear due to errors in the file system of the flash drive. For example, in the process of copying a file, you removed the flash drive from the USB port or simply turned off the light - errors could well appear on it (by the way, the file system may be marked in such cases as RAW).
To check the flash drive for errors, open "My computer", then open properties flash drives, and in the section service click the button (check the disk for errors, see screenshot below).

6) Is there a Read-Only attribute on the flash drive?
Another reason why Windows may give an error when writing a file to a USB flash drive is read-only attribute (if it is installed on a flash drive). There is nothing wrong with this attribute; it only tells the system that this disk is read-only, so it does not write data to it.
By the way, this happens quite often if you have picked up certain types of viruses, or, for example, downloaded something from torrents (the uTorrent program often creates files with a read-only attribute).
And so, let's remove this attribute.
7) Check if there is any protection in the Group Policy Editor
Writing to a flash drive can be disabled through the Group Policy Editor. Therefore, I also recommend checking if the treasured parameter is there...
Note: users of Windows entry-level and home versions will not be able to open the Group Policy Editor.
To open the Group Policy Editor:
- press a combination of buttons Win+R;
- enter the command gpedit.msc;
- click Enter .

It should have the option "Removable drives: disable writing". Open it and see if it's turned on...

By default, the parameter should be set to “Not set” (see screenshot below). If this is not the case for you, switch it to this position, save the settings and restart the computer.

Parameter responsible for prohibiting recording
8) Formatting a flash drive
Perhaps this is the last thing you can do if all other advice has been in vain and led nowhere. Formatting the media helps in many cases, including with our error, discussed in this article.
Note: copy all the necessary data from the flash drive; when formatting, everything will be deleted from the flash drive (just in case, I warn you ☺)!
In most cases, to format a flash drive, just go to "My computer", select the flash drive among the disks, right-click on it and select the command in the context menu "Format" .

If you fail to format the media: errors appear, the computer freezes, etc., then you need to use special utilities to format it. One of these that I recommend is HDD LLF Low Level Format Tool.
HDD LLF Low Level Format Tool
A small utility used for low-level formatting of disks and flash drives. Helps in the most difficult situations when it is impossible to format the media through Windows. Interfaces supported: S-ATA (SATA), IDE (E-IDE), SCSI, USB, Firewire.
The utility is distributed in several versions: there is also a portable version that does not require installation.
Because There is no Russian in the program, I will show you with an example how the media is formatted.
After starting the utility, click the button "Continue for Free".


When it ends, Windows will prompt you to format the flash drive (you can format it in the usual way through “My Computer”). As a rule, after low-level formatting, a flash drive can be formatted easily and without errors in Windows.
By the way, if your flash drive still doesn’t work, I recommend trying to restore it. Here is another way described in this article:
I have everything! I would be grateful for any additions on the topic.
Miniature USB flash drives are our reliable electronic storage devices for various data. With their help, information can be easily “carried” in your pocket.
USB flash is convenient, compact, mobile, has a stylish design and makes it possible to connect to any modern device with a USB connector for reading and writing information.
How flash drives work
The USB Flash Drive uses non-volatile NAND flash memory controlled by a microcontroller. The controller chip contains information about the manufacturer, available memory and service information necessary for the operation of the device. The storage time of information in memory cells is quite long, but limited. The number of data rewrites on a flash drive ranges from five to ten thousand cycles.
Typically, flash media with a small amount of memory use the FAT family file system (FAT 16, FAT 32, ex FAT), and for Flash media larger than 64 GB, the NTFS or ex FAT systems are used.
Protecting information on flash drives
To ensure the safety of storing confidential information and preventing viruses from entering flash media, various protection methods are used. This:
In this case, when you try to change data on a connected flash drive, for example, when formatting, copying, transferring, deleting information, messages about write protection of the disk appear on the monitor screen.


This review provides several options for removing protection from mechanical and software blocking of flash media.
This article will also discuss possible causes of failures in the flash drive or software that cause a prohibition on overwriting, as well as ways to eliminate such malfunctions.
Flash drive malfunctions associated with system messages indicating that the disk is write-protected
Blocking a flash drive from being overwritten can be caused by:
- Special user actions to protect confidential information during mechanical blocking and encryption of data;
- A software write ban installed in the operating system;
- Hardware settings of the personal computer that prohibit recording to USB devices;
- Limiting rewrite cycles when the flash drive has exhausted its resources. In this case, Flash is switched to read-only mode;
- Disk full and lack of free space for recording data;
- Malfunction and disconnection of computer USB ports;
- Incorrect formatting;
- File system errors;
- Damaged (Bad) blocks (sectors) of the memory chip caused by wear;
- Removal or absence of a special program - “driver”, designed for correct recognition of devices by the operating system;
- Unsafe removal of the device from the USB connector during the running processes of writing, moving, renaming, deleting, downloading, reading open files;
- Running (hung) system processes accessing the disk;
- Using flash drives in devices with various types of operating and hardware systems. For example, after watching movies on a TV and recording video data from it, the flash is not detected and cannot be read by the computer. In these cases, each operating system changes the file structure of the flash drive, while recording data under its own unique scheme;
Malfunctions of the main hardware components: memory chips and microcontroller (including failures of its program);
- Poor quality manufacturing when purchasing “counterfeits” of leading brands;
- Under thermal and electrical influences. For example, during discharges of static electricity and overheating;
- Mechanical damage as a result of breaks, cracks, scratches, desoldering and impacts during falls;
- Exposure to moisture and electromagnetic radiation;
- Unstable power supply;
- Malicious software - viruses.
The main ways to remove protection from overwriting information from a flash drive
Hardware method
Some manufacturers of USB drives implement mechanical protection against changes in the form of a switch (Lock), allowing or disabling writing. Typically, it is located on the side of the media and is marked with a lock icon.
To remove the mechanical lock, you must move the lever in the opposite direction.

Software methods for unlocking flash media using standard Windows tools
Removing overwrite protection using Windows Registry Editor
The registry is a hierarchical database of parameters, hardware and software settings, and information about user profiles of the Windows system.
Registry Editor is a special program included in the standard set of Windows operating systems. It allows you to add, edit registry keys and settings, set default values, import or export keys for saving, and restore the registry file from a backup copy in case of system failures.
To enter the Registry Editor, there are three options:
Using the Run software utility. To do this:

After the registry editor has been launched, the following window opens

you need to find the registry branch
HKEY_LOCAL_MACHINE\ SYSTEM\ CurrentControlSet\ Control\
Color: #008000;">Control and then the StorageDevicePolicies subsection, if available, and on the right side of the program interface, pay attention to the binary parameter WriteProtect (Reg_Dword), the value of which can be (0) or (1).

If this parameter is present and equal to (1), this is the reason for blocking the flash drive.
To remove protection you must:
- double-click on the WriteProtect (Reg_Dword) parameter;
- manually change its value from (1) to (0);
- confirm changes OK ;
- close the registry editor;
- restart your computer;
- check the removal of protection from the device.
If the registry key is missing HKEY_LOCAL_MACHINE\ SYSTEM\ CurrentControlSet\ Control\ StorageDevicePolicies, it must be created using the “Editor” described above in this way:

Removing overwrite protection of a flash drive using the Windows command line
For experienced users, the Windows operating system provides the ability to text input computer and MS-DOS commands using the command line shell.
The Command Console can be run as a standard user or as an administrator.
To remove overwrite protection or the read-only attribute from USB drives, it is recommended to work in the console with administrator rights.
There are several ways to launch the command line interface:
Running the Command Prompt in Windows 7
Using the Run software utility.
To do this:

Via Search in the Start menu. To do this:

Running the Command Prompt in Windows 8

Launching the Command Prompt in Windows 10
Similarly, you can find the console application " Command line (cmd)"through the Start menu and launch it through the context menu" On behalf of the administrator»

With any of the methods described above, the following console window opens.

Using the text command interface, you must do the following:

Removing overwrite protection using the Local Group Policy Editor
Group Policy is a set of rules that allow you to manage user settings and policy settings in Windows operating systems.
Group Policy Editor is a Microsoft Management Console snap-in available in the standard set of utilities for operating systems starting with Windows Server 2008R2 and Professional versions for Windows 7 and Windows 8.
With this tool you can:
- configure various settings of your personal computer,
- set some restrictions for individual users or their groups on the launch and installation of programs, services, processes,
- prohibit changing information on any media, including removable disks, etc.
There are several ways to launch the editor:

After opening the Local Group Policy Editor, to remove write protection from removable USB drives, you need to go to the following console tabs:

Software methods for unlocking flash media using special software
If the standard Windows operating system tools described above did not lead to the desired result and the flash drive remains blocked, you can use special software (hereinafter abbreviated as software) from various manufacturers to remove protection and restore functionality.
In most cases, such software formats the flash drive, deleting all data on it.
Selecting software for restoring Flash media
The choice of utilities for servicing a USB Flash Drive is based on the compliance of the flash drive model, its memory chip and controller.
All well-known USB Flash manufacturers develop special utilities for their products that restore the functionality of devices and correct possible defects. Such programs can be found on official websites and downloaded.
When selecting software for a specific Flash device model, it is advisable to know the following values:
- Vendor – manufacturer;
- Product – model;
- VID – Vendor Identifier, manufacturer identifier;
- PID – Product Identifier, product identifier, that is, a specific device model;
- Serial Number – serial number;
- Controller Model – controller model, etc.
If determining the model (Product) and manufacturer (Vendor) does not cause any particular difficulties, then to detect other information you will need to use third-party programs or built-in operating system tools.
In order to find out the VID and PID of USB devices through the built-in system tools, you must do the following:

To establish information about a flash drive, you can also use the ChipGenius program from Chinese developers, which displays a report on the following data: Vendor, Product, VID, PID, SerialNumber, ControllerModel, FlashID, Channel, etc. This program is compatible with various models of controllers. You can download ChipGenius for free from the developer’s official website using this link.
Below is the ChipGenius interface with an example scan report of a 32GB Flash USB device and defining values such as:
- Device Vendor, Product Model (Innostor);
- Device Name (PenDrive);
- VID (1F75);
- PID (0903);
- Serial Number;
- controller manufacturer (Vendor Innostor);
- Controller Part-Number and other parameters.
 ChipGenius interface with flash drive scanning report
When the necessary parameters are set, then using special sites with extensive databases of well-known flash drives (for example, http://flashboot.ru/iflash/), it is easy to select a utility for restoring them or even “reflashing” the controller.
Below we will consider popular programs that will help remove protection from a flash drive and restore its functionality.
Users should remember that during the operation of such software, data from flash media will be permanently deleted.
AlcorMP
AlcorMP is a recovery program for flash drives with controllers, produced by Alcor. It allows you not only to remove protection from a flash drive, but also to restore its functionality, “reflash” the controller and create protected partitions on the disk.
When using AlcorMP, all data on the USB drive is permanently deleted as a result of formatting.
Therefore, if the data on the media is important to you, then first try to recover deleted files from a flash drive. Since the official developer no longer supports this utility, our site recommends downloading AlcorMP for free from this link.
After downloading the program, you need to unpack it and run the executable file AlcorMP.exe as an administrator and then connect the USB flash drive.
To recognize the device, press the Refresh (R) button. After reading the data, data about the media will appear in the program window, marked with a letter or number in black (in the example given, the letter G). If the letter is red, then you need to use other software, because the flash drive cannot be processed in AlcorMP.
If desired, you can configure a utility for deep analysis of flash memory. To do this, go to Settings (Setup S) and set the scan speed value.
To start formatting, click Start (Start A) and wait until the process of removing attributes from the flash goes through. Depending on the volume, speed of the media, and memory state, this process takes from two minutes to an hour.

Upon completion of the process, first disconnect the drive from the USB connector, and then close the program, check the functionality of the flash drive and the success of removing the read-only attribute.
HP USB Disk Storage Format Tool
HP USB Disk Storage Format Tool is a freely distributed program designed for formatting any model of flash media. With its help, you can partially restore inoperative flash drives and format disks even in cases where this is not possible using standard operating system tools. You can download the Russian version of HP USB Disk Storage Format Tool for free on the official website.
The functionality of the utility allows you to unlock any USB device, select a file system (NTFS, FAT32), a quick formatting option, assign a label to the disk, and enable information compression for NTFS.
There is also an additional option HP USB Disk Storage Format Tool - creating bootable flash media using MS - DOS files located on the hard drive.
The program does not require installation. After downloading, launch the executable file HPUSBDisk.exe (as administrator) from the archive, select the disk, set the necessary values for the file system, label and formatting method, and click the Start button. At the end of the process, close the Close interface and check whether the flash drive is unlocked

JetFlash Recovery Tool
JetFlash Recovery Tool is a program designed to recover flash drives, produced by Transcend (JetFlash) and A-Data, available for free use. You can read an overview of the program on our website.
Functionality:
- Correction of errors in reading write blocks at high data processing speeds;
- Unblocking if recording is impossible;
- Recognition of media with a RAW file system that has a damaged structure;
- Formatting with the ability to pre-save data.
Download the JetFlash Recovery Tool program from the developer’s official website using this link.
After downloading the program, you need to run the application file JetFlash Recovery Tool.exe as an administrator and wait for installation on your hard drive

Then run the executable file JFRecoveryTool.exe to download the application, connect a non-working or blocked flash drive and click Start. Upon completion of work, check the normalization of the media condition

Apacer Repair
A small program, Apacer Repair, was developed specifically for flash media from Apacer Technology Inc. Using it, you can perform quick formatting if other options do not help, as well as USB Flash repair. As a result of software processing, it is possible to remove overwrite protection and correct errors in memory blocks.
You can download the Apacer Repair utility for free from the developer’s official website using this link.
After downloading the program and connecting the flash drive to the USB connector, launch the utility and follow the instructions on the screen.
Disk formatting begins with a warning: "" ( This will destroy all data on the flash drive, do you want to continue?)

When you click the Format button, quick formatting begins. A successful cleaning operation will remove write protection from the flash drive.


Other reasons why USB devices are blocked from being overwritten and how to eliminate them
Viruses blocked the flash drive from writing
Computer viruses are malicious software that disrupts the operation of operating systems, the file structure, deletes information, blocks media, and unauthorized encrypts data.

The term viruses includes such types of malicious programs as Trojans, downloaders - droppers, phishing sites, worms, spam bots, spiders, etc.
These programs are capable of creating their own copies and being implemented through communication channels into systems and boot sectors of computers. They bring a lot of trouble to users, stealing confidential information and disrupting entire computer systems.
According to statistics, the most common cause of malfunctions of USB storage devices is malware or viruses.
When connecting external media to an unprotected computer, there is a high probability of infection, i.e. copying viruses to flash media.
Many viruses are created with the goal of blocking access to a flash drive and prohibiting any operations to change data on it in order to “protect yourself” from forced deletion or movement.
For example, such a common virus as Autorun is written into the computer system file Autorun.inf, which allows applications to run from removable media. When you connect a flash drive, Autorun copies files like: Autorun.exe**, Autorun.inf__ and others onto it. Signs of infection with this virus are as follows:
- The USB drive does not open at all, or when you try to access it, it suddenly appears in another Explorer window;
- it is impossible to delete or open suspicious files, and the system may display a message about write protection or impossibility of accessing the file;
- Task Manager and Registry Editor do not start;
- There is a hidden folder on the flash drive RECYCLER, which contains the executable file of the virus.
To combat viruses of this type, special Anti-Autorun programs have been developed.
In cases where a flash drive is infected with a virus that blocks any action related to changing information, you must do the following:
- Install antivirus software on your computer.
- When connecting a USB drive, perform a thorough scan with the installed antivirus with updated databases. It is advisable to check the flash using several programs.
- If possible, format the flash drive using the built-in operating system tools or additional utilities described in this article.
- If it is impossible to format in normal mode, try to perform this operation in the safe boot mode of the operating system (diagnostic mode, using only the main files and drivers). Why reboot the system by holding down the F8 key and selecting “ Safe Mode».
- Be sure to check the hard drives of your personal computer for viruses so as not to spread them to other removable drives in the future.
Checking for disk fullness and removing protection from files intended to be copied to disk
To check the availability of free disk space, you must do the following:

Physical damage to the flash drive
The reason flash media is blocked for writing may be mechanical damage.
It usually occurs in the following cases:
- when purchasing low-quality goods (“counterfeits”);
- when exposed to high temperatures and overheating of parts of the device;
- electrostatic discharge;
- as a result of breaks, cracks in the electronics board, chips, scratches and impacts from falls, when the main elements are damaged: memory chip and microcontroller;
- improper storage conditions (for example, a humid environment) and violations of operating rules;
- voltage surges when power is supplied to the media elements;
- limited service life with reduced data recording and erasing cycles;
- loosening the USB connector (interface)
If the integrity of the memory chip is not damaged due to physical damage, the data can be saved or restored. Such operations are carried out by specialists in service centers.
Malfunction or disconnection of PC USB ports
Sometimes the reason why write protection appears on a USB flash drive may be a malfunction or disconnection of the USB ports of a computer, laptop or other device by software or technical means.
To check for a port problem:
- insert the disk drive into another USB port;
- connect other USB devices to the connector. For example, a camera, mobile phone, printer, tablet. If the devices are not recognized by the personal computer, are read in jumps with significant interruptions, and system messages about connection errors pop up, then the USB port is not working.

This way, you can eliminate the possibility of problems with the USB ports when messages appear that the disk is write-protected
Prohibiting recording to flash devices when USB ports are disabled in software or hardware
To limit access to connected removable media (flash drives, portable hard drives, phones, etc.) or even prohibit their use, computer system administrators disable USB ports. The purpose of such measures is to prevent the theft of valuable information or infection of computers with malware and spyware through flash drives. This causes system messages about the prohibition of writing to the memory of Flash devices. If you find yourself in front of such a computer, then you need to enable the USB port.
There are several ways to disable (enable) USB ports:
- Via BIOS.
This is a small program recorded in a special chip on the motherboard of the system unit. It is intended for initial startup of the computer, testing its main components, performing I/O functions, and storing information about the PC hardware components and their settings.
To disable USB ports you need to:
- enter the BIOS by holding one of the following keys: Del, F2, F10, Esc, F8;
- find all values related to USB Controller (or Legacy USB Support) and set them to Enabled;
- press the F10 key to confirm changes in the settings;
- restart your computer.

- Using the Registry Editor.
This method is convenient because, unlike the previous one, USB devices such as keyboards, mice, printers, scanners are not disconnected, but only flash drives.
This article has already discussed the process of loading the Registry Editor as a standard operating system utility.
To disable ports through the editor you need to:

- In Device Manager. To do this:

- Uninstalling (removing) USB controller drivers.
- Using special software to set access levels and prohibit users from connecting USB devices. For example, these functions are performed by the Microsoft Fix It 50061 and USB Drive Disabler programs.
- Disconnecting USB from the computer's system board. In this case, you can only disable the ports on the front and top of the system unit by disconnecting the adapter cables going to the motherboard.
- You can also allow/deny access to removable storage devices using the Group Policy Editor. This method was discussed above in the article.
- In the reverse order, you can check and connect all controllers and USB ports, allowing access to them for personal computer users.
Thus, by checking all options for disabling USB ports, you can eliminate the possibility of flash drives being blocked for rewriting.
Microcontroller software failures and flash memory wear

Each flash media includes a controller chip designed to connect flash memory and the computer. The controller is controlled by firmware, part of which is written on the chip. This program is responsible for memory parameters, the operation of the translator, contains the values of product identifiers and the so-called write prohibition flags.
In cases of improper operation, unsafe removal of media during running recording and moving processes, power surges, a software failure of the controller occurs. One of the signs of such a malfunction is that the device is blocked from recording information.
Blocking of the device can also occur due to wear of the memory chip, in which defective (Bad) blocks appear and the threshold of rewrite cycles is exceeded. In this case, the microcontroller marks the blocks as unused, blocks the flash from being written, and goes into data protection mode to prevent further destruction of the NAND memory.
To eliminate software failures, you should reprogram (“reflash”) the microcontroller using special software. Firmware programs are selected in accordance with the controller model and flash media identifiers (VID and PID). More details about the selection of such software were described above in the article.
Flash drive file system errors

Damage to the internal structure of the file system is a violation of the order of storing and naming data in the memory of a flash drive. Logic errors can be caused by unsafe removal of the device from the USB connector, power surges, viruses, memory wear and other reasons. As a result of such failures, the disk is blocked for overwriting, there is no access to it, an undefined RAW file structure is displayed in the properties of the USB disk, and a system message is issued stating that the disk needs to be formatted.
In these cases it is necessary:
- using special software tailored to a specific flash device model, try to recover valuable information;
- perform a high-level format that will restore the file system.
The selection of utilities for restoring and formatting Flash USB was described above in the article.
Low-level formatting - as one of the ways to restore the functionality of a locked flash drive
If attempts to recover information on a locked USB device did not lead to the desired results and the data stored in memory is not important to the user, it is best to perform low-level flash formatting (Low Level Format), which will correct the damaged memory.
Low Level Format is a basic layout in the data storage area with recording of control information, which is usually carried out at device manufacturing plants and remains unchanged. However, there are a number of programs whose capabilities allow users to carry out low-level formatting themselves.
The Low Level Format process completely deletes data from device memory and it is no longer possible to restore it. This action is carried out in order to block damaged areas of the USB Flash, which will not be recorded during further operation, as well as to prevent the theft of confidential information.
The most popular program for carrying out the process of low-level formatting of USB devices is HDD Low Level Format Tool. It allows you to change the size of the drive. Works with removable drives via USB and Firewire interfaces. The erase process clears the partition table, boot sectors (if any), manufacturer data, and every byte of data. The program is shareware.
The free version has limitations on formatting speed and does not have access to program updates.
After downloading the program, you need to install it following the recommendations on the screen.


Select one of the options for using the program:

Since low-level formatting deletes all bytes of information, to resume working with the device, you need to perform high-level formatting using the usual standard operating system tools, having decided on the file system of the flash drive.
Results
This article examined in detail the possible causes of flash drive malfunctions that prevent rewriting. The main measures to eliminate such problems were listed.
In some cases, in case of serious mechanical damage and software failures of Flash USB, users are advised to contact service centers. Specialists use highly specialized software on special equipment to restore and repair USB devices.
If all the methods listed in the article did not help “save” the flash device, and it remains inoperative, then you should think about buying a new one.
In order for the purchased flash drive to serve for a long time and be a reliable carrier of important information, you must adhere to simple rules for using Flash USB:
- do not expose them to mechanical shocks;
- isolate from moisture, high temperature and exposure to electromagnetic fields;
- remove only using “Safely Remove Hardware”;
- periodically defragment the memory area;
- check for errors using the chkdsk system utility (scanning and correcting data errors);
- Be sure to use anti-virus software and keep it updated to protect against virus infection.