Some tips for cleaning Apple keyboards. How to clean the keyboard on a MacBook Cleaning the keyboard on a MacBook
Sometimes it happens that the key on your laptop refuses to respond to pressure or is simply not flexible enough, causing a lot of irritation. Don’t rush to run to the service center, but read the simple instructions shared by Apple itself.
Please note that this guide applies to the 12-inch MacBook and all newer models. To clean your laptop keyboard yourself, you first need to get a can of compressed air.
It is imperative to use the tube that comes with the cylinder to direct the air flow. The end of the tube should be separated by approximately one and a half centimeters from the keyboard. It is also recommended to hold the can as level as possible when spraying.
Hold your MacBook at a 75-degree angle to the surface and spray air over the entire keyboard or just the non-functioning keys in a left-to-right motion.

Then you need to turn the laptop to the right and again spray air from left to right. Repeat the process by rotating your MacBook to the left.

We hope that this method will save you extra time and money on going to the service center. By the way, you might want to ask why the 75 degree angle in the illustrations is actually a 105 degree angle. We have no answer to this question other than the assumption that someone in Cupertino regularly skipped geometry classes at school.
Sooner or later, even the most careful computer users end up with dirt on their keyboards. This is especially noticeable on light-colored keys. In this material we will try to look at several different methods that will allow you to clean the keyboard on Apple computers.

It is worth noting that when actively used, it is better to clean the keyboard once every few months. However, if you actively use your laptop on the road, or take your computer with you to the office and home, you can clean it more often.
External cleaning
By externally cleaning the keyboard we mean removing dirt from the surface of the keys and the keyboard body. This can be done in a variety of ways. Some people prefer to use wet wipes, cotton pads, or just microfiber to clean the keyboard.
To better remove dirt, you can use a small amount of water or alcohol-containing substance. The main thing is not to overdo it. Excess moisture in the keyboard case will definitely not extend the operating time of the device, especially for laptop keyboards.

It is worth noting that some people prefer to clean the keyboard not only with wet wipes, but also use small brushes and a vacuum cleaner with a compact attachment or a can of compressed air. The latter will help clear small debris from the keyboard. However, the main thing here is not to overdo it.
It is also worth remembering that it is better to clean the keyboard when it is turned off. This way you can avoid some problems. For example, a large number of false clicks.
Internal cleaning
Those who find external cleaning of the keyboard not enough can disassemble it by removing the keys. True, this process requires a lot of patience and great caution. Otherwise, the thin plastic fasteners may simply break off.
It is also worth noting that in some cases some keys may not be removable. This should be taken into account when disassembling the keyboard. For example, in the new MacBook Pro, the Space key cannot be removed.
At the moment, there are already a sufficient number of different videos on Youtube designed to help users who are planning to disassemble the Apple wireless keyboard or the keyboard in a MacBook for the first time.
However, in our opinion, it is worth disassembling the keyboard only in extreme cases. If used carefully, regular external cleaning will be sufficient, which is a good idea to do once every few months.
Buttons sometimes get stuck not only on new MacBooks, but also on old ones. Usually it is recommended to disassemble the keyboard for cleaning, but in practice this only leads to breakdowns - Mikk has already proven this.
We will tell you how to clean your keyboard without vandalism using a couple of proven methods if the buttons on it are already sticking or are just being assembled.
Five minutes once a week and the buttons on my 2017 MacBook Pro work like a charm. Yours will be no worse.
Why do the keys on a MacBook periodically stick? The keys start to stick only because foreign particles get under them. There are no other options, and buttons even with a broken mechanism do not behave this way.
If something gets under the button, it prevents it from being pressed, and it seems to you that it is simply stuck to the base. That's why they say the key is “stuck.”
They began actively writing about the problem in 2015. The world saw a 12-inch MacBook with a butterfly keyboard. The new mechanism turned out to be much smaller in size, so cleanliness turned out to be more critical for it than for the usual “Scissors”.
In 2017, “Butterfly” was updated to the 2nd generation, the problem began to appear less frequently, but remained.
However, the services say that they are regularly contacted not only by owners of new MacBooks, but also by old ones. Why? Residues of food and dust. Yes, these are the most frequent guests of your keyboard, who happily find hidden places under the keys and prevent them from being pressed.
If you eat near a MacBook, you have already encountered or will encounter this problem in the near future.
If you don't eat near your MacBook, dust will still fall on it, so you won't be able to avoid it getting stuck. Pieces of skin and sweat. Microscopic parts of your body, to a lesser extent, can also cause sticky keys.
To minimize the effect, do not forget to maintain hygiene - just wash your hands with soap and water often. Tea and water with sugar. Liquids with sugar are critical for the keyboard. In this case, it will not be possible to completely get rid of the sticking even after cleaning.
Even before the New Year, I spilled tea with sugar on the keyboard of my MacBook - there was minimal liquid, it was quickly removed at the nearest service center, but I was not able to save the keyboard.
The only correct solution was to replace the keyboard. That's what I did.
How Apple advises cleaning laptop keyboards Apple has not officially recognized the problem with MacBook keys sticking. And it was pointless to do this, because this could be avoided with banal accuracy.
But a large stream of criticism against the company forced it to update the Butterfly, which became more practical - this is a step towards users.
And last year, the manufacturer released a guide on cleaning the keyboard from dirt using compressed air.
Yes, Apple suggests simply blowing out food debris and other foreign objects from under the keys with a special balloon.
By the way, you can easily find one like this in any modern electronics store or order it online. The asking price is 200-400 rubles. Step 1: Hold your MacBook so that its keyboard is at a 75-degree angle to you—no need to place it vertically. Step 2. Blow the entire keyboard or only the most problematic keys, first from left to right, and then from right to left. Step 3: Place your MacBook on its right side and do the same. Step 4: Place your MacBook on its left side and repeat the procedure.
Please note that when using a compressed air cylinder, a small amount of liquid may be released from it. It's harmless, just wipe it off your keyboard with a tissue.
Our method for cleaning a MacBook keyboard from the pharmacy To blow dirt off your MacBook keyboard, you can use more than just compressed air. You can simply blow on the buttons with your mouth, but this is not as effective.
It is better to use a “Pear” type enema-syringe from the nearest pharmacy for purging. Don't laugh - the method works quite well. Roma Yuriev tested it on himself a couple of years ago.
Blow air out of the device so that it gets under the keys. The faster you compress the rubber part of the device, the more efficient the process will be. Which syringe to choose? I took the smallest version with a plastic tip to prevent blockages, which I do once a week.
If the blockage is serious, it is better to pay attention to the larger option. With it it will be easier to create a powerful stream of air.
How to avoid problems with keyboard sticking 100% To protect the keyboard from dirt and further sticking, you can use special covers, which are full on AliExpress for every taste.
But working with them on a MacBook is terribly inconvenient. I don't recommend this option.
It is better to thoroughly blow off dust from the laptop buttons with a syringe or compressed air from a cylinder at least once every one to two weeks. Then you are unlikely to encounter sticking.
And if you can’t handle the problem yourself, go to service. Do not try to disassemble the keyboard - do not repeat the mistakes of others.
There are times when you need to remove individual buttons on your MacBook Air or Pro keyboard. Most often, this happens when liquid is spilled on the keyboard or solid particles get under the buttons, which in turn leads to sticking (sticky pressing) or jamming of individual MacBook keys. Today we will learn how to eliminate troubles of this kind with our own hands.
The most common case is when a sweet liquid is spilled on the keyboard (tea with sugar, compote, Buratino, etc.). To restore functionality in this case, it is necessary to remove the stuck keys and clean the fastening mechanism under them.
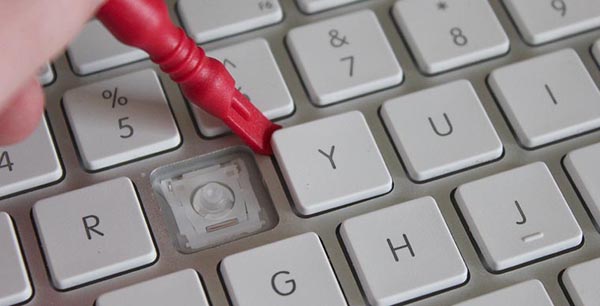
Each MacBook keyboard button is attached to a miniature mechanism. It resembles a scissor mechanism, and consists of two tiny plastic rectangles inserted into each other and connected by a central hinge (see picture below). This mechanism is responsible for the smooth movement of your MacBook's keyboard buttons.
So, if the buttons stick or don’t press at all, then something is interfering with them. Let's take them off and see what's going on. This procedure is not complicated, but it requires care and attention.
To remove the buttons, we need a tool to lift the edge of the button itself (this could be a small flat-head screwdriver, a plastic spatula, etc.) and something flat and thin (for example, tweezers) to detach the mechanism.
There are many videos on the Internet on this topic, but be careful when following the advice you are given. So in one of the videos, the “craftsman” removes the buttons of any keyboards only by lifting the right corner of the button. Try this method with a MacBook and your keyboard will lose a couple of teeth.
I would like to warn you right away that the attachment of the Air and Pro buttons is slightly different and different methods are used for removal.
In order to remove the MacBook Air keyboard buttons you need to.
Step 1
It is necessary to lift the bottom edge of the button using a plastic spatula (flat-head screwdriver). Don't be afraid to raise the bottom edge, but don't overdo it either. The plastic mechanism is quite pliable and easily allows the bottom edge to rise 1.5 - 2 mm above the aluminum body.


STEP 2
We insert the tweezers horizontally into the resulting gap on the right and gently press down. This will release the lower right corner of the button from engagement with the mechanism.
If the button does not release completely, insert the tweezers from the left, move it slightly towards the bottom edge and press down lightly. Both lower corners are free.


STEP 3
After removing the button, examine the mechanism for possible causes of inoperability. Is it possible to fix the problem (clean off sweet jam or remove hard crumbs) without removing the mechanism?
If not, then remove the plastic mechanism. To do this, we perform a tricky maneuver: insert the blade of a stationery knife into the gap between the parts of the mechanism (as shown in the pictures above), push the plastic parts of the mechanism apart and bring the edge of the inner part up.
We do the same on the other side. Thus, the parts of the mechanism disengage and are easily removed from the mounts on the body.


STEP 4
To restore the button, put the scissor mechanism in its place and press it with your finger to the base of the keyboard. You will hear “click-click” - the mechanism has engaged with the base.
Buttons sometimes get stuck not only on new MacBooks, but also on old ones. Usually it is recommended to disassemble the keyboard for cleaning, but in practice this only leads to - Mikk has already proven this.
We'll tell you how no vandalism Clean the keyboard using a couple of proven methods if the buttons on it are already sticking or are just being assembled.
Five minutes once a week and the buttons on my 2017 MacBook Pro work like a charm. Yours will be no worse.
Why do the keys on a MacBook occasionally stick?

The keys begin to stick only because foreign particles get under them. There are no other options, and buttons even with a broken mechanism do not behave this way.
If something gets under the button, it prevents it from being pressed, and it seems to you that it is simply stuck to the base. That's why they say the key is “stuck.”
They began actively writing about the problem in 2015. The world saw a 12-inch MacBook with a butterfly keyboard. The new mechanism turned out to be much smaller in size, so cleanliness turned out to be more critical for it than for the usual “Scissors”.
In 2017, “Butterfly” was updated to the 2nd generation, the problem began to appear less frequently, but remained.
However, the services say that they are regularly contacted not only by owners of new MacBooks, but also by old ones. Why?

Residues of food and dust. Yes, these are the most frequent guests of your keyboard, who happily find hidden places under the keys and prevent them from being pressed.
If you eat near a MacBook, you have already encountered or will encounter this problem in the near future.
If you don't eat near your MacBook, dust will still fall on it, so you won't be able to avoid it getting stuck.

Pieces of skin and sweat. Microscopic parts of your body, to a lesser extent, can also cause sticky keys.
To minimize the effect, do not forget to maintain hygiene - just wash your hands with soap and water often.

Tea and water with sugar. Liquids with sugar are critical for the keyboard. In this case, it will not be possible to completely get rid of the sticking even after cleaning.
Even before the New Year, I spilled tea with sugar on the keyboard of my MacBook - there was minimal liquid, it was quickly removed at the nearest service center, but I was not able to save the keyboard.
The only correct solution was to replace the keyboard. That's what I did.

Apple has not officially acknowledged the problem with MacBook keys sticking. And it was pointless to do this, because this can be avoided with banal accuracy.
But a large stream of criticism against the company forced it to update the Butterfly, which became more practical - this is a step towards users.
And last year, the manufacturer released a guide on cleaning the keyboard from dirt using compressed air.
Yes, Apple suggests simply blowing out food debris and other foreign objects from under the keys with a special balloon.
By the way, you can easily find one like this in any modern electronics store or order it online. The asking price is 200-400 rubles.

Step 1. Hold your MacBook so that its keyboard is at a 75-degree angle to you—no need to place it vertically.

Step 2. Blow the entire keyboard or just the most problematic keys, first from left to right, and then from right to left.

Step 3. Place your MacBook on its right side and do the same.

Step 4. Place your MacBook on its left side and repeat the procedure.
Please note that when using a compressed air cylinder, a small amount of liquid may be released from it. It's harmless, just wipe it off your keyboard with a tissue.
Our drugstore method for cleaning your MacBook keyboard

You can use more than just compressed air to remove dirt from your MacBook keyboard. You can simply blow on the buttons with your mouth, but this is not as effective.
It is better to use a “Pear” type enema-syringe from the nearest pharmacy for purging. Don't laugh - the method works quite well. Roma Yuriev wore it a couple of years ago.
Blow air out of the device so that it fits under the keys. The faster you compress the rubber part of the device, the more efficient the process will be.

Which syringe to choose? I took the smallest version with a plastic tip to prevent blockages, which I do once a week.
If the blockage is serious, it is better to pay attention to the larger option. With it it will be easier to create a powerful stream of air.
How to avoid problems with keyboard sticking 100%

To protect the keyboard from dirt and further sticking, you can use special covers, which are abundant on AliExpress for every taste.
But working with them on a MacBook is terribly inconvenient. I don't recommend this option.