Windows 7 language switching panel. How to add a language to the taskbar. Switching languages from English to Russian disappears. Program, Utility for the Punto Switcher language bar
For almost twenty years now, the Windows operating system has existed approximately in the form in which we are accustomed to seeing it. But there is one little thing that the industry giants cannot fix - the disappearance of the language bar!
They probably don’t really care about this, because they only use English, and we switch between at least two: English and Russian. We will move from the most banal solutions to more complex ones.
You can watch the video or continue reading the article:
Language bar settings
To get started, do the following:
- Go to the menu “Start -> Control Panel -> Change keyboard layout or other input methods”
- In the "Regional and Language" window that opens, on the "Languages and Keyboards" tab, click the "Change keyboard..." button.
- In the new window “Languages and text input services”, check that the switch is set to “Pinned to taskbar”
In this picture (clickable) you can see all the actions in a visual representation.

IMPORTANT: for the language bar to appear, more than one language must be active in the system!
To check this, go to step 3 and on the “General” tab, make sure that more than one language is present.

Also, some users have noticed that the language bar disappears more often if the default language is “Russian”. If this is your case, then try choosing the English layout as the default. In general, panel problems are usually associated with incorrect operation of applications. If this happens too often, then I advise you to install the Punto Switcher program and disable the standard language bar.
Installing Punto Switcher
There is a radical way to solve the problem - the Punto Switcher program from Yandex.
The program is not intended to return the language bar, but it can replace it and solve problems with switching languages. The main purpose of Punto Switcher is to automatically switch keyboard layouts. That is, if you enter “rjvgm.nth”, the program will automatically switch to the Russian layout and change what you entered to “computer”.
Installing the program is simple and straightforward. You will see a language icon in the system tray. By right-clicking on it, you can turn off auto-switching layouts, and then it will be just an analogue of the language bar. This is exactly how I use this program, i.e. I turn off the language bar and use Punto Switcher.
Another very interesting feature of this program is the ability to change the keyboard shortcut to switch the layout, which helps a lot if the language is difficult to switch. I use one button - right Ctrl. It is very convenient to switch the layout with one button. To do this, right-click on the program icon and select “Settings”. Right in the “General” tab, select “Switch layout by right Ctrl”, for example.
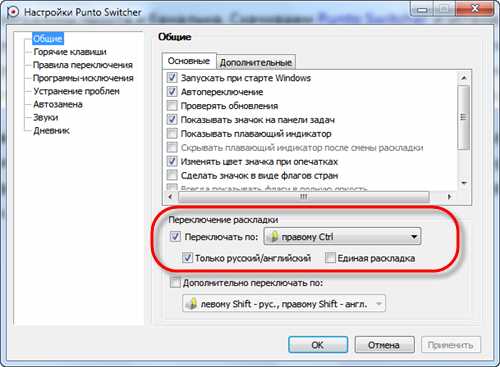
If the system has several languages installed, and you mainly have to switch between Russian and English, then simply check the “Russian/English only” box. Then the right Ctrl will switch only between Russian and English, and the rest of the layouts using a standard keyboard shortcut, a very convenient function.
Restoring the language bar using the registry
If nothing works, then we will make changes to the system registry. In previous versions of Windows, the language bar was controlled by the regular program “ctfmon.exe”. But in Windows 7 it can also be used, only to do this you need to add it to startup:
- Launch Registry Editor: Press “Win + R” and type “regedit”
- Find a thread
- In the right part of the window, right-click on an empty space and select “New -> String Parameter”, give it the name “CTFMON.EXE”
- Double-click on it and set the value to “C:\WINDOWS\system32\ctfmon.exe”
In the end it should look like this

Reboot and check. If it doesn’t work again, then perhaps the “ctfmon.exe” file itself is missing. Download the archive with the file from me and unpack it into the folder “C:\Windows\System32”, where C: is the operating system drive.
Restoring the Windows 7 Task Scheduler
In Windows 7, unlike XP, the scheduler is responsible for launching the language bar. Accordingly, if the scheduler service is not running, the language bar will not be available. Let's check this as follows:

If the scheduler service is running, but the language bar does not appear, then check whether the task is enabled in the scheduler itself:

If you haven’t found the “MsCtfMonitor” task at all, then I suggest creating it. To do this:
- Download the file too
- Right-click on the “TextServicesFramework” section and select “Import task...”
- Select the downloaded file
- Enable the task and reboot
Checking Windows System Files
In especially severe cases, you can ask Windows to check the system files for correctness. To do this, you need Administrator rights and issue the command:
sfc /scannow
Windows may ask you to insert an installation disc. After the verification is completed, you need to reboot.
Tell us in the comments which method helped, and additions on the topic are also welcome! I would be grateful if you share the post on social media. networks.
This element allows you to quickly switch between keyboard layouts. Even those users who are accustomed to switching using keys still look for it visually when they look at the monitor.
If the Windows 7 language bar disappears, this brief instruction will help. Let's start with its definition. The language bar automatically appears on the system tray taskbar when typing services are started, for example, hand input recognition, layout, etc. This panel is needed to quickly change the typing language or keyboard layout. It can be placed on the desktop in any place convenient for the user. Usually located in accordance with the default settings of Windows 7 at the bottom right, near the tray.
 But sometimes she disappears. A possible reason for the non-display could be a virus program that has infected the computer, or it disappears as a result of the system cleanup wizard (therefore, you should work with optimizers carefully, with knowledge of the processes it performs). Of course, switching between languages can be done by simultaneously pressing Alt/Ctrl + Shift on the keyboard. But without seeing the language settings currently in use on the screen, this is not convenient.
Restoring the language bar
Restoring in Windows 7 is performed using many methods. All of them will restore the display of the disappeared icon depending on the reason that caused its loss. There are the following methods to enable its display; we will list them here, starting with the simplest:
Using normal Windows 7 features
 After completing the above steps, the disappeared icon will begin to appear.
If there is no positive result, it is recommended to activate the language bar using an alternative method.
Using the Windows 7 scheduler
The main functional difference between the language bar in Win 7 and previous versions of Windows is that it is included in the Windows system scheduler.
This scheduler is responsible for starting the ctfmon.exe process, which manages it. The icon may be missing due to problems starting this service.
To determine the correct operation of the scheduler service, do the following:

Using the Windows 7 registry
This method is already more complex. This method also requires that you include the ctfmon.exe utility in the startup system. Before starting work, determine the presence of this file. Location in Windows 7 in the C:\Windows\System32 directory. If missing, you should copy it from any other computer that has working Windows 7.
The culprit for the disappearance of the icon can be viruses, as well as various failures in the system, but sometimes the owner of the personal computer himself inadvertently removes the language indication by transferring it to the desktop. In this case, it is simply necessary to install it in its original place using the drag-drop method.
These techniques will help if the language icon has disappeared from the monitor screen in Windows 7.
There is a small problem in Windows 7 - sometimes you cannot see the usual language bar, which can be extremely inconvenient, especially for novice users who use it to switch keyboard layouts. But this useful element of the system can be returned at any time, and for this you can choose one of several possible options.
Using system management tools
Using this tool, you can try to restore the desired element in one of the most accessible ways:
A check mark should be placed opposite the bottom line responsible for displaying text labels on the language bar.
The fastest way to get to the layout settings window
To use the tool we need, we don’t have to enter the computer control system. Moreover, you won't even need a Start button, which can be useful if the problem is caused by malicious applications. We will use hotkeys and the standard Windows 7 “Run” utility:
- Press Win and R at the same time, the “Run” window will appear;
- Write the line intl.cpl in the command input field, press Enter, after which the configuration tool will open.
Next, you will only need to follow the steps to configure the utility described earlier in the last section. If in the end the element cannot be returned to its usual place, more labor-intensive manipulations will have to be performed.
Using the system registry
First, you should try making changes to the registry manually. To do this, you will need the standard Notepad editor. Here enter the following three lines as in the picture.
- From the list of commands in the "File" menu, select "Save As";
- Name the file Run.reg and in the bottom line of the file type, instead of text, select “All files”, confirm saving the changes.
Now all that remains is to run the file you just created and click “Yes” in the registry changes confirmation window. If after a reboot the desired system element still cannot be returned, you will have to use other options for making changes to the registry.
System tools for changing the registry
Now, to return the Windows 7 language bar, we will use the capabilities of the built-in registry editor:
- Open “Run” (Win and R), write regedit in the command line, press Enter;
- In the left part of the window, open the HKEY_LOCAL_MACHINE folder, in it - Software, then the subdirectories Microsoft, Windows, CurrentVersion and Run;
- In the left window of the program, find the CTFMon parameter, the value of which should be C:\Windows\system32\ctfmon.exe.
If the above-described CTFMon parameter with the required value is present in the list, then the reason for the absence of the system element is not in the registry. If it is not there, restore CTFMon yourself. To do this:
- On the empty field of the left window, right-click and in the context list, create a string parameter;
- Give the latter the name CTFMon and double-click on it to set the previously named value.
All you have to do is reboot, after which Windows 7 should be able to switch layouts.
Using third party utilities
If you were unable to restore the language bar in Wnidows 7 using all the methods described, then the best replacement would be the third-party program Punto Switcher from Yandex. This utility displays a similar element in the same place in the same way and can be used in the same way. In addition, Punto Switcher provides users with additional, sometimes very useful features:
- The program automatically switches the layout if the user has forgotten to do this and is typing, for example, Russian text in Latin;
- If an error is detected when typing a word, the program issues a sound alert;
- Automatically checks spelling;
- A floating program indicator can be placed not only on the taskbar, but anywhere on the screen;
- Punto Switcher can convert Russian text of any volume into transliteration, and the reverse effect is also possible;
- The utility remembers the history of texts saved in the clipboard;
- Create templates yourself to automatically replace phrases using built-in tools;
- Using your own diary, you can monitor what users type on the keyboard, information is sorted by date;
- The meaning of any word can be found in Yandex dictionaries and Wikipedia by using the quick search function of Punto Switcher (select the word and press Win and S).
Regardless of what operating system you are working on, installing or restoring the language bar on your computer desktop is approximately the same.
There are several methods, which are described below in order of increasing complexity. Start with simple actions: if they do not lead you to results, then move on to the next options.
Restoring the language bar using language and locale settings
The fastest and easiest option for panel restoration. The following steps should be followed.
Go through the Start menu (bottom left button) to the Control Panel.
In the new window that appears, you need to go to the “Languages and Keyboards” tab and then click “Change Keyboard”.
There are three tabs in the upper area of the window that opens. Open the “Language Bar” tab.
Check the “Pinned to taskbar” checkbox if you want your language bar to always be at your fingertips.
Second option: the panel can be located in any location on the desktop. By checking the appropriate box, you can subsequently drag the panel across your monitor with the mouse and leave it where its position will not interfere with you.
On the same tab, you can select the appearance of the language bar: when inactive, it can be transparent. If you want to see which language is currently active, then add text labels to the language bar.
On the “Keyboard Switching” tab, you can set keyboard shortcuts that will make it possible to switch the Latin alphabet to the Cyrillic alphabet and vice versa.
In the window, select the “Taskbar and Start Menu Properties” tab and in the part where the “Notification Area” is displayed, click the “Customize” button.
Another “Notification Area Icons” window will appear, at the bottom of which there is a command “Always display all icons and notifications on the taskbar.” Check the box to activate and confirm the action by clicking “Ok”.
This is the simplest and most visually clear way to attach a language switching panel to the desktop if some minor failures occur in the program.
Restoring the language bar using the ctfmon.exe file
Using the Start menu search or in Explorer, locate the program file "ctfmon.exe". Copy it. Next, you should open the Startup folder. It is located on drive "C". In the Users folder, select the desired account with which you work on the computer. Then the path looks like this: “AppDate” - “Roaming” - “Microsoft” - “Windows” - “Main Menu” - “Programs” - “Startup”. Open the Startup folder and paste the file you copied earlier. After performing this operation, the language bar will load again simultaneously with Windows loading.
Hard option: changing registry settings
It is possible that the recovery options described above did not work and the panel remained inaccessible. Go to the registry settings.
Open the Start menu and type regedit in the search bar. Click on the found program to open the registry editor.
In the edit sheet, find the branch (verbatim) "HKEY_LOCAL_MACHINE".
