Transferring win 10 system to ssd. Correct transfer of Windows to HDD or SSD. Applying an image to an SSD
If you have a Windows 10 computer with a valid license key and you want to install the same license on another Windows 10 computer, then you can do so using this guide. You can transfer your Windows 10 license to another PC. However, there are a few things you should keep in mind:
- If you purchased a box license key or a Windows 10 product key, you can transfer it to another computer. Your Windows 10 must be a retail copy. Purchasing a key at a retail outlet is tied to a person.
- If you purchased a laptop or desktop computer and the Windows 10 operating system came preinstalled (OEM), you cannot transfer that license to another computer running Windows 10. The OEM locator is tied to the PC hardware. You must understand that keys that are sold on the Internet for 1,000 - 2,000 rubles. - These are OEM left keys.
Transferring a Windows 10 license to another computer
Step 1. The first thing you need to do is delete current license from an existing computer and only then install it on another. To do this, open a command prompt as an administrator and enter the command slmgr.vbs /upk. Next, you will see a window with a message that Product key deleted successfully.

Step 2: Now install Windows 10 on another computer and make sure that when installing the system, you select "I don't have a product key" when it asked you to enter a valid product key. In simple words, install Windows 10 without entering a product key. After installing Windows 10, open a command prompt as an administrator and enter the following command slmgr.vbs /ipk xxxx-xxxxx-xxxxx-xxxxx-xxxxx, where xxxx is your Windows 10 retail product license key.

Why Windows 10
Because 2017 is just around the corner, the very middle, and progress does not stand still. No matter how those affected by Vista scold Windows, the system has made great progress along with the rest of humanity, and the top ten is very good for work and everything else. If there are clear reasons to install some old versions, please write them in the comments.
Ways to transfer Windows 10
- Using special programs like Paragon Migrate OS to SSD (paid) or EaseUS Todo Backup Free (free).
- A clean installation of Windows on a new drive is personally a better way for me. The installation itself is easy and quick, partitioning the new disk and formatting the old one is right there in the process. A kind of general cleaning in the computer industry.
Clean installation of Windows 10 from a USB drive
I assume that you already have a legal copy of Windows 10 installed, which you are going to transfer to a new SSD drive. And it goes without saying that all your work or family files and folders are already saved to an external hard drive or to the cloud! Making backup copies regularly is generally a good thing.
1. Create Windows 10 installation media.
Connect a USB drive with a capacity of at least 5 GB to your computer - empty or with files that you don’t mind, because the entire contents of the flash drive will be erased.
- Go to the microsoft.com downloads page and download the Installation Media Builder - click the "Download Tool Now" button at the top of the page, save the file, and run it once the download is complete.
- Accept the terms of the agreement.

- Select create installation media.

- View system parameters and change if necessary.

- Select recording to a USB device.

- Information about the selected USB drive.

- We are waiting for the Windows 10 installation files to finish downloading. Depending on the Internet speed, the process may take different times. In my case, it took about 40 minutes before it fully loaded.

- Click “Done” when finished.

2. Installing Windows from a USB drive
- We go into the BIOS settings to set the flash drive as a boot disk. To do this, restart the computer, and when the manufacturer’s logo appears, press the Del key on the right side of the keyboard. We put the USB drive first in the boot queue. The specific type of BIOS depends on the manufacturer, but the meaning is the same.

- Save the settings and reboot again.

- Launch the installation program. We check the parameters, then the “Next” button.

- Click the “Install” button.

- We agree that Microsoft doesn’t owe us anything and all that.

- Select “Custom: Windows installation only.”

- We choose which disk to install the system on. The screenshot shows two completely clean, unallocated disks as an example. The larger one is the old HDD on which the previous Windows system was installed (I just deleted it using the “Delete” command at the bottom of the window). The smaller one in this case is the new SSD. I select it and click “Create”.

- I'm creating partitions for the second disk.

- I select the largest partition from the first disk (Disk 0 in the screenshot), then “Next”.

- We are waiting for the installation program to prepare everything. Then the computer will reboot itself. The whole process may take 10-20 minutes depending on the speed of the USB drive and SSD.

- Setting the region.

- Keyboard layout.

- Additional layout.

- Connect to the network.

- Sign in to your Microsoft account.

- Set a PIN code, if needed.

- Drive if needed.

- Privacy settings. If there is no definite opinion on this matter, just leave it as is.

- Complete installation.

Life after reinstallation
She's beautiful! Windows starts before you have time to pour the tea. 3ds Max installs in 9 minutes, launches in 30 seconds instead of 3 minutes with HDD. Whether such pleasant little things are worth all the fuss - everyone decides for himself.
One way to avoid losing data, system settings, software products and documents is to transfer the installed Windows 10 OS from the HDD (hard drive) to a more mechanically resistant and fast SSD drive. The transfer is performed not only for the purpose of quickly recovering files, but also for the purpose of replacing the HDD drive with an SSD. Therefore, it makes sense to understand in detail how to competently transfer the Windows 10 operating system from a hard drive to an SSD drive.
We use built-in functionality
SSD drives are silent, have a large buffer for faster PC performance, and have no moving parts for durability. But SSD drives, unlike HDDs, have a limited number of overwrites, so before you save Windows 10, you need to understand the process. It will not be possible to repeat the procedure endlessly.The easiest way, which gives the least number of errors when migrating the OS, is using the built-in functionality. The rewrite operation is performed as follows:
Important! The image recorded on the media is used to restore the system. If, while working with a PC, the user adds important software products or changes system parameters, the procedure should be repeated and overwritten the old image. You should not use an SSD drive to store photos and other frequently updated files. Repeated rewriting will exhaust the limit, but on average the disk resource lasts for 7 – 10 years.
Migration Tools Available for SSD Drives
Large manufacturers of solid-state drives Samsung or Seagate, for example, produce special software products for data cloning along with disks:DiscWizard- software released by the Seagate brand for transferring information to SSDs of its own production. A very capacious program that covers virtually all the user’s needs: deleting confidential information, cloning a system, transferring OS settings and software products, restoring files, etc.;

Data Migration- the software is designed to work with SSD drives manufactured by Samsung. The program helps optimize the disk's potential, searches for drivers, clones the system, etc.

The listed software products are comprehensive packages that are used to backup all data from the HDD to SSD drives or only the necessary sections of the main disk. With their help, you can clone the operating system and create disks for booting the system.
Important! Using software products native to the SSD reduces the risk of errors during the cloning process.
There are also universal programs. Acronis has released free True Image software for backing up the OS to SSDs of any brand: Kingston, Samsung, Seagate, etc. On the Internet you can find many paid and free analogues - Paragon Drive Copy, Macrium Reflect, etc. To start the process, you need to download from software manufacturer's website and install it on your PC. Installation is performed using the classic method.
How to transfer using Acronis True Image
The True Image program is considered the most popular and easiest to use. It is equipped with a Russian-language interface, but requires activation during operation (you can bypass the procedure). This is done by registering on the network. After installing the software, you should not immediately start cloning. SSD drives are not as capacious as hard drives, so system C should be organized:- Clean partitions, or only system C (System). Remove all unnecessary traces without traces;
- Defragment the system space;
- Fix system errors.
- go to menu " Tools»;
- select program block " Cloning...»;
- put a dot next to automatic mode. Manual configuration of the transfer process is used if it is necessary to clone only the system space or select a list of important partitions;
- select the cloned space. In automatic mode there will be one object, in manual mode there will be as many objects as the number of disks the hard drive is divided into;
- select the target media - the connected external drive. At this stage, the program will ask you to exclude those files that do not require cloning;
- checking the selected data. If something is selected incorrectly, you can use the menu " To" And " After»;
- press " Get started" and confirm rebooting the PC.
What do we get?
The user's actions after completing the cloning process depend on the purpose of migrating Windows 10 from HDD to SSD. In 8 out of 10 cases, the operation is performed to replace the hard drive with a faster drive. To do this, you just need to select it as the main one in the BIOS. The OS will always boot from a high-speed storage medium. Since OS files are static and are not overwritten as often as those used by the user, installing an SSD as the main drive has many advantages: The freed HDD can be safely used to store photos, videos, etc. In other cases, the cloned data is used to restore the system. The procedure for transferring a data package is simple, so follow the instructions and remember the overwrite limit.
 Until recently, the only option for ROM on any computer or laptop was the so-called hard drive or hdd. However, most PC and laptop users today have already heard about solid-state drives and many have chosen them. Despite the fact that the more familiar hdd has its advantages, more and more often when choosing a permanent storage device, the scales tip towards the ssd, which appeared on the market in 2009 and immediately established itself as faster and more reliable compared to its predecessor. What is the difference between ssd and hdd and in what cases should one or another drive be preferred?
Differences between ssd and hdd
Both the traditional hdd and the more modern ssd are used to store information that remains on the computer at all times, including after it is completely turned off (unlike random access memory devices). The fundamental difference between these two devices is the method of data storage: in hdd, information is stored due to the magnetization of certain parts of it, in ssd it is recorded in a special type of memory, presented in the form of microcircuits.
Externally, a hdd looks like several disks with a magnetic coating, information from which is read through a moving head. Data placed on such a disk can be read at a speed of 60–100 Mbit per second, the disk itself rotates at a speed of 5–7 thousand revolutions per minute (you can imagine the operation of a hdd by looking at a vinyl record player). The disadvantages of hdd are known to any user:
- makes noise during operation. The noise is caused by electric motors and rotating disks;
- low speed of reading information due to the fact that some time is spent positioning the head;
- susceptibility to mechanical damage.
Both the traditional hdd and the more modern ssd serve as permanent storage devices
The ssd device is fundamentally different from the hdd: to be precise, the ssd disk does not have any disks at all, as well as other rotating and moving elements. Solid State Drive is a set of chips placed on one board. An ssd works roughly like a flash drive, but many times faster: information is written and read from such a device at a speed of 600 Mbit (with a SATA connection interface) to 1 GB (with an ePCI interface) per second. Obviously, such a disk is preferable to users who care about the speed of processes occurring in the computer.
In addition to high performance, ssds are quiet during operation and are less susceptible to mechanical damage. At the same time, they are capable of storing less information and are more expensive than HDDs. Thus, a computer with an ssd works faster, and a computer with an hdd stores more data: taking this into account, you can choose the most appropriate type of drive for yourself.
Pros of moving OS to ssd
Transferring Windows 10 to an ssd allows, as a rule, to make the OS more “responsive” to any user actions. The use of ssd for storing media files is controversial due to the limited rewriting limit of such devices. In this case, it is more advisable to have a hdd, which can serve the owner for a long time if its resource is used correctly. Windows components are static files that are not constantly overwritten, but only read, so working with the OS when transferring it to an ssd will speed up several times, and the device’s resource will be consumed extremely slowly. The configuration of modern PCs provides for a mixed disk interaction scheme, which eliminates the problems associated with limiting overwrites: in this case, the operating system runs on an ssd, and media file libraries are stored on a hdd.
Video: features of moving the OS to an ssd
Transferring Windows 10 from hdd to ssd
You can transfer Windows 10 from hdd to ssd using the capabilities of the OS itself or using third-party software.
Using Windows 10 tools
Despite the fact that Microsoft has not provided its users with special cloning tools, certain features of Windows 10 allow you to transfer the OS from a hdd to an ssd. In this case you will need to do:
- media preparation;
- intermediate cloning;
- transfer to ssd.
SSD drives placed inside a PC are not formatted (unlike those connected via USB), and therefore they are identified by the computer, but are not reflected in the OS. To make all drives formatted and visible, you need to:
- Mount the drive into the computer. After turning on, the OS recognizes only the system partition C.
 Initially, the computer sees only partition C
 - Press Win+X to open the custom menu.
 Press Win+X to call up the custom menu
 - Click "Disk Management".
- In the management manager that opens, select the partition table - MBR for 32bit systems and GPT for 64bit. Press Win+X to call up the custom menu
- Click "Disk Management".
- In the management manager that opens, select the partition table - MBR for 32bit systems and GPT for 64bit.
 In the management manager that opens, select the partition table - MBR for 32bit systems and GPT for 64bit
 - Call the context menu in the unallocated area and click “Create simple volume”.
 Next, call up the context menu in the unallocated area and click “Create a simple volume”
 - In the wizard that opens to create simple volumes, follow the prompts.
- Of all the pop-ups, changes can only be made when setting a volume label.
 Of all the pop-ups, changes can only be made when setting a volume label
 - At the last step, the wizard will highlight the parameters of the created volume.
 At the last step, the wizard will highlight the parameters of the created volume
The same thing should be repeated with the ssd, giving it a different name.
Using third party programs
Among the programs with the most favorable user reviews:
- Acronis WD Edition, which is a convenient tool for cloning drives, as well as creating backup copies of the OS and applications. The program allows you to configure the required data and delete unnecessary information. The user of the program will be able to restore the OS if any files or folders are accidentally deleted, or if problems with accessing information arise due to errors. The program is free, to use it you need:

- . This program differs from the previous one only in that it is developed for Seagate disks (the Acronis WD Edition program is for Western Digital disks);
 Seagate DW is designed to work with Seagate drives
 - Samsung DM. If the ssd is made by Samsung, then this program is suitable for transferring Windows 10 to it; it works through the installation wizard and can perform a complete or selective data transfer;
 Samsung Data Migration program is designed to work with Samsung disks
 - Minitool PW. This program is considered to be one of the best solutions when choosing a method for transferring an OS from hdd to ssd. MiniTool Partition Wizard Free has a convenient, intuitive interface, versatility, support for all types of hard drives recognized by Windows;
 MiniTool Partition Wizard Free has a convenient, intuitive interface, versatility, support for all types of hard drives recognized by Windows
 - - a program designed to create and restore an image of a disk or its partitions.
 Macrium Reflect is a program designed to create and restore an image of a disk or its partitions
Setting up Windows 10 after transferring to ssd
You can ensure optimal operation of the OS on an SSD drive using a number of settings that are performed after transferring Windows 10 to a solid-state drive.
Checking the parameters of the new disk
Before proceeding with settings (or optimization), you should check whether the following are enabled:
- ACHI SATA mode;
- TRIM support on Windows.
To perform these checks, you will need to enter the BIOS and verify that the drive is running in ACHI. You can open the BIOS in Windows 10:
- restarting the PC while holding down the Shift button;
- When you turn on the PC, press and hold the F2 button in this position.
Once in the BIOS, you should find the SATA Configuration line, click on it and select the required mode. If it turns out that the ATA mode is activated, you need to make the appropriate switches.
 To perform the checks, you will need to enter the BIOS and ensure that the drive is running in ACHI
 In this case, the system may refuse to boot due to the lack of necessary drivers. You can solve this problem by installing the drivers first or reinstalling Windows. In addition, older computers may not have ACHI mode at all: in this case, you need to update the BIOS.
You can make sure that ACHI is present in the system using the device manager (which can be found in the Start menu): if among the IDE ATA/ATAPI controllers there is a device whose name contains SATA ACHI, nothing else should be done.
 If among the IDE ATA/ATAPI controllers there is a device whose name contains SATA ACHI, you do not need to do anything else
 Why is ACHI mode needed? To ensure correct operation of TRIM ssd drive. What is TRIM? This is a special ATA interface command used to transfer data to the ssd about those blocks that are no longer required and can be overwritten. Using TRIM allows you to speed up the disk and ensure uniform resource consumption of its memory cells.
You can find out whether TRIM is supported by the operating system using the command line, running it as an administrator and entering the fsutil behavior query DisableDeleteNotify command. If it turns out that DisableDeleteNotify=0, then everything is in order and you can continue working. If instead of 0 there is 1, this means that TRIM is disabled.
 To enable TRIM, enter the command fsutil behavior set DisableDeleteNotify 0
 Disabling features
To optimize the performance of newly installed Windows 10, it is advisable to disable some functions that were used on the hdd drive.
Indexing
You can find the indexing service by sequentially clicking on the control panel icon, the “Administration” section, and the “Services” subsection. When a window opens with a list of local services, right-click on Windows Search.
 You can find the indexing service by sequentially clicking on the control panel icon, the “Administration” section, the “Services” subsection
 After this, the “Properties” window will open, in which you need to select the record type “Disabled” and click the “Stop” button.
 In the “Properties” window, you must select the recording type “Disabled” and click the “Stop” button
 A function such as file indexing is relevant when working on a hdd, because in this case it allows you to speed up the operation of the OS. Considering that the ssd already works quite quickly, and repeated rewrites can harm the disk, indexing can be sacrificed without compromising performance. To do this, you will need to uncheck the permission to index files in the local disk properties. You can open the local disk properties window by clicking “This PC”, right-clicking on one of the disks and selecting “Properties”.
 To disable indexing, in the local disk properties, uncheck the permission to index files
 Defragmentation
If the OS is installed on a regular hard drive, then through defragmentation you can organize the location of files and, as a result, speed up the system. The solid-state drive provides equal access time to all files and works reliably without defragmentation. Defragmentation settings can be made by going to “This PC”, right-clicking on one of the drives, selecting “Properties” and going to the “Tools” tab, in which you should click the “Optimize” button.
 Defragmentation settings can be made by going to “This PC”, right-clicking on one of the drives, selecting “Properties” and going to the “Tools” tab.
  To disable defragmentation, you need to go to the optimization settings, click “Change settings” and uncheck “Run on a schedule”
 Search service
The search service is designed to create file indexes to help you find them faster. The average user rarely needs this function, so you can safely disable it. One way to access the search services settings is to call up the dialog box by pressing Win+R and entering the services.msc command.
 To access the search service settings, press Win+R and enter the command services.msc
 In the window that opens, select Windows Search and double-click, after which properties will open, in which you should select the startup type “Disabled” and click “Apply”.
 The search service can be disabled by following the following steps: Control Panel → System and Security → Administrative Tools → Services → RMB on the Windows Search service → Properties → Startup type → Disable
 Hibernation
After turning off the PC, the image of the working OS is saved using hibernation on the internal drive, which subsequently speeds up the startup of Windows. When working on an ssd, hibernation can be disabled, since the loading speed in this case is already high, and frequent rewriting can shorten the life of the disk. You can disable this feature using the powercfg –h off command entered into the command line.
You can open Command Prompt as an administrator by right-clicking on the Start menu. After that, enter powercfg –h off and press Enter.
 You can open Command Prompt as an administrator by right-clicking on the Start menu, then typing powercfg –h off and pressing Enter.
 Prefetch SuperFetch
If you have frequently used software installed on your computer, Prefetch helps you launch it faster, and SuperFetch determines which program is about to launch. The OS on the ssd can run successfully without these options. To disable these options you must:

Formatting an old drive
When turning on the computer after transferring the OS to the ssd, the user will see a window asking to select a boot. After cloning the OS onto the ssd, it remains on the old disk and is used, as a rule, as storage for various kinds of files. It is not recommended to remove Windows 10 from the hard drive immediately after completing the transfer procedure to the ssd. It would be correct to first check the operation of the OS on the new disk, so that you can return to the previous state of the computer in case of any problems.
After this, you will need to change the system bootloader settings. A built-in component called a boot manager allows the computer to determine whether to start the copied or original system. If it turns out that the OS on the ssd works correctly, the old version can be uninstalled from the hard drive. To do this you need:

You can delete an OS from a hdd using the delete ID command.
AppData transfer
AppData is a hidden subdirectory of the Users system folder by default. It stores files that, according to Microsoft developers, should not be of particular interest to the user. However, if AppData is transferred to an SSD, it should be taken into account that after a certain time the size of this folder may grow so large that there is a shortage of free space on the disk. You can get rid of unnecessary files using a tool such as CCleaner.
Transferring AppData to another drive entirely is problematic, because the properties of this folder do not have a “Location” tab. But this tab has the Local, Roaming and LocalLow folders, located inside AppData. Therefore, you need to transfer the contents of the AppData folder to the required disk in one of the following ways:
- making changes to the register;
- using OS Explorer tools.
If you transfer using the first method, you must:

To transfer using Windows 10, you need to do the following:
- in the required location, create the AppData folder and the Local, Roaming and LocalLow folders in it;
- in the existing AppData folder, select Roaming and open its properties;
- in the “Location” tab of the next window, click “Move”;
- in the newly created Roaming folder, open the “Location” tab and click “Move” and “Apply”;
- confirm your intention to transfer files;
- do the same for the Local and LocalLow folders.
Those PC users who already use an ssd will confirm that their computer or laptop now starts up much faster, and working with programs has become much more convenient due to the fact that access to all files is available simultaneously. Supporters of a traditional hdd may say that fast startup is not the most important requirement for a PC, since it turns on 1-2 times a day, and not everyone needs speed when working with a large number of programs. In addition, for some, factors such as the cost and capacity of the ssd may be significant, in terms of which the solid-state drive is still inferior to the hard drive. Nevertheless, ssd drives have many more advantages and, above all, their reliability, efficiency, noiselessness and speed.
Installing an SSD – one of the most effective methods that can breathe “second life” into a computer even with not the latest configuration. The operating system accesses files faster and becomes much more responsive to user actions. At the same time, it is absolutely not necessary to install and configure the OS and software from scratch. In this article we will talk about how to transfer Windows 10 to an SSD without losing data.
Microsoft does not provide special tools for cloning in the system. However, Windows 10's built-in capabilities allow you to do this.
Media preparation
According to the official recommendations of the company's technical support, we will need an additional, third, hard drive. Unlike those connected via USB, SSDs intended for internal placement are not pre-formatted. As a result, they are detected by the computer, but are not displayed in the OS. To clone Windows, you first need to make all drives visible.
- We mount the drive in the PC and turn it on. Having opened the file manager, we see that the OS has recognized only the system partition.

- Using the Win + X key combination, call up the “Power User menu”. Let's move on to the designated point.

- The Disk Management Manager opens with an initialization window. At this point, the user must select a partition table. For x32 bit systems, only MBR is needed. For users of x64 bit versions of Windows, GPT is better suited.

- Having decided on the partition table, let's format it. Both drives must have the NTFS file system. By clicking on the unmarked area, we call up the context menu. Select the item marked in the screenshot.

- The Create Simple Volume Wizard is activated. We will perform further actions following his prompts.

- We do not change the volume size, but create one using the entire available volume.

- The letter is assigned automatically. Since the placement of disks in the system is temporary, only for the cloning period, we will leave it unchanged.

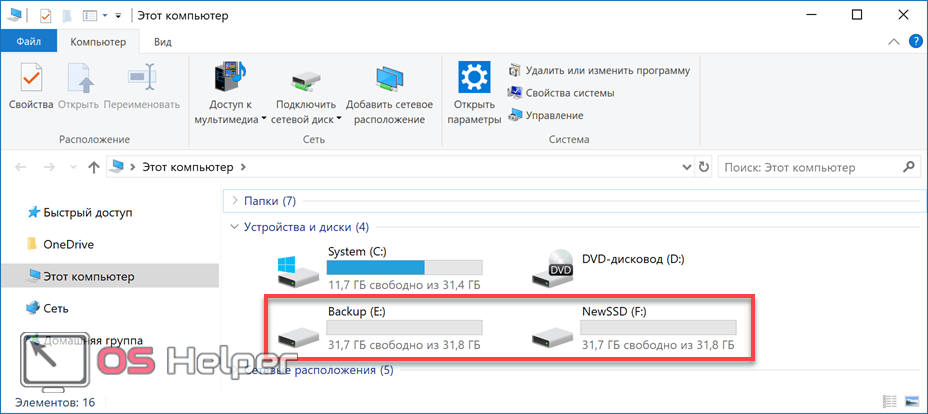
- At this stage we set a text label. For convenience, let’s give the intermediate HDD the name “Backup”.

- At the last step, the wizard displays the parameters specified for the drive in the form of a list. We complete the work by clicking on the “Finish” button.
 We perform a similar operation with the new SSD, giving it the name “NewSSD”. By opening Explorer, we make sure that all of them are visible from under the OS.
At this point, the preparation of media for cloning can be considered complete.
Intermediate copying
The next step in allowing you to move Windows to a new “location” is to create an intermediate copy.
- The tool we need is located in the classic control panel. Let’s run it by entering “control” in the “Run” system menu. To do this, press Win + R.

- Open the element indicated in the screenshot.

- In the quick navigation area, select “Create a system image.”

- The wizard that launches prompts you to determine the storage location. Using the drop-down menu, we specify the intermediate hard drive, which we named “Backup”.

- At this stage, the system shows us what data will be included in the finished image. We agree and move on to the next step.

- We complete the wizard by clicking the “Archive” button.

- An image of the system HDD is being created.

- The operation is not accompanied by time stamps. Its duration depends on the amount of data being stored. Once complete, we will be prompted to create a rescue disk.

If you have Windows 10 installation media, you can skip this step. Otherwise, you will need a flash drive with a capacity of at least 8 GB.
Transfer to SSD
At the last stage, the old HDD can be removed from the computer, leaving the drive with the backup copy and the new SSD prepared for transfer.
- The download is performed from the installation media with the Windows distribution. After checking the language settings, move on.

- At this stage, instead of installation, select recovery mode.

- In the action selection window, go to the marked item.

- In the advanced options area, the section you want is framed. Having selected it, we launch the recovery wizard. Since we are performing a full migration, the next step is to validate the solutions offered by this mode.

- Having received the last warning, we activate the recovery procedure.

At the final stage, the computer will automatically reboot and the operating system will start from the solid-state drive. Reactivation is performed without user intervention after checking the hardware configuration.
Disk cloning programs
As we saw in the example given, it is possible to clone Windows 10 using system tools, but the procedure is lengthy and labor-intensive. Sometimes it is faster and easier to reinstall the OS from scratch than to look for a disk suitable for intermediate backup.
Against this backdrop, applications specifically designed to facilitate migration look great. The average user does not need disk cloning on an industrial scale. In most cases, this is a one-time operation. For this reason, we will only consider software that has free versions or allows you to perform the necessary operations during the trial period.
Macrium Reflect
The program is published by Macrium Software in several editions. Free Edition allows you to transfer the OS directly, without intermediate media.
- Installation is performed using the Download agent. The user can first select the required components using the “Options” button. By clicking “Download” we begin the download. The circled “Run installer” box has a check mark by default. If you do not remove it, the program will begin to install automatically after the components are downloaded.

- We check the correctness of the architecture: it must correspond to the bit capacity of the installed OS. Select a “clean” installation from the drop-down list. Such a distribution will not include tools for creating a boot disk and disaster recovery.

- The main window of the installed Macrium Reflect displays the disk structure available on the PC. The boxed option opens cloning options.

- At the top is the original datum disk. At the bottom of the window, select the target SSD. The section marked “3” contains advanced copy settings.

- You don't have to change anything here. The default smart copy option is suitable for any user. During the transfer process, the file system will be checked and the TRIM function will be automatically enabled.

- After checking all the options, click the highlighted button to copy the existing structure to the new drive.

- By clicking “Next” we launch Migration master, which will give us detailed technical information about each partition of the disk being created.

- At the final stage, remove the crossed out check mark. She is responsible for creating a recurring schedule, while ours is a one-time operation.

- Before the transfer begins, Macrium Reflect will warn you that the data on the drive specified in the window will be completely destroyed. We agree and wait for the process to complete.
 As a result of the actions performed, we receive a valid licensed copy of Windows on new media.

You can remove the old disk and start working on the SSD without reinstalling the system.
Acronis True Image
Another program worthy of attention is Acronis True Image. It differs from other products of this company in its ability to perform cloning operations during the trial period. For example, Acronis Disk Director allows you to do this only after purchasing the full version. True Image is limited by the need to use intermediate media.

The declared on-the-fly cloning option becomes available in the full version of the program.
- You can use any suitable sized USB drive as an intermediate one. We connect this to the PC and specify it as a storage location.

- We start the procedure for creating a backup copy.

- Go to the “Recovery” tab. Select the target disk in the window and press the button marked “3”.

- To perform cloning, open additional options.

- Check the source – a backup copy of the current disk. Select the destination disk from the drop-down menu – new SSD. We start the transfer process.

The operation is performed in the background and its progress is displayed in the system tray. When the transfer of Windows 10 to SSD is completed, the program automatically makes adjustments to the bootloader.
Manufacturers' software
Samsung, one of the leaders in the production of solid-state drives, has created its own software to make it easier for users to migrate the system. The proprietary utility is free, but only works with manufacturer’s disks. The list of supported SSDs can be found on the official page, where Samsung Data Migration is available for free download.
Transfer issues
There are no system restrictions for working with SSDs. Microsoft provided full support for SSDs with the release of Win 7. However, the transition may be difficult for laptop users. Manufacturers are reluctant to allow changes to the factory configuration.
As a result, some top MSI and ASUS models do not allow HDD replacement. The user will not be able to install a cloned SSD into it, since the laptop refuses to work with it. The only way out is to contact the manufacturer’s technical support to find out in advance the possibility of an upgrade and supported drive models.
In conclusion
The capabilities that the user receives when using free cloning programs are enough for a one-time system transfer. In terms of functionality, they are somewhat inferior to professional tools such as Paragon Migrate OS to SSD, but they get the job done.
Video instructions
For those who want to learn more about how to use programs for migrating to an SSD, below is an overview video.