Why is the flash drive write protected, how to remove it. The disk is write protected, USB is not formatted. Prohibiting recording to flash devices when USB ports are disabled in software or hardware
The era of floppy disks is long gone, but sometimes when trying to write to a flash drive, the user may encounter a situation known since the days of using floppy disks - the removable disk is locked and cannot be used to write files.
We will look at how to solve this problem in detail in our article today.
So, you need to write some information to a flash drive, you insert it into the connector and receive a message like “The disk is write-protected, remove the protection or use another disk.”
This problem can be solved quite quickly, and we will talk about this a little later, but now we should say a few words about the purpose of installing write protection on a flash drive.
Pay attention! As a rule, this operation is performed for only one purpose - to protect the flash drive from viruses that can spontaneously be copied to removable media without the user’s knowledge.
Methods for removing write protection from a flash drive
There are 2 key ways to remove protection from a flash drive: hardware and software.
The hardware method is to install a lock switch, which is present in some models of USB flash drives, as well as SD cards. As a rule, the switch is located on the side edge of the drive.
Carefully inspect your existing drive and look for an open/closed lock icon or the word Lock on it.
Pay attention! Removing the protection is very simple - you just need to move the locking lever in the opposite direction. Write protection has been removed. Insert the flash drive into the appropriate slot and repeat the file writing operation again.
The software method involves software interaction between the operating system and the flash drive controller, which is responsible for the ability to record information.
You can remove write protection programmatically using the command line, registry editor, or local group policy in Windows 7/8. Let's take a closer look at all of the above methods.
Removing protection using regedit
Step 1.“Start”, in the search field enter the name of the Windows registry editor - regedit. Right-click (RMB) on the program and in the context menu go to the “Run as administrator” item.

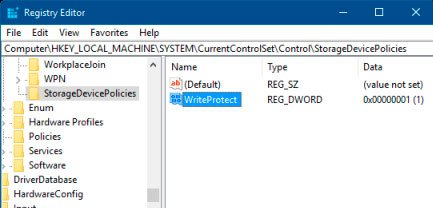
Step 2. Let's go to the StorageDevicePolicies section:
HKEY_LOCAL_MACHINE\SYSTEM\CurrentControlSet\Control\StorageDevicePolicies
Important! If there is no such section, you need to create it. To do this, right-click on the section Control - New - Section. We name the section “StorageDevicePolicies” without quotes.

Create (RMB in the right column of the registry) a DWORD value (32 bits) in the created registry branch. For convenience, let's call the created element WriteProtect.

Step 3. You need to make sure that the value of the WriteProtect parameter is 0. Right-click on WriteProtect and select “Change”. If the value is “1” you need to change it to “0” and click “Ok”.

Step 4. Close the registry editor, remove the flash drive and restart the computer. Insert the flash drive. Now the flash drive works as usual, allowing you to write files.
Removing protection using Diskpart
If the flash drive could not be unlocked using the registry, let's try to do it using the Diskpart command interpreter, which allows you to manage disks and partitions using commands that the user enters at the command line.
Step 1.“Start”, in the search field enter the name of the Windows command line - cmd. Right-click in the program and select “Run as administrator” in the context menu.

Step 2. Now you need to enter the commands: diskpart and list disk, and after entering each of them, press the Enter key.
Step 3. In the list above, you need to determine what serial number in the name the flash drive has.
This can be done based on the specified size, in our case an 8 GB flash drive, presented in the table as “Disk 1” with a capacity of 7441 MB.
Step 4. We select the disk with the “select” command, clear the attributes that allow only reading “attributes disk clear readonly”.
If the flash drive needs to be formatted, you should enter the following commands “clean”, create a partition “create partition primary”, format it to NTFS “format fs = ntfs” or FAT “format fs = fat”.

Removing protection using the Local Group Policy Editor
Step 1. Open the editor by pressing the Win + R key combination, after which you should enter the command gpedit.msc and press “OK” or Enter.

Step 2. In the editor, open the branch: Computer Configuration - Administrative Templates - System - Access to Removable Storage Devices. And look at the status of the “Removable drives: Deny reading” parameter.
If the parameter is enabled, you must disable it.

Step 3. To disable recording restrictions, double-click on the parameter and in the window that appears, select “Disable”, “OK”.

If all the methods described above did not help solve the recording problem, you can try going to the official website of the flash drive manufacturer and looking for proprietary utilities for working with the drive.
It is also possible that a flash drive has exhausted its resource (there is a limit on the number of rewrites, after which the drive is switched to read-only mode) and the only way out of the situation is to buy a new flash drive.
What to do if the disk is write-protected, and how to remove the protection - from time to time this question arises for all people who use flash drives.
The problem of a write-protected disk is very common, and solutions are known.
We will list the most popular of them, in order of increasing complexity.
First thing to do
When the system message “disk is write protected”, the first thing to do is check Is the media equipped with a physical switch?.
It is found on some models of SD cards and USB drives, and protects the disk from accidentally writing new data over existing data.
Most often, this element is located on the side of the device and is indicated by a lock icon or the word Lock.

The protection can be removed by moving the lever in the opposite direction. Once the switch is in the desired position, you should try recording again.
Check the flash drive with an antivirus. Flash drives constantly “travel” between computers and are at high risk of infection with malware.
Make sure that the write protection is not the result of some worm.
Format the drive using the same file layout as the computer on which the recording will be made.
If all the above methods do not help, move on to more complex ones.
Specialized programs
- JetFlash Online Recovery utility for Transcend products(the utility only works on Windows);
- USB Disk Storage Format Tool application from the well-known manufacturer of computers and components HP. Unlocks any drive, regardless of its model and capacity, checks for errors, formats it for the selected file system and can create a bootable USB Flash;
- The Apacer Repair Tool application solves various problems with opening and formatting Apacer drives, including USB 3.0 drives.
Advice! All applications should only be opened as an administrator. To do this, in the menu that opens by right-clicking on the executable file, select “Run as administrator.”
Making changes to the registry
Launch Registry Editor You can by opening a command prompt (Win + R) and typing regedit. Next, you should complete the following steps:
- find the HKEY_LOCAL_MACHINE item in the editor window that opens;
- open the SYSTEM, CurrentControlSet, Control and StorageDevicePolicies sub-items one by one;

- if there is a corresponding section in the computer registry, go to the right side of the editor and check if there is a WriteProtect parameter there, the value of which is 1. It is this unit that most often causes the error;
- Instead of one, put a zero, save the changes and restart the computer, after which the error should be eliminated.
If there is no partition, it is created by right-clicking on Control and selecting “Create Partition”. The name is StorageDevicePolicies.

After the section is created, you need to go to the empty area on the right and find the “DWORD Value” item, renaming it to “WriteProtect” and setting the value to 0 (zero).
Now you need to close the editor, remove the disc, restart the computer and repeat the recording cycle again.
Working with the command line
The next option for removing protection from the media is using the Windows command interpreter called Diskpart.
With its help, partitions and disks can be managed by entering commands on the line. The user actions in this case are as follows:
- Run Command Prompt as administrator. To do this, in Windows 7 you need to find the corresponding item in the Start menu, and for Windows 8 or 10 - press the key combination Win + X);
- Type Diskpart in the line and press enter.

- in the interpreter that opens, type “list disk” and determine in the list that opens what number your media is located in it;
- one by one enter in the command window: select disk N (N is the drive number), attributes disk clear readonly and exit. After each, press the enter button.
After closing the command line, you need to restart your PC or laptop and perform some actions on the drive - for example, format it, write information to it, or erase a file.
Restoring the file system
You can check the functionality of the drive’s file system and possibly restore it. CHKDSK utility. To launch it you should:
- open command line;
- type the command “chkdsk X: /f”, where X is the name of the volume of the disk being checked;
- wait a few minutes until the application completes the check.

In most cases, errors detected on a USB drive are corrected by the program, and the flash drive is again available for writing.
Restoring the controller
Sometimes the reason for the failure of a flash drive is a malfunction of the firmware of its controller.
To correct the problem, special programs are used that determine VID and PID (identifiers of the manufacturer and device, respectively).
Popular apps are CheckUDisk 5.0, ChipGenius And USBDeview.
After identifying the identifiers, you should download an application from the network that restores the operation of the firmware.
For drives with an AlcorMP controller, programs are used lcorMP And Alcor Recovery.
You can check their compatibility with the flash drive after launching them.
Red color indicates the impossibility of using the utility, yellow and green allow disk recovery.

Local Group Policy Editor
The editor is a utility used to modify local group policy objects.
It opens by pressing the Win + R key combination, which brings up the command line, and entering gpedit.msc.

Now you should find the branch Computer Configuration/Administrative Templates/System/Access to Removable Storage Devices in the utility tree structure.
Here you check the value of the “Removable drives: Deny reading” item, which must be turned off for normal operation with flash drives and SD cards.
If disc writing is limited, double-click on the corresponding option and, when the dialog box appears, select “Disable”.

Advice! When using any application for working with flash cards and USB drives, it should only be opened as an administrator. To do this, in the menu that opens by right-clicking on the executable file, select “Run as administrator.”
Conclusions
After launching all the utilities and completing the suggested actions, most of the media starts working.
The last thing you can do with a flash drive or memory card if all the previous methods did not work is to finally make sure that they are not working.
Try writing something to them on several other computers. If the disc does not open on either of them, your only option is to buy new media.
If you want to learn something more about removing write protection from a flash drive, here is our other material on the same topic:
Video instructions:
Writing files to a removable drive is the simplest operation on a personal computer, which millions of users perform every day. But not all users understand the true reasons for such an error. In this article we will look at the causes of the error and how to resolve it.
Causes of the “Disk is write-protected” error. Why is the microsd card write protected?
The verbatim text of the notification looks like this: “The disk is write-protected. You need to remove the protection or use a different disk." The appearance of this message is quite logical if the operating system does not have the ability to write to the disk - for one of the reasons it is prohibited.
The causes of failures may be software or hardware. Software and hardware failures occur both in the computer OS and in the file system of the drive. But before deciding what to do, you need to understand the reasons for this phenomenon.
Basic ways to protect a flash drive (memory card) or disk from being written to
Methods for protecting information on a flash drive, as well as types of failures, can be divided into two groups: hardware and system.
One of the options for hardware protection is a mechanical switch on the drive body in the “lock” position.
System protection is a set of programs and utilities specifically designed to ensure data security. For example, a block is set in the Windows registry or a group policy prohibits writing.
The easiest way to remove protection from a flash drive is Total commander
Total Commander is one of the oldest Windows managers, but is still popular among users because it has good functionality and is easy to use. You can remove protection in TC using the following algorithm:
- Open "Configuration".
- Open the “File Operations” tab.
- Select "automatic copy method".
Hardware method. Windows Command Line – Diskpart
Important: You must run the command line as an administrator.
To remove protection using the command line, you need to follow the following algorithm:
- Go to the Start menu.
- Find the “Command Prompt” application (the command line can also be launched using the Win + R key combination).
- Enter Diskpart into the command and press the “Enter” key at the command line, thereby launching the disk manager application on the system.
- Enter Attributes disk clear readonly into the command and press the “Enter” key, thereby disabling the read-only mode.
- Enter Clean in the command and press the “Enter” key, thereby deleting all partitions and volumes of the disk.
- Enter Create Partition Primary in the command and press the “Enter” key, thereby creating the primary disk partition from scratch.
 The ability to write to a flash drive is often blocked by numerous malicious programs that enter the computer system through other external media connected to the device or the Internet.
To find and eliminate them, you need to download an antivirus, for example Dr.Web CureIt, and scan the system for malicious code.
Mechanical protection. Switch for recording modes on a flash card
Some flash drives are equipped with special write protection mechanisms. They are located on the device body, on the outside. The device looks like a small switch.
Important: These switches are more common on SD cards, but some USB models also have them.
To activate the ability to write to a disc, just move the switch slider to the desired “OnLock” position.
Windows Tools. Setting up Group Policy (gpedit.msc)
How do I remove protections that have been installed as a result of Local Group Policy settings? This restriction is removed using the following algorithm of actions:
- Activate Windows keys + R command prompt.
- Enter the command Gredit.msc in the search bar and click OK.
- In the new window, go to the tabs: Configuration>Administrative Templates>System>Access to removable storage devices.
- Go to the “Disable reading” line.
- Double-click on the line.
- In the new window, activate “Apply”>OK.


Registry editor. Removing write protection using regedit
Registry Editor is a standard program built into a modern Windows system. The application edits registry keys, sets new default settings, and restores files from backup copies.
To remove protection using the editor, you need to follow the following algorithm:
- Log in to the registry editor program by activating the Win+R keys.
- Type Redegit in the search bar and click OK.
- Find one of the registry branches called: HKey Local Machine
- Select the System branch from the drop-down list.
- From the list that drops down under this branch, select Current Control Set, then Control
- From the list of subsections, select StorageDevicePolicies
- In the program interface, check the WhiteProtect parameter
- Change the parameter value from 1 to 0.
- Close the editor and reboot the OS.

What to do if the disk is write-protected and the flash drive cannot be formatted - Low-level formatting
If the above attempts to remove protection did not bring results, then it is worth using the low-level formatting of the drive to clear and recreate all tables of the file system of the flash card. At the same time, you need to remember that in this case the recorded data will be lost, but the damaged disk memory will be restored. Full formatting will block damaged USB areas and the system will not be able to write data to them in the future.
The Low Level Format Tool program is suitable for this operation. The application clears the partition table, boot sectors, and even manufacturer data - all down to the last byte. A free version of the program is available on the Internet, but it works slower than its paid counterpart.
Not typical causes of the “Disk is write-protected” error
The reasons why writing to a disk is blocked can be divided into common and atypical, more rare ones. The second group includes file system errors, wear or physical damage to the flash drive, microcontroller failures, and USB port malfunctions.
— Fatal errors in the file system of the flash card
If the sequence of storing and naming information in the drive's memory is violated, the structure of the file system is damaged. Logical errors occur after incorrect removal of the flash drive from the connector, memory wear, power surges and other processes. The disk is blocked, and the system reports the need to format it. To correct the situation you need:
- Try to recover data using software suitable for this media.
- Perform a high-level format with file system recovery.
 Physical damage to the media includes manufacturing defects, cracks, and overheating in motherboards and microcircuits. Physical damage is also caused by violations of operating and storage conditions, power surges, and loosening of USB connectors.
— Microcontroller failures or complete wear of the flash drive
Flash memory and the computer “communicate” with each other using a controller chip built into the external drive. The controller is controlled by a microprogram written into the chip. Sometimes, in case of unsafe removal of the flash drive or electrical current surges, a software failure of the controller occurs. A clear sign of such a malfunction: write blocking. Also, blocking occurs due to wear of the memory chip, exceeding the threshold of rewrite cycles. The system goes into information protection mode to stop the process of memory destruction. Reflashing the microcontroller using special programs will help eliminate failures.
It is rare for a USB port to turn off spontaneously on a computer, but this error still happens. To check if the port is working properly, you must first try connecting other devices to it. If the port sees the smartphone, keyboard and other devices unstable or completely refuses to notice them, then it does not function. If the user sees a system message about the disk being write protected, it is not related to a malfunction of the USB ports. But the administrator can disable them intentionally to protect data from downloading. How to remove write protection from a flash drive if the port is disabled?
In this case, you need to enable USB using the following procedure:
- Enter the BIOS by holding down the F2 or F10 keys.
- Find values for USB Controller.
- Set the Enabled parameter for these values.
- Confirm the changes by activating the F10 key.
- Restart your PC.


How to remove protection from excel sheet
If the Excel sheet is not editable, the application toolbar is inactive, and the user does not have access to most functions. When you try to make changes, the program will display a message stating that the sheet is protected. To unlock the sheet, you will need the following steps:
- Click on the “File” item.
- Activating the “Unprotect” link in a new window.
- Enter your password. Without knowing the password, you cannot remove the protection.
In the old version of Excel, to remove the lock you need to:
- Activate the “Service” item.
- Select the “Protection” tab from the list.
- Activate the “Unprotect Sheet” command.
- Enter your password.
Programs for eliminating recording errors and formatting protected flash drives
Flash drive manufacturers understand that their products may malfunction for various reasons, so every well-known brand creates utilities to eliminate them. Useful programs are available on the manufacturers' websites. For example, the program for Kingston is called Kingston Format Utility, Transcend is called JetFlash Recovery. The programs are freely available on the manufacturers' websites.
At the moment, all computer users everywhere use USB flash drives to store and transfer their files. It is not uncommon when data cannot be copied because the system writes that the flash drive is write-protected. In this case, you need to figure out what caused the problem and how to remove write protection from the flash drive.
If the flash drive is write-protected, the system will not allow you to write a file to the flash drive until you remove this restriction. There can be two problems due to which the message “The disk is write-protected, remove the protection or use another disk” may appear - hardware (related to the flash drive itself) or software (related to the operating system).
Hardware write protection on a flash drive
There is a small share of USB drives on the market (not only flash drives, but also SD cards) that have mechanical write protection. Such flash drives on which the disk is write-protected are mainly aimed at inattentive users who can accidentally delete necessary files.
Pay attention to the picture above. The USB drive has an “open” and “close” switch, represented by a lock icon. If the switch on your flash drive is in the “closed” position, then writing files to usb will be prohibited.
If your device does not have such a switch, then the disk is write-protected in the operating system settings and interaction with the usb drive controller.
Software write protection
Removing write protection through the Windows registry
To enter the Windows Registry Editor, press the Win+R key combination, enter regedit there and press Enter. Instead of the Win+R key combination, you can click “Start” - “Run”. These actions are equivalent.

On the left side you will see the structure of the registry keys. Go to the registry key HKEY_LOCAL_MACHINE\SYSTEM\CurrentControlSet\Control\StorageDevicePolicies.
However, this thread may not exist. If it is, then look at the value of the WriteProtect parameter. A value of 1 prohibits writing files to the flash drive. Set the resolution to 0, then remove the USB flash drive and restart the computer. The problem should go away.
If you do not have such a branch, then you need to create it. To do this, right-click on the partition above Control and select “Create Partition”. Provide a name for the new StorageDevicePolicies section.
After that, go to the newly created StorageDevicePolicies section, right-click on the right and select “create DWORD Value”.
Call it WriteProtect and leave the value 0. If the value is 1, then you need to remove it. As in the last paragraph, after this, remove the USB drive and restart the computer. Make sure that the message indicating that the disc is write protected is gone.
Removing protection via the command line
If editing the registry does not help, then there is a way to remove write protection through the Diskpart command interpreter in the Windows command line.
Click “Start” and write cmd in the search bar, then a command line window will pop up. You can also go to the command line in the “Start” menu - “All Programs” - “Accessories” - “Command Prompt”.
At the command prompt, write diskpart and press Enter. After that, write list disk and press Enter again.
You will see a list of computer disks. You need to determine which of them belongs to the flash drive on which the disk is write-protected. In our case, this is disk 2, this can be seen from the size of 8GB.
We write select disk 2 to select our disk, press Enter.
We write attributes disk clear readonly to clear read-only attributes.
After executing the commands, close the command line, remove the flash drive and insert it back into the computer. Try writing something down to see if the problem is resolved.
Removing protection using the Local Group Policy Editor
Click “Start” - “Run” and the Win + R key combination and enter the value gpedit.msc and then press Enter.

The Windows Local Group Policy Editor will open.
Go to the tab “Computer Configuration” - “Administrative Templates” - “System” - “Access to Removable Storage Devices”.
If the "Removable drives: Deny read" option is enabled, if it should be removed. To do this, double-click on the policy and select “disable”, then click OK.
Removing protection using special programs
Now let's look at how to unlock a flash drive if standard Windows tools did not help. You can try to remove the protection using special programs for working with flash drives from different manufacturers, which will allow you to format the disk to remove the write prohibition error.

A free utility that will help you format your flash drive, after which the write protection problem will be eliminated.
JetFlash Recovery Tool

Special program for Transcend flash drives. This program is designed to fix errors on Transcend flash drives, including problems with protecting the flash drive for writing files.
I also suggest that you familiarize yourself with the video on this topic, maybe after watching it you will be able to remove the write protection on the flash drive.
If you have any questions, write them in the comments. We will try to help you.
Hello everyone friends. Today, I want to tell you about how to remove write protection from a flash drive in the shortest possible time and without much difficulty. The thing is that the other day, as usual, I wanted to copy a certain file to a flash drive, but in response I saw a message of a similar nature: “The disk is write-protected. Remove protection or use another disk." What kind of things are these? After all, such cases had never happened before and everything worked perfectly. As a result, I began to look for ways to solve this problem, which I will discuss in this article.
First, let's look at the main reasons why write protection may appear:
— The integrity of the file system was violated, for example, due to improper use of the flash drive (for example, after finishing work with the flash drive, the function of safely removing the device is not used)
— The flash drive was attacked and infected with viruses. The most common reason.
— Trivial damage to the flash drive itself. She fell somewhere or was subject to a strong blow.
— A special switch is installed on the flash drive, which prevents infection by viruses and puts write protection on the flash drive.
We have figured out the reasons, now I will tell you how to remove write protection from a flash drive using software and mechanical means.
Mechanical method of removing protection from a flash drive
As for the mechanics, everything is very simple here. Carefully inspect your flash drive for the presence of a so-called switch, which mechanically installs protection on the flash drive. Below, I have given several examples of flash drives with such a switch. If yours has such a switch, just move it to the other side and everything will work.


If the situation with the switch does not solve anything, we move on to software methods for removing protection from a flash drive.
Removing protection using the OS registry
1) In order to remove protection from a flash drive using the operating system registry, we need to click the Start button and enter regedit (command for editing the registry) in the search field. After that, right-click (right-click) on the icon that appears and select the item – Run as administrator.

2) Now we need to find a special section called – StorageDevicePolicies, which is responsible for prohibiting writing to the flash drive.
It should be located in the following path:
HKEY_LOCAL_MACHINE\SYSTEM\CurrentControlSet\Control\StorageDevicePolicies
Important! If you do not find this partition at the specified path, you must create it manually. To do this, go to the parent section Control, right-click on it and select – Create – Section. Give it a name – StorageDevicePolicies.


3) Go to the StorageDevicePolicies section we created and right-click in the right area of the registry. Select the menu item - New - DWORD value (32 bits). We call it an arbitrary name, for example, WriteProtect.

4) Now we just have to make sure that the value of the WriteProtect parameter is 0. To do this, double-click on this parameter with the mouse or right-click on WriteProtect and select the menu item - Change.
Important! If the value in this parameter is set to 1, then change it to 0 and click OK.

5) Close the registry editor window, remove our flash drive from the device, and reboot it. After the reboot, insert the flash drive and check whether files can be written to it.
Removing protection from a flash drive via Diskpart
If the option of removing protection using the registry did not work, let's try this operation through the command line interface.
To do this:
1) Press the Start button, enter the command diskpart, then right-click on the icon that appears and select the item – Run as administrator.

2) In the window that appears, enter the command – list disk and press the Enter key. A list of drives will appear in front of us, in which we need to determine the serial number of your flash drive.
This is easy to do using the size of your flash drive. For example, my flash drive is 8 GB in size, so I can easily identify it in the list of media. If you don’t know the size of your flash drive, then double-click on the My Computer icon (usually located on the desktop) and see what size your flash drive is (RMB - Properties).
After you have selected the desired media, enter the command select disk your media number(I have this 1). Press Enter and a message with the selected disk should appear.

3) Enter the command - attributes disk clear readonly, which clears the read-only attributes for the flash drive and removes write protection from it.
Press Enter and if everything is done correctly, the message “Disk attributes successfully cleared” will appear in front of you.

Close the diskpart utility window.
Removing protection using the Local Group Policy Editor
Sometimes there are cases where the write ban is enabled through the Group Policy Editor in the OS itself. Let's check it out:
1) Click the Start button and enter the command gpedit.msc in the search bar, then press the Enter button.

2) In the window that appears, follow the path: Computer Configuration - Administrative Templates - System - Access to removable storage devices and in the right area of the window select the item - Removable drives: Deny writing.

At this point, we pay attention to the condition that appears next to the inscription. If the status is set to Enabled, then double-click on it and select Disable in the new window. Click Apply and OK.

List of programs for removing protection from a flash drive
HP USB Disk Storage Format Tool– a universal program that fits almost any flash drive and allows you to quickly remove protection. program, run the exe file (this program does not require installation) which is located in the archive and the program itself will detect your flash drive. After which, you need to select the type of file system into which the program will format and click the Start button.

JetFlash Recovery Tool - this program is only suitable for flash drives from the following manufacturers: JetFlash, A-DATA and Transcend. program, carry out a simple installation, and after launching it, press the Start button.

Apacer Repair – this program only works with Apacer flash drives. If you have just such a flash drive, then in order to remove the program from the flash drive, simply launch it and follow the instructions on the screen.
AlcorMP is one of the best programs for carrying out such actions. It works with AlcorMP controllers. archive, unpack it and run the file AlcorMP.exe from the folder itself. If your flash drive works on an AlcorMP controller, then the inscription in line G will be black and this means that everything is in order and you can work. If the inscription is red, then working with this flash drive is impossible. In order to remove write protection from a flash drive, simply press the Start button (A) after setting the switch to Russian.

An important nuance. All programs for working with flash drives must be run with administrator rights. To do this, right-click on the program launch shortcut or on the program itself and from the context menu select – Run as administrator.

A couple of points. Before using the above programs, I recommend carrying out preliminary steps and if they do not help, only then resort to the help of software. What is this connected with? If you use software, all your files will be deleted as the flash drive is formatted. To prevent this from happening, use the methods below, and if they do not help, then you can already start working with the programs.
1) If your flash drive is infected with viruses (suspicious files on it), then scan it and remove all viruses found.
2) There are times when it is enough to change the USB port and the data from the flash drive can be read perfectly.
3) Be sure to check for a security switch on the flash drive. If it is in “Lock” mode, then move it to the other side.
That's all the advice that I wanted to give you on the topic of how to remove write protection from a flash drive. I hope this article will help you in solving this problem.
That's all for me. See you again!!!