Why may the tablet not connect to wi-fi? Error correction options. Lenovo tablet does not connect to Wi-Fi
Once you get your tablet, you'll likely want to use wireless connectivity. Often, users find themselves in a situation where the device does not see the network or displays a number of errors when connecting. In this article we will look at the most common problems that arise when accessing the Internet and ways to solve them.
Why doesn't my tablet connect to the wireless network?
1. Entering the wrong password
The most common reason for wireless Internet failure on a tablet. Most often it occurs if the user has changed the password, but the Android device has never connected to it. Enter a new password and check if your device connects to the Internet.
2. Viruses
Sometimes the reason why your device won't connect to the Internet can be due to malware. To fix this problem, you need to scan the gadget with an antivirus.
3. Power failure
Inexpensive routers are characterized by unstable operation. Voltage surges can lead to the tablet not seeing the network. To solve the problem, reboot the router by disconnecting it from power for 2-3 minutes. Then turn it on again. Sometimes a reboot needs to be done several times.
4. Wrong encryption type
To check the encryption type, go to the router settings. To do this, enter the router's IP address in the address bar of your browser. This data can be found on the device sticker or in the instructions. In the tab that opens, select “Advanced settings”. Then, under Wi-Fi, click Security Settings. To view the encryption type, go to the “Network Authentication” menu. From the proposed options, select WPA-PSK\WPA2-PSK2 mixed. Reboot your router. 5. Time and date settings are incorrect
In some cases, the tablet does not connect to the wireless network due to incorrect date and time values. After correcting these parameters to the correct ones, network operation will resume.
6. Checking the MAC filter mode
Another reason why a user on a tablet does not see Wi-Fi may be changes in MAC address filtering settings. To exclude this option in the router settings in the “Wi-Fi” section, go to the “MAC filter” item. Check which mode is selected. The following values are possible:
- Disabled – by default, there is no restriction for MAC addresses.
- Allow – access to the wireless network is allowed only to those devices whose MAC addresses are registered on the corresponding tab. Other devices are not allowed to access the Internet.
Deny – there is a list of MAC addresses that are restricted from accessing the Internet. If the router sees a prohibited MAC address, it closes the Wi-Fi connection for this device.
 If the “Allow” or “Deny” modes are selected in the router settings, check whether the MAC address of your device has access to the wireless network. Or change the mode to Disabled. After these manipulations, check how the gadget connects to the network.
7. Channel diagnostics
If the tablet sees the network but does not connect to it, check the channel matches. This problem occurs when the signals of two routers operating on the same channel intersect. Interference occurs, blocking access to the wireless network.
Check on your tablet to see if there are other wireless networks nearby. If your neighbors have Wi-Fi, then perhaps your routers operate on the same frequency.
To change the channel in the router settings, go to the “Wi-Fi” section to the “Basic settings” tab. Find the “Channel” line, try choosing a different value.
Reboot your router.
 If the channel is set to “Auto” mode in the settings, the router itself will search for an available free channel and use it. Therefore, in most cases it is recommended to use this mode.
 8. Changing Wi-Fi version
The reason why the tablet does not see the wireless network may be that it does not support the wireless version that is installed in the router settings. On the “Wi-Fi” tab, go to “Basic Settings”. In the “Wireless mode” line, enter 802.11b\g\mixed. In this mode, the router provides Internet access for all types of devices.

A tablet computer is an incredibly convenient invention. With it, you don’t have to be tied to your workplace, as is the case with stationary computing systems, and you also don’t have to carry around extra pounds in the form of a full-size laptop. However, without access to the Internet, the tablet significantly loses its flexibility of use. However, this applies to all mobile devices. In light of this, it is quite clear that if the tablet does not see WiFi, then such a problem should be solved immediately.
Connection procedure
The number of tablet computers running the Android operating system is tens of times greater than their counterparts running the corresponding version of Windows or iOS. That is why this article will focus specifically on mass-produced devices. People who are encountering Android-based devices for the first time cannot always use wireless communications correctly. And since in normal state the Wi-Fi module is turned off, beginners have a question: “Why doesn’t the tablet connect to WiFi?” It's actually quite simple. The process of joining an existing wireless network includes several mandatory steps:
- using the transceiver module of the tablet computer;
- scanning the range and selecting the desired SSID name from the list;
- secret combination set.
If the network to which you are connecting is open (Free), then the last point is not required.
How to connect a tablet via WiFi

You need to open the “Application Menu”, which is available on any Android device. Typically, to access it you need to click on the circle icon at the bottom of the screen. Next, carefully look through all the icons and find “Settings”. After clicking on it, a window will open where there is a “Wireless Networks” section.
If you select the WLAN item, you will see an “Off/On” switch. When turned on, it will automatically scan frequencies and display a list of detected networks. You can also see if password access is used and where exactly. If the network is open, then just click on its name and the tablet will connect to it. In case of security (WEP/WPA/WPA2), when you try to join, a password request window will be displayed. By specifying it and clicking the corresponding button, you can connect your mobile device to the network.
There is a faster way to access Wi-Fi. There is no need to search for “Settings” to do this. Just slide your finger down the screen, pulling the curtain, find the WLAN (Wi-Fi) image and click on it. The module will be activated, scanned and a list of networks will be displayed.
Nuances of the alternative method

Nowadays, many owners of Android devices often replace the official firmware with a custom one (made by craftsmen). As a result, not all functions work as usual. For example, if you use a call through the curtain, the tablet often does not see WiFi. The list of detected networks is simply not displayed.
Therefore, in such cases, it is necessary to enable the Wi-Fi module through “Settings”. When using, be aware that some of them have recognized networking bugs. At the same time, the latest “homemade” software updates often integrate the latest versions of Wi-Fi drivers. The conclusion is simple: before studying a lot of information about why the tablet does not connect to WiFi, sometimes it is enough to change the firmware.
The problem of standards
In order for devices to form a wireless network, the protocols they support must be compatible with each other. Thus, the first models of Android tablets may simply not “know” how to work with WPA2 security, supporting only WEP. In this case, changing the encoding type in the router settings can help. Another thing is also true: a “clumsily” configured access point can ruin the life of the most patient owner of a modern tablet.
Interim solution
So why won't my tablet connect to WiFi? There are many reasons. We have indicated the simplest ones above. In addition to them, the tablet’s ability to work with a wireless network is affected by the power of its transmitter.
Very often, when scanning, the desired SSID is determined, and even a password is accepted, but it is impossible to work with such a connection. This occurs due to the fact that, although the device “sees” the router, the data packets sent do not reach the recipient. The solution is simple - physically move closer to the access point. This “disease” often affects inexpensive transmitters that use cheap transmitters.

A crutch program
But what should you do if, for no apparent reason, your tablet stops connecting to WiFi, although until recently everything was working properly? You can try using a wonderful software solution that is distributed free of charge in the Market - Wi-Fi Fixer. After installing the application, the tablet must be restarted, and the subsequent connection to the network must be made through the interface of this program, which will be displayed in the curtain. In addition, sometimes it helps solve problems with transmission speed.
Working with settings
When figuring out why the tablet does not connect to WiFi, one cannot help but mention possible failures in the operating system itself. Installing third-party applications, making changes to the operation of components, obtaining root rights - all this can affect Wi-Fi. You can try to restore functionality by returning to factory settings. To do this, go to “Settings - Personal Data” and enable “Backup and Reset”. In this case, all user data (including the phone book that has not been saved to a file) will be erased. Therefore, you must first prepare copies.
A lot of users, when trying to connect their Android smartphone or tablet to a Wi-Fi network, encounter many different problems and errors. In this article, we will try to deal with the problem that appears after connecting the Android device to Wi-Fi. When Wi-Fi does not work on a smartphone or tablet. More precisely, the Internet does not work when connected via a wireless network. A very popular problem.
We connected our smartphone to the home Wi-Fi network, or at work, there is a connection, but the Internet does not work. Websites do not open in the browser, Google Play Store does not work, other applications that require Internet access also refuse to work. True, there are exceptions when, for example, sites open in the browser, but the Play Store does not work, and the YouTube video does not play. Typically, the Wi-Fi icon in such cases is gray and not blue, as it should be. We will also talk about this.
When many people write that Wi-Fi doesn’t work on their smartphone, what they mean is that Android connects to Wi-Fi, but doesn’t load anything. If your mobile device does not see any Wi-Fi networks, or some errors appear when connecting, then this is a completely different topic; we will definitely talk about these problems in other articles. Or, check your router if it is . Now we will look at exactly the case when an Android smartphone connects to Wi-Fi without problems, but problems arise with Internet access.
In fact, there are many reasons and solutions. The whole difficulty is that the problem can appear either due to some problems in the settings of the tablet or smartphone itself, or because of the settings of the router. We will first check whether the settings on the mobile device itself are correct, and if this does not help, then we will change the settings of the router.
Android: Internet via Wi-Fi does not work. Solving a problem on a smartphone
If you have a tablet, then these tips will also apply.
1 First of all, you can try turning off/on Wi-Fi on the device. Enable/disable airplane mode. Reboot your smartphone. Sometimes it helps.
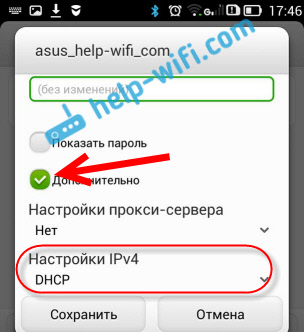
2 Checking proxy server settings. If a proxy server is enabled on your smartphone in the properties of your wireless network, then the internet will not work. You need to check, and if it is enabled, then disable manual proxy server configuration. Go to settings, where a list of Wi-Fi networks is displayed, and the network to which you are connected. Usually, you need to click on the desired network and hold it. A menu will appear in which you need to select something like Change network. Next, you will most likely need to check the box next to Additionally. The proxy server setting will appear. It should be disabled. See screenshots, yours may be slightly different.
If it is set to “manual”, then the Internet on the phone will not work.
3 Check the date, time, and time zone settings. These are the parameters due to which the Play Market most often does not work on Android, gray Wi-Fi icon, and the Internet does not work in other programs.
Your phone or tablet should always have the correct date and time settings. It is also recommended to use the 24-hour time format if you have it disabled. Be sure to check these settings on your device. You can set it to automatic.

After proper setup, the Play Store starts working. This has been verified.
4 There is such an application - “Freedom”. If you have it installed, then in the application itself you need to click Stop. And if you deleted it, then install it back, go to the application, click Stop and then you can delete it. I haven’t encountered this myself and haven’t tested it. But many people write that it helps. The Internet starts working.
5 Setting up automatic IP acquisition. When there are problems with IP, Android usually does not connect to Wi-Fi at all. But it doesn't hurt to check.
Open the Wi-Fi settings on your device and go to the properties of your network (as I showed above). By checking the box next to Advanced (you may not need to do this), you will see the item IPv4 settings, or something like that. It should be set to automatically obtain IP - DHCP.
6 I saw reviews that help a lot of people setting static DNS addresses. This method helps in cases where you have a gray Wi-Fi icon on your smartphone or tablet instead of a blue one, and the Market does not work. Also, not all sites may open.
Go to the properties of the desired Wi-Fi network, as I showed above. Check the Advanced box (if necessary) and find the item IPv4 settings (yours may be slightly different). You need to select an item Manually, and find the fields DNS1, And DNS2. Write the following addresses in them:

You can also change the DNS in the router settings, if it makes it easier for you.
7 You can do more Full reset of your Android device. If you are not too lazy to configure it again, install applications, etc. But, if nothing helps, then you need to reset it, this can solve the problem with the Internet.
8 Update. In the comments, they shared unusual tips that helped get rid of the Wi-Fi problem on Android. The solution is really very strange, but you can try.You need to select in the phone settings as the main memory phone's built-in memory, not an SD card. I can’t specifically tell you where this can be done on your smartphone. Maybe you don't have such a function at all. But look somewhere in the settings, in the "Memory" section.
Change the router settings if the Internet does not work on your smartphone (tablet)
Let me remind you once again that the Internet from your router should work on other devices. If it does not work at all, on any device, then you need to configure the router. Android has nothing to do with it. Basically, the tips that I will write below help in cases where the smartphone does not see the Wi-Fi network at all or does not connect to it. By the way, before setting up, you can simply try rebooting the router.
1 Try changing the channel in your router settings. Very often, it is the channel that causes problems with connecting to Wi-Fi. There is a detailed article on this topic:. You don’t even have to look for a free channel (this takes a long time), but simply install some static one, for example - 6. In the article at the link, I showed how to change the channel on different routers.
2 On the same page where you can change the channel, you can usually change the region. These settings are usually located on the Wi-Fi network settings page. Set your region in settings.

3 Here you can also try changing the wireless network operating mode. These settings are available on any router. You can try different options. For example, put n only.

Here you need to experiment. Don't forget to save the settings and reboot the router.
Ask questions, share your tips and solutions in the comments!
It is impossible to remember a tablet from the 2010s that did not have a Wi-Fi module. Fast wireless Internet is a must-have feature for portable smart devices. It’s all the more offensive when it doesn’t fulfill its task and doesn’t provide access to the Internet.
We do not consider the case where the device does not turn on Wi-Fi at all. Here there can be only one recommendation: quickly take the tablet to a service center. Another unpleasant option is more common: the device seems to find the desired Wi-Fi, but cannot connect to the Internet.
Let's try to describe the most common problems with Wi-Fi connections and ways to solve them. Some of them will only require changing the settings of your tablet or router. Others will force you to spend a certain amount, but incomparably less than on repairing a tablet (or even more so buying a new one).
Why might Wi-Fi not perform its function?
Signal or channel problems. Although the smartphone/tablet connects to Wi-Fi, there is no wireless Internet access.How to solve: go into the router settings and change the Wi-Fi channel (for example, instead of automatic selection, assign a static 6th channel). Choosing a different network mode also helps: instead of 11bg mixed, put 11n or 11g. This method is applicable when you have problems with your own router and you have full access to it.
Bad signal. Formally, there is a Wi-Fi connection, but it is not possible to connect to the Internet through it. Reason: interference, especially if the router is behind a wall or several.
How to solve: bring the tablet close to the router and check the connection. If everything works without any obstacles, you are better off moving the router or using a signal repeater. Today, repeaters are inexpensive enough to install in one or more problem rooms.
The router does not connect to the Internet. Reason: the cable is damaged, the provider has technical problems, or you are behind on your Internet payment.How to solve: Go to your personal account: providers usually leave access to it, even if your account is in deep red. If your bill is fine, call your provider.
Unknown router failure. This happens.
How to solve: reboot the router. Most often it helps. If you are not at home, but in a public place, ask an employee for such a service.
You are connected to the internal network, in which access to the Internet is not provided for “vagrants”. This usually happens in cafes, restaurants, hotels, and other public institutions.How to decide: Ask employees which of the available networks is intended for customers.

The password is entered incorrectly. It’s unlikely that you noticed this while typing (then you would have corrected it). Some networks do not immediately report this if your password is incorrect, but simply refuse to provide you with access to the Internet.
How to solve: talk to the owner of the house/employee of the establishment and clarify the correct spelling of the password.
The proxy server on your tablet is incorrectly configured. Quite a rare reason nowadays, when almost all networks can do this automatically. But you may have your own reasons for entering a proxy manually: bypassing a ban on access to some sites, impersonating a resident of another region, etc. In this case, the side effect may be the inability to connect to the Internet at all.How to solve: Go to Settings, select Wireless networks/Wi-Fi, find the network you are currently connected to and go to its settings. On Android, this menu is usually opened by long tapping on network. Try to find the “Proxy” section in the settings, and if some kind of proxy server is registered in it, disable it by selecting the “No” option. Now the proxy will be automatically assigned by the provider, which will most likely solve the problem.
Incorrectly configured date. This is unlikely to prevent you from visiting sites through your browser. But other Google applications (if you use Android) may go on strike due to violation of the regime. Nowadays this problem is rare, but it still happens on exotic tablets from the Middle Kingdom.How to solve: go to Settings, find the Date/Time section and set the correct data.
The MAC address of your device is blacklisted on the network. This happens if you are in a facility with high security requirements, where only approved devices can connect to the network. Or you personally annoyed the admin with something, so he takes revenge on you.How to solve: buy a bottle of whiskey and go to the admin to resolve the issue. In some cases, beer will help.
We hope our tips helped you set up high-quality Wi-Fi on your tablet.
Often, users do not have problems connecting their tablet to Wi-Fi: they need to visit the appropriate section in the menu, select an access point, and then enter personal data. However, it happens that the tablet does not connect to Wi-Fi, and then there is cause for concern. There may be several reasons for this phenomenon. Below we will consider each problem problem and solutions separately.
Important to know! In most cases, the reason for the lack of connection to the Internet lies in the settings of the router or the gadget itself. Much less often, connection problems arise due to a non-functional built-in module.
Time and date settings are incorrect
Incorrect time and date settings often cause problems with Internet connections for owners of various devices. So, what to do in this case? First, look for opportunities to solve the problem:
- First, visit the settings section of your personal gadget
- Now you need to go to the “Date and time” item
- Configure the correct settings
- Connect to a Wi-Fi network
If the Wi-Fi network appears, the tablet works - the problem is solved. But what if the device still doesn't work? Continue reading the instructions below.
Password difficulties
It happens that the tablet does not connect to the Wi-Fi network due to the user’s carelessness: he can change the old password with a new one, but forget to indicate the changes in the gadget’s settings. In this case, the device will connect to the World Wide Web using the former password. Is it worth explaining that such intentions of an electronic device will not be successful?
To get rid of the complexity, you will need Wi-Fi settings, and then deleting the old profile. Reconnect the gadget.
Software glitch
The software may also experience glitches and malfunctions, which can also cause the tablet to not see the Wi-Fi network. You can eliminate such a nuisance using a useful utility - Wi-Fi Fixer. In order to take advantage of the program's capabilities, download it to your tablet, then install and launch the application.
The main page is where information regarding connection status is located. The Known item provides information regarding access points ever used to connect a specific device.
Now you will need to reboot your device.
Incorrect device settings
There are other reasons why the tablet does not see Wi-Fi, one of which is the failure of some settings. To forget about this problem, you will need to make a radical decision and reset the settings. This path represents the most radical, most effective option for solving a complex problem.
Important to know! Before you reset your tablet, you should back up your important information because it will all be deleted later.
You are required to visit the settings, where you select the “Backup and Reset” tab
The next item that should interest you is “Reset settings”
Now try to find out as much system information as possible that appears on the tablet screen. Confirm the decision and try to connect to the Internet again.
Virus programs
This is another reason why the tablet cannot connect to the Internet. Why is this happening? Many users of Android OS devices tend to think that their gadgets are protected from viruses and malware, but this opinion is incorrect. Of course, it is unlikely that the cause of your discomfort will be a large malware program, but small pests that interfere with the correct operation of the device are not excluded.
In order for your tablet (Lenovo or another brand) to connect to the network, you need to download and install a special application for devices running on the Android operating system - an antivirus. There is nothing complicated or time-consuming about using an antivirus program: launch the application, scan your device for virus software. If you find suspicious files, follow the instructions that appear on the screen.
Router settings
If your tablet stops connecting to the Internet, a possible problem could be a problem with the device's Wi-Fi connection. The tablet does not search for Wi-Fi? The router settings may be incorrect. In this case, there is a sequence of actions:
- Device settings are the area that interests us first. Connect to the equipment wirelessly or using a cable. Find tips on the procedure in the instructions included with your specific router model. Often it is enough to enter 192.168.0.1 in the address bar
- Now go to the “Wireless Mode Settings” item, where you will need some changes: “Mode” - “11bgn mixed”, “Channel” - “Auto”. Next is “MAC Address Filtering”, select “Disabled”
Most likely, by following the instructions above, you will be able to get rid of the reason why your device does not connect to the Internet. If the gadget still cannot connect to the Internet, we recommend contacting a service center to diagnose the problem and possible repairs.