TP link is connected. How to configure a TP-Link N series router as an access point? Router Compounds
TP-Link is the largest manufacturer of Wi-Fi routers and a number of other computer equipment. TP-Link TL WR741ND is a widely used router model for home and office use. Next, we’ll look at how to configure a router to access the Internet using different types of connections, and also give an example of setting up a Wi-Fi network.
Resetting the router and connecting to a computer
Since you are going to completely reconfigure the TP-Link router model TL WR741ND, it is best to immediately reset its settings to factory settings. To do this, take a small object as thick as a needle (the tip of a ballpoint pen will do), and then use it to press the Reset button (see picture below) located at the back of the router and hold for a few seconds. The router must be turned on at this moment.
If you notice that all the front lights of the device come on at the same time and then go out, then the default software setting has been reset - you can continue.
Before setting up the modem, connect to it the cable that is used to access the Internet. It must be connected to the WAN port, which is blue (indicated as Internet in the figure). Now let's look at how the setup itself will be done.
Since the TP-Link TL WR741ND is a wireless router, you can connect to it via a Wi-Fi connection. To do this, just turn on the router, and then connect to the Wi-Fi network through a computer or other communication device - a smartphone, tablet, etc. If you have just purchased the modem or you have reset its settings, then the name of the network will be the same as the name of the model itself router. In this case, you will not need a password.
If for some reason you cannot connect to the router via Wi-Fi, you can only use a cable connection. To do this, one end of the network cable is connected to any of the ports of the Link TL WR741ND router, which is yellow, and the other end is connected to the computer’s network card. After this, the computer should notify you about connecting to the local network, and the light on the router will blink under the number of the LAN port to which the cable was connected. However, this does not always happen, so it is better to configure the connection manually. We enter one by one:


If the exchange does not occur, and the command line writes something like “Timeout interval exceeded,” you can try resetting the router again, checking that the wire is connected to it correctly, and reconfiguring the IP addresses of the computer’s network card.
The router is configured via the web interface
Open your Internet Explorer and enter “192.168.0.1” in the address bar. A small dialog will appear in the browser window, in which you will need to enter your username and password. Both of them are admin by default. Enter them and click "OK". 
TP-Link TL WR741ND supports several types of Internet connection
Before setting up your device, you need to find out exactly what technology for connecting to the global network is used by your Internet provider. Below we will discuss the most likely connection options, one of which will exactly suit your case.
Go to the Network section on the left side of the modem interface, then to WAN. We are interested in WAN Connection Type. Setting up for one type of connection or another always starts from here.
Static IP
The technology is not used very often. Here you just need to ask your provider for 5 network IP addresses (shown in the picture below). Enter them in the appropriate fields and click Save - the setup is complete. 
PPPoE/Russia PPPoE
The technology involves using a login and password to access the network. If you know the data, enter it in the appropriate fields: User Name (login), Password (password) and Confirm Password (confirmation).
PPPoE technology is often used with static IP. If your provider issues these addresses to its clients, you will also need to enter them. To do this, in the Secondary Connection section, move the switch to Static IP and enter the IP address and subnet mask provided by your provider. 
Click Save.
L2TP/Russia L2TP
By default, the connection type requires specifying the server address, login and password, as well as (not always) additional network addresses issued by the provider individually to each client.
First we enter the data in the User Name and Password fields. Then in “Server IP Address/Name” we enter the server address (also issued by the supplier). It may look like a regular IP address or, for example, “adres.provaydera.ru”. If your provider has issued additional network addresses, turn on the Static IP item and fill in the fields, as in the case of the Static IP paragraph. 
Click Save.
PPTP/Russia PPTP
Another common type of connection. Here, a VPN network is used to connect to the provider. The settings are exactly the same as in the case of L2TP/Russia L2TP, described in the previous paragraph. You will only have to call your provider to clarify the type of connection they use. 
In the case of TP-Link TL WR741ND, Wi-Fi is installed simply:

All other points can be left as is.
Click Save. TP-Link TL WR741ND is ready for use! All that remains is to check the connection.
A router is an inconspicuous, but one of the most important devices for a modern Internet user. Despite the simplicity of the main function, which is to provide wireless access to the network, the router is characterized by a huge number of settings. Of these, the average user will be interested in only a few - those that ensure the device’s connection to the Internet and are responsible for the wireless connection of computers with the router. Let's look at them, as well as a number of other notable router options, using the popular TP-LINK TL-WR841N router as an example.
How to connect a TP-LINK router to the Internet
The first task when setting up a router is connecting the device to the Internet. A router is an “intermediary” between the provider’s server and the user’s computer. Therefore, in order for the latter to be able to access the network, an “intermediary” must first be connected to it. To do this, you need to follow the following steps.
Step 1: Connect to the router control panel
Almost any router is configured using the device’s proprietary control panel. It is accessed through a browser - the one you use on a regular basis.
First of all, you need to physically connect the router to your computer. There are 2 options for this connection:
1. Wired
You can use it as your main one. With a wired connection, the likelihood of certain failures/freezes in the router setup procedure is minimized.
To use the considered option for connecting the router to a PC:
- Turn on the router and computer.
- Take a twisted pair cable, that is, one with connectors at both ends.
- Insert one end of the cable into the computer's Ethernet port, and the other into a similar port located at the back of the router (in both cases until you hear a slight click).
- Wait 1 minute.

2. Wireless
The option under consideration can be used if a twisted pair cable is not at hand or there is no Ethernet port on the PC (this happens on many “super-thin” laptops or tablets, on which such a port is, in principle, very rare). But you need to make sure that there are no microwave ovens, radiotelephones, electrical panels, or other working routers in the room near the router. All of these devices can interfere with Wi-Fi networks. If there is no reason to talk about their impact, then to connect to the router:
- Boot your PC, open the list of Wi-Fi networks available for connection, take a screenshot of them, or, if there are few networks, remember their list.

- Turn on the router, wait 3 minutes.
- Open the list of Wi-Fi networks again and, checking it with the original one, “calculate” the new Wi-Fi network (most likely, its name will include the TP-LINK brand name).
- Connect to a new network.

As a rule, entering a password to enter the network in such cases when using TP-LINK routers is not required.
If it was not possible to calculate a new network in the “calculate” list, then this most likely means that in the firmware of a particular router model, data transmission via Wi-Fi is disabled by default. You will have to use the wired option to gain access to the router control panel.
By connecting your PC to the router, you can enter the device control panel. To do this:
- Open any browser, enter in the address bar: 192.168.0.1 and click Enter.
If the specified address does not work (the browser will display the message “Page not found” or similar), then you can try 192.168.1.1.
- On the loaded page, in the top field, enter admin (this is the login to enter the control panel), below - also admin (this is the password). Click Enter.

It is possible that the specified login information for the control panel (address, login, password) will not work for some reason. This probably means that the previous user configured the router with non-standard settings. You need to reset them to factory settings.
To do this, you need to find a button on the router case "RESET".

button "RESET" you need to press and hold for 1-2 seconds, which requires a sharp and durable object. After resetting the settings, you will need to wait about 3 minutes until the router reboots. Then you need to try to log into the control panel again using the above data - it should work.
So, we are in the router control panel, which is controlled via the browser. Using the tools available in it, we will solve our main task: setting up the router’s connection to the Internet.
Step 2: Setting up the router's connection to the Internet
Before performing any actions, you need to connect the router to the cable for connecting to the Internet, which is laid by the provider. In the case of the router in question, this is an RJ-45 cable (digital connection to the provider using Ethernet technology). Other routers may support fiber and ADSL connections.
- The tab is responsible for setting up the router’s connection to the Internet. "Network". It is fourth from the top in the list of settings bookmarks, which is located on the left.
Let's agree that the menu items in question on the router control panel will be in English - despite the fact that many types of TP-LINK firmware are characterized by the presence of control panel interfaces that are translated into Russian. The use of English terms, firstly, will allow us to avoid possible discrepancies in the translation of certain menu items, and secondly, will allow us, if necessary, to navigate the control panels of other router models that are not Russified in terms of controls.
- Select a tab "Network", and then immediately go to the tab "WAN".
- On the tab "WAN" we are interested in the only point - "WAN Connection Type". This is a drop-down list of Internet connection types that are supported by the router. Among them, you need to choose the one used by the provider. To find out the specific type of connection, you need to contact your provider.

- If you press the button "Detect", which is located to the right of the list "WAN Connection Type", then the router will try to automatically determine the type of connection and offer it to the user.


Note that when setting up a PPPoE connection (and others, which will be discussed below), you may need to specify not a dynamic IP address, but a static one - Static IP. It is provided by the provider for an additional fee (sometimes under a separate contract) and, as a rule, is not in great demand among ordinary users.
Mostly static IP addresses are ordered by organizations. For example, to ensure the security of data transmission during authorization in the bank-client system - when, as part of such authorization, a connection to a specific IP address is provided, which in this case cannot be assigned to anyone else.
If the user has ordered a static IP address from the provider, then the communication service provider needs to find out:
- The exact value of this IP address ( "IP Address");
- Subnet mask ( "Subnet Mask");
- Main gate ( "Gateway");
All this data is indicated in the window "WAN", if the option is activated "Static IP". If PPPoE is used, you will need to specify only the first 2 parameters (in this case, the option is assumed to be activated "Static IP" at point "Secondary Connection").

3. L2TP and PPTP
If the provider works according to this communication standard, then:
- Select the appropriate item from the list "WAN Connection Type".
- Enter your username and password.
- Below - "Dynamic IP", then - "Connect Automatically".
- Click "Save".

In some cases, you need to specify the IP address set by the provider for the server (the option appears in the window "Server IP"). You should also check with your telecom service provider.
For PPTP the settings will be completely identical.

If the settings we reviewed do not work, then most likely you will have to call the support service of your communication service provider for additional advice.
After setting the required settings for the type of connection and pressing "Save" We will move on to solving the next task - setting up a Wi-Fi network.
Wi-Fi setup
Even if the user has made a wireless connection to the router in order to set Internet connection settings, the Wi-Fi network at that moment cannot be considered optimized for constant use. It is necessary to “modify” it, and in the case of a wired connection, configure it from scratch.
To do this, after pressing the button "Save" on the tab "WAN Connection Type" go to the tab "Wireless".

Select an item "Wireless Settings". These are the basic wireless network settings. In it:
- Specify the name of the Wi-Fi network, or rename the one suggested (SSID item).
- Select country ( "Region"), Wi-Fi channel number or indicate its automatic selection by the router ( "Channel", recommended "Auto").
- Select your wireless data standard ( "Mode", working version - "11bgn mixed").
- Select channel width ( "Channel Width", you can choose "Automatic").
- Select the maximum data transfer rate ( "Max Tx Rate", possible at the maximum value).
You must also check the boxes (or make sure they are already checked) opposite the following items:
- "Enable Wireless Router Radio"(that is, actually, turn on Wi-Fi);
- "Enable SSID Broadcast"(that is, activate the option to detect a Wi-Fi network by its name - SSID, set by the user in the previous step).
- Click "Save".

Select an item "Wireless Security". These are the security settings for accessing the Wi-Fi network from computers within the Wi-Fi coverage area. In it:
- Check the box next to the option "WPA-PSK/WPA2-PSK".
- Listed by item "Version" select option "WPA2-PSK", "Encryption" — "Automatic".
- In the field "PSK Password" Enter the password to log into the Wi-Fi network.
- IN "Group Key Update Period" enter "3600".
- Click "Save".

This set of settings provides reliable protection of the Wi-Fi network from unauthorized connections to it. It is very important that network security is based, one way or another, on the WPA2 standard (in combination with one or another data encryption algorithm - for example, PSK).
Restart the configured router: select "System Tools" > "Reboot" and click on the button "Reboot".

Rebooting the router will take about 3 minutes. After this, you can fully use it. The one to which we have given a suitable name in the SSID field will appear on the computer in the list of Wi-Fi networks. To enter it, you will need to enter the information we entered earlier in the field. "PSK Password" password.
If you forget your new password, you will need to:
- Log in to the Control Panel using the wired method.
- Choose "Wireless", then "Wireless Security".
- Find line "PSK Password" and see the password.
If you study the menu structure of the control panel of the TP-LINK router, you will find that there are dozens of other options there. As a rule, ordinary users do not need to use them in one way or another. But among these options there are some extremely useful ones, and therefore worthy of attention.
Setting up a TP-LINK router: other useful options
Indeed, the router has plenty of settings. Many of them are designed for experienced IT specialists, but, perhaps, most are understandable to the average user who does not have special skills in the field of network administration. We can talk about such options as:
1. Securing access to the router control panel
The login and password we know for logging into the control panel of the router - admin and admin, are installed in the router firmware by default. It is advisable to change them to custom ones so that no other users have access to your router’s settings.
To change the factory login and password for logging into the router control panel:
- Log in to the control panel using your standard username and password.
- Select a tab "System Tools", then - "Password".
- Enter admin in the field "Old User Name" and admin - in "Old Password".
- Enter your new username in the field "New User Name" and the new password - in "New Password".
- Confirm the new password in the field "Confirm New Password".
- Click "Save".

Afterwards we reboot the router in a way known to us ( "System Tools" > "Reboot", button "Reboot").
If you suddenly forget the password to log into the router, you will have to reset the device to factory settings by pressing "RESET" on the device body.
2. Restricting access to the Wi-Fi network from computers with a specific MAC address
A MAC address is a unique identifier of a computer's network card (in this case, a Wi-Fi card) that provides data transmission over the network. To change this address, you will need to replace the network card, which in some cases is almost impossible without losing the functionality of the computing device - for example, if it is a smartphone or tablet.
Therefore, if you restrict access to a Wi-Fi network by the MAC address of a computer known to the administrator, the user of this computer will not be able to connect to the network via Wi-Fi. To set such a restriction:
- Open the tab "Wireless", then - "Wireless MAC Filtering".
- Click the button "Enable" opposite the option "Wireless MAC Filtering".
- Select the option that begins with the words "Allow the stations".
- Click "Add New".

- On the page that opens, enter the MAC address of the device whose access you want to deny, enter any description of this device ( "Description"), select "Enable" in option "Status".
- Click "Save".

Afterwards the prohibited computer will appear in the list on the page "Wireless MAC Filtering".

If on the tab "Wireless MAC Filtering" select the option that begins with the words "Deny the Stations", the opposite rule to deny access will be set. Computers with the MAC addresses specified in the list will be the only ones from which you can access the Wi-Fi network. Others will be denied access.

3. Limiting the data transfer rate in the Wi-Fi network
This option is useful in cases where a large number of computers are expected to connect to the network at the same time. To set a speed limit for a specific computer connected to a Wi-Fi network (group of computers):
- Select "Bandwidth Control" > "Rules List".

- Click "Add New" and in the window that opens, check the box "Enable".
- In the field "IP Range" mark the range of local IP addresses for which the speed limit is set (or specify the same IP address twice - so that the limit is set for a specific computer with the same IP address).
- Set a limit on outgoing traffic ( "Egress Bandwidth") – minimum, maximum (in kilobits per second), the same for incoming traffic ( "Ingress Bandwidth").
- Click "Save".

If you select "Control Settings" on the tab "Bandwidth Control", then you can set a general traffic limit for the entire network.
Conclusion
Setting up most modern routers - including those belonging to the TP-LINK brand line - consists mainly of setting the correct settings for connecting the router to the Internet and installing the necessary options for protecting the Wi-Fi network. TP-LINK routers have a fairly convenient and logical interface that allows even untrained users to configure network connections and Wi-Fi. They also have a large number of useful options to optimize the network.
Instructions
In fact, all TP-Link models have similar parameters and connections, so this one will help you configure a TP-Link WiFi router under any number, for example, WR841n or WR740n. First, make sure that you have a configured wired DSL connection to the Internet (a network cord will be pulled into the apartment, and you have a login and password for the connection issued by your provider). Unpack the router: the kit must contain a short double power cord, a cable for connecting to an outlet and instructions.
Plug the router into a power outlet and press the start button; the indicators on the front should light up. Connect your main DSL cable to the WAN connector of the router (usually it is located on the edge and highlighted with a blue or other frame). Connect the short power cord from the kit to any of the four LAN connectors at one end, and insert the other into the network connector of your computer or laptop.
Now, to enter the device settings and configure the TP-Link WiFi router, open any installed Internet browser (for example, Internet Explorer), enter the address 192.168.0.1 or 192.168.1.1 in the address bar. You can find out which of them is working from the instructions included with your TP-Link router model. If none of the specified addresses are suitable (pressing Enter does not open anything), reset the current device settings by holding the Reset button for a few seconds (or inserting a needle into the corresponding hole, depending on the model). After entering the appropriate address in the browser, the router settings menu should open.
Set up your router's main network connection. Go to the Network settings section and specify the type of your home network (for example, PPoE). You can look it up in the contract with the provider or call the support service. The provider must also provide information such as the presence of a dynamic or static IP address, server name, IP submasks and DNS. Enter your username and password for a wired Internet connection, select Connect Automatically and save the settings. Now, when you boot and have a connected router, your computer or laptop will automatically connect to the Internet.
All that remains is to configure the TP-Link Wi-Fi router to have a home wireless connection to the network. Go to the Wireless section. Enter the desired Wi-Fi connection name and set any password convenient for you, saving the settings. Now try searching for available wireless connections or your smartphone. The connection you created should also be among those found. Select it, enter the password and check the functionality of the Internet by opening any site in the browser.
A router is an ideal device for creating Wi-Fi fi networks. But many people have problems setting it up. In this article we will talk about how to set up tp link router.
Let's start connecting the router
You brought your router home and have already opened the box. Great. In front of you should be several pieces of paper, a disk with software, a network cable and the router itself. Let's start setting up:
- Setting up a tp link router starts with connecting the device. It is advisable to place it close to the computer, because The manufacturer provides a small cable in the kit. We connect the router to the power supply and plug it into an outlet.
- Connect the router to the network. To do this, we are looking for a blue socket, under which there is the inscription “Wlan”. We plug the wire included in the kit into it.
- We connect to the computer. We use another wire, plugging it into one of the yellow connectors on the router. The other part of the wire needs to be connected to the port on your PC, which is located on its back side.

WAN and LAN ports. WAN - Internet input. LAN - local network (connecting local devices)
Let's look at the buttons and connectors that can be found on your router:
- Button to start and shut down the device.
- Connector for power supply.
- WAN. The blue port to which the network cable is connected.
- LAN The yellow port is needed to connect to a computer.
- Button to launch the QSS function. Used to connect your phone, tablet, TV or laptop to wifi.
- Reset. Designed to completely return the device to factory settings.
Almost all ports and buttons on the router are labeled, which makes them easy to find.
We figured out the router itself and connected it.
Take a thin needle, carefully insert it into Reset and hold for 10 seconds.
Setting up the router
So, you have connected the device to your PC. Now let's go to tp link router settings. To do this:
- We launch absolutely any browser. We look for the address bar and enter a special IP address into it. You can find it on the back of your device.
- After the previous paragraph, you are asked to enter your username and password. To find them, just like in that case, turn your router over. If you are too lazy to search, then enter the standard ones - admin/admin.
Let's update the firmware before moving on. Go to the website “tp-linkru.com”. This is the official website of the manufacturer of your equipment. Find your device model there and download the latest firmware. Unzip it. Return to your router's web interface. We look for the “System tools” menu item and go to equipment upgrade. There, using “browse” we point to installed file.
Let's go back to the settings:
- Necessary install login and password for wai fi network. To do this, find the “system tools” item in the web interface. In the drop-down menu, click on “Password”. In the window that appears, you must fill in all fields. In the old lines, enter admin/admin. Fill out the rest as you wish. Save.
- We return to the left side of the web interface. Click on “Network” and then on “Wan”. Next you need to set the network type. It all depends on your provider, so it’s better to check this point with them. After setting, don't forget to save.
- Now in “Network” select the “MAC clone” item. There, just click on the bottom button, which clones the top address. Save.
- We are looking for the “Wireless” item. Open "Setting". Next, enter ssid in the required line. If desired, indicate your region.
- Let's go to wireless security. Enter the password in the password field. Be sure to remember it in order to use the wifi network.
Great. You are completely done with the setup. If you wish, you can reboot your router.
Various problems with the router
Now let's talk about some possible errors during and after setup.
If you have forgotten your password, you need to return your router to factory settings. This is done using a thin needle and the “Reset” button. Press and wait for about 10 seconds. After this procedure set up equipment again.
In cases where it is impossible to log into the web interface of the TP router link, you need to try returning the device to factory settings. You can also use another browser for this.
If your device does not see wai WiFi network, then try bringing it closer to the router. If this does not help, then go to the web interface and enable visibility for all devices.
There are also times when problems are caused by a device failure. In controversial cases, you can contact a professional who will help you resolve this issue.
Determining your Internet provider's network settings
Before you connect your router, you need to know what network settings are needed to connect to the Internet.
The most common types of network settings are:
- Dynamic IP— dynamic settings, issued automatically via DHCP
- Static IP— static settings, entered manually
- PPPoE— Internet access is provided via the PPPoE protocol after entering the username and password
It is assumed that you have Windows 7 installed, the provider cable is connected to the computer and Internet access is configured.
Go to "Change adapter settings".

Right-click on "Local Area Connection" and select "Properties"

Click on “Internet Protocol Version 4 (TCP/IPv4)” and the “Properties” button.

- If you have selected “Use the following IP address” and there are numbers, then write down all settings- these are the static settings of the provider ( Static IP). After that, select “Obtain an IP address automatically” and click the “OK” button.
- If you select the “Obtain an IP address automatically” option, then you receive network settings automatically - these are the dynamic settings of the provider via DHCP ( Dynamic IP).

There are providers that block access to the Internet by MAC address (you can look it up in the contract). In this case, you need to configure the router so that it has the same MAC address that is registered with the provider.
To find out the MAC address of the network card, click “Start”, in the “Search programs and files” window write the command cmd and press Enter.
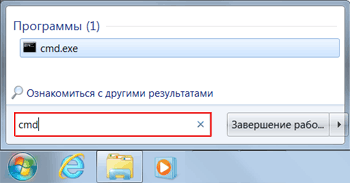
We write the command in the console ipconfig /all and press Enter.

We are looking for “Ethernet adapter Connection via local network...”

In the field " Physical address"Your MAC address of the network card is indicated. Let's rewrite it.
Connecting and setting up a TP-Link router
To set up a Tp-Link Wi-Fi router we will need:
- provider cable (Triolan, MaxNet, Vega, Volya, Airbites, or others without vpn);
- computer or laptop;
- TP-Link router, which will distribute the Internet via Wi-Fi to a laptop, TV with Wi-Fi, tablet or smartphone.
Let's connect the equipment as follows:
- Plug the power supply into the router’s “Power” connector;
- connect the Internet provider cable to the blue WAN port of the router;
- connect the computer to the router using a network cable to any yellow LAN port;
- We will connect other devices (laptop, tablet, TV with Wi-Fi, smartphone) via Wi-Fi wireless connection.

Let's move on to setting up the router.
Open Internet Explorer and enter the address 192.168.1.1
Attention! The proxy server should not be specified in the browser settings
In the window that appears, enter your username admin and password admin.

On the left side of the menu, select Quick Setup Wizard Quick Setup and press the button Next.

Dynamic IP - automatic network settings of the provider via DHCP
If you receive automatic network settings, then select Dynamic IP and press the button Next.

In the field SSID
In the section Wireless Security specify the encryption type WPA-PSK/WPA2-PSK
In the field PSK Password:

Finish.

Network - MAC Clone.
In the field WAN MAC Address enter the MAC address.
You can also click Clone MAC Address, if in the field Your PC's MAC Address

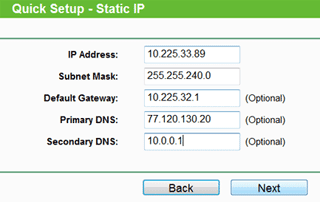
Static IP - static network settings of the provider
If network settings need to be entered manually, then select Static IP, press the button Next.

Enter the settings:
- IP Address(IP address)
- Subnet Mask(Subnet Mask)
- Default Gateway(Main gateway)
- Primary DNS(Preferred DNS Server)
- Secondary DNS(Alternate DNS server)
- and press Next
In the field SSID Enter the name of the access point to connect via Wi-Fi.
In the section Wireless Security select the encryption type WPA-PSK/WPA2-PSK
In the field PSK Password: enter the password to access the Wi-Fi access point. The password must be at least 8 characters.
The next window indicates that you have successfully completed the setup. Press the button Reboot and wait for the router to reboot.

If your provider blocks access by MAC address, select from the menu on the left Network - MAC Clone.
In the field WAN MAC Address enter the MAC address.
You can also click Clone MAC Address, if in the field Your PC's MAC Address the required MAC address is located.
PPPoE - Internet access using user and password
If Internet access is provided via the PPPoE protocol after entering the username and password, then select PPPoE.
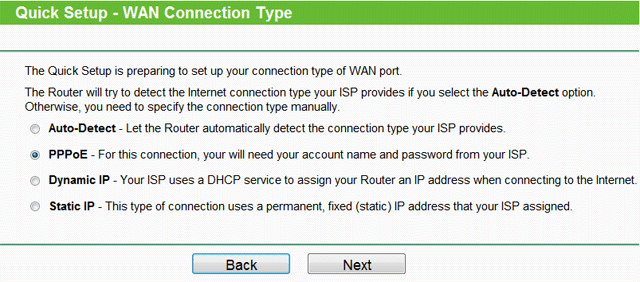
Enter the settings:
- User Name:(Username)
- Password:(Password)
- Confirm Password:(Confirm password)
- and press Next

In the field SSID Enter the name of the access point to connect via Wi-Fi.
In the section Wireless Security select the encryption type WPA-PSK/WPA2-PSK
In the field PSK Password: enter the password to access the Wi-Fi access point. The password must be at least 8 characters.
The next window indicates that you have successfully completed the setup.
Press the button Reboot and wait for the router to reboot.
TP-Link router security settings
To prevent anyone other than the administrator from entering the router settings, you need to change the password to enter the settings.
To do this, select from the menu on the left System Tools - Password and enter the settings:
- Old User Name: old username, enter admin
- Old Password: old password, enter admin
- New User Name: enter a new username, you can leave admin
- New Password: enter a new password
- Confirm New Password: confirm the new password

After this, press the button Save to save the password.
Connecting a laptop to the Internet
We will connect the laptop to the Internet via Wi-Fi.
To do this, select the wireless network management icon in the lower right corner of the monitor. After updating the list of wireless networks, our network should appear in it. Select it and click the “Connect” button.

In the next step, enter the password to connect to the Tp-Link router via Wi-Fi.

Enter the password you specified in the field PSK Password: in the router settings. After this, the Internet will appear on the laptop.
You can connect devices that support Wi-Fi, such as a TV, netbook, tablet, smartphone, to the Tp-Link Wi-Fi router. To do this, you need to select a Tp-Link access point in your device and enter a password.
Recovering the password to enter the settings of the TP-Link router
If you have forgotten the password to enter the settings of your Tp-Link router, you can restore the factory settings and password.
To do this, press the Reset button on the back of the router for 8-10 seconds.