Step-by-step instructions for obtaining an electronic pass in the ATO zone. Comparing cues: solid or composite? Distracted all fields marked with an asterisk
In a previous post, I already wrote that the Russian science citation index is calculated by the electronic scientific library service Elibrary.ru. To find out your RSCI, you first need to register in this service, providing information about yourself as accurately as possible.
1. How to register on Elibrary.ru to calculate the RSCI?
There are two registration options: regular user and registration as an author. The second includes the first, i.e. first register as a user, and then as an author - or immediately fill out an extended questionnaire.
To do this, go to registration page and carefully fill out all fields marked with an asterisk.
In addition to the names, the fields also have explanations and hints. To see them, hover over the question mark next to each field.
Where there is a Select or Add button, click it and fill out the form that appears on top of the main questionnaire. For example, in the following form, manually enter the full name of the organization on the left, and select the city where it is located on the right. After that, click Search and select the desired organization from the list (if only one is found, click it - this is the only way it will appear in the field of the main form).
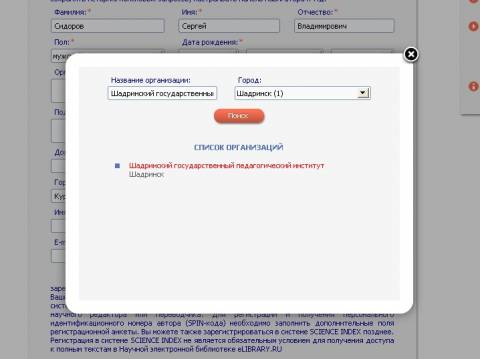
After this, the additional form can be closed.
Having reached the end of the user form, check the box next to the inscription “register me as an author in the Science Index system” and continue filling out - as an author.
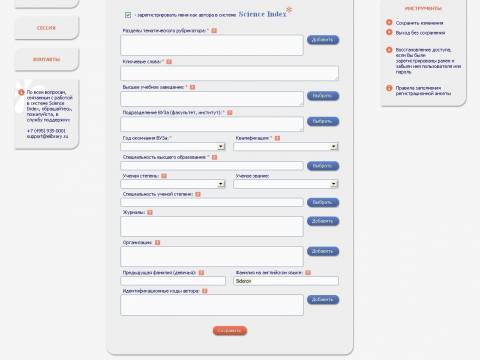
When all fields marked with an asterisk are completed, do not forget to click the Save button.
2. Fields not marked with an asterisk are also important!
Fields that are not marked with an asterisk do not need to be filled in immediately; they can be edited later by logging into the same page using your name and password. But there is no need to delay filling them out, otherwise your RSCI will remain a mystery for a long time.
Be sure to fill out the Journals field (they are added from the ready-made RSCI list).
If you work or have worked in different organizations, enter the other organizations in the Organizations field (necessary for the best recognition of your work if some of your publications indicate other organizations).
For the same reasons, the form contains the Previous last name (maiden name) field.
3. How long should I wait for the result?
But I don’t know!!! In any case, the result will not be ready as quickly as one would expect from a modern web service! What were you waiting for? This is a serious Russian scientific service, and not some Yandex or Google! Its developers seriously complain that only a limited budget did not allow them to carry out manual data processing. I waited for the result for so long that more than once I imagined librarian girls painstakingly sorting through paper forms in wooden boxes.
Seriously, they say that information is processed within 10 days. But this is provided that you have not ignored the fields without asterisks. If after a couple of weeks there is no result, then check the completeness and correctness of filling out the registration form and, if necessary, make changes to it: edit keywords, add sections of thematic rubric, journals, etc. After editing, the RSCI should be determined almost immediately.
On the elibrary.ru website, in the menu on the left, click Author's search (or go to this link), fill out the form that opens and click Search.

The main numbers - the number of publications and the number of citations - are located at the bottom right. Clicking on any of these numbers will open the corresponding list of publications.
The viewing option is also available to unregistered users. Without registration or authorization, you can find out the RICN of any scientist - of course, provided that he himself is registered on Elibrary.ru as an author.
If you plan to visit the ATO zone and cross the contact line, you must have the appropriate permit (pass). It can be issued independently through the “Register of permits for the movement of persons in the ATO area” of the Security Service of Ukraine on the website urp.ssu.gov.ua.
Due to the fact that the system is constantly being improved, we offer updated instructions for submitting an electronic application as of February 19, 2016.
STEP 1. REGISTRATION
We go to the website urp.ssu.gov.ua.

Click “Registration” and get to the appropriate section.

We fill out the fields in Ukrainian. Provide a valid email address. We provide the phone number with the country code (i.e. for Ukraine with “+38”). It is possible to specify multiple numbers. Enter the digital security code indicated on the website and click “Register”.
Check the specified email address. He instantly receives a letter from the address [email protected], which indicates the login assigned to you and the password you entered.

Lost your email with your login details? On the main page of the site there is a function “Forgot your login or password?”. If you use it, then with [email protected] a letter will arrive: the login will remain the same, but the password will be new, generated by the system.

We return to the main page. Enter the login and password sent to you, additionally enter the digital code indicated on the page, and click “Leave.” Going to the welcome page means that you are logged in - the full name you provided during registration will be displayed in the upper right corner. Click “Submit Application”.


STEP 3. SUBMIT YOUR APPLICATION
Today, you can submit up to 10 applications from one account (after exceeding the limit, a message will appear indicating that you will be able to submit new applications in 10 months). That is, from your account you can submit documents, for example, for yourself, for your relatives and friends. When you need to submit more than 10 applications, you need to register a new account linked to a different email address.
Select the sector for which you would like to receive a pass. If you intend to drive through several sectors, select them at once by holding down the “Ctrl” key. In practice, when crossing Entry and Exit Checkpoints (EECP), an electronic permit gives the right to travel through all sectors, even if you indicated only one when submitting your application. But since the system provides such a function, it is better to select several sectors.
For understanding:
“sector A” includes the road corridors “Stakhanov - Lisichansk” through the checkpoint “Lisichansk” and “Stanitsa Luhanska – Novoydar” through the checkpoint “Stanitsa Luhanska”;
“Sector B” includes the road corridors “Donetsk – Kurakhovo” through the Maryinka checkpoint and “Donetsk – Mariupol (via Volnovakha)” through the Novotroitskoye checkpoint;
“Sector M” includes the road corridor “Novoazovsk – Mariupol” through the checkpoint “Gnutovo” (Pishchevik village);
“Sector C” includes the road corridor “Gorlivka – Bakhmut (Artemovsk)” through the Zaitsevo checkpoint.
On the same page, citizenship is automatically selected - “I am a citizen of Ukraine.” If you are not a citizen of Ukraine, then your position is “I am a foreigner or a person without the bulk.” Click “Next”.

We proceed to the expanded form that appears to fill out the application. Outwardly everything is clear. But there are some peculiarities.
When you fill out the fields for the first time, copy the answers into a separate word file. This will come in handy if the system freezes and you have to enter the form again.
The application must be submitted in Ukrainian. All fields marked with an asterisk (*) are required.
As for images, you don’t have to add them. Simply because the server was overloaded when trying to upload scanned copies of documents, the system immediately “freezes”. Therefore, it is allowed to submit applications without photos and scanned versions; this does not affect the final decision - whether to allow or prohibit you from crossing the contact line.

Regarding the positions “Place of actual residence” (MFP) and “Place of registration” (MR):
if you are an internally displaced person: in the MFP indicate the registration address from the IDP certificate, and in the MR - the registration address from the passport;
if the MFP and MR coincide (you live in the same place where you are registered), then check the appropriate box and fill out only the fields in the MFP;
If you are registered at one address and live at another, then indicate the first address in the MFP, and the registration address from the passport in the MR.

“Meta and route of movement of people in the area where the ATO was carried out.” Now the SBU has begun to treat this position more simply when considering applications. Therefore, you can indicate up to “meeting with friends”, “visiting a bank in a controlled territory”. But it is better, of course, to indicate significant reasons for the trip. This field must be filled in in any case, otherwise the system will not transfer you to the next level.
About the types of passes: reusable is issued for a period of 1 year, single-use is valid for 14 days with exit/entry to both sides of the contact line. We advise you to immediately apply for a multiple-use permit, because... The system does not yet allow you to independently renew your pass.
Click “Next”.
When submitting an application, it is linked to your passport data. You can submit an application for one person (for one passport data) only once. When resubmitting (for any reason), a notification will appear that “Such series and passport number are already in the database.” Such a warning may also appear when someone else has entered your passport information (for example, someone made a mistake when adding their information). There is no need to discount the fact that your passport details could become known to scammers. In such cases, you need to call the hotline; the telephone numbers are listed in the “Contacts” section. You can also write a letter to the system administrator at: [email protected].

STEP 4: MAKE CHANGES
If the system has passed you to the next level, a summary page will appear. Please check all entered data carefully. If you find an error, press the “Correct” button. If you are sure that everything is correct, click “Tax.”

STEP 5. RESULT
After submitting the application, a message appears:

Additional confirmation of the submission of information is its recording in the “Application Submission History” section. On this page you will follow the application review process. It will first indicate that your application is being processed.
In about a few days you will receive the result in the form of green information “Completed”.

The clarification that “your permission will be registered within 3 business days” will not disappear. To find out the final verdict, click on the application number itself, and you will be redirected to a page with extended data. And at the end there will be one word “Designed”. This means the application process is over. You have received permission to cross the contact line.
Please note the innovation in the system; now the extended data contains a line with your pass number.

Finally, please note that the system is constantly being improved and updated, so these recommendations should only be taken as a basis in the process of applying for a pass.
Many billiard players, having reached a certain level, strive to purchase a solid cue, believing that such a cue is a priori better than a composite one. However, this is not entirely true. Let's try to figure out what the differences are between cues of different designs, their pros and cons.
Ideally, a billiard cue should be solid, it’s hard to argue with that. But in order for the cue to be great gaming tool, this is not enough. The cue must be made of the “correct” shape, from several types of selected wood (the shaft uses light, impact-resistant wood, and the turnik uses dense, heavy wood that absorbs vibrations well), be even, perfectly balanced, all parts of the cue must be carefully adjusted to each other friend and firmly glued, etc.
Therefore, let's look at the advantages and disadvantages of cues of different designs, taking as a given that the cues in question are made of the same quality and have the same parameters (weight, length, cue shape, sticker diameter, balancing, etc.).
Solid cues.
Solid cues have excellent feedback; when you hit, you get the feeling that there is a rod inside the cue. This feeling occurs because after the impact, part of the energy, “reflected” from the ball, spreads without distortion from the sticker to the turnip, because this process occurs in a homogeneous medium (wood). As a result, an excellent so-called “cue feel” arises. Another distinctive feature of a one-piece cue is its slight bending during impact and the rapid damping of vibrations compared to multi-piece cues. This results in less distortion and therefore increased accuracy, and the cue does not “throw” the ball off the line on some difficult shots.
The main disadvantages of solid cues include inconvenience in transportation. If a billiard player plays in several clubs and goes to competitions, then this becomes a real problem.
Also, the disadvantages include the fact that a solid cue is much more difficult to make straight than a composite one, and the likelihood of leashes in solid cues is higher. This is due to the fact that the length of the wooden part of a solid cue is several times greater than the wooden part of a composite cue. And the longer the tree, the greater the likelihood of leashes.
Composite cues.
Composite cues can be made from two, three or even four parts.
Their main difference from solid ones is the presence of connecting nodes, which, as a rule, are made of metal and have air cavities. This leads to the loss of the ideal “feeling of the cue” due to the fact that the energy reflected after the impact spreads in a heterogeneous medium and practically does not reach the turnip, but is interrupted in the air cavities of the connecting nodes.
The presence of joints in composite cues leads to an increase in the deformation (bending) of the cue upon impact compared to solid cues, and this affects the accuracy of playing balls.
But an important positive factor of composite cues is that the likelihood of them getting caught is lower than that of solid cues. If the joints are initially glued evenly, then with proper storage and use, it is easier to keep a composite cue even than a solid one.
Also, composite cues have no problems with transportation and are easy to use. The market offers many cases, tubes, cases, which in themselves are an additional decoration for the cue.
Eat compromise option, when a composite cue approaches the playing qualities of a solid cue, but is much more convenient to transport. These are two-piece cues with a connecting unit shifted towards the bumper: the connection is not located in the middle of the cue, but at a distance of 1/3 or 1/4 of the length of the cue from the bumper.
Let's summarize.
When faced with the choice of what design of cue to purchase - one-piece or composite - first of all, the billiard player must decide for himself what he needs:
- If it’s easy to use, then the choice is obvious - a composite cue, perhaps even made of three or four parts.
- If you need a tool that matches and complements the high level of skill of the player, then you need to buy a well-made solid cue.
POSITION
On holding open team and individual competitions
For powerlifting and naked bench press,
Podolsk and Moscow region
1. Goals and objectives
· Competitions are held to popularize powerlifting in Podolsk and the Moscow region
· Raising a physically developed younger generation and promoting a healthy lifestyle
· Involving young people in systematic physical education and sports
· Creating motivation among adolescents and young people to engage in physical education
· Improving the sportsmanship of athletes in Podolsk and the Moscow region
· Identification of the strongest athletes in Podolsk and the Moscow region
· Formation of a team to perform at open team powerlifting competitions in Podolsk
2. Date and place
The competition is held on November 16, 2013 at the Palace of Culture on May 1: Moscow region, Klimovsk, Zavodskaya street, 3. The start of the competition and weigh-in will be announced additionally (by email or SMS).
3. Organization and leadership
The general organization of the competition is carried out by the MU Center for Civic and Patriotic Education of Youth “Fakel” and the “Good Lift” gym, with the participation of the Podolsk branch of the All-Russian All-Union Organization “Combat Brotherhood” and the “Healthy Nation” Charitable Foundation.
Direct supervision is carried out by the athletic gymnastics coach of the Fakel MU Popov S.A., and the director of the Good Lift gym P.S. Yakovlev. and the representative of the “Healthy Nation” charitable foundation, I.F. Rabotkin.
4. Competition participants
Interested organizations and institutions, as well as individual athletes who have reached the age of 16 and have submitted personal applications to participate in the competition, are invited to participate in the competitions.
The organizers reserve the right to later announce standards for admission to competitions, with mandatory notification of athletes (by email or SMS).
The organizers reserve the right, if the number of applications exceeds, no later than November 9, 2013 to announce standards for admission to competitions, with mandatory notification of athletes by posting information in open sources, as well as sending SMS and e-mail messages.
5. The procedure for holding competitions and conditions for submitting applications
Applications for participation in competitions must be submitted before November 9, 2013 by email: [email protected] or via SMS message to the number +79099250337 (the cost of an SMS is equal to the cost of an SMS message from your telecom operator).
Attention! See Appendix 1 for the correct application form.
6. Procedure for determining the winners
Attention! Competition judging is carried out according to IPF rules (see Appendix 2)
Competitions are held in the open age category (Open).
in the individual championship:
Women compete in the absolute weight category, the winners (who took 1st-2nd-3rd places) are determined by the Wilks formula.
Winners in men are determined in categories up to 75kg, up to 90kg, up to 110kg and over 110 for the best result. Winners in absolute championship (athletes who took 1-2-3 places) in triathlon and bench press are determined according to the Wilks formula.
In the team championship 4 best results of male team members and 1 female result are taken into account
Points are awarded according to the following scheme:
1st place – 6 points
2nd place – 4 points
3rd place – 3 points
4th place – 2 points
5th place – 1 point
The winner of the team championship is the team that scores the maximum number of points among all teams.
7. Awarding the winners
The winners and prize-winners in the individual and team championships who took 1-3 places in the nominations are awarded with commemorative certificates and medals.
8. Financing
The costs associated with organizing, conducting and rewarding the winners are borne by the organizers of the competition, interested organizations and sponsors. Expenses associated with travel and meals for participants are borne by sending organizations. There is no entry fee.
Appendix 1
Sample application (sent by email or SMS):
1. nomination: for example, bench press or triathlon.
2. team name or mark personal *
3. Full name *–
4. Year of birth *–
6th digit *–
7. best result * (over the last 6 months) -
8. age* -
9. coach -
10. contact phone number (preferably cell phone)* -
Fields marked with an asterisk are required.
Attention! All participants on the day of the competition must have visas certified by a doctor, and a passport or identity card (licence, military ID). Without these documents, athletes will not be allowed to compete.
Appendix 2
Competition rules:
- Performance at competitions takes place without the use of equipment (press shirts, overalls, knee bandages for powerlifting).
- You can use: wrist bandages, belts (maximum belt width – 10 cm).
- If necessary, you can use a non-supportive bandage (on one leg or arm). Non-supportive bandages are ordinary medical bandages. The bandage must be presented to the judge before use.
- Exercises are performed according to IPF rules
Squats(rules and order of execution).
After removing the bar (assistants can provide assistance), the athlete takes the starting position.
After the athlete has accepted the starting position, the judge gives the command to SIT DOWN.
The athlete squats so that the top of the legs at the hip joints is lower than the top of the knees. Only one attempt to make a downward movement is allowed.
The athlete must independently return to a vertical position with legs fully straightened at the knees. Double standing up (“jumping” is prohibited).
As soon as the athlete takes a stationary position, the referee gives the command to return the barbell to the racks - RACKS.
- Prohibited- Failure to comply with the senior referee’s signals when starting or finishing an exercise. Double stand-up (jump) from the bottom of a squat position or any downward movement while standing up. The mistake is to bend the legs at the knees and lower the body to a position where the upper surface of the legs at the hip joints is lower than the top of the knees.
Bench press(rules and order of execution)
The athlete should lie on his back, with his head, shoulders and “whole” buttocks in contact with the surface of the bench. The sole and heels of his shoes must be in contact with the surface of the platform or blocks (as far as the shape of the shoes allows).
The fingers should wrap around the bar lying on the racks, with the thumbs positioned “locked” around the bar. This position must be maintained during
performing the exercise. The use of a reverse grip is prohibited.
To ensure firm support for the legs, the athlete can use flat slabs or blocks no higher than 30 cm from the surface of the platform.
The distance between the hands on the bar, which is measured between the index fingers, should not exceed 81 cm (both index fingers should be inside the 81 cm marks).
After removing the bar from the racks with or without the help of assistants, the athlete must wait for the signal from the senior judge with his arms fully straightened (“on”) at the elbows.
The signal to begin the press must be given as soon as the lifter assumes a stationary position.
position and the bar will be in the correct position. The signal to start the exercise is the command – START.
After receiving the signal, the athlete must lower the barbell to his chest and hold it in a stationary position on his chest (usually the base of the sternum), after which the judge gives the command - PRESS. Then the athlete must press the barbell up into straight arms. After fixing the bar in this position, the judge gives the command - RACKS.
- Prohibited– Any error in following the referee’s commands. Any change in the starting position when performing an exercise (any lifting (separation) of the head, shoulders, buttocks from the bench or movement of the legs on the platform or blocks, or movement of the arms along the bar). Any downward movement of the barbell during a bench press. Lack of squeezing the barbell with fully straightened arms at the end of the exercise.
6. Deadlift (rules and order of execution)
The athlete must face the front of the platform. The barbell, which is located horizontally in front of the athlete’s legs, is held with a free grip with both hands and rises up until the athlete stands upright.
Upon completion of lifting the barbell in the deadlift, the knees should be fully straightened and the shoulders should be pulled back.
The judge gives the command - DOWN.
Any lifting of the barbell or any deliberate attempt to lift it is considered an approach. Once the lift has begun, no downward movement of the barbell is allowed until the lifter reaches a vertical position with the knees fully extended. If the bar sag when the shoulders are pulled back, this is not a reason not to count the weight lifted.
- Prohibited– any downward movement until the final position is reached. Supporting the barbell with your thighs while lifting up. Steps back or forward. Lowering the barbell to the command. Releasing the barbell from your hands when executing the downward command.
Journalist Larisa Lisnyak presented step-by-step instructions on how to obtain an electronic pass across the demarcation line in the ATO zone.
“Finally, we waited, it happened... These are the emotions of those who never managed to receive a paper pass to cross the contact line, and since June 16 have been generally shocked by the new travel rules. But, despite all the horrors of the new system (kilometer-long queues under the scorching sun, spending the night in the fields, walking for several hours across the demarcation line, etc.), the desire of the same displaced people to get home, visit relatives, spend at least one night in their home apartment, your bed, touch your past life in that peaceful Donetsk. Local residents who officially continue to be citizens of Ukraine have no less reasons to leave for free territory.
So, this should have become a reality on March 25th, but it came true on July 7th. The SBU announced the launch of the website urp.ssu.gov.ua, where you can send documents for issuing an electronic pass. The site worked in test mode for about a week, and if you registered and tried to submit an application earlier, forget it, everything starts all over again on July 7th.
I checked the functionality of the system (the motives intersected - curiosity and the need to obtain a pass). The immediate result is that the system works. But, as always, with nuances. And, given that there are no instructions for using the site, the whole process is a matter of trial and error. At the same time, the site is quite understandable and “in principle, nothing is impossible. For a person. With intelligence.”
Step 1. Registration
When working with the site, immediately be patient - it crashes from time to time, data may be lost (but not always), and you will have to start all over again. Therefore, step one is to wait until the site is up and running.
Click “Registration” and go to the appropriate section.

Fill in the fields. It is possible in Russian, but given that the decision is made by the registrars of the Ukrainian department, it is better to fill out in Ukrainian. This is additional loyalty on your part.
Just an emphasis - the site does not yet have a “personal account” function, so it is impossible to change the entered personal data in the future.
We indicate a valid email address, since this is practically your only subsequent communication with the registrars. As for your phone number, you need to submit it in a format indicating the country (if the number is “Ukrainian,” then “+38”), since if you have the Internet, the application can, in principle, be submitted from anywhere in the world. Enter several numbers at once, because see above - there is no “personal account”, and you won’t be able to add them later.
An important point is the password. Immediately enter the normal one, and not, as always, “for testing” – 111111. You won’t be able to change the password in the future on your own (again, see – there is no “personal account”).
Click “Register” and check the specified email address. Almost instantly he receives a letter from the address. It contains neither “hello” nor “goodbye”, but only the login assigned to you on behalf of the SBU (a meaningless six-digit set of letters and numbers) and the password you created. It is noteworthy that the answer comes in Russian, we will consider this a mutual tolerant step on the part of the SBU.

If you suddenly lost a letter with your login data, the main page provides a function “Forgot your login or password?” But I don’t recommend checking it purely out of curiosity. I checked - in the end, I received a new letter with: the login remained the same (chaotic letters and numbers), but instead of my “pretty” password, the SBU sent me its own version - no less chaotic letters and numbers. From a security point of view it's ok. But if before I couldn’t remember only my login, now there’s no point in cramming the password either.

We return to the main page (again, it’s not always possible to go straight away, don’t be nervous, it will load in a few minutes). Enter the login and password sent to you into the fields and click “Log In”. Going to the welcome page means that everything is OK, you have passed the level. The full name you provided during registration will be displayed in the upper right corner.

Click "Submit Application".
Step 3. Submit an application
Select the sector for which you want to receive a pass (if you intend to travel through several sectors, a separate application must be submitted for each). Select the citizenship option.

Click “Next” and move on to the most interesting part. An extended form appears for you to fill out. Outwardly everything is clear. But it has its own characteristics.


When you fill out the fields for the first time, copy the answers into a separate word file. This will be useful to you if you don’t want to type the same thing dozens of times. The system “fails”, so there will be a second, a fourth, and a seventh time to fill out the form.
All fields marked with an asterisk (*) are required. But you will find out about this only after all the ordeals, because the note about the “asterisk” is indicated at the very end.
Again, the application can be filled out in Russian. But in order to avoid guessing later, “maybe I was denied a pass because of my language,” write in Ukrainian, you won’t be mistaken.
The main problems begin when you try to upload images (photos, copies of documents). Images are accepted in two formats - .jpeg/.jpg and .png. The notes do not indicate either the size or kilobyte "weight" of the download. Given my trial and error, take care to keep the images under 1 Mb. It is unlikely that you will be able to upload all the necessary photos and scan versions in one sitting. If the image takes more than a minute to load, congratulations, the system is frozen. You cannot cancel the download - there is no such function. It is impossible to go back a step - and there is no such function. Reloading the page takes you back to the main page. Enter your login and password again, and here it’s a “roulette” - either your previously entered data will be saved, or you’ll have to retype it (but we have a magical archive word file).
Another important nuance is the phrase that you can download all the images “for the sake of it.” But from experience: your “bazhanna” indicates how interested you are in obtaining a pass, that you have all the documents, at least scanned, etc. Therefore, so as not to torment yourself again in the future with the question - “maybe it’s because of me lack of a passport photo, the pass was denied" - upload, Shura, upload.
If you hesitate and stay on the page for more than five minutes, the chance of being “thrown out” from the system increases. You may not notice this: the photos simply won’t load, or you won’t progress further through the levels.
Pay special attention to the block “Meta and route of movement of people in the area of the ATO.” Because on the basis of it, the decision will be made whether to give you permission to enter/exit or not (I won’t even stutter about the fact that your documents must be in order and that you are not on the official wanted list, etc.).

Of course, it is ideal to confirm your goals with documents. For example, I indicated two routes and two goals: in connection with the work process (with a description of the enterprise and position), and also in connection with the fact that my son is studying at one of the Ukrainian universities, and I want to visit him. To confirm my intentions, I prepared 4 scanned versions of documents (a certificate from my place of work, additional certificates, a certificate from my son as a temporary migrant, and a certificate from my son about studying at a university). But... It turned out that you can upload no more than two files. Therefore, advice: either combine several documents confirming the purpose of the trip into two files, or select the two most important ones. (By the way, in the passport data section you can currently only upload three files; the first two spreads and the registration page are required). If anything, during the process of filling out the form, you can delete already uploaded images and re-upload the ones you need instead. And another option - I think they will increase the number of downloaded files in the near future, so you can just wait.
Click "Next".
Step 4. Result
And if you still managed to fill out all the fields of the application and attach a photo (it took me several hours due to the constant “crash” of the system), then you will move to the next level.

I am not deluded by the statement that my “application will be examined with 10 dibs.” The last actual deadline for issuing paper certificates was two months. But the main thing is that I did it! And additional confirmation of this is the recording in the “Application History” section, where it is indicated that my application is being processed.

However, no additional confirmations are sent by email. Therefore, if suddenly someone decides to “hack” the site or the database “disappears” by itself, then there is no evidence of filing an application. In this case, another piece of advice is to make screen versions of your steps. It is clear that this will not be official proof, but based on these images you will be able, like me, to write an article about your own experience of submitting an application.
Good luck in mastering the new system. I succeeded - and you will definitely succeed. But remember: even if the system accepted the application, this does not mean that you will receive a positive response to crossing the contact line. Everything is at the discretion of the decision maker (decision maker), who is unknown to you. There is no online consultant on the site, but for this there is a “Contacts” page with phone numbers and email addresses of all coordination centers. All questions should be addressed to them.

And one more thing. Due to the fact that the system has just been launched, its refinement and changes are possible. But so far, as of July 7, the site was operating in the mode described above.
Afterword
Of course, this method of submitting an application limits the rights of those who do not have access to the Internet, those who do not have computer skills; not every grandmother has children or grandchildren nearby who can create an email account for them, scan documents and fill out the form. But since January, the business of issuing passes has already developed quite actively. And all these companies are not going to curtail their activities. On the contrary, they are rebuilding in a new way.
“No, we are not closing. There were, are and will be clients. Not all pensioners are computer gurus. Elementary, not everyone has an electronic version of documents. Therefore, we will continue to help in issuing passes,” Svetlana, an employee of one of the such companies in Donetsk.
“The final price has not yet been set, since the site has just started working. But taking into account scanning documents, registering and filling out forms, tracking results, expenses for the company’s activities, I think it will be somewhere between 100 hryvnia. The price will also depend on the demand for this service, because many already have a paper pass, and they must automatically be entered into the electronic permit database. In addition, today we see that the SBU website is working unstably, and every day the number of requests to it will only increase. The organizational reasons are already clear. nuances: people will only hand over documents to us, leave, and then our girls will sit all day and try to submit an application to the site, and we will inform the client about the results,” Svetlana clarified.
But even at this intermediate stage, employees of companies that assist in issuing passes are not sitting idle. “For now, we are actively registering new e-mail boxes in order to link them later to clients. Of course, we will try to submit several applications from one box. We’ll see what comes of it. We also have collected about a hundred packages of documents that we did not have time to submit for paper registration There are people who were denied the previous application. So now we are calling them and asking if they want to use our services so that we can do everything for them in the electronic system. Most of them agree. So we started registering them,” the girl concluded.
P.S. Features of indicating the purpose of the trip
Pay special attention to indicating the reasons for entry/exit. Judging by the experience of experienced people, the motivation “to visit friends/cousin”, “to receive a pension on the territory of Ukraine”, “to visit a bank on the territory of Ukraine” will be immediately refused.
Good reasons are:
Departure to the actual place of residence (attached is a copy of the passport page indicating registration or a certificate from the housing office about the place of residence, a temporary migrant certificate)
In connection with the implementation of labor activity (attached is a scanned version of a certificate from the place of work, on the company’s letterhead, indicating all the details, certified by a wet seal);
In connection with studies (students must attach a certificate from the place of study, a copy of their student ID);
To control and maintain real estate (attached is a copy of the document on ownership - purchase and sale agreement, gift, etc.);
Visiting close relatives (first-degree relatives are “suitable” - mother, father, spouse, children; copies of birth certificate, marriage certificate, etc. are attached. If the motive is visiting a child studying in another territory, again a certificate from place of his studies);
If you have a child under 16 years of age, then in your reason for departure/entry you can indicate his accompaniment;
Visiting the burial places of relatives and friends (the main difficulty here is that you must attach a copy of the document confirming the burial place);
Completing a course of treatment (you need a certificate or course certificate from a medical institution ready to accept you for treatment);
Traveling abroad (attach copies of the ticket, travel voucher, passport);
Death or illness of relatives, family members (a copy of the death certificate, in case of illness - a telegram certified by a medical institution).