Appears when loading into safe mode. Entering “Safe Mode” through BIOS
Many users working on a computer running Windows 7 sometimes encounter problems with the operating system. The immediate thought that comes to mind in such cases is to reinstall the operating system. But there is no need to rush to reinstall Windows; the problem with its functioning or startup may lie on the surface, and anyone can fix it. First, let's try to start from the last known good configuration.
If this method does not help, then you will have to start Windows 7 in safe mode and try to fix the problem that may have arisen with drivers or programs
What is Safe Mode
WATCH THE VIDEO
Keeping Windows 7 in working order through constant maintenance and installing only proven applications and official driver versions minimizes the need to run diagnostic mode. Now you know how to start Windows in safe mode.
PC users often encounter a problem when the operating system begins to freeze mercilessly. If you have a lot of utilities and drivers installed, it can be quite difficult to figure out what is causing the crashes. Fortunately, the developers have provided a solution to the problem: you will need to run Windows 7 safe mode.
Safe Mode Features
(safe mode) includes loading basic services and drivers, without which Windows will not start at all. All non-essential services and programs will not be launched, which greatly increases the chance of successful loading of the OS. Also, if you switch to safe mode, you can use simpler methods to identify problems related to the incorrect operation of Windows components and perform system diagnostics. Therefore, another name was assigned to it; it is also called the diagnostic mode.
Booting Windows 7 in safe mode will allow you to determine at what level the problem occurred. If after startup there are no failures, then the reason needs to be looked for in the downloaded files. Run the programs one by one to find the culprit.
Entering safe (diagnostic) mode in Windows 7 will help clean your computer from viruses. If the system is heavily infected, the antivirus may not be able to cope with the problem during a normal boot. In safe mode you can also install an antivirus program if it has not been downloaded.
In particularly critical situations, Windows does not boot in the usual way. Then you can perform a system rollback through safe mode. Select a restore point at which the system functioned without failures. The computer should return to normal operation.
Before you start
Before you enter Windows 7 Safe Mode, you need to check if USB is supported in the BIOS. If this feature is turned off, you will not be able to use your USB keyboard and mouse, even if the devices work normally without any problems.
Now USB devices will work even before the OS starts.
Login during system startup
Restart your computer. When the BIOS logo appears on the screen, press and hold F8. Sometimes the key may not work. If everything is fine in the BIOS settings, try the combination Ctrl + F8 or Shift + F8.
You need to be in time before the Windows logo appears, otherwise you will have to start the procedure again. If you do everything correctly, a signal will sound and “ Additional boot menu", the opening will take some time. 
Using the navigation keys we can select the appropriate option:
- safe mode- graphical interface with basic programs; - the seven will launch the drivers required to access the Internet;
- with command line support- instead of the usual graphical interface, command line mode will be activated. This download is suitable for IT specialists. Regular users are not recommended to boot Windows this way.
We choose the first or second option, based on the need to access the Internet. But be careful: protection means usually do not work in safe mode and you cannot always enable them manually. So it’s better to opt for the first download method.
A window for downloading files will appear. This will take a few seconds.

So now our computer is in safe mode. The screen resolution became low, and the screensaver changed to a black background. Help immediately opens, where you can learn about enabling and operating features in diagnostic mode.

However, there are some disadvantages here. The BIOS logo disappears very quickly, and users simply do not have time to press F8 in time. In addition, on a laptop it is not difficult to immediately go to the additional boot menu. But on a desktop computer it often does not open or will open only once every ten attempts. The exception is when starting after an emergency shutdown.
Therefore, the question arises: what to do in this case, how to enter safe mode in Windows 7. Fortunately, it can be turned on in another way.
Launch from the system
This is an alternative option on how to quickly enable safe mode in Windows 7. The advantage of this method is that it almost always works and there is no need to “catch” the treasured F8.

The PC should now boot into Safe Mode.
We looked at how to start safe mode in Windows 7 without logging out. It is especially important here that the BIOS supports USB. In the first case, safe mode is selected before the system starts. Accordingly, if you are using a USB keyboard, the F8 key simply will not work and the standard startup will begin. But when launched via the command line, the diagnostic mode opens from the Windows environment. If the keyboard and mouse have USB connectors, the user will encounter an unpleasant situation: safe mode is enabled, but the main input devices are not responding. You will have to exit through the emergency shutdown.
How to exit diagnostic mode
As a rule, to exit safe mode, it is enough to reboot the system. This can be done using standard methods.
Via menu Start
 or via the key combination Alt + F4.

Windows should return to native mode. But sometimes the reboot stubbornly refuses to start. Then safe or diagnostic mode in Windows 7 can be turned off within the system. Essentially, we will come out of it the same way we entered it.
After rebooting, normal mode will turn on.
Of course, safe mode will not necessarily solve the problem. The computer may slow down due to heavy processor load. If you enable safe mode on Windows 7, the load will be significantly reduced and the system will start working well. But after a normal boot, crashes will appear again. Then you will have to clean the startup. However, this is an indispensable assistant in case of problems or problems starting the system.
Video on the topic
- If your computer has two or more operating systems, use the arrow keys to select the one you want, and then press Enter.
- To use the arrow keys on the numeric keypad, Num Lock must be disabled.
In the window select " Safe Mode" and press the key " Enter».
Press the button " Start" and write in the search bar msconfig and press the " Enter»

In the window that opens System ConfigurationSafe Mode" and select " Minimum».
For reference:
- Boots the Windows graphical user interface (Windows Explorer) in safe mode, running only the most important system services. Network components are disabled.
- Boot Windows command line in safe mode, running only the most important system services. Network components and GUI are disabled.
Safe Mode: Network
Without GUI - The Welcome screen does not appear while Windows is loading.
Download log -
Basic video
OS information -

Exit without reboot


In order not to boot into safe mode, you need to go into the system configuration again and uncheck the previously checked boxes.
Safe boot mode of a personal computer is a diagnostic startup of the OS, which allows you to get rid of various problems. In most cases, it is used when Windows malfunctions during normal booting or does not start at all. Safe Mode provides for the use of standard settings, as well as the minimum number of utilities necessary for normal operation of the OS.
Windows XP
- We turn on the personal computer. Without waiting for it to fully load, press the F8 button on the keyboard. In the future, we will see a black screen with suggested options. Select the appropriate item and press Enter. This is the simplest and most common method that provides the ability to start Windows XP Safe Mode.
- While in Windows, click on “Start”, then on “Run”. In the line that appears, type the msconfig command and press Enter. In the window that opens, find the BOOT.INI tab. (loading). Check the /SAFEBOOT checkbox. Click the "OK" button and restart your personal computer. These steps will enable Windows XP Safe Mode.
Windows 7
First you need to restart your computer. You can also select Restart from the Start menu. During startup, press and hold the F8 key. If the Windows icon appears on the display, then repeat all the steps again until you are able to start Windows 7 safe mode.
Please note that if you are using a laptop, you will have to use the Fn+F8 key combination.
Windows 8
- If your personal computer boots, then you can start Windows 8 safe mode as follows. Hover your mouse over the lower left corner of your monitor, wait a couple of seconds, and select Settings and Shut Down. Then hold down “Shift” on the keyboard and, without releasing it, click “Reboot”. Next, you need to select “Diagnostics” and “Boot Options”. On the next screen, you will be given the option to restart your computer. The fourth line indicates the “Safe Mode” item. Click "Restart". In the boot settings, you can select the parameters that correspond to the F1 - F9 keys. Safe mode is assigned to the fourth line, so to start Windows in safe mode, the user just needs to hold down F4.
- You can enable safe mode in Windows 7 and 8 using “System Configuration” (the presented utility is launched on the command line with the command msconfig.exe). After launching the utility, go to the “Boot” tab and check the “Safe Mode” option in the boot settings. Then click the "OK" button. In the future, you will see a prompt to restart your personal computer. Choose one of the available options - “Exit without restarting” or “Reboot”, depending on whether you plan to restart your PC right now or after some time. The next time you start Windows, it will boot into safe mode.
For more information about entering Safe Mode, see this article.
Basic download options
Each user has the opportunity to choose one of several available OS boot options. Let's look at them in more detail.
- Safe mode. Only the most important programs and drivers are used to turn on the OS.
- Safe Mode with loading network drivers. To enable the OS, some drivers and programs are used that allow you to work with the local network and the Internet.
- Safe Mode with Command Line. The OS starts in safe mode. Additionally, the Cmd.exe file is downloaded.
- VGA mode. The system is turned on using the current video card driver (display resolution - 640 x 480). This option is most useful in situations where settings are specified that are not supported by the monitor (it should be noted that in safe mode the Vga.sys driver must be loaded).
- Running the last successful configuration.
- Directory recovery. This option is recommended for use exclusively on Windows domain controllers. This domain enables directory service recovery.
- Enable boot logging. When you select a specific boot option in Safe Mode, and this option is enabled, boot logging starts. To save the results, use the Ntbtlog.txt file, which can be found in the %SystemRoot% folder (the folder can be opened via win +r).
- Debug mode. The operating system starts debugging mode. All information can be sent via serial cable to other personal computers that also run the debugger. In this situation, the COM2 port is used.
- Normal OS boot. The system starts in standard mode.
- Reboot. The personal computer is rebooting.
- Return to OS selection. On a computer that is configured to run multiple operating systems, you return to the boot menu.
In Windows 7, there are two ways to get into safe mode:
1) Entering Windows 7 safe mode at system startup.
2) Entering Safe Mode from the Windows 7 environment (from a running OS by changing the boot in System Configuration).
Entering Windows7 safe mode at system startup.
Turn on the computer and while the system is loading, press the F8 key several times; if the welcome window appears (Windows 7 logo), it means you did not have time to press the F8 key, in this case you need to wait for the system to boot and turn off the computer again and when loading, press again F8 key. When trying to get into safe mode, you need to consider:
- On some keyboards, the function keys F1–F12 are always disabled by default. To turn them on, you need to press a special key (usually Fn) and while holding it, press the F8 key.
- If your computer has two or more operating systems, use the arrow keys to select the one you want, and then press Enter.
- To use the arrow keys on the numeric keypad, Num Lock must be disabled.
In the window Additional download options select " Safe Mode" and press the key " Enter».
After a few seconds, the system will boot into safe mode.
Entering Safe Mode from Windows 7.
Press the button " Start" and write in the search bar msconfig and press the " Enter»
In the window that opens System Configuration, go to the “” tab and check the “ Safe Mode" and select " Minimum».
For reference:
Safe Mode: Minimum- Boots the Windows graphical user interface (Windows Explorer) in safe mode, running only the most important system services. Network components are disabled.
Safe Mode: Another Shell- Boot Windows command line in safe mode, running only the most important system services. Network components and GUI are disabled.
Safe Mode: Active Directory Restore - Boots the Windows GUI in Safe Mode, running only the most critical system services and Active Directory.
Safe Mode: Network- Boots the Windows GUI in safe mode, running only the most important system services. Network components are enabled.
Without GUI - The Welcome screen does not appear while Windows is loading.
Download log - All information regarding the boot process is saved in the file %SystemRoot%Ntbtlog.txt.
Basic video- Boots Windows GUI in minimal VGA mode. This mode loads standard VGA drivers instead of display drivers that match the computer's video hardware.
OS information - Displays the names of loaded drivers during system boot.
Make these boot options permanent - Changes made to system settings are not tracked. You can change the settings later using System Setup, but only manually. If this option is selected, you will not be able to roll back changes by selecting Normal Startup on the General tab.
After this, you will be prompted to restart your computer to enter Windows 7 safe mode. If you want to boot into safe mode now, click "", if you want to do this later, select " Exit without reboot"And the next time you reboot or turn on your computer/laptop, automatically boot into safe mode.
The next time you boot Windows 7, the system will boot into Safe Mode.
In order not to boot into safe mode, you need to go into the system configuration again and uncheck the previously checked boxes.
Safe Mode is a special Windows startup mode that is used to troubleshoot operating system problems. In safe mode, most drivers and programs do not load, startup is disabled, and only what is necessary for Windows to run. This mode is useful for troubleshooting problems caused by installing or updating programs and drivers, which can lead to the computer not working properly (freezing, slowing down), as well as Windows starting normally.
Many users, when Windows malfunctions, immediately begin to reinstall the system or look for a specialist who could do this. But the problem can be solved simply, and by yourself, just restart the computer in safe mode and look at the latest installed programs and drivers, which could have failed, and remove the latest ones.
It’s very easy to determine whether you’re booting into safe mode—the message “Safe Mode” is displayed on the display of your laptop or PC in the corners of the screen.
There are several ways to boot your computer in safe mode and in all Windows operating systems; we will tell you how to do this in versions 7, 8/8.1 and 10.
Booting Safe Mode from the Operating System
The easiest way to load Safe Mode is to use the System Configuration program while booted into the Windows 7, Windows 8/8.1 or Windows 10 operating system.
To do this, click the START button and select the Run menu item or use the keyboard shortcuts Win + R. In the window that appears, enter the command: msconfig and press Enter

The System Configuration program window will open. Select the tab and in the "Download Options" check the box Safe Mode, click OK

Now confirm the reboot by clicking the appropriate button

After which your system will reboot into safe mode.
After fixing the problems, do not forget to restart the program and uncheck the boot options. Otherwise you will always boot into Safe Mode
In the operating system Windows 8/8.1 and Windows 10, there is another way to load safe mode. To use it, click on the On/Off button. power on the login screen or in Windows 8/8.1, move the mouse to the upper right corner of the desktop and select the Settings button, and then the power button icon, in Windows 10 - START and


The computer will reboot and a service screen will appear where you need to select the Diagnostics option


In the window that appears Additional options, select Boot Options

We are asked to reboot for further selection, click Reboot

After the reboot, a window appears in front of us with a choice of boot options.
In Windows 8 we select Safe Mode and press Enter

In Windows 8.1 and Windows 10, to boot into Safe Mode, press the number 4 or F4 key on your keyboard

Your Windows 8/8.1/10 computer will boot into Safe Mode.
Booting into Safe Mode Using the Keys
It happens that a laptop or PC cannot boot in normal mode at all, and to get into Windows safe mode you need to press and hold the F8 key just before starting the operating system, as soon as the image appears on the screen, sometimes you need to use the Shift + F8 key combination
From the Windows 7 start menu, select
On Windows 8, 8.1 and 10, go through the procedure that .
Now you know how you can boot your computer and laptop into Windows safe mode.
Apparently, any user knows that sometimes it is recommended to boot the system using a special startup option called Safe Mode. Why you need to use it, and how to turn on your computer in safe mode, we’ll see further. It’s worth noting right away that the actions performed vary quite a lot, depending on the modification of the Windows operating system that the computer or laptop is running. However, despite this, a general solution can be proposed that can be applied to any of the known versions.
What is Safe Mode and what is it used for?
First, let's briefly look at what this mode is and why its use is sometimes so important. In most cases, it is used when the operating system is unstable or when it is impossible to boot it in normal mode to troubleshoot all sorts of problems. Usually, users do not pay attention to the options for starting the system and select the standard Safe Mode, but this is not always advisable, since in this case network drivers are completely ignored, and Internet access, for example, for downloading some important components of the system itself is unavailable .
In some situations, command line support may be required, since it is its tools that allow you to troubleshoot possible malfunctions and failures when loading Windows as efficiently as possible. Actually, most users saw such instructions in the start menu of some Windows modifications, but simply ignored their application, but when choosing the wrong start method, some operations turned out to be impossible.
How to start your computer in Safe Start Mode in Windows 7 and below?
Now let's move on directly to activating such a start. How to start a computer of the seventh version and earlier modifications probably doesn’t need much explanation. Probably everyone has already guessed that we are talking about calling up a special start menu in which you can select several types of actions.
Access to it is activated by pressing the F8 key at the very beginning of the system boot (after control is transferred to the bootloader from the BIOS, but before the Windows logo appears). In some cases, you may need to press the key several times, since a single press may not have an effect (the main thing here is not to miss the moment). On some non-standard keyboards that combine function keys with number buttons, you may need to press additional keys like Alt, Fn, or Shift at the same time.
How to enter the safe mode of the computer in the eighth and tenth versions of the system?
The release of the eighth version, its version 8.1, and then the tenth modification was marked by the indignation of users, since the use of the standard boot menu in them disappeared, although it itself may have remained, which will be discussed a little later. In them, the computer turns on in safe mode using many additional steps, and without using removable media with a distribution kit or a recovery disk, it is extremely difficult for an ordinary user to get to this boot option.

In a running system, to do this, you need to enter the settings menu, select the recovery partition, and then use the special boot options item, then select boot options through the diagnostics and additional options items and press the restart button.

Only after this the computer or laptop restarts, and a start menu appears on the screen containing items for selecting the required action (the menu itself is blue and slightly different from what the user sees in Windows 7 and below).
Booting into Safe Mode: general settings for all systems
Now a few words about how to start a computer in safe mode, based on general methods that can be used, regardless of the version of Windows installed. To do this, any OS has a special configuration tool, called from the “run” console with the msconfig command.

After entering the configurator, you need to go to the download tab and simply check the safe start option with loading the minimum configuration. But there are pitfalls here. The fact is that when this type of start is activated, loading in Safe Mode will occur constantly. I think it’s already clear how to disable safe mode on your computer. On a loaded system, you simply need to go to the configuration again and uncheck the above item.
Starting Secure Boot Using Removable Media
Finally, let's see how to start the computer in safe mode if the system does not boot at all and under no circumstances. To select the desired action, you can use bootable media (for example, an installation disk with any latest version of Windows), after selecting the language options, go to recovery, and then call the command line, for which you can use either the corresponding main menu item or the shortcut Shift + F10 . In the console you should enter the command “bcdedit /set (globalsettings) advancedoptions true” (without quotes). To cancel Safe Start on a loaded system, call the command console and run the above command, but without the additional “true” statement at the end. After this, the start will be made with normal loading.
How to return the start menu for Windows 8 and 10?
Naturally, many users of the last two modifications of the system would like to return to using the F8 key to call the start menu, since it is both simpler and more practical.

This can be done quite simply by launching a command prompt (necessarily as an administrator), and then running the command “bcdedit /set (current) bootmenupolicy legacy” (again, without the quotes at the beginning and at the end). Upon completion of all actions, a restart is performed, and pressing the F8 key gives the same result as in systems of the seventh modification and lower. By the way, this option is also good because you don’t have to give up using the special starting options that were mentioned above. Basically, it is designed to more conveniently call up the menu when starting the operating system, even if the system does not boot at all and it is impossible to get to the desired item.
Any computer running the Windows operating system can be started in safe mode. In this mode, only the most basic components of the operating system are loaded. This allows you to start your computer even if serious software conflicts or problems occur. From safe mode you can remove programs that block the operation of the operating system or cannot be removed during normal operation.
If you are having problems and need to start your computer in safe mode, then this material should help you. Here you can find out how this is done in the Windows 7 operating system, as well as the new Windows 8 and operating systems.
How to start your computer in safe mode (Windows XP or Windows 7)
If you are using Windows XP or, then starting your computer in safe mode will be quite simple. To do this, you need to restart the computer (if the computer is turned off, just turn it on) and when the computer starts booting, press the F8 key on the keyboard. You need to press the F8 key until a list of ways to boot Windows appears on the computer screen.
In this list we are only interested in the first three items. Let's look at them in more detail:
- Safe Mode– standard safe mode. In this mode, the computer will start using only the most necessary components. In most cases, this is the safe mode option that is used.
- Safe mode with loading network drivers– safe mode is similar to the previous one, but with loading of network drivers. When loading in this mode, you will be able to work with the local network and the Internet.
- Safe Mode with Command Line Support– safe mode without GUI. After loading in this mode, a command line appears on the screen with which you can interact with the system.
Please note that the F8 key must be pressed immediately after the computer starts up. If you are a little late, the list of download methods will not appear and the computer will start in normal mode.
How to start your computer in safe mode (Windows 8 and Windows 10)
If you are using Windows 8 or, then you will not be able to start your computer in safe mode using the method described above. The computer simply won't respond to the F8 key. In this case, you need to start safe mode using the MSCONFIG command or using a Windows boot disk. We'll look at both of these options next.
Option #1: Start the computer in safe mode using the MSCONFIG command.
If your computer is in working order, then you can use the MSCONFIG command. Press the Windows-R key combination and enter the MSCONFIG command in the window that appears.

After this, a window called “System Configuration” will open in front of you. In this window, you need to go to the “Boot” tab and check the box next to “Safe Mode”.

After that, close the window by clicking on the “OK” button and restart the computer. The next time you boot your computer, Safe Mode should start. In order for the computer to boot again in normal mode, you need to go to MSCONFIG again and uncheck the box.
In principle, this option for starting the computer in safe mode works in both Windows XP and Windows 7. But, using it is not as convenient as starting it via the F8 key.
Option #2: Start your computer in safe mode using a Windows boot disk.
The second option is to start safe mode using a Windows boot disk. This option will be useful if your computer does not start at all, and it is not possible to use the MSCONFIG command.
For this download option, you need the version of Windows that is installed on your computer. If it is Windows 8, then you need a boot disk with Windows 8, if it is Windows 10, then Windows 10.
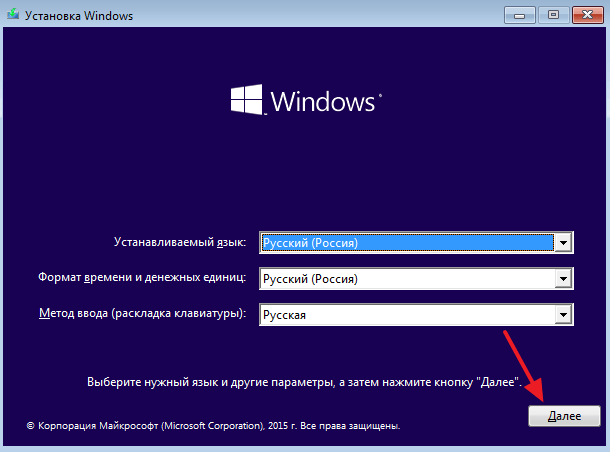
Insert your Windows boot disk and boot from it. At the very beginning, a window will appear in front of you with a choice of language. Here we simply click on the “Next” button.


And open the “Advanced Settings” subsection.

After this, open the command line.

As a result, it should appear in front of you. In this line you need to enter the command “ bcdedit /set (globalsettings) advancedoptions true" After entering this command, simply close the command line by clicking on the button with the red cross.

After closing the command line, the Select Action menu will appear. Here we select the “Continue” option.

After this, the computer should reboot. After rebooting, boot the computer in normal mode (not from the boot disk). As a result, when you start your computer, a list of Windows boot methods will appear on the screen, with which you can start Safe Mode.

It should be noted that now, every time you start your computer, a list of boot methods will appear. In order to disable it, you need to boot from the disk again, go to the command line and run the command “ bcdedit /deletevalue (globalsettings) advancedoptions».
Safe Mode is an alternative way to start your computer; it only uses the programs needed to run. Typically, when you boot your PC, it loads a lot of drivers, which are programs that allow your operating system to communicate with other devices and software. However, when started in this mode, only the minimum number of drivers needed to start the computer are loaded (usually just mouse, keyboard, and display drivers).
Why use this mode?
If, while using your computer, you find that your OS simply does not start, or starts with errors, you simply need to use this boot method. This can be due to many reasons, including a virus, malware, damaged files or something else. This mode allows you to boot the OS in a basic state so you can identify and fix the problem.
Your screen resolution may be minimal, some applications may not work correctly, or your computer may run a little slower than usual. This is completely normal, because some drivers do not work.
To run on Windows 8.1 and later:
Click the Start button and select the Power icon.
Hold down the Shift key and click Restart.
A menu will appear. Select Diagnostics.


Your computer will restart, presenting you with the menu shown below. Press 4 to select Enable Safe Mode (or 5 to select Enable Safe Mode using Network if you need to use the Internet).

Your computer will then boot into Safe Mode.
To run on Windows 7 and earlier:
Turn on or restart your PC. While it's loading, hold down the F8 key until the Windows logo appears.
A menu will appear. Then you can release the F8 key. Use the arrow keys to highlight the appropriate option (you can highlight Using Network if you need to use the Internet to solve your problem), then press Enter.
What to do when you are in safe mode
Some problems can be easily resolved using this option, while others may be more difficult.
If you think malware is affecting your computer, you can easily run an antivirus application to try to remove it. This task may be difficult when the PC is running normally.
If you recently installed a program and notice that your PC has been acting strange since then, you may want to uninstall it.
If you suspect that your drivers are making your system unstable, you can update them.
If you boot using this method and your computer continues to behave incorrectly, there is probably something wrong with your hardware. If this is the case, you will likely need to contact a repair professional.
Once you have solved your problem, you need to exit this mode to test and see if it worked. To do this, simply restart your computer. When it boots again, it should start Windows in normal operating mode.
