When you start the computer, the BIOS opens what to do. The BIOS does not start: what to do and how to “revive” the microsystem. Not a short introduction: small bios and big consequences...
The situation when a user turns on a computer or laptop and sees that instead of loading the operating system, the BIOS options setup program opens does not occur very often. However, it cannot be classified as a problem that the user has no chance of encountering. This problem is unpleasant because it makes it impossible to use the computer for its intended purpose.
It should be noted that not all BIOS provide automatic entry into the BIOS when turning on a computer or laptop. In most cases, if any faults are detected, the BIOS stops the computer or laptop from booting. Automatic entry into the BIOS is intended to indicate to the user that he must fix something in the BIOS before continuing.
It follows from this that the source of the problem, as a rule, is incorrect BIOS settings. First of all, overestimated values of the frequency or voltage of the memory or processor can lead to spontaneous entry into the BIOS - if the user has been overclocking hardware components. In addition, many motherboards react by booting the BIOS to unexpected power outages, perceiving them as evidence of system instability due to overclocking.
Very often, spontaneous loading of the BIOS when you turn on your computer or laptop may indicate problems with the BIOS itself. In most cases, these problems can be caused by a faulty battery powering the CMOS memory. The problem may also appear when the hardware of a computer or laptop changes, for example, when installing a new video card.
And finally, you shouldn’t discount such a banal reason as a faulty keyboard or even just a single key that sticks. It is possible that a faulty keyboard constantly emits a signal that is interpreted by the BIOS as a signal from a key intended to enter the BIOS.
What needs to be done to fix the problem
If you are faced with a situation where the computer automatically loads the BIOS of your computer or laptop, then first of all you should try to restart the computer again. It is quite possible that you yourself could accidentally press the BIOS entry key when rebooting or turning on your computer or laptop. Also, the BIOS setup program may appear after a computer or laptop restart caused by an unexpected loss of power in the network.
However, if you are convinced that the cause of the problem is not a random error, then you should try other ways to fix it. First of all, you can try changing the keyboard. Then try to remember if you have made any changes to the BIOS before. If so, then the options you edited should be returned to their original values. The safest thing to do is reset the BIOS to default settings. You should also try removing recently installed cards from the computer, if any.
If this operation does not help, then you can try replacing the BIOS battery with a new one. Practice shows that in most cases changing the battery helps solve the problem. However, if the problem still persists, then it is highly likely that the cause of the situation is a faulty BIOS chip or motherboard.
Conclusion
The reasons for the situation when the computer spontaneously loads the BIOS instead of loading the operating system can be varied. This phenomenon can be caused by either incorrect BIOS settings or hardware failure. If the situation is not the result of a random failure, for example, caused by an external voltage surge, then in most cases the problem can be corrected by resetting the BIOS to default settings.
BIOS is the Basic Input/Output System, the heart of the computer, without which the normal operation of other components and software is impossible. When you turn on the computer, the BIOS starts first and only after it is turned on does the operating system begin to load.
Theoretically, since Windows boots after the BIOS, reinstalling the operating system or adding another OS should not affect the normal operation of the BIOS. However, there are often cases when an attempt to install a second operating system results in the BIOS not loading.
In this case, we can assume that the BIOS settings have gone wrong and restoring the default settings may solve the problem. To reset the settings, you need to perform the following operations.
- Disconnect the PC and monitor from the electrical network.
- Open the system unit and remove the battery from the motherboard.
- Wait a few minutes.
- Return the system battery to its place.
- Connect power to the computer and monitor.
After restarting, the BIOS will start loading “like the first time”. If the problem goes away after this, it is recommended to format the boot hard drive and reinstall the operating system. Preferably one that has previously worked without problems. It is quite possible that the added operating system was damaged in the distribution.
Connection problems
There is a high probability that the BIOS does not load due to breaks in the power supply networks or data loops. To check this option, you first need to listen to see if the cooler on the motherboard is spinning. The BIOS is part of the processor and therefore poor cooling of the motherboard leads to malfunctions.
Perhaps the contact groups of the fan have come loose, which is why it does not work. After this, carefully inspect all cable and cable connections. Check to see if dust has accumulated on the motherboard or contacts. Dust is an excellent conductor of electric current, and it also creates electrostatic fields, to which electronics are very sensitive.
- Clean the device from dust using a vacuum cleaner and a brush.
- Sequentially disconnect the contactors and clean the terminals from dirt and oxidation. You can use a school eraser to clean the contacts.
- Check that all connectors are securely attached. It is likely that vibration caused the contacts to separate, and therefore the equipment stopped working correctly.
After the maintenance, you can try to start the computer again. The screen is black again and the BIOS won't load? Then we can assume that one of the internal modules is faulty. Including the motherboard itself could fail or need to be reflashed.

You can download the new firmware for the motherboard on the manufacturer’s official website. Updating the firmware is a difficult and quite risky task. Therefore, if you don’t know exactly what and how to do, it’s better not to take risks, otherwise you could ruin your entire computer, including the hard drives. It is better to contact the service center.
Faulty blocks in the computer
None of the above helped? Then the likelihood of hardware failure increases and you can start checking the blocks.
Disconnect and remove anything from the device that is not necessary for the computer to start. Leave only the motherboard, power supply and one of the RAM sticks. The computer will not work in this state, but it is possible to check the serviceability of the motherboard itself.
A common reason for the inability to start a computer is insufficient power from the power supply. For example, you replaced the motherboard with a more advanced one, which requires more electricity. However, the power supply remains old. Or so - additional hard drives or some other functional components were installed in the system unit. Energy consumption can increase quite significantly. Installing a more powerful power supply will solve the problem. If the issue, of course, is a lack of energy.
Often, loading the BIOS is prevented by a malfunction in the video card. If possible, you need to check the video card by replacing it with another similar one. Or install the video card in another computer. Here you need to look at the compatibility of the equipment. Otherwise, you won’t find the problem, but you may create new problems.

If the minimum configuration - motherboard, power supply, RAM socket - the system unit is working and the BIOS is loading, then the problem is in one of the removed modules. After installing and connecting the next unit, try turning on the computer again and see what happens. As soon as the BIOS stops starting again, we can assume that you have discovered a faulty unit. Now all that remains is to find a similar one and replace it.
In reality, everything often turns out to be much more complicated. For example, the computer sometimes boots and works quite normally, and then, for no apparent reason, it starts to fail. The problem can be either software or component failures.
Such periods of normal operation, alternating with the inability to load the BIOS, are typical for three types of problems.
- Presence of microcracks on the motherboard. Because of this, contact periodically disappears.
- The electrolytic capacitors on the motherboard or power supply have dried out. This malfunction mainly applies to old system units that have been in use for a long time. Sometimes faulty capacitors can be identified by characteristic swelling of the housing.
Poor contact in the connected wires. As already mentioned - the presence of dust, oxidation of contacts, insufficient pressure. If the contactors have fixing screws, they must be tightened completely. The opposite situation also happens - clamping screws that are tightened too tightly lead to deformation of the connectors and poor contact in the connection.
Hi all.
I updated the BIOS on an ASUS laptop, I don’t remember the model, perhaps Asus x550, via Easy Flash. The update seemed to go fine. At least the process completed and the machine rebooted. After rebooting the BIOS opened. Boot devices are no longer displayed. In addition, the settings for selecting boot devices, as well as the “Create a boot option” option, have disappeared. Moreover, in SATA configurations, hard drives are displayed and therefore identified. But they are not in the Boot section, just as there is no USB drive, which was previously detected and worked. Moreover, he clearly sees the drive, because after the reboot he first starts to turn it, but does not want to boot from any device! It just opens the BIOS. That's it.
As I understand it, it’s updated, it’s updated, because it loads, it sees that there’s a new version... But it doesn’t want to load the devices. It just opens the BIOS when you turn it on. When exiting - reboot. The screws are formatted and of course he won’t boot from them, but he didn’t open the BIOS before, he just wrote “where is your boot device?”, and now neither of this nor from the boot drive. Perhaps some data was written incorrectly to CMOS, but I have no idea how to reset this data (I don’t suggest disassembly, the machine is new).
I updated the BIOS with a connected USB drive. It had boot priority.
Chipset - Intel HM76
I took the BIOS firmware from the official website.
I read the manual for such updates - everything is simple, insert a flash drive with the new BIOS, use the Easy Flash utility (which is located in the BIOS) to select the file and confirm the update.
Basically, the BIOS jambs are of a slightly different kind - a black screen.
In general the solution:
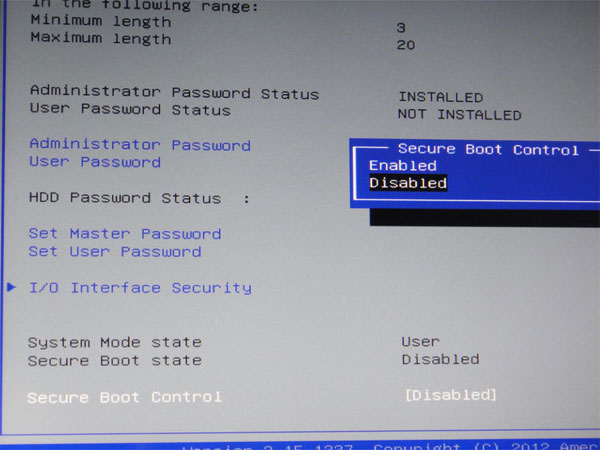
go to the Boot section in the BIOS, then enable Launch CSM

then go to the Security section and disable the Secure Boot Control option.
Even the most careful users will one day have to log into the basic computer system themselves. Being afraid and doing something wrong is normal, but the same cannot be said about the opposite reaction - the frivolity of beginners driven by the irresistibility of testing the microsystem in action. However, both some and other users may have a question: “The computer does not enter the BIOS: what to do,” even when the “same” service key for calling the basic microsystem of the computing device is used to enter. It will be interesting for everyone, even you an advanced user!
Introductory theory of "unstartability"
Let's leave the boring story about what a BIOS is and why it is needed at all... You need to know one thing - BIOS is not a place where you can thoughtlessly conduct experiments. Before you change any parameter or make a certain change in the operation of the microsystem, you need to understand that the result may be tragically unexpected. So let’s turn on our brains and get down to business.
Energy “CMOS problem” - the battery is dead
The one who knows what we are talking about will smile. Although it is not a fact that when the situation “The computer does not enter the BIOS” arises, a knowledgeable user will immediately pay attention to the battery that keeps the CMOS memory chip, so to speak, in good shape.

Sometimes an advanced computer engineer takes a roundabout route - he tries to reflash the BIOS or subjects the system to a kind of software “shock therapy”, loading various DOS utilities and trying to resurrect the “maternal instinct” of control system bootability.
In fact, the first thing you need to do when the problem we are considering occurs is to replace the CMOS battery and reset the BIOS settings to default values.
Where is the “main” battery located and how to reset the BIOS?
The location of the battery may depend on the modification of the computing device, its type and other design features of the device. If we talk about laptops, access to the battery is often incredibly difficult, since the battery is often hidden deep in the bowels of the compact device. However, turning to the material of the article, which is located , you can reset the BIOS settings without going through the difficult process of dismantling the laptop frame.

In the case of stationary computers, everything is much simpler - we disconnect the power cable from the system unit, remove the protective cover and, without much stress, we immediately find a large coin-type battery. Naturally, it must be dismantled and before installing a working battery in its place, close the battery contacts of the socket with any metal object (static, you know!). After that, proceed to the “reset user settings” operation.
Mechanical method - closing special connectors with a jumper or clicking on the “Clear” button
Some manufacturers provide the motherboards they produce with a special button, pressing which allows you to clear the CMOS memory and return the BIOS settings to, so to speak, their original state - factory. However, most motherboards are equipped with a more ascetic reset mechanism - a three-pin breaker, the location of which can be easily determined by the “CLR CMOS” marking.

So, in order (by default, we de-energized the computing device and removed the protective casing):
- Typically, the reset pin mechanism is located in close proximity to the CMOS battery. However, in the photo below, the jumper is located in a different place on the board.

- Working position of the jumper “1-2” - move the contactor one position forward/backward, in accordance with the markings on the motherboard. Regarding the graphic example (above picture), this is position “2-3”.
- Wait a couple of minutes and install a new battery in the battery connector.
- If the motherboard is equipped with a special button, activate it.

- Close the cover and connect the power cable to the system unit.
- Turn on your computer.
If everything went well, as they say, “Hurray”, then pressing the “necessary” button will take you to the basic settings interface, no - we continue to look for the reason.
Keyboard “passions”, or Why can’t I enter the computer’s BIOS?
Sometimes, especially with regard to portable electronics, the culprit of “uncontrollability” is the keyboard module itself. Make sure that none of the keys are stuck, that is, not in a closed (pressed) state.

Perhaps some unfortunate incident that happened the day before will come to mind - a spilled cup of coffee, for example.
In any case, it’s worth trying the “connecting an external keyboard via USB connector” option.
If the premises are correct, the keyboard module needs to be replaced. For desktop computers, the most acceptable test scheme is to connect a known-good keyboard to the PS/2 connector.
Complex case - “hard” problems
The inability of a computer system BIOS to start or complete a full initialization process may be caused by a malfunction of any hardware component of the computer. Most often, the reason lies in the incapacity of the hard drive. By the way, do not neglect the importance of sound signals (produced by the BIOS system). You can find out more about “beep” codes . This kind of knowledge greatly simplifies the process of finding a specific fault.
It is not uncommon for a favorable boot scenario to be disrupted by a malfunction of the front connection panel, to which external audio and other peripheral devices are connected. Try disconnecting the external controller connecting cable from the motherboard.

Check whether the problem “the computer does not enter the BIOS” has been resolved; if not, disconnect the hard drive and start the computer again. In the end, if possible, experiment with RAM strips - check their performance, so to speak, by alternating connections. All of the above also applies to laptops. Perhaps information from It will come in handy for you.
In addition to what has been said
So, you, dear reader, have become familiar with the basic methods for eliminating the reasons when the computer does not enter the BIOS. We dare to assure you that the described troubleshooting algorithm is the most optimal. However, if your BIOS has simply crashed, then you still cannot do without flashing the CMOS chip (see the article located ). Happy repairs to you!
Updated: 02/26/2020 Published: March 13, 2018
Description
Every time you turn on the computer, the BIOS immediately opens (a blue window with settings). After exiting it, either the system starts or only the BIOS loads again.
Very often, this can happen with laptops from ASUS, MSI or Samsung.
Cause
Typically, the problem is caused by the BIOS not being able to find the device from which the operating system should boot. This may happen for the following reasons:
- The settings of the basic input/output system have gone wrong;
- There are no media to run the operating system or its malfunction;
- BIOS software error;
- Warning about computer malfunction - launching the menu indicates the presence of an incorrect setting, which can lead to failure of the PC itself. For example, incorrect bus frequency.
It is also possible that the BIOS start key (usually Del or F2) is simply stuck - because of this, the basic input/output system is constantly stuck.
Solution
Solutions are arranged in order of ease of diagnosis and likelihood of occurrence.
1. Enable Launch CSM (BIOS / UEFI mode)
In case of using systems that do not support UEFI (for example, Windows 7), it is necessary that the “Launch CSM” option is enabled (this option is responsible for compatibility with older operating systems). If it is disabled, first find the “Secure Boot” option - disable it and restart the computer. Then we activate Launch CSM. Afterwards you can try restarting the computer.
We check if there is a Boot Device Control section and the ability to choose between parameters such as: UEFI and Legacy, UEFI Only, Legacy Only. For older versions of the system, you should choose Legacy and UEFI Only or Legacy Only. For new systems you need to try different options.
Some BIOS/UEFI versions have an option to select the type of operating system - there may be Windows 8 (7) and Other OS options. For systems that do not support UEFI, select the last option.
2. Check the disk drive
We check the functionality of the disk on which the operating system (or bootloader) is installed. To do this you can:
a) See if the BIOS disk is visible in the partition Main.
b) Disconnect the disk from the computer and insert it into another, checking that it is detected and data can be read from it.
12. Setting date and time
We go into the BIOS and check that the date and time are correct. If they are incorrect, then set the correct values. Apply the settings and exit the BIOS.
If the date and time are lost when the computer is turned off, the motherboard battery must be replaced.
13. Disabling fast boot
Disabling fast boot in the BIOS may also help. To do this, find the option Fast Boot and move it to position Disabled. The option itself can be found in one of the sections:
- Advanced - OS Configuration
- BIOS Features
* please note that the “Quick Boot” option, similar in name, has a different purpose and does not affect our settings in any way, so there is no need to touch this option.
14. Bootloader recovery
Due to system boot problems, the computer will constantly launch the BIOS. The operating system may not start due to problems with the bootloader.
To solve the problem, run . Then run 2 commands on the command line:
bootrec.exe /fixmbr
bootrec.exe /fixboot
We check the system startup. If this does not happen, run the commands:
bootrec.exe /scanos
bootrec.exe /rebuildbcd
* using these commands we will scan the disk for operating systems and write the found systems into the boot.
We check the system startup again.
15. System Restore
The problem can be resolved by using a checkpoint recovery tool. Again we launch system recovery from the Windows installation disk. Afterwards we perform a system rollback.
We try to select a point at the moment when the system started normally.
16. Update BIOS
To update the BIOS, download the latest version from the motherboard developer's website. Instructions are attached to the downloaded archive - we carefully study it and carry out step-by-step actions.
If the latest version of the BIOS is already installed on the computer, then install it again (reflash the BIOS).